Russian knife craftsmen never look for easy ways. Because this is a hobby and passion for many. It happens that a simple activity turns into a real small business. But for the most part, for people it’s still a relaxation and distraction from everyday life. Each person determines his own leisure time. Forging enthusiasts quite often make their products from unusual things, for example: a knife from a bearing. A very interesting and difficult process.
Homemade knife from a bearing.
How to properly harden a knife from a file
Modern products bring their owners a lot of disappointment. Ergonomic new products from popular brands are distinguished by excellent design. However, in terms of their consumer properties, they are often not much superior to cheap consumer goods. A similar disaster has not escaped the knife market. The blades of newfangled knife models quickly become dull, and the fragile cutting edges become jagged. The complete opposite would be a knife made from a bearing, which is made using especially strong steel. According to reviews from owners, the tip of such a homemade knife can scratch glass, while the metal blade cuts meat with bones without forming nicks.
Installation of bearings: how to properly install and secure parts, installation diagrams
In the mechanisms that people use in everyday life, you can often find such a part as a bearing. They are found in systems of both household and industrial appliances. The bearing housing is part of the workpiece assembly. It comes in different shapes, varieties and sizes. To better understand its structure, it is necessary to study the bearing housing. Self-repair of many types of equipment will become clearer and more effective. If desired, you can create bearing housings yourself.
Pros and cons of a bearing knife
There are a variety of ways to make knives. Springs, piston valves of ship engines, railway spikes, steel cables, saw blades, files, and drills are used as metal blanks. Fans of high-quality cutting tools will not be disappointed by a homemade knife made from a bearing.
Do not forget that according to Russian laws, according to Art. 223.4 of the Criminal Code of the Russian Federation prohibits the illegal production of bladed weapons. A special license is required for its production and sale.
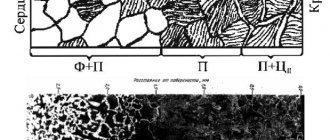
Isn't it easier to cut a steel sheet from a strip of suitable thickness than to bend and flatten a thick-walled bearing ring? However, the whole point of this choice is to use a particularly strong grade of low-alloy steel. The large labor costs during the processing process are justified by the extraordinary properties of the resulting knives. The secret lies in the special chemical composition of the ShKh15 “bearing” steel, which can be judged from the table.
| Name | WITH | Si | Mn | Cr |
| % content | 0,95 — 1,0 | 0,17 — 0,37 | 0,2 — 0,4. | 1,35 — 1,65 |
You should pay attention to the fairly low percentage of chromium, which allows Cr to remain in the cementite composition. If we talk about the structure of the metal itself, it is homogeneous, which increases the ductility and toughness of the bearing metal. This allows the steel to show high resistance to crushing in products and to hold the edge of a knife perfectly. A distinctive property of steel is the ability, as a result of heat treatment:
Due to its high contact endurance, the knife is sharpened no more than once every six months. It is better to harden a knife made of “bearing” steel in the temperature range from 810 ºС to 850 ºС, and temper it at 160–200 ºС. The disadvantages of knives made from bearings include decarburization of the metal due to improper heat treatment and the appearance of rust spots when stored in a damp room.
Profile options Design diagram
Features of fastening to the body
There are several types of bearing fitment on the shaft in the unit housing. The most common of them today are the technologies described below.
One of the most common is a bearing in a housing on legs. It has the ability to lubricate and is involved in the creation of high-speed mechanisms. These could be fans, emergency energy saving systems, flywheels. Their distinctive feature is the ability to work at elevated temperatures.
The inner ring can also be secured to the shaft using set screws. There are cases whose inner ring has a conical hole. The part is secured in it using an adapter sleeve.
There are also cases in which the installed product is secured with a special eccentric ring.
Hardening a knife from a bearing, a “peasant” approach / Guestbook / Not Lost
Since I make knives mainly from bearings from cars, the size is usually 10-15 centimeters in diameter, and I started out as a complete woodpecker, after purely intuitive attempts the following problems arose: • After hardening in water, the steel is so brittle that it shatters like glass upon a strong impact
Actually, that's all. Everything else suited me. But I wanted something that “won’t rust,” “cut well,” “keep an edge,” “don’t splinter.”
I don’t have a bolometer, “everything is by eye”, and when I read the recommendations “withstand two hours at a temperature of 453 degrees” - this is not for me. In the end, plus or minus hardness or viscosity is purple to me. I am quite satisfied with “more or less” decent quality according to the listed parameters.
1. I forge, making sure to observe the following conditions:
• When heating, I would rather underheat than overheat. I try not to heat it up to a white glow, I work in the red-yellow range. I’d rather stick it in and out more often than burn it out. • We carefully monitor the part when it is in the forge: trying to save money and make two parts at the same time leads to the fact that you will either burn it out or spoil something. • It has heated up to a bright red with pieces of a yellow glow - take it out • Periodically spray it from a plastic bottle (like on a shish kebab) - you can better see the temperature, where what is heated, and it saves coals • Especially carefully when there are thin parts (a blade, for example) – don’t burn it!
2. NEVER HIT COLD METAL!
• When you forge, the metal is ductile. And you can see from the glow if it starts to cool down. Of course, I want to forge “more” at one time. We must fight this temptation. • As soon as you hit it with a hammer (and I do everything manually, there are no mechanics) you feel that the plasticity is decreasing - we stop and heat further.
Explanation: As far as I understand, everything is explained simply. As soon as I hit the cooled metal with a hammer, micro-cracks appear that are difficult to “heal” even with good heating, and then everything breaks along them. That's all.
I tried it in the water. With any (almost) options, the result is brittle steel. So I took it and poured it into a canister of used machine fuel (not a problem to get it). I read pictures and about what temperatures are for what grades of steel... I understood the glow and color of the metal. Dry residue:
• When the shape of the part is constrained - I try to be as close as possible to the final shape in order to sharpen less - I start hardening • I heat it to (on average) a color-glow between red and yellow (by eye) - but there are theoretical justifications for this, I will say below , — and I lower it VERTICALLY BY THE TAIL with the tip of the blade down quickly and quickly into the oil. Let it cool for a few minutes until it cools completely. • I heat it to a dark red color and harden it again • If the knife “leads”, which happens - it simply becomes bent - I heat it to a dark red color (minimal plasticity) and correct it, if necessary, I harden it again. • I put it on a tray next to the coals, turn off the forge - let it all cool down together.
Rules for installing roller assemblies
Roller bearings are often used to minimize the friction force during operation of the mechanism. They are durable and efficient, and therefore are often installed in complex technical structures, such as industrial machines. But to achieve a productive result, you must follow certain rules.
It is better to carry out the process using a hydraulic or manual press so as not to damage the parts. There are other recommendations:
- • To begin with, the seats are coated with a special lubricant. Its layer should be thin, but sufficient to freely accommodate the unit.
- • Depending on the specific type of support and the actual design of the mechanism, the installation side is determined.
- • Next, the mounting cup with stop is aligned with the roller bearing ring strictly along the axes.
- • Once compliance has been ensured, an initial test load is applied to see how smoothly the movement occurs.
- • If the result is satisfactory, final installation is carried out and the gap is adjusted.
- • At the last stage, all elements are fixed.
If you do not skip a single step in the process of installing the part, the subassembly will smoothly fall into place. Otherwise, distortions often occur. They interfere with wear resistance and lead to rapid breakdowns. You can check how successfully the work has been completed not only during the first test run, but also during a simple inspection of the product. Obvious problems will be immediately obvious, which means they must be eliminated immediately.
Required material and tools
In addition to the bearing itself, in the process of making a knife you will need:
- wooden handles;
- brass pins for rivets;
- epoxy resin with hardener;
- oil, antiseptic impregnation for wood;
- consumables: paper, plastic tape, marker.
The oil for hardening is mineral or vegetable oil; old transformer oil or automotive waste oil is suitable. You will need copier paper in A4 or A3 format, wrapping paper for clamping the blade in a vice, and sanding paper of different grain sizes for sanding metal and wood.
It is necessary to have the appropriate equipment and tools available, as well as stock up on the following equipment:
- grinder with an abrasive disc and grinding wheel;
- an anvil or an analogue from an I-beam trim;
- hammer 4 kg, hammer 1 kg, blacksmith pliers and clamps;
- bench vise, chisel;
- furnace or forge;
- household oven;
- tabletop drilling machine;
- polishing machine;
- belt sander (grinder);
- Dremel;
- jigsaw and chisel.
Special requirements are placed on the stove; it must heat up to 1100 ºС, which is unattainable in the combustion zone of a conventional hearth. A thick-walled metal stove fired with charcoal is required. A conventional hood must be retrofitted with a supply fan.
It is best to use an abrasive disc to make it easier to cut the bearing race. A diamond coated bit will do. You should not try to use a milling cutter in the grinder - it will only slide along the surface of the hardened metal bearing.
Additionally, if you do not have sufficient experience working with forging tongs, electric welding will be required. With its help, reinforcement is welded to the workpiece, which will become a convenient holder for the knife workpiece when forging metal with a heavy hammer.
If you follow the recommendations of owners of bearing knives, it will not hurt to make or purchase a special device for sharpening the tool. It will allow you to maintain a high level of cutting properties of the knife during subsequent operation.
Case types
There is a certain classification of bearing housings. Each type differs in its purpose, mounting method, configuration and size. The following varieties are standard today:
- stationary solid;
- stationary detachable;
- flanged.
The one-piece stationary type of case is made of pure nickel, which makes it more rigid and simpler. The axial fit of bearings in the housing has a complex axial type of installation. Therefore, this variety is used in low-speed mechanisms that have a small shaft diameter.
The detachable stationary housing is made of gray cast iron. It consists of a lid and a base. These body elements are connected with bolts. This design makes it easy to change the bearing when it wears out, make a secondary bore of the liner, and also adjust the gap. This is a common type of housing in mechanical engineering.
The flanged body is similar to the previous type. It consists of a base and a cover connected by bolts. It is used for very demanding parts. It serves as a support for both the end and through shafts.
Features of steel 65G
Knife blades made from this steel do not shine. The blades of such blades are distinguished by a dark shade; they are usually decorated with ornaments of various types. This material is harder, as a result of which a knife made from it can easily withstand contact with bone, while the cutting edge remains unharmed. In addition, such blades are very sharp and cut paper similar to a razor. Discussing the disadvantages, it can be noted that such steel rusts faster and is not as easy to sharpen as compared to ShKh-15. As a result, among the main advantages of pchaks made from 65G steel, the following stand out:
- The blade is capable of cutting various materials due to its sharpness;
- The point absolutely easily tolerates the fact of hitting the bone without losing its qualities.
From what was written above, we can draw the following conclusion: Whatever steel the knife is made of, each of them has its own advantages and disadvantages, taking into account which any person can choose a national Uzbek knife that is suitable for him.
Installation of sliding assemblies
Such parts can be one-piece or detachable. The installation features primarily depend on what type of product is planned to be replaced. If we are talking about the first group, the bearings are first pressed onto the shaft and secured in the housing. This can be done not only using special pressing equipment, but also manually. In this case, the step-by-step instructions look like this:
- • The sleeve fits onto a mandrel that is centered in the hole.
- • Using a hammer, the structure is carefully inserted into the seating slot. It is important to avoid distortions.
- • The already pressed bushing is secured with special stoppers.
If you press the bearing onto the shaft correctly, you can achieve high wear resistance from the nodal support. The external condition of the element used is important. If there are scratches, chips and other damage on it before starting work, it is better to replace the part. When receiving a strong load, the damaged element will continue to collapse. A small abrasion can quickly become a serious problem. Especially if there are accompanying problems with lubrication or incorrect installation.
Detachable structures are installed separately in the base and cover of the mechanism. This leaves a small gap allowing normal operation. An important feature is the need to adjust this type of nodal supports, regardless of whether the replacement is made in a home workshop or in mass production. Moreover, this is already accomplished during the initial inspection. Correct installation is assessed by how freely the part slides in the structure.
Machining the bearing and preparing the part for forging
An outboard bearing for a car driveshaft or any other with a diameter of 100–150 mm is suitable as a knife blank. For example, it is allowed to use copies of the required sizes from the axial mechanism and drive equipment of machine tools and moving units. The direct source is the most massive part of the product, called the outer race of the bearing. It is made of structural steel grade ШХ15.
There are different methods for disassembling a bearing. Since you won’t need anything other than the outer shell, and you can’t split the shell under any circumstances, we’ll use the most “humane” method - sawing the metal with a grinder. It is better to clamp the bearing in a vice and, if possible, saw the inner ring. It is better to saw the outer ring diagonally, thereby forming the nose of the knife. After cutting with a chisel, the separator is destroyed and all the insides are removed along with the balls. If required, the cut area is opened with a metalwork tool. The circumference should be 1–2 cm longer than the knife, so the extra centimeters of the workpiece are sawed off.
Manufacturers and labeling
Depending on the type of manufacturer, there is a certain marking of parts. If this is not a bearing housing created with your own hands, it will definitely have the designation of the corresponding company that created it.
There are a large number of brands, but the following manufacturers are considered popular today:
- China and Singapore produce parts marked FBJ.
- Italian bearing mechanism elements can be marked as KDF or TSC.
- Japan labels their cases as ASAHI or NSK.
- SKF products are so expensive that they are practically not found in equipment in our country.
The price of such products depends on the manufacturer and, as a rule, the higher the quality of the part itself. Polish and Russian cases are considered the cheapest, but short-lived; the presented parts are manufactured by the Japanese of higher quality. Further, Italian-made components have higher reliability and cost, followed by Serbian mechanisms. The most reliable, but very expensive, are considered to be German and Swedish, as well as some Japanese (NTN, KOYO) bearing housings.
Blade sharpening
It is better to sharpen a knife manually, since when using an electric sharpener there is a danger of overheating the metal. A whetstone is usually used for sharpening. The procedure begins after etching is completed, after the epoxy resin has dried. The blade is fixed so that the sharpening angle is 20°.
- First, sharpening is done with a coarse abrasive sharpener (for example, an “extra-extra coarse” diamond stone). Processing is carried out exclusively in the direction perpendicular to the cutting edge. It is necessary to periodically wash the sharpener in soapy water. Having finished sharpening one side of the blade, turn it over and sharpen the second.
- Then they start fine-tuning. An “extrafine” diamond stone or a ceramic stone with a grain size of 1000 is suitable for this purpose. During finishing, the sharpening direction changes to the opposite (along the blade).
- The next stage is surface polishing. For this process, an extra-extra fine diamond stone or 8000 grit ceramic sharpener is used. The tool must move perpendicular to the edge of the knife blade. This rule must be observed during the final polishing of the product.
Housing marking depending on design
The bearing housing may be identified by different markings depending on the type of assembly. Made for radial parts that are installed in flanged assemblies, the mechanism is secured with set screws. The bearing in them is designated UC, and the housing for them is F, P, T, FL, FC. If this node is connected together, the part will look like, for example, UCP, UCT, UCFL.
For supporting structures, the housing is designated as SD, and the bearing itself is designated SN.
It is better to purchase such products from a direct representative of a particular manufacturer. This guarantees the quality of the purchased parts.
Annealing and forging of the workpiece
The steel is alloyed with chromium, so it must be annealed before forging. You must first heat the part red-hot in the oven and, without allowing it to cool, straighten it with a hammer on an anvil. The steel becomes ductile and, after cooling slowly in a furnace at a rate of 20–40 degrees per hour, is ready for forging.
The most critical stage of forging bearing steel should be carried out in the temperature range from 800 ºС, which corresponds to a cherry-red color of heat, and up to 1100 ºС, accompanied by a dark yellow glow. If you have a non-contact pyrometer, the temperature of the metal surface can be determined with an accuracy of ± 1.5 ºС.
You should first practice heating and forging metal on a regular rod. In order not to break the workpiece under hammer blows, it is better to heat the metal one more time than to continue processing it when it is cooled. It is easier to control the temperature by looking at the glow color; when a dull cherry glow appears, you should immediately place the part in the oven.
After heating, the knife part is placed on an anvil and flattened with hammers to the required thickness. If you have no experience working in a forge, you can limit yourself to straightening the workpiece, replacing the forging operation with stripping the workpiece. A correct knife forging technique is considered to be one in which:
- forging is carried out by shifting the metal from the middle of the blade to the edge of the blade, gradually becoming thinner;
- rounding of the tip is carried out with simultaneous drawing of the knife blank along the length;
- After final rolling of the plate, an allowance of no more than 2 mm remains.
The workpiece is heated. The cooled workpiece is sawed along the grooves with a grinder. The bent workpiece is heated and brought to a flat shape with a hammer. The resulting tail is pulled out in length so that in the end it comes down to a size of 5 mm by 5 mm.
How to make a bearing housing without a lathe
In this review, the author shows how to make a bearing housing from scrap metal. Moreover, in this case you can do without a lathe.
To make the bearing housing you will need a metal corner 32*32 mm, a metal strip 5 mm thick and 19 mm wide.
The author also uses a piece of steel pipe with an outer diameter of 60 mm (internal - 54 mm) and a steel washer with an internal diameter of 31 mm (external - 55 mm).
Preparing for work
At the preparatory stage, you should come up with the shape of the blade and the handle for it. These details must be displayed on the drawing of the future product. Also mark on the sketch the method of their fastening. Professionally making a dagger from a file involves forging iron in a forge.
This ensures the strength of the metal, giving it elasticity, allows you to remove excess thickness by flattening the steel with hammer blows, and also speeds up the stiletto manufacturing process, reducing the time spent on its subsequent processing. In the absence of blacksmithing equipment and special skills, you can make a good homemade knife without forging. Its quality will not be inferior to that made by an experienced blacksmith, provided that a real Soviet file is selected.
You can check whether the steel is alloyed or regular, hardened, in the following way: just place the part on the edge of the table and hit its tail tip with a hammer. It should not break, but bend a little.
Processing on a grinding machine will also determine the quality of the metal - ordinary steel will produce many long beams of sparks, while high-alloy steel will produce a lush sheaf of sparks of short length.
Read also: Pressing sawdust at home
The first stage of making a knife with your own hands is firing. Heating the metal ensures its pliability necessary for machining. Therefore, it is impossible to make a knife from a file without heat treatment.
general characteristics
The bearing housing is a special part. It is usually made of cast iron or other alloys. A bearing housing is used to seat the main shaft on the main platform. It secures the part tightly.
The housing and the bearing itself - rolling, sliding and other varieties - together create a unit. It is easy to find in the equipment and technology of enterprises in all industrial sectors.
Since quite a few types of the presented parts have been developed, there are even more cases for them. Moreover, manufacturers are ready to produce both standard configuration products and housings for specially shaped bearings. In the latter case, an individual drawing is created, on the basis of which the master produces the required part. This makes it possible to ensure that the unit complies with existing production conditions.
Roughing and grinding the forging, transferring contours from the template
After this, the part is peeled using a sharpener or belt sander. During the processing process, excess layers of metal and unevenness are removed, and the surface becomes perfectly smooth and shiny.
At the next stage, a template of the cutting tool is prepared on paper on a scale of 1:1. A paper copy is cut out with scissors and traced with a marker on a sanded plate. It happens that the outline transferred to the workpiece is difficult to distinguish or is erased during subsequent cutting. In this case, you should duplicate the contours of the knife by scratching lines on the metal with a scriber. Instead, any bench tool with a tool steel tip will do.
The plate is clamped in a vice and cut using a grinder according to the template. In the most curved areas, many cuts are made, small fragments of metal are cut out in “steps”. In order to remove the remaining pieces and nicks, the semi-finished knife is ground with a grinding attachment.
Using a marker, draw the shape of a knife on the workpiece and cut it out. Improve the corners and make a smoother line.
Tools you'll need
A range of mechanical tools have been developed to simplify the installation process. In particular, NSK offers the following products:
- The FTN333 mounting kit is an excellent option for installing small to medium diameter bearings (from 10 to 55 mm) using the cold fit method. This way you will complete this operation correctly and without any problems.
- Wrenches - available in standard and reinforced versions. Indispensable when installing locknuts. This is a simple and inexpensive means of mounting tapered seat bearings.
For the convenience of working with large diameter bearings, the company offers hydraulic equipment:
- Pullers, pushers and puller plates – provide large loads to maintain the recommended contact force between the part ring and the surface. They simplify the installation process and eliminate the possibility of errors during installation.
- Nuts – Using the offset method, they increase the accuracy and speed of installation of tapered bearing components. They have an anti-corrosion film, which means they have a long service life.
- Pumps - intended to be used together with nuts, pump oil and greatly simplify the operation.
In addition, induction heaters have been developed for each bearing size. NSK offers a range of devices in different sizes and capacities. They ensure optimal and safe parts temperatures to ensure a smooth shrink-fit installation process.
Blade hardening and tempering
Heat treatment is carried out in order for the steel to achieve the required parameters and is carried out in two stages. At the hardening stage, the metal acquires high hardness, strength and wear resistance. The blade should be heated in an oven to 830 ºС and immediately placed for one hour in a cuvette with oil heated to 50–60 ºС.
How to harden a knife from a bearing without a pyrometer? There are two ways to determine whether the product has reached the required temperature in the oven:
- sprinkle the instrument with table salt and note the moment of NaCl melting, it occurs when t = 800 ºС is reached;
- the magnet stops “sticking” to the metal at the temperature of the restructuring of the crystal lattice of the material, which occurs before melting.
Heating the oil is required to liquefy it so that it better envelops the homemade tool. During processing, the product should not be turned over; the hardening substance should not be added or shaken. You should be especially careful with oil. When hot metal is immersed, it tends to ignite.
At the tempering stage, an optimal combination of strength, ductility and toughness of steel is achieved. At the same time, the internal stress of the material is relieved. The instrument is placed in an oven heated to a temperature of 170–200 ºС, where it is kept for two hours.
Cooling of the handmade semi-finished product to ambient temperature occurs naturally in the switched off oven.
You can check the quality of hardening using a needle file. If, when running along the edges of the blade, it slides, hardening the knife from the bearing has achieved results. Also, the testing method involves trying to cut a glass bottle; the blade should leave scratches on the glass. This blade is used to shave the hair on a hand and plan a suspended sheet of paper.
After hardening, an interesting pattern appears on the blade
Kinds
These mechanisms can be divided into groups according to the direction of the load, according to the elements on which the holders rest, according to the presence or absence of a rotating spacer and according to the material of manufacture.
What are they made of and how are they made?
The product can be radial and supporting, with full or partial rotation. Depending on the operating conditions, it is manufactured in the form of: outer and inner races (lower and upper), sliding sleeve (washer), lubrication system (forced, natural, air).
Polished surfaces, due to the lubricant or due to the physical properties of the gaskets, provide long-lasting easy sliding. Raw materials for production: steel, cast iron, bronze, fluoroplastic, babbitt, aluminum, ceramics. Pairs with a minimum friction coefficient are selected. What metal the bearing bushing is made of directly determines in which cage it will rotate.
Rolling
Such units are divided into radial, thrust and complex. This determines the direction of the load. The first are divided into three main classes: ball, roller, needle. These species can be with or without restrictive rings, with one or two anthers, and completely open.
The second type is created on the basis of spherical elements, cylindrical and conical rollers. Completely collapsible varieties are available. The third – combines the qualities of the first and second in terms of perceived effort. There are also open and closed types.
Depending on the materials for the manufacture of rolling bearings, there are several subclasses:
- • standard (most common);
- • designed for increased loads;
- • designed for extreme temperatures;
- • resistant to aggressive environments.
For special conditions (ultra-high rotation speeds, strong heating, the need to operate in the presence of acids and alkalis), products made of ceramics, silicon nitride, and plastics are used. There are models where the sliding layer is a gas or a magnetic field.
Chemical composition
Like all carbon steels, ShKh15 contains carbon, the content of which ranges from 0.95 to 1.05%.
The main alloying additives are:
- silicon, which increases strength and maintains viscosity;
- manganese, which together with chromium increases hardness and wear resistance, resistance to impact loads while maintaining ductility;
- chromium, which gives the alloy anti-corrosion properties.
It is worth noting that if the alloy contains more than 13% chromium, the steel is classified as stainless. In SHH15 its amount is small: only from 1.35 to 1.65%.
Advantages of non-lubricated and lubricated housings
Today, manufacturers produce both lubricated and non-lubricated bearing housings. The bearing housing, the design of which is designed for standard re-lubricated units, contains a lubricator.
The advantages of housings that are not refilled with additional lubricant include savings on maintenance and compact design. There is no risk of oil leakage in such parts. This results in increased cleanliness of the part.
Re-lubricated housings are used at high temperatures and in dusty environments. If it is not possible to use a part with a lid, such a unit is used in conditions where it is splashed with water or other liquids.
If such a housing is not used regularly, the bearing will work properly. Such parts are used when the unit moves at an accelerated rate, under increased loads and the need to reduce noise during operation.
Cleaning and pickling
Unsightly scale and traces of burnt oil on the forged blade are removed with a grinder and a 240–320 grit sanding belt. Scratches remaining after machine processing are removed manually using 320-400 grit abrasive paper. Processing is carried out by straight-line movements of sandpaper directed at an angle of 90 relative to the direction of the grinder scratches.
From grinding with a P400 zero polish, they move on to polishing with a material with a grit of 600–800. Wetting the abrasive paper with water allows you to polish the product more effectively. A mirror shine appears after treatment with GOI paste or other polishing compound applied to a piece of leather.
In an additional etching operation, inscriptions, ornaments, and drawings are applied to the metal surface of the knife. Typically a technique is used in which a stencil is glued to the image area, and the surface around it is sealed with masking tape. Then a mordant is applied for a certain time, after which the knife is washed in water.
Rules for installing roller bearings
During installation, the main force should be directed exclusively through the inner race when fitting onto the shaft and the outer one when pressed into the housing. It is unacceptable to carry out work that causes impact or other dynamic effects.
When attaching both to the shaft and to the housing structure, direct simultaneous force to both rings at the same time, avoiding distortion.
When installing parts using improvised tools, when it is not possible to use standard devices, impact forces must not be allowed to the surface of the separator; it is necessary to use a gasket that dampens the impact. You can use a bushing made of unhardened steel or copper alloy.
When installing ball bearings on a shaft with an interference fit, it is advisable to preheat the element using an induction device and then press it on with little force. The p/w side with the factory markings should be on the outside.
When working with large-sized elements, it is advisable to use specialized devices, for example, hydraulic spacers, which guarantee no damage to surfaces and increased productivity. This technique is recommended when installing p/w with an internal diameter of more than 150 mm.
Preparation of overlays
The ergonomics and overall perception of the knife depend on the correct choice of material for making the handle. Metal alloys, plastics, genuine leather, and elastomers are used as the starting material for the manufacture of knife handles. Hard and valuable wood species are irreplaceable for this purpose.
The overhead handles, most suitable for the shank of the bearing knife, consist of 2 identical halves. You will need to stock up on scraps of metal rod for the knife handle pins. In the case of using wood, the following sequence should be followed:
- the antiseptic-treated block is clamped in a vice and sawn into 2 identical parts;
- to eliminate gaps, thoroughly sand the sides in contact with the metal;
- the contour of the knife handle is drawn, two dies are cut out with a jigsaw;
- the halves are placed on the shank, the holes for the pins are marked and drilled.
Handle preparation
Features of installing the release bearing
This p/sh is one of the main components of the vehicle clutch assembly, installed between the engine and the gearbox. Its task is to open the flow when the pedal is pressed. A special drive moves the p/w along a guide on the shaft to the basket, pressing on the diaphragm. Different vehicles use mechanical and hydraulic parts. To install, you must follow a certain algorithm:
- dismantle the gearbox to gain access to other components;
- move away the ends of the clamp where the coupling meets the glass;
- remove the p/w from the bushing simultaneously with the coupling and the spring holder, pressing out the 4 fasteners;
- inspect the old component for defects, check the seat and adjacent components;
- Before installing a new unit, check for play and the possibility of free rotation;
- mount the part on the guide bushing and fix it with a spring device together with the coupling, after applying copious amounts of lubricant;
- After checking the proper fit, replace the gearbox.
A similar method describes replacing the p/w on a VAZ passenger car; when installing a release bearing on a MAZ and other cargo vehicles, you should follow the detailed instructions and recommendations of the vehicle manufacturer. It is advisable to use specialized devices and carry out repair work at a service center, this is especially true for machines under warranty.
Source
Assembly
You need to dilute the epoxy glue. Marks should be applied to the dies being joined or shallow dents should be pressed for better adhesion of the epoxy layer. Be sure to degrease the metal part of the knife, which will be located inside the handle. Assembly is carried out in the following sequence:
- Epoxy glue is applied to the surface of the overlays from the scratch side;
- the halves are placed on both sides of the shank, pins are inserted into the holes, the assembled handle is wrapped in paper and tightly compressed with a clamp;
- after the epoxy has hardened, use a wood cutter to remove chamfers from the edges of the knife pads;
- Using sandpaper on a fabric base with a grit of 80, rough processing of the wooden dies of the knife handle is carried out;
- Polish the handle clean with strips of sandpaper.
The polished surface is covered with linseed oil heated to 50–60 degrees. After absorption, the procedure is repeated 2-3 times. There is no need to varnish the knife handle later. Under the influence of ultraviolet rays, the oil polymerizes, turning into a hard elastic substance. It fills the smallest pores of the wood, protecting the knife handle from moisture and external influences better than any varnish.
Source
How to remove the outer bearing race of a washing machine?
In this article we will analyze the installation diagram of angular contact bearings and tell you how they are mounted on the shaft and in the housing in different ways. The choice of the most suitable one depends on the type of support unit, its size, the load taken and many other factors. Sometimes the process requires the use of additional devices for more reliable installation. Let's consider the most popular paths recommended for installation, as well as possible problems associated with incorrect implementation of the procedure.
Bearing flange units from NTN-SNR
The manufacturing company NTN-SNR is a French-Japanese joint venture that produces bearings for aircraft, missiles, helicopter transmissions, etc. Among the extensive product range of this manufacturer are flanged bearings, as well as housings of various types.
The company produces ball bearing units with cast iron bodies and round, oval, and triangular flanges. It produces special corrosion-resistant models for chemical, medical and food equipment. These include parts made of thermoplastic, characterized by low weight and increased resistance to aggressive external influences.
Textile equipment uses models enclosed in flanged housings for three-point fastening.
Rules of use and tips
When using bearing adhesive, you must adhere to some rules:
- Despite the fact that some structures are used on uncleaned surfaces, if possible, it is still necessary to clean and degrease. This will have a positive effect on the gluing result.
- A stronger connection will occur on rough surfaces.
- Do not allow material to get on the bearing balls, as this will lead to damage to the part.
- The glue must be distributed evenly over the entire plane of the element being connected. Some compounds can be applied to one of the planes being connected.
- for applying its compositions it provides for manual use, semi-automatic and automatic methods.
- For better distribution of the mixture on the planes, it is necessary to rotate them relative to each other with the composition applied to them.
- If re-gluing occurs, then previous applications must be removed from the surface.
We recommend watching the video review:
Bearings with split races
To carry increased axial and radial-axial loads, bearings with an outer (Fig. 757, a) or, less commonly, internal (type b) race that is detachable in the equatorial plane are used. The connector allows you to increase the number of balls and deepen the running grooves.
With a purely radial load, three contact points are formed in bearings of this type - two on a split race and one on a whole race (hence their conventional name “three-contact” bearings). Correct rolling of balls simultaneously on three surfaces is, of course, impossible. The balls, which are braked by two-point contact with a detachable race, slide along the entire race, so three-contact bearings are used to carry an axial or radial load while simultaneously acting as an axial load. The axial load presses the balls against only one surface (see c), on the other side the balls move away from the surface of the treadmill, and the result is a two-contact bearing.
The contact angle β depends on the ratio of radial and axial load. With a purely axial load in completed structures β = 20–30°.
Detachable clips are usually tightened with fastening nuts, and the mutual centering of the clips occurs along the seating surface.
Bearings designed to carry purely axial loads are installed in housings with radial clearance. In this case, bearings with half-clips are used, tightly connected using a sleeve rolled at the ends (type d).