If you are reading this article, it means it is already February, or you have already started looking for ideas for congratulating your beloved men, grandfathers and fathers on the Defender of the Fatherland Day. And we are happy to help you.
We hasten to please you: we have prepared a full selection of master classes of different difficulty levels. DIY children's crafts for February 23rd and cute souvenirs, colorful pictures and complex projects - a fascinating world of creativity awaits you.
Making a helicopter main rotor
We take one of the bottles and cut off the top part along the “hangers”.
We also cut off the bottom of the bottle.
From the resulting workpiece we cut 4 strips - parts of the main rotor (or, simply put, the propeller on top of the helicopter). We place the workpieces in front of us with the convex side up.
We cut off rectangles on each part out of four with a height of 1/3 of the height of the main part, leaving a narrow protrusion 0.6-0.7 mm wide.
We flatten the resulting protrusions to form a “groove”. We place toothpicks in these “grooves” and wrap them with tape.
Cut the cocktail tube into pieces 2/3 the length of a toothpick. We put short tubes on toothpicks. This will give a neat look to the propeller blades.
We make 4 holes in the bottle cap using an awl or a thick needle. The holes should be of a diameter suitable for a toothpick.
We insert toothpicks with propeller blades into the holes. The helicopter's main rotor (propeller) is ready.
DIY helicopter craft
Kids really like to play with toys made with their own hands with the help of adults. Such toys remind them of pleasant moments of joint creativity and allow them to fully enjoy its fruits.
Both boys and girls are of great interest in toys in the form of vehicles. They can be used in any game, allowing your heroes to move to any destination. As a rule, any child has several cars, a train, a boat and even an airplane. Therefore, we propose to make a not quite familiar type of transport - a helicopter. A DIY craft made from an egg carriage will be feasible even for small children, and any child will enjoy it.
DIY helicopter craft
All you need for the job is a cardboard egg carriage, paints, scissors, glue, strips of thick cardboard and a stationery nail.
Let's get started.
First of all, in order for us to get a helicopter craft, we cut out the body of the helicopter and its tail from the egg carriage with our own hands. The body will be one of the cells, and the tail will be the partition between them.
Cut out cells from a cardboard carriage
At the same time, we cut off the bottom of one of the remaining cells - this will be a continuation of the helicopter body.
Cut off the sharp part
We paint the helicopter parts in bright colors. We draw doors and windows on the body.
We color the cell, giving the image of a helicopter
We are waiting for the craft to dry
Color the helicopter with a marker
We make a recess in the bottom of the cell that we cut off, using a simple pencil.
Making a hole in a cardboard cone
We glue the helicopter parts together using PVA or office glue.
While the glue dries, cut out two identical strips from cardboard - these will be the propeller blades.
Cutting out strips
Glue it together
Use a nail to attach the blades to the top of the helicopter.
We fasten the blades with a nail to the future roof
You can place the blades on a match or any stick, fixing them on top with a piece of plasticine or a glued ball.
When the blades are secured, our craft is ready.
Glue the tail
DIY helicopter
This simple helicopter craft for children of any age will be an interesting toy that will help develop their imagination and occupy their free time with exciting games.
Making a propeller in the tail of a helicopter
From the remaining blank of the first plastic bottle, we cut 4 strips for the propeller in the tail of the helicopter, 1/3 the length of the strips for making the upper propeller.
Similarly, we cut out rectangles from the parts of the blades, leaving a “teeth”.
We flatten the “tooth” on each part of the blade into a groove.” Let's prepare a cross measuring 1.5 cm x 1.5 cm. (For the cross, you can purchase ready-made parts that are used when laying facing tiles or cut from a very dense material - plastic or cardboard). Cut short tubes from cocktail tubes with a length equal to the length of the “teeth” of the blade.
We put short tubes on the cross. We insert the propeller blades into the tubes. The propeller for the tail section of the helicopter is ready.
Attaching the propellers and final assembly of the helicopter
We take a second plastic bottle and two caps from such bottles.
We place the covers next to each other and make a through hole with a diameter suitable for a felt-tip pen. Insert a felt-tip pen into this hole. The covers can be secured to each other using tape.
Then we cut helicopter windows on both sides of the bottle.
Between the windows we cut a hole at the top for attaching the top screw.
We fasten the upper rotor of the helicopter.
We screw the cap with a felt-tip pen (the tail part of the helicopter) to the bottle.
At the end of the felt-tip pen we attach a small screw for the tail of the helicopter using tape.
We use cardboard packaging for eggs
Such homemade helicopters can be made with children of senior preschool age in kindergarten during manual labor classes. The blanks for the body and tail can be cut by the teacher. To attach the screw, you will need to cut two strips from cardboard; you will also need a bolt and nut, a plastic bottle cap, gouache paints for decoration, thick PVA glue or a glue gun.
The educator or teacher tells the children in detail how to make a homemade helicopter before class. First of all, the tail is glued to the body and the bottle cap on top. It is best if a hole is made on it with an awl. Older children will be able to do this on their own on a wooden board.
Then cut out two identical strips of yellow double-sided cardboard along the lines under the ruler, and make a hole in the center for the bolt. Before connecting the parts, it is advisable to paint the helicopter with paints, drawing the windshield and painting the body. Once dry, you can attach the screw to the top by inserting the bolt and tightening it tightly with a nut from the bottom.
Master class “Helicopter made from waste material”
Margarita Sergeevna Rudakova
Master class “Helicopter made from waste material”
Master class “ Helicopter made from waste material ”
.
I bring to your attention a master class on making a helicopter from waste material . This master class is provided as a possible option for crafts made by adults for a thematic exhibition in a kindergarten or school. Subsequently, the craft can be used for games, to decorate the interior of a children's room, or as a gift.
For work we will need:
— disposable tableware (tubes, spoons)
;
- a jar of Rastishka
;
- a wheel from a broken toy.
Let's get to work.
We screw the wheel to the sharp end of the plastic egg with a self-tapping screw.
We cut the jar of cottage cheese with a stationery knife - this will be the bottom of the helicopter .
We make small cuts and glue the bottom of the helicopter .
We cut the tubes in half and make a screw and attach it to the helicopter .
We make a tail from the remaining part of the tube.
to the bottom of the helicopter .
Draw the elements of the helicopter fuselage with a marker .
This helicopter was made for my son’s school exhibition of crafts made from waste material .
Master class “Designer from waste material” Man is a creator. This is the main quality of his personality. The need to create appears already in early childhood. This need is known. Master class “Herringbone” from waste material Master class “Herringbone” from waste material (cardboard box) Good evening, dear colleagues! I would like to share with you a master class made from waste material “Buses” Master class made from waste material on the topic: “Buses”. A lot of strong packaging remains with us after using the purchased goods. Master class from waste material “Helicopter” Master class from waste material on the topic: “Helicopter” I continue the series of master classes from waste material dedicated to the holiday.
Commander's jeep made of paper
By folding paper using the origami method, you can make a variant of crafting military equipment for the garden. Following the step-by-step drawing, you need to act in the order of the numbers. To work, take a sheet of A4 paper and fold one of the corners diagonally to form an even square. The excess strip on the side is cut off with scissors.
To assemble the initial figure shown in Figure 1, you need to bend the square in half from top to bottom and left to right, then repeat the procedure again, only this time making diagonal folds. It remains to bend the triangles formed on the sides inward on both sides. The resulting figure will be the initial one when folding origami. Then they act exactly according to the picture above.
After production, the jeep is painted with pencils, wax crayons or paints. It is better to do the craft together with an older preschooler, as it requires constant supervision. The folds must be carefully ironed so that the work looks neat.
Master class “Helicopter made from waste material”
Margarita Sergeevna Rudakova
Master class “Helicopter made from waste material”
Master class “ Helicopter made from waste material ”
.
I bring to your attention a master class on making a helicopter from waste material . This master class is provided as a possible option for crafts made by adults for a thematic exhibition in a kindergarten or school. Subsequently, the craft can be used for games, to decorate the interior of a children's room, or as a gift.
For work we will need:
— disposable tableware (tubes, spoons)
;
- a jar of Rastishka
;
- a wheel from a broken toy.
Let's get to work.
We screw the wheel to the sharp end of the plastic egg with a self-tapping screw.
We cut the jar of cottage cheese with a stationery knife - this will be the bottom of the helicopter .
We make small cuts and glue the bottom of the helicopter .
We cut the tubes in half and make a screw and attach it to the helicopter .
We make a tail from the remaining part of the tube.
to the bottom of the helicopter .
Draw the elements of the helicopter fuselage with a marker .
This helicopter was made for my son’s school exhibition of crafts made from waste material .
Master class “Designer from waste material” Man is a creator. This is the main quality of his personality. The need to create appears already in early childhood. This need is known. Master class “Herringbone” from waste material Master class “Herringbone” from waste material (cardboard box) Good evening, dear colleagues! I would like to share with you a master class made from waste material “Buses” Master class made from waste material on the topic: “Buses”. A lot of strong packaging remains with us after using the purchased goods. Master class from waste material “Helicopter” Master class from waste material on the topic: “Helicopter” I continue the series of master classes from waste material dedicated to the holiday. Master class “ Cats" (from waste material) Good day, Maamites! I would like to bring to your attention a master class on making such charming cats. Master class “Christmas tree” from waste material. Good day everyone. Admiring my colleagues’ New Year’s crafts, I couldn’t help but add my contribution. An incredible number of Christmas trees. Master class “Drums” from waste material. I would like to share with you my experience of making drums from waste material. To do this, I needed tape spools of different sizes. From. Master class “Flowers” from waste material Organizing project of the master class TOPIC: “Flowers” Conducting an organized master class Contents of work: Making souvenir flowers from various materials. A snowman from waste material. Master class This snowman can be made from waste material. All you need is: a bottle from under the plant, soft microfiber napkins, cotton wool, a tank made of waste material. Master class On the eve of the Day of Defenders of the Fatherland, kindergartens are in full swing with the production of various crafts for exhibitions of creative works timed.
Wooden models
If you have the skills of a carpenter, then you can make a child or an airplane from wooden planks or leftover plywood. You will need a jigsaw and a grinder.
Options for making models depend on your skills and imagination. There won't be much material, you can glue the craft together from individual planks.
The article presents crafts of helicopters and airplanes from various materials that can be made at home with children. Teach children to manual labor, the ability to imagine and plan work. Making homemade toys is interesting for all children, especially boys. After all, how nice it is to brag to your friends that you made a toy yourself.
Both in schools and in preschool institutions, teachers try to make crafts with children on all holidays as gifts for parents or simply to implement creative ideas. On Victory Day or February 23, military equipment most often becomes the object of creativity. Crafts are made from a variety of materials, and exhibitions and competitions for the best product are organized. When such a homework assignment is given, parents are at a loss as to how to help their child, not make mistakes, and complete the task perfectly.
The article gives several different options for making simple crafts of military equipment with your own hands. The description of the work and attached photographs will help you quickly understand the principle of the product. Examples are given of the manufacture of tanks and airplanes, helicopters and cars made from paper and corrugated cardboard, waste material and origami folding. We hope that this material will help schoolchildren and parents of children to complete the teacher’s assignment and receive positive feedback at the exhibition.
Airplane piggy bank
You will need: plastic bottle (0.5 l), colored paper, double-sided tape, pencil, scissors, ruler.
Master Class
- Make a hole for coins in the center of the bottle in this way: make a rectangular slot 2 cm long and 0.5 cm wide.
- Draw the body and tail of the plane in an "L" shape, then cut them out.
- Glue 2 blanks to the bottle using double-sided tape, then cut a hole for coins.
- Make engine stands in this way: draw 2 rectangles measuring 10x3cm on colored paper, roll them into tubes, then glue them to the bottom of the body on both sides.
- Draw the airplane wings, cut them out, then glue them on.
- Create a propeller: trace the cover onto the paper, then make a larger circle and draw the blades.
- Cut out the propeller, place it on the neck of the bottle and close the lid.
- Cut out 8 circles and glue them as windows on both sides.
- Prepare 2 stripes and glue them onto the tail.
DIY airplane
Toy planes and helicopters have always been a weakness, both for little boys and for established men. Creating an airplane with your own hands not only helps the baby get closer to his parents, but also helps to unleash the child’s creative potential. This kind of work is, of course, a creative process.
What shape will the wings and tail be, how to decorate the skin of the plane, whether to make windows - your child will find the answer to all these questions. However, since we will have to work with a stationery knife, take special safety measures so that the child does not accidentally get hurt during your work.
For work, it is better to use bottles made of softer material - they are easier to cut.
Materials and tools:
• Scissors • Colored paper (preferably colored on both sides) • Glue stick (ideally colored, becoming colorless after drying) • Felt pen • Scissors • Stationery knife • 2 small and one large bottles of drinking yogurt Cash costs: 30-40 rubles
Time required: 15-20 minutes.
Stages of work:
Take the yogurt bottles and wash them well, remove the promotional label.
Take a large one and use a utility knife to cut off the neck and bottom.
Make a vertical cut along the entire bottle.
From the resulting material you can make wings for 2-3 airplanes, decide with your child on the shape and size of the wings and cut them out with scissors, try to make the wings symmetrical.
On the small bottle, mark the cut line through which the wings will be installed. The length should be equal to the maximum width of the wing. It is convenient to orient it relative to the factory seam (it is on every bottle).
Draw a second cut line, symmetrical to the first.
Carefully make cuts using a utility knife.
We wash the bottles, both inside and outside (it’s easier to insert wings into a wet bottle).
We insert the wing into one of the holes, holding it through the neck, push it into the second hole and pull it out until it is symmetrical with respect to the back of the aircraft.
We make a tail from a small piece of a bottle (ask your child for questions about shape and size).
We make small grooves near the side of the “tail” that will be inserted into the plane so that the tail does not fall out.
We make a cut on the back of the plane equal in size to the tail section minus the size of the grooves.
We insert the tail and align it with the back of the plane and the wings.
Now you can decorate your plane using colored paper and a glue stick.
War plane
You will need: plastic bottle (0.6 l), caps, cocktail tubes, cardboard, newspaper, PVA glue, brush, gouache, glue gun.
Master Class
- Cover the bottle with pieces of newspaper using PVA, then leave it to dry.
- Cut out the tail, wings and propeller of the airplane from cardboard.
- Cover the workpieces with pieces of newspaper and pva, then leave to dry.
- Make the chassis (wheels) in this way: glue 2 caps and a tube together with a glue gun, as shown in the image.
- Use a glue gun to glue the tail onto the neck of the bottle and the wings just below the center of the bottle.
- Use a gun to glue the cork to the bottom of the bottle, then glue the screw to the cork.
- Glue the chassis.
- Glue cocktail tubes crosswise between each wing.
- Paint the plane and wait for it to dry.
A military plane made from a plastic bottle is ready! I recommend watching this video!
Cardboard airplane
For such a simple craft of military equipment, you will need a sheet of colored thick cardboard, PVA glue, scissors and an empty box of matches. Along the length of the A4 sheet, cut out two identical rectangles the width of a matchbox. These will be the wings of the aircraft. The corners are rounded off with scissors. The screw is glued crosswise from two thin rounded strips of equal length. Apply glue to the boxes and attach the wings with the central parts. You can leave it like that, it will turn out to be a corn shell, or you can, as in the photo below, fasten the wings at the edges.
The body is also assembled from 2 strips, and the tail has a loop on top, glued to the edges. The box can be wrapped in colored paper. If you make a craft from green cardboard and attach red stars to the edges of the wings with an appliqué, you will get a craft of military equipment. Can be taken to the exhibition.
Simple airplane made from a plastic bottle
You will need: plastic bottle, scissors, knife, colored cardboard, pencil, ruler.
Master Class
- Draw 2 identical stripes for the wing on the cardboard, then cut them out.
- Draw 3 small stripes for the tail, then cut them out.
- Create a propeller: trace the cover onto the paper, then make a larger circle and draw the blades.
- Cut out the propeller, place it on the neck of the bottle and close the lid.
- Using a knife, make 3 cuts in the tail area and 2 cuts for the wings.
- Insert 3 strips into the cuts to form the tail of the airplane.
- Secure the airplane wings.
A simple airplane made from a plastic bottle is ready! I recommend watching this video!
Plastic helicopter
To create a plastic helicopter, prepare one small juice or water container with a wide screw-on lid, three cocktail straws with an accordion for bending the top, a ball suitable in size for the bottle, a bead, scissors, an awl, stapler with paper clips and good glue (preferably a glue gun).
The photo above clearly shows the step-by-step process of making military equipment with your own hands. In kindergarten, such a helicopter can be given to a child even to play with friends. Having made such an aircraft together with their parents, the child will treat it more carefully, since he put effort into its creation.
Toys made from plastic bottles
Using 1.5 liter plastic bottles, you can construct animal figures. Look what a wonderful dog made from green bottles!
Try to simulate an airplane. You can cover the frame with colored paper and make portholes with passengers. Or simply place your favorite toy in a special slot.
Using a plastic bottle, cocktail straws and a ping-pong ball, you can construct a helicopter using a stapler.
A real “waterfowl” catamaran for dolls can be made from two plastic bottles.
A more complex craft using heating and melting of structural parts looks simply gorgeous. Look, it turned out to be a real Frog Princess!
By heating and melting plastic, you can make a naturalistic crayfish, and then “place” it in an aquarium.
A series of colorful nesting dolls can be made from plastic bottles covered with colored self-adhesive paper. The second option is paints for glass surfaces.
From several bottles, movably fastened together with screws, you can get a bright and memorable snake or shark, whichever you prefer.
For a Christmas theme, try making adorable, colorful penguins from the bottoms of plastic bottles. We cut them, put a “hat” on the penguin, paint them, add bright details: a pompom and a scarf.
If you need a Christmas-themed craft, try making an Orthodox church out of plastic bottles. Domes are most easily sculpted from plasticine, crosses are made from wire, and then wrapped in gold metallized paper. The white edging of the window openings on colored plastic gives the craft a special elegance. They can be done using a “stroke” corrector, or a thin strip of white plasticine.
You can build an entire castle in a similar way. Plastic bottles will form the frame for the four corner towers. Slots are made in them for windows or loopholes, and they are coated with plasticine on top, on which the texture of brick and “white stone” decorations are applied. The walls of the castle are made of cardboard and also coated with plasticine. This impressive craft is sure to bring a lot of joy to your child.
How to make a tank from corrugated paper
An excellent piece of military equipment for kindergarten would be a tank made of thick corrugated paper. If you are familiar with quilling techniques, you can easily cope with such a simple task. Beginners can be reassured that they will succeed the first time too. We take any three colors of wavy paper, you can use the data on the sample below, it is interesting to choose the colors of a military tank - green, marsh, sand. In any case, the tracks of the car are made black.
To twist rolls of paper, you need to use some kind of rod for convenience. This can be either a special quilling hook with a slot at the end for inserting paper, or any substitute, such as a toothpick, a ballpoint pen, or a wooden skewer. Wheels of different sizes are wound, reducing the diameter towards the edges of the caterpillar. The edge is attached to the last turn using PVA. The created parts are fastened together and wrapped in two layers of black corrugated paper. In order for both tracks to have a base, you need to place a cylinder twisted from a wide strip in the center between them, on which the turret with the cannon will subsequently be located.
To attach a long barrel, it is best to use a glue gun or insert a rod, such as a piece of wire or a toothpick, into the body of the tower. The tank serves only the function of a craft, it is inconvenient to play with it, since the wheels do not rotate, and children prefer mobile toys.
Starry sky in a bottle
You can create a magical and fairy-tale galaxy inside an ordinary bottle. We will need: cotton wool, glycerin, colored glitter and a little dye. Place a piece of cotton wool inside a transparent jar or bottle and add glitter. Pour in a jar of glycerin to obtain a viscosity effect. Then add food coloring. You can make several shades inside one container. But at the same time, we add cotton wool and glitter every time. Carefully fill everything with water. We glue the bottle cap around the edge so that it is airtight.
Homemade flowers
From an ordinary green bottle you can make a bouquet of lilies of the valley in a vase. To do this, cut the bottle according to the diagram. We put large polystyrene balls on thin twig-stems.
By cutting out and melting the necks of plastic bottles you can create gorgeous flowers.
With some skill, you can depict cacti and other indoor plants.
Do you want to add color to a dull winter landscape and plant fabulous plants right in the snow? Plastic bottles come in handy here too!
You can make asters from colored plastic cups. To do this, cut off the rounded edge, make cuts, wrap the edges of the cups and connect them according to the diagram.
Household crafts
We invite practical craftswomen to start making handicrafts that come into use in everyday life. Make a beautiful stand for storing needles. A wonderful gift for mother or grandmother, easy to make and affordable even for a small child.
Schoolchildren and teenagers can please their mother or girlfriend with a unique holder for their mobile phone while charging. Such a useful hand-made, painted with stained glass paints according to your own sketch, will undoubtedly bring joy to your loved ones!
The housewife always needs a transparent container in which it is easy to find the right thing. A boy can make such a storage box as a gift to his mother. To do this, you need to cut a plastic bottle, walk along the future joints of the parts of the box with a heated awl, forming holes. All that remains is to connect the parts of the product with lacing or zipper.
If you are a school student and are wondering what to give your dad or brother, pay attention to these homemade dumbbells for sports. You will need several bottles, two wooden sticks for the handle, glue, electrical tape and regular sand. A fun and useful gift is guaranteed!
It’s easy to make a convenient dustpan from a plastic bottle with a handle.
You can even make slippers from a plastic bottle. This product looks unusual. But the question of convenience remains open.
A stand for jewelry and jewelry can also be made from the bottoms of plastic bottles.
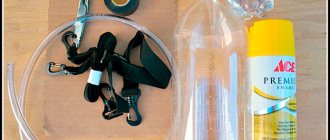
DIY bird repeller from a bottle. Sequence of actions step by step
Before you learn how to make a bird repeller from a bottle, you need to prepare materials and tools.
To work you will need:
- plastic bottle;
- pieces of foil;
- scotch;
- knife-cutter;
- small washer;
- glue or liquid nails;
- felt-tip pen;
- a piece of thick wire;
- stick holder.
We begin to assemble a bird repeller with our own hands from plastic bottles according to the instructions:
- Drill a hole in the lid and bottom, placing them opposite each other. The diameter must be such that the prepared wire or electrode can pass freely.
- Make markings for future blades with a felt-tip pen. Divide the surface vertically into four parts, draw straight lines. Add two horizontal lines to each vertical line to make four “C” letters.
- Make slits along the marked stripes with a knife. The result is 4 blade doors that open outward.
- Glue a washer onto the wire at a distance of 1 cm from the end.
- Place the wire in the bottle, directing it into the hole made in the bottom. The washer holds the bottle, spins, and does not fall down.
- Screw the lid on, passing the second end of the wire into the hole.
- To frighten birds, you can glue pieces of shiny foil to the blades.
- If the length of the wire is at least 1 m, then the repeller can be mounted on it. If you don’t have a long steel wire at home, it is recommended to attach the finished product to a stick.
It's time to take the device out into the garden and test it in practice. Even a small breeze will spin it, which means the task is completed.
You may be interested in this product:
Conclusion
A do-it-yourself bird repeller made from plastic liter or one and a half liter bottles is the simplest means of helping to preserve the harvest and drive away uninvited guests from the site.
It is installed for times when protection is required. In autumn, rooks, sparrows, tits and pigeons will return to the gardens, sing songs, and destroy real pests.
The ultrasonic model sends high-power ultrasound signals towards the dog. Ultrasound has a depressing effect on dogs, forcing them to turn around and even run away, while the device is completely safe for humans. As the dog approaches, the signal intensifies and the animal begins to feel discomfort. The device is compact and can be carried with you in a bag or pocket. As the animal approaches, it will react and the signal will increase. With a repeller, a whole pack of dogs is not scary, which is very convenient; you can do without blood and victims. There are a lot of electrical diagrams for this device on the Internet, so if necessary, you can assemble it yourself and buy the components at any radio store. The device is quite simple, and it will cost you much less. An electric device or stun gun is no less popular. It’s also compact, and when you press the button it produces a characteristic crackling sound, which means that ozone is released, which is unpleasant to a dog’s sense of touch. The device is dangerous for an approaching dog; if the distance decreases, it can give an electric shock and temporarily paralyze. The device will also force the dog to open its jaws if the dog still grabs you. Gas in the form of a gas canister with a chemical filler inside
When buying a spray can, pay attention to its technical characteristics, since not all products are effective; if a dog attacks, the product may simply fail. When sprayed, the dog should charge, run away and no longer show aggression.
In principle, you can build a gas pistol yourself by filling the cartridges with red hot pepper. You can leave the device idle. Sound is effective against dogs; the device can also be made with a light signal reflector. Repeller - smell. Everyone knows that dogs have an excellent sense of smell and they do not at all like, for example, the smell of medical or isopropylene alcohol. All you have to do is wet the tampon. But this method has a big disadvantage - the alcohol evaporates quickly, which means you need to carry it with you at all times when going outside. Hot capsicums are irritating to the dog's nose, skin, and eyes, as is the smell of lemon, orange, and vinegar.
Interior details
You can really surprise and amuse your guests at a themed party by making wall compositions-heads from canisters and plastic bottles.
You can cut out such delicate and elegant panels from plastic from bottles that viewers will hardly guess what it is made of.
Using plastic bottles you can create a lamp, night light or chandelier.
You can also make a lampshade from plastic cups.
Using bottoms from transparent bottles, you can create original and stylish curtains.