The topic of storage is always relevant. It is easier to find any thing if it is in its place. In order to properly organize the space in your home, various storage systems are created. It’s very easy to find a place for any little thing with the help of an organizer. You can easily buy such a thing in a store, but it is better to save money and make an organizer yourself.
Making an organizer with your own hands
An organizer is a very practical thing. It is also an excellent decorative element. You can make this product yourself without spending a lot of money. You will only need available materials and quite a bit of free time. Materials for crafts are available in almost any home. Good for this:
- boxes, gift packaging;
- sleeves from cling film, foil, toilet paper;
- beverage cans or tins;
- scraps of materials, old clothes, jeans;
- wallpaper, gift ribbons, twine, etc.
Missing parts can be purchased. A good option for decorative covering is self-adhesive paper. If you know how to work with this material, then you can use it. All kinds of beads, beads, rhinestones, ribbons and other little things are suitable for decoration.
You can come up with various storage system options yourself. You can also look at a photo of the organizer on the Internet and make a similar product. Check out some ideas.
Lifehacks: useful things for repairs
Repair is such a scary word! At first everyone is inspired by the changes, and then it almost comes to divorce. In fact, many of the difficulties that are so annoying during this difficult period can be easily solved!
Are you tired of paint dripping from your brush, but it’s too hot to work with gloves on? Come on, paint! Let it hit the walls
Can’t decide whether to buy a spatula for decorative work or don’t know how to creatively and for free paint walls with a twist? Use a broom for this
An ordinary crumpled rag and paint give unique wall coverings
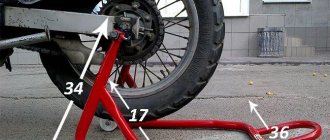
Using electrical tape and tape can minimize losses when drilling tiles. And to prevent the drill from slipping off the tile, you need to stick a strip of tape on the place where the work is being done.
To make the screws screw in easier, you need to rub them with soap.
Drilling brings a lot of dust, which angers the wives and irritates the respiratory tract of the architect himself. Let there be less dust by placing it on the self-adhesive folded sticker
Tired of washing out your paint container? Why do you wash it if you can get by with foil?
Excess paint can be easily removed using a wire placed on the can
Convenient storage method for office supplies
Pens, pencils, rulers and other office supplies are often scattered on the table. This creates clutter and interferes with work. You can eliminate this problem by making your own organizer for your office. To work you need:
- several tin cans;
- cardboard, paper;
- dye;
- Ruler and pencil
- twine;
- glue and scissors.
You need to lubricate the jars with glue and wrap them in paper. Then wrap the cans with twine, paint and let dry. It is better to use paint in a spray can. Draw a handle on the cardboard and cut it out. For convenience, you need to wrap the cardboard with twine. Place the dried jars in two rows, pressing tightly. Insert a handle between the cans. The resulting structure must be tightly wrapped with twine. You can add decorative elements. Ready!
This is just one way to create an office organizer with your own hands. There are other options for similar products. Choose the most suitable and convenient for you.
From cardboard
Storage organizers help you organize your space.
To make a simple craft in which elements of underwear are folded, you will need the following materials:
- knife or scissors;
- pencil;
- drawer from the closet;
- ruler;
- cardboard along the width of the secretary.
Do-it-yourself storage organizers made of cardboard (1 option)
Organizers for storing things with your own hands made of cardboard (2nd option)
Procedure:
- Measure the parameters of the finished box, then calculate how many cardboard strips should be inserted into it. This factor is determined by the desired cell size.
- All strips must have the same width, which corresponds to the height of the drawer.
- Mark long pieces on cardboard, then cut them along the marked lines. You will get 2 long and 3 short tracks.
- Next, you need to mark the cut lines according to the diagram below:
| Band size | Number of cuts | Length | Section width |
| Extended | 3 | ½ partition height | Equal to wall thickness |
| Shortened | 2 |
- It is recommended to cut the workpiece carefully; it is better to first make a small cut, and in the process bring it to the desired size.
- To strengthen the partitions and prevent creases, it is advisable to varnish the paths or wrap them with tape. If desired, the parts are covered with colored paper.
- Install membranes in a furniture box - install short strips on top of long pieces.
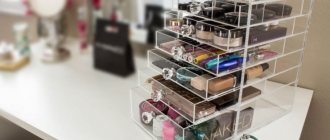
Methods for storing cosmetics
Almost all women have a lot of cosmetics. How to quickly find the thing you need in the morning? You can conveniently place all your jars, tubes and bottles using an organizer. There are many options for making your own cosmetics organizer. Let's look at two.
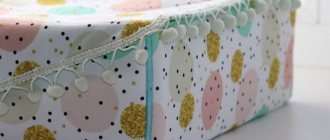
Organizer made from boxes
To work you need:
- box;
- scissors;
- glue;
- several small boxes;
- wrapping.
Cover a large box with paper. Do the same with small boxes. Then you need to place all the small boxes on the bottom of the large one and secure it with glue. You can add additional decor using ribbons or rhinestones.
Two-level cosmetics stand
To create this option you will need:
- a pair of shoe box lids;
- decorating paper or wallpaper;
- sleeve from cling film or foil;
- glue gun
First you need to cover the lids with paper. Instead of paper, you can use wallpaper. Let the cardboard dry. Make additional decoration with paper with a special print. Measure 20 centimeters on the sleeve and cut off the excess. Cover the sleeve with paper too.
Apply hot glue to one edge of the sleeve and glue it to the center of the larger lid. Wait until the parts are well fixed. Apply hot glue to the other edge of the sleeve and install the smaller cap. For greater stability, you can take two bushings. The organizer is ready!
Tricks for caring for home furniture
Home furniture is very susceptible to temperature changes, exposure to sunlight and changes in air humidity. In this regard, furniture requires systematic and proper care . A few tips to help with this:
- Dirt stains from polished furniture can be removed using pure gasoline, and a mixture of turpentine and denatured alcohol, taken in equal proportions, will help restore shine. It is enough to wipe the problem area with a cloth moistened with this mixture.
- Ink stains can be easily removed with warm beer. Wipe the cleaned area with wax and polish with a soft woolen cloth.
- Furniture upholstery made of artificial or natural leather can be refreshed using beaten egg white, after wiping it with a damp cloth. Apply the white with a woolen cloth and rub.
- You can also restore the elasticity and shine of leather upholstery with damp coffee grounds.
A formaldehyde solution will help get rid of old stains on leather sofas . To prepare it you need to mix:
- formalin - half a glass;
- soap shavings - one teaspoon;
- ammonia - one teaspoon.
Apply the prepared solution to the stain, leave for two hours, and then wipe off with a clean soft cloth .
- A mixture of gasoline and potato starch, taken in a one-to-one ratio, will help remove stains from leather upholstery. It must be rubbed into the area of contamination, allowed to dry and cleaned off.
- To make it easier to move heavy furniture, you can put pieces of felt under the legs.
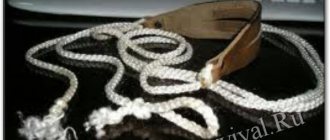
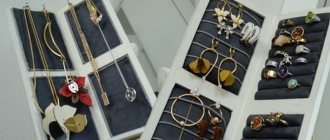
Simple organizer for decorations
Earrings, bracelets, chains and other jewelry are inconvenient to store in one pile. If stored improperly, small items can quickly get lost. You need to allocate your own special place for decorations. An organizer in the form of a picture works well for jewelry. To make such an organizer, you need to take:
- picture or photo frame
- paint, coating varnish;
- ruler, pencil;
- glue;
- stapler;
- rope or tape;
- self-tapping screws;
- beautiful fabric or picture.
It is advisable to use the frame without coating. They are sold in construction and art stores. This frame can be painted in any desired color.
The first step is to paint the frame in two layers. After the paint has dried, coat the product with varnish. Then insert a picture or fabric with a beautiful pattern, lace, into the frame. This will become the background of your organizer. Next, you need to place pieces of rope along the width of the frame parallel to the product and secure it with glue or a stapler.
The decorations will be held on these. You can drive small nails into the edges of the frame and stretch the rope between them. At the end of the work, secure the loop with a self-tapping screw and hang your product on the wall. The jewelry organizer is ready!
Tools for work
To manufacture structures, you will need different tools depending on the material, complexity of the work, and finishing decoration:
- Scissors;
- Threads with needles;
- Measuring tape, tape measure;
- Ruler, pencil, eraser;
- Glue. PVA, stationery, glue gun, “Moment”;
- Acrylic paints;
- Acrylic varnish. As a rule, the finished product is coated with several layers of varnish, allowing each layer to dry thoroughly. Use glossy, matte, or glitter varnish to create various visual effects;
- Fine-grain sandpaper for sanding, giving wooden surfaces a smooth appearance;
- Primer, putty;
- Hammer, nails;
- Screwdriver, drill;
- Decor: ribbons, buttons, lace, natural materials, cards, napkins.
Children's organizer for the car
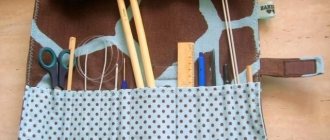
You can also make a children's organizer that is easy to take with you on the road, usually using fabric. In the niches of such an organizer it is convenient to store toys, feeding bottles and baby care items. You can sew such a product by hand or using a sewing machine. To work you need to prepare:
- fabric for base;
- material with children's drawings;
- mesh fabric;
- elastic band for fastening.
You can start manufacturing. First you need to cut out a rectangle from the main fabric. It should be the same size as the back of the front seat of a car. Then cut out pockets from fabric with a child's design and sew them onto the base in any order.
To close the pockets, you can sew buttons on them. Make an insert of mesh fabric in the upper part. You need to stitch it from the bottom and divide it into sections in which you can put toys. All that remains is to sew elastic bands on top and bottom. The organizer is secured to the car seat with rubber loops. When sewing, you need to make sure that all seams are strong and can withstand the weight of toys and other items.
As you can see, the process of creating storage systems is not very complicated. You just have to look for suitable material among unnecessary things, and you can start creating. Nowadays it is very easy to buy any thing. But the value of a product increases when it is created with your own hands. Fill the space around you with original and useful things.
Tips for keeping things organized
A house in which order reigns is the dream of any housewife. To ensure that every item is in its place and accessible, you need to use popular life hacks for the home.
Putting things away correctly
For many people, their clothes closet looks more like a laundry basket. It is not difficult to correct this situation. The Kon Mari method, named after its author, a Japanese writer, is now popular. She offered an incredibly convenient and practical way to put things on a shelf - not in piles, but in rolls. As a result, every item is visible and can be taken out without turning over the rest. In this form you can store knitwear, jeans and other wrinkle-resistant wardrobe items.
Outerwear
A compact way to place outerwear on the bar:
- tuck the sleeves and hood inside;
- put on hangers;
- hang it on the rod.
Children's and adult jackets and down jackets look much neater and take up less space.
Shirts
Shirts are stored folded in the closet. If you fold the item correctly, there will be no creases, folds or dents on it, and it will not take up much space in the closet.
Folding a Shirt:
- keep the washed and ironed item on a hanger in the room for at least half an hour so that it cools completely;
- fasten all the buttons (on the sleeves too);
- put a cardboard rectangle inside, as they do in stores;
- fold towards the middle of the sleeve;
- bend the back.
The shirt should look like a rectangle.
Lingerie
The underwear drawer is rarely in order. A pile of panties and bras takes up a lot of space. If you fold them in the shape of small rectangles, the box will become much more spacious.
You can fold any panties into rectangles: boxers, shorts, thongs. If you fold each rectangle in half, you get rolls. They can be arranged at the bottom of the drawer like pencils in a pencil holder. This is vertical storage that was invented by the famous Kon Marie. If you pull out the closet in which the linen folded in this way is located, you can look at all the toiletries at one glance and remove the one you need without denting the rest.
Cleaning a sink drain with salt
Most often, the kitchen sink becomes clogged due to grease stuck in the pipes. In this case, salt and soda will come to the rescue:
- Dissolve half a glass of salt and a glass of soda in a glass of hot water;
- pour into the drain;
- Wait 10 minutes;
- clean with a plunger;
- rinse with a stream of boiling water.
We remove animal hair from surfaces with rubber gloves.
It is convenient to clean wool from carpets and upholstered furniture using a special roller with adhesive tape. If you don’t have such a device in your household, put rubber or latex gloves on your hands, wet them, and rub the upholstery. The wool will stick to the wet rubber or roll into clumps.
Removing labels with a hairdryer
Many people have wondered how to remove a label from plastic or metal so that no traces of it remain. If you just try to tear off the sticky paper, a stain will remain. It’s even worse if you only manage to peel off part of the label and start scraping off the rest with your fingernails or a knife.
It is better to use a household hair dryer:
- warm the sticker for about a minute;
- grab the edge with your nails;
- peel off slowly.
Removing stains with lemon
Lemon contains a lot of organic acid, which can “eat away” stains from fabric. This product can handle blood, rust and markers. Apply lemon juice to the stain, sprinkle with table salt and place the fabric in the sun for several hours.
Washing with lemon juice to restore brightness to clothes
Lemon juice brightens fabrics. Lemon flavors and removes stains. Just add lemon juice to your laundry detergent.
Crafts for phones
Mobile phones, tablets, laptops and other electronics have long become an integral part of our lives. But progress has not yet reached such heights that it works smoothly without recharging or connecting to the mains. As a result, our houses are tangled with wires, which not only create interference, but also do not look aesthetically pleasing.
This problem can also be solved with the help of simple DIY devices.
Charging point
Several devices can be charged simultaneously in the house. In order not to look for a free outlet or trip over wires, you can make a compact charging point for all devices from an ordinary shoe box.
It needs to make several holes in the front wall to output the “tails” of the charges, and one in the back for an extension cord with several sockets. Decorate the box as you wish.
Charging point
Hanging case
If the sockets in the house are located high, you can get rid of the appearance of hanging wires using a hanging case made from a container for shampoo or household chemicals of a size suitable for the phone.
Step 1. Cut off the neck of the bottle, leaving a pocket for a phone with a high back wall. We cut a hole in it in the shape of the charger.
Marking and cutting along the line
Step 2. Wash the resulting cover to remove chemical residues and wipe it dry or let it dry.
Step 3. Use fine sandpaper to sand the cut edges and erase the text and drawing from the surface.
Sanding
Step 4. Decorate the case in any desired way: paint, cover with fabric, use decoupage techniques, etc.
Decoration
The result of the work is in the next photo.
Photos before and after
Fast, easy and practical.