DIY buggy frame
DIY buggy drawings
The first step, of course, is to decide which buggy you want to drive on the roads (or on the roads?). It should shine like a super or muscle car, or be dirty and scary like in Mad Max, but with a happy face of the owner who sits behind the wheel of a loud, rolling, off-road monster.
The second option, by the way, is quite exciting, but somehow after the apocalypse. In the meantime, we need to live in this world, where there is still a place for the beautiful and the intelligent. So here's a photo of the buggy we ended up with:
I think it looks quite nice. One question - how to do this? Questions like “will it be possible to get permission for it? will he be able to drive off-road?” etc. fade into the background. In a state where you see such power and beauty, you just want to answer “Move aside, gentlemen, where is my mask and welding machine.”
“Hey, palehche, guy!” First - the drawings! We found something similar on the Internet - and here they are, the drawings:
“Download blueprints for the buggy” (~2MB)
In the expectation that during construction we will be able to change the appearance of the frame the way we want, we decided to use such drawings at our own peril and risk.
Buggy pipes
The first questions facing the material implementation of a buggy are: what type of pipe to use, where to find these pipes. For each buggy builder, such issues are resolved differently. In our case, we chose pipes with a diameter of 40mm and a wall thickness of 3mm.
To find such pipes, we had to go to an industrial area at the opposite end of the city. Why weren’t they sold to us somewhere nearby (although there were places)? Yes, because no one is going to order a truck from afar for such a small volume (only 50 meters of pipe) (the seller even snorted with displeasure). Therefore, we had to go to where the pipes were available. As for the “seamless-seamlessness” - depending on your luck, availability. We took sutures. After all, our buggy won't have to dock with the moon. More likely)
Pipe bender
First, let’s decide - why can’t we just bend the pipe “over the knee”? How we tried) Health will still come in handy, but using improvised means to bend the pipe - you can still try. What happened? We were quite able to bend the pipes at a small angle using “bricks” and physical force. But for sections of the frame in critical places, which are designed to protect against rollovers, kinks are unacceptable.
So, should you buy a pipe bender or order a pipe bending service?
Yes, we ordered the service, why delay? But just in case, we studied the issue.
There are different types of pipe benders for different types of pipes. What points may exist and what should be taken into account: 1. A pipe bender can be created to bend profile (rectangular in cross-section) or non-profile (round in cross-section) pipes.2. A pipe bender may “not take” (fail to bend) pipes that are too thick (depending on the type of pipe bender).3. Types of pipe benders: manual, (manual) hydraulic, electro-hydraulic, electric. There are probably others. Why have an idea about this: they cost differently, and offer different opportunities.
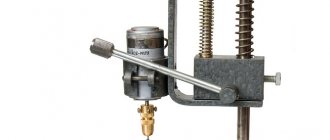
Different types of pipe benders:
What capabilities of a pipe bender you need to know about in order to bend pipes for a buggy: 1. Range of pipe diameters and thicknesses that can be worked with.2. Maximum bending angle.3. Bend angle accuracy.
This data was enough for us.
Question price? The most suitable pipe bender (hydraulic) for our conditions cost from 12,000 rubles. But I think it’s unlikely that we would have been able to find such a good option. Most likely the price would be around 20,000 rubles.
If we talk about the pipe bender with which the guys bent the pipes for us, then it was just a hydraulic pipe bender. What is the accuracy of its bending angle? Let's just say: it's good that we took a protractor with us. An ordinary school protractor. After bending, the pipe springs back a little; we had to adapt to physical processes in order to adjust the desired angle. This is probably normal.
As a result, we managed to get correctly curved pipes for the upper part of the frame for only 800 rubles.
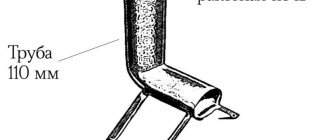
Metal crown
When joining round pipes together, you need to ensure a minimum distance between them at the joint. It is advisable to do without distance at all. Then the weld should go like clockwork. Pictures, I need pictures. Now I'm going crazy:
Here I have tried to depict a 90 degree connection between two pipes (I hope the meaning is clear). So, delta S ideally should not exist at all. To do this, you need to cut a semicircle at the top and bottom of one of the pipes (on the right). Rough semicircle radius = pipe radius. But in practice, you also need to take into account the thickness of the pipe.
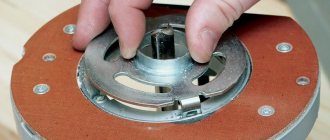
There are several ways to achieve a semicircular cut like this. In descending order of accuracy: 1. Milling machine2. Metal crown3. Bulgarian
You can probably come up with even more hardcore ways, but let's start with what we have at hand. So, let's see. Milling machine. Aw. No, he is silent. Metal crown. Somewhere, a crown from a hardware store echoes in the distance.
We go there and are surprised to discover that the crown itself costs around 600-1000 rubles. Yeah, we find crowns for 200 rubles. We take two pieces. And the base for it (spindle) 800 rubles! Pfff, okay, let's take it too.
In general, we now have a bit with a spindle, we put it all on the drill. And we are trying to cut pieces of the required diameter on our pipe.
Test 1: cut a piece on the pipe from the top side, add WD-40 (you can also use water) for cooling. It was possible to cut, but several teeth fell off from the crown.
Test 2: cut a piece on the pipe from the bottom side, add WD-40 (you can also use water) for cooling. I managed to cut it off and all the teeth fell off completely.
Having assessed the trends, it became clear that such 200-ruble crowns would definitely not be enough for us. Having confirmed this trend in practice, we managed to complete 5 percent of the work with joints.
But we decided to end the story with the joints on a positive note! And the remaining joints were finished using a small grinder. Slowly, carefully, but surely, this tool helped bring the work to fruition.
Perhaps we simply approached the choice of crown incorrectly. You can unsubscribe in the comments about this.
Afterword
If you are interested in the fate of the project, or you were also inspired and decided to build a buggy (or teach us), you can subscribe to our YouTube channel. Follow, comment, have fun)
angrybro.ru
Do-it-yourself tarabike drawings
Well, since such a strong interest in this means of transportation has arisen, I hasten to repent, dear friends!