A little history
People have long sought to protect their savings from thieves. For this purpose, wooden chests were used, lined with iron for strength. They were more like modern safes. The poor layers of the population put their savings in stockings or clay vessels, egg capsules, which could be sealed and buried for greater safety.
Historians do not have reliable data in which country piggy banks first appeared. Germany, China and Malaysia are mentioned as her homeland. Previously, piggy banks were made mainly in the form of pig figurines. This, in particular, is associated with the fact that in Chinese culture the pig symbolizes prosperity and prosperity.
Features of making a pig flowerpot
Almost the same scenario is used to make a figurine of a pig, in which you can plant garden flowers. The following steps will be distinctive:
- One of the side parts is cut out in a five-liter container.
The hole can be in the form of an oval, circle or rectangle. The cut hole is needed to fill the soil and sow the seeds. - On the opposite side, which will be the lower part of the body, it is necessary to make several drainage holes to drain excess moisture.
- After assembling and painting the craft, a drainage layer (expanded clay, broken brick, clay shards, etc.) and fertile soil are poured inside and the flower you like is planted.
To prevent the piglet with flowers from turning over, you can first make a hole at the bottom and secure the craft with a wooden peg.
Space for creativity
You can easily buy a piggy bank, but they are not cheap. Instead of buying, you can make your own piggy bank at home.
Its cost will be very small, because for production you can use materials that are in every home. At the same time, you do not need to have any special skills and you can use your imagination and creativity without restrictions.
You can use plastic bottles, shoe boxes, glass jars, cardboard packaging from various products, soap dishes, etc. as a basis for a homemade money storage. And for decoration, anything is suitable.
There are no rules or standards - there is only imagination and the desire to create. This hobby can even become a source of additional income. Indeed, lately, handmade, handmade goods have become increasingly popular.
The instructions on how to make a piggy bank with your own hands are quite simple. Regardless of what material will be used as the base, there are several steps involved:
- Select material, base;
- Make a hole for coins or paper bills;
- Decorate.
Help from parents with assignments
Great help will be provided by parents who will find enough time and mental strength not to hastily do a task instead of a child, but to help him express himself independently.
It is important that the young creature acquires new skills and learns how to handle unusual materials and tools
Support, attention from parents and joint creative work with a child will bring you closer together than any other activity.
At home, the elders will help you pick up some items that no longer have any value, but will serve as part of a unique exhibit. This could be old jewelry, unwanted cans, spools, leftover yarn, scraps and much more. Adults can also remember original recipes from their childhood and teach them to children.
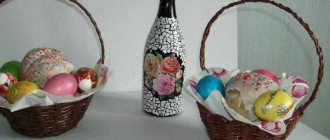
Glass jar
There are glass jars in every home. Even if you don’t make any preparations for the winter yourself, grandparents definitely love to please their children and grandchildren with homemade pickles and jams. Or buy pickled cucumbers or tomatoes in stores.
So a homemade piggy bank from a jar is one of the most common and simplest options. For this you need the following materials:
Note!
- DIY ottoman: TOP-190 photos of the best diagrams and drawings. Do-it-yourself master class with a full description of the stages of work
- Do-it-yourself easel - varieties, drawings with dimensions for creating with your own hands. Step-by-step instructions for beginners
- How to Write a Screenplay: Tips and Best Practices for Writing a Screenplay. Step-by-step master classes for beginners with detailed descriptions of the stages
- The bank itself.
- Lid. You can use nylon, but tin is better. If your goal is not to spend your savings ahead of time, then you can take a lid for home canning.
- Acrylic paints for glass, if you plan to make a drawing.
The manufacturing process itself looks like this: a hole is made in the lid for coins or bills, then the jar is closed with a lid. That's it - the simplest piggy bank is ready. The advantage is that you can see how much money has accumulated. And a large number of coins is very pleasing to the eye.
Even if the actual amount is not very large. It depends on the volume. After all, you can, for example, take a three-liter jar. When it is completely filled, the amount will be quite impressive.
For beauty, it is fashionable to cover the jar with ornaments or various applications. For appliques you will need colored paper and a glue gun. It can also be covered with fabric or wrapped in colored paper.
Product for deep watering of plants
Useful device for deep watering
Not every plant is well adapted to surface watering, so a special device will be needed here. In order not to waste money, you can make it yourself from plastic.
First, you need to take scissors and cut off the neck with a small margin so that it looks like a lid. It is necessary to make a trench on the convenient side of the plant and place stones there; such drainage will not allow water to erode the soil.
Cut off the neck with a small margin
The cut part of the bottle is installed so that the neck is at the bottom, after which it is sprinkled with earth. To water the plant, you need to open the installed lid and add water. If installed the other way around, it is advisable to make holes for water drainage.
To water a plant, you need to pour water into a bottle.
Brilliant ideas for DIY crafts (95+Photos) - 11 brilliantly simple step-by-step master classes: the second life of cotton wool and computer disks
Piglet
To depict a pig, you need to cover the bottle with pink paper and glue on ears made of the same paper. It is fashionable to draw eyes or use small buttons.
The spot will be a traffic jam. You can make legs from the same corks. A woolen thread or a piece of rope painted pink is suitable as a ponytail.
Note!
- DIY medical mask: TOP-140 photos of the best DIY options. Instructions for making a mask at home
- Cold porcelain: features and methods of making it at home. Reviews of the best recipes + 120 photos
- Cake decorating: TOP-170 photos of the best ideas for decorating a cake at home + instructions for beginners with simple patterns
Turtle
You can make a turtle like this - cut off the bottom part of the bottle. Make a slot in the bottom for money. From thick cardboard, you can use corrugated cardboard, cut out a turtle figurine with a head, legs and tail. Draw eyes, mouth, and paws on this basis.
Then glue the cut-off bottom part of a plastic bottle to this figure using a glue gun. If the bottle is green, then this may be enough - Tortilla, the keeper of money, is ready.
If the color of the base is white, then you can glue squares or diamonds made of colored paper onto it.
Bottle curtain
Plastic bottles, or rather their bottoms, make an excellent thread curtain. In order to make such a curtain you will need many bottles in one volume.
The most optimal would be the bottoms of 1 liter bottles. And in order for everything to work out well, you will also need a holding beam, threads, if desired, you can prepare paints of the desired colors and a stationery knife.
Carefully cut out the bottoms of the bottles in the form of flowers without sides. We hang the resulting flowers on strings by the upper petal by tying knots.
DIY flowers from plastic bottles are also made from this part of the bottom.
After the threads are ready, they should be secured to the bar and hung in the right place. If you want to add variety to the curtain, you can paint the flowers.
Also a good option would be to add beads or plastic butterflies. This option refers to easy DIY crafts made from plastic bottles.
Rocket
To make a rocket, you need to make a cone out of red paper and glue it to the top of the bottle, after closing the lid. The “body” of the rocket can be wrapped in white paper.
Cut out six or eight triangles from red paper and glue them in pairs, with the colored part facing out, using paper glue. This is how you get stabilizers. Now, using a glue gun, you need to attach them to the base of the rocket.
Note!
- How to make a house out of cardboard: 140 best photos of children's crafts with your own hands + step-by-step manufacturing instructions with simple diagrams
- DIY rose lamp - step-by-step instructions for creating a lamp with your own hands + original design ideas with photo reviews
- Furniture decoupage: TOP-140 photos of non-standard decoupage options. Step-by-step instructions for decorating furniture with your own hands
Dog
You will need: 2 liter plastic bottle, glue gun, 4 empty spools of thread, masking tape, stationery knife, scissors, newspapers, PVA glue, water, paints, brush, craft paper, black marker, sanding block or sandpaper, varnish decoupage
Master Class
- Draw a pug's face on the bottom of the bottle with a marker.
- Glue 4 spools as legs using a hot glue gun, then secure with tape.
- Cut out the ears from kraft paper, then glue them on with hot glue.
- Remove the cap.
- Twist a newspaper tail and secure it to the neck of the bottle as shown in the image.
- Tear the newspapers into pieces, dilute white glue with water in a 1:1 ratio and cover the workpiece using the papier mache technique. If you are not familiar with this technique, click here.
- After complete drying, sand the workpiece.
- Cut a hole for coins.
- If desired, make another coin hole in the pug's belly area, then cover it with a spool.
- Cut out parts of the muzzle from paper, then glue to the bottom of the bottle.
- Color the pug to your liking and leave to dry.
- Cover the craft with decoupage varnish and wait until it dries.
Cardboard box
If you want to save a lot of change, or save paper money, then a shoebox piggy bank is best suited for this. You just need to make a cutout for the money and decorate it.
If you set a goal not to open the bottle until a certain time, then the lid can be glued. If you simply tie a ribbon around the box or make a lock, it can be used more than once.
Tree
Making a piggy bank from wood is not so easy. This requires a special tool and the ability to handle it. For such a craft, you can take a piece of a thick branch with one or several small branches.
A disk about 1 centimeter thick is sawn off from the thick part. In the remaining part, the middle is drilled with a special tool, but not all the way through.
A hole is made at the opposite end for coins. A plug is screwed to the cut disk using a screw so that it fits tightly into the hole in the main part.
You can glue colored paper leaves onto the branches. Then coat all parts with acrylic varnish. The “Money Tree” is ready.
How to make a piggy bank from plaster?
The simplest option for making a piggy bank from plaster is the round shape of the product. For example, in the form of a dog, a pig or just a big smiley face.
To work you will need alabaster, water, an inflatable balloon, paints, brushes and strong but careful hands to make a slot:
- Gypsum is diluted in a plastic bottle, a ball is put on it and the mass is poured inside.
- The ball is picked up and gently rotated: as soon as the plaster has set, the ball is placed in water and continued to be rolled to distribute the mass.
- After the homemade piggy bank has completely hardened, the ball is carefully cut with a knife.
- The piggy bank is painted with acrylic paints and decorated.
- Using a screwdriver, cut a hole.
According to this scheme, you can make a New Year's piggy bank in the shape of a ball and give it to your loved ones and children.
Important! When working with plaster, use gloves and place a protective oilcloth over your work area. This craft will be a good gift for friends, and can also be considered for industrial production.
This craft will be a good gift for friends, and can also be considered for industrial production.
Paper
It is better to make a paper piggy bank with your own hands using the papier-mâché method. For this you will need newsprint, paper napkins, a balloon, PVA glue, paints, egg cells, cardboard, paints.
The ball is inflated and coated with glue. While the glue is not dry, glue the newspaper scraps. In order for the craft to be strong enough, you need to glue 4-5 layers of newspapers. The final layer is paper napkins. Then you need to wait for the glue to dry well.
When the glue has dried, make a hole through which we pull out the ball. We make ears and a muzzle from cardboard. The egg cells will serve as legs. We paint the piggy bank twice with pink paint. Draw eyes and nostrils with black paint. The tail can be made from colored paper or a small piece of rope.
At an older age
Over time, your beloved child will grow up and he will no longer be interested in primitive paintings made from simple components. An application for children 4–5 years old should be made from more modern components.
This does not mean that art costs will increase significantly. Everything for manipulation can be found at home; the use of improvised things is encouraged. The technique of torn painting will help to complicate the work and significantly increase the attractiveness of the finished composition.
From small colorful pieces you can create unique and incomparable landscapes.
It is impossible to look at all the manipulations in a paper craft with the hands of a child without emotion. The soul and heart of the young master were literally absorbed into every part.
Images are selected based on gender. Boys will happily start making a car or a tank, and girls, in turn, will give preference to flowers or cute animals.
The background on which the future masterpiece will be located plays a big role; it will be a moonlit night, a sea breeze or a blue sky with clouds.
Cardboard
The simplest version of a cardboard piggy bank is a cube. A pattern is made from a single piece. To prevent the cardboard from breaking, it is better to run a nail or the blunt side of a knife along the folds.
A hole is cut in one of the planes. Then the cube is glued together with paper glue. The lid can be glued on. Or pierce holes in it and in the wall with a nail and make a “lock” from woolen thread or beautiful braid.
The cube can be painted or decorated in any other way that your imagination dictates. If you use corrugated cardboard, the piggy bank will be more durable.
Greenhouses made from bottles
The most enterprising people can build anything and use available means for this. Plastic containers, for example, can serve as building materials for gazebos or greenhouses.
A finished medium-sized greenhouse costs about 15 thousand rubles or more (depending on the region). Add to this the cost of assembly work (after all, not everyone can figure out where and what to screw in), and you will get a colossal amount. However, there is an alternative option. Such a greenhouse will not be inferior to a purchased one in terms of performance, but will cost you approximately 500-700 empty bottles.
Bottle plastic is about 20 times stronger than polyethylene. It holds temperature well, does not deform even under the scorching sun and lasts for decades. Such a greenhouse will have a number of advantages:
- original and cute appearance;
- Quite light weight (it won’t be difficult to rearrange if necessary);
- very easy to repair, you just need to replace damaged bottles with new ones;
- durability combined with low cost of construction.
If the process is described briefly, it will be similar to making a palm tree trunk. Dozens of palm tree trunks. We cut off the bottom of each bottle and attach them to each other. To fasten the parts together, you can use an awl and carbon thread.
As you can see, there are no limits to the choice of what you can make from empty containers with your own hands. It could be simple decorations, or maybe you want to try making garden furniture? Create and experiment, everything is in your hands!
Knitted piggy banks
Piggy banks decorated with knitting look very unusual. For them, it’s easy to take a plastic jar and simply tie it around it like a stocking. Tie the ears, paws and attach them to the “body”.
To make the legs stable, they can be strengthened from the inside with cardboard or egg cells. Small buttons on a loop will serve as eyes. Here is a photo of such a homemade piggy bank.
Making a craft in the shape of a pig
Despite the presence of many original versions, this particular option is very popular. A master class on creating a piggy bank will be equally relevant for girls and boys . There is no need to take a large bottle - a container of 1-1.5 liters will be enough.
Important: you will have to degrease this container, and therefore you need to stock up on alcohol or acetone.
Also useful:
- pink paint (aerosol spray is best);
- marker with black pen;
- thick paper;
- scissors;
- universal superglue;
- knife for office work;
- scotch;
- a small amount of cotton wool.
First of all, you need to remove the ring from the bottleneck. It is no longer needed there and will only take up space in vain. Next, with cotton wool soaked in a special liquid, the bottle is degreased from the inside, outside and its lid. Attention: when using acetone, precautions must be taken.
Then you need to cover the neck, where the lid is usually screwed on, with tape.
Once this is done, it's time to paint the bottle and its lid. Considering the pungent odor and toxic effect characteristic of most construction paints, it is better to do this outdoors. As a last resort, choose a place in the room with a high-quality, powerful hood. Specific actions with paint must comply with its instructions. Usually several layers are applied at intervals of 10-15 minutes (unless the manufacturer has made other requirements); complete drying of the paint sometimes takes several hours.
But this does not mean that you have to sit and be bored. While the paint on the bottle is drying, it’s time to work on the pink paper (or cardboard, depending on what you’ve prepared). A rectangle of 150x50 mm is cut from them. Then fold this blank in half diagonally and cut out triangular-shaped ears. Note: it is advisable to make sure that these ears are identical in appearance.
The pig's ear should have an inner contour. The easiest way to create it is with a marker. The line must be drawn with an indentation of approximately 5 mm from the edge. The rest of the cardboard or paper is used to cut out 4 rectangles of 80x40 mm.
Tin
This piggy bank is very suitable for saving for something specific. Because you have to open it with a can opener to get the money. To make it, you will need a canning lid, a tin can that fits the lid, and a machine for sealing the lids.
A hole is made in the lid. It is better to process the edges of the hole with a file or sandpaper to avoid injury. Then we put the lid on the jar and roll it up with a machine, as is done when canning. Now the jar can be painted and wrapped in colored paper.
Family Affair
Making homemade piggy banks can be used as a way to keep young children occupied. This activity is useful both for communicating with children and developing their creative skills and the ability to work with different materials.
The whole process can be organized as a game. Then the kids will be happy to do this exciting activity. Paper is a fairly soft material. Therefore, a child can make paper piggy banks himself, with his own hands, without the risk of injury.
Even young children can make a piggy bank from cardboard with their own hands. A child can give it as a gift to a friend. During the manufacturing process, you can explain to the child what the piggy bank is for. This way you can instill a careful attitude towards money and teach how to save.
You can even organize an entire design bureau! First, the child makes a project in the form of a picture of a piggy bank. Then he makes it and decorates it himself. Such a game will develop in children the ability to achieve results. As an incentive, adults can put a “down payment” into the piggy bank.
Vase for decorations
Women's jewelry is often available in such quantities that there is simply no place for it in the house. A good option in this case would be to make a vase with several levels.
You can put this craft on your dressing table and your favorite jewelry will always be at hand. And due to several levels, you can conveniently distribute different parts of jewelry among them.
In addition, you will need a stationery knife, a glue gun, and fasteners for the slide vase. Such fasteners can be found separately from the vase in many stores.
To begin with, it is worth marking the part on the bottles that will be cut off about 3 centimeters from the bottom. Next, we drill the bottoms in the center and connect the compartments to each other.
Glue the lower part, which will serve as a stand, to the third with the gun bottom up. This way you will get a stable, beautiful mini slide for decorations.
All parts of the slide can be painted in any preferred color. This is a beautiful DIY craft made from plastic bottles.