What is decoupage?
This is an amazing technique that allows you to give ordinary objects an unusual look using an ordinary picture or a special napkin.
This is an inexpensive way to make the interior of your own apartment or house especially cozy and memorable.
This is a great way to give your favorite but shabby items a new life.
This is a great way to spend time with your family.
The decoupage technique for beginners is not as complicated as it might seem when looking at the lovely creations, most of all reminiscent of luxurious items of palace utensils or pretty handicrafts of artisans of the 18th-19th centuries, inherited from great-great-grandmothers and retaining their enchanting beauty.
Well, speaking without emotion, the artistic technique of decoupage is a method of decoration using a picture glued to the surface and coated with varnish on top for durability.
The name of the craft comes from the French verb “to cut,” as the image was simply cut or torn out of a postcard, newspaper, or other printed items.
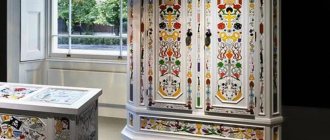
Decoupage of furniture in Provence style: master class on updating a chest of drawers
Having tried your hand at simple things, you can safely start decoupaging furniture with your own hands using napkins. In addition to the usual list of working materials, you will need wood putty. It is used to pre-level all the cracks, cracks and other irregularities on the surface of the chest of drawers, cleaned of old paint.
Sequence of decoupage of kitchen furniture with your own hands, photo and description:
| Image | Operation description |
| Preparation | The furniture must be thoroughly cleaned of all layers of old paint, and defects must be smoothed out with putty. After drying and sanding, all surfaces are coated with a primer and sanded with fine sandpaper. |
| Preparing pictures | The design on the napkins is carefully cut out or torn off by hand, and the bottom layer is removed. The picture is coated with glue and applied to the furniture. The application is carefully straightened with a brush. |
| Finish coating | No need to hurry. All drawings must dry. You need to varnish all the furniture, not just the place of decoration. For large areas it is convenient to do this with a spray bottle or spray can. This way the varnish will lay down in a thin layer. For the best effect, you need to apply 3-4 layers in succession, waiting for complete drying between treatments. |
| Result. |
Helpful advice! If you need to apply a design to a polished surface, the polishing is pre-treated with sandpaper until the shine disappears.
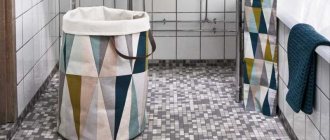
When decorating furniture with fabric, the process is practically no different from that described.
Furniture decorated using patchwork technique will look organic in the interior of a country house
A little history
This type of creativity first appeared in the Middle Ages, when practical German artisans began to decorate the furniture they produced in this way.
But the design style reached its first heyday in the 18th century, when Italian and French masters imitated expensive inlays made of wood or leather in this way.
Note!
- DIY gifts for February 23rd - a large selection of ideas for creating unusual gifts for Defender of the Fatherland Day
- What to give a 2-year-old boy - a list of the best options for an interesting and useful gift (120 photo ideas)
- Papier-mâché - TOP 120 photo reviews of original products. Detailed instructions for beginners on creating beautiful crafts
A little later, the technique became popular among poorer segments of the population. At the end of the 19th and beginning of the 20th centuries, the decoupage technique conquered all of Europe and moved to America, where it acquired the form of a craze.
The development of new technologies, an increase in production and consumption pushed handicrafts into the background, and for a long time it was in some oblivion. But now it is coming back into fashion.
Renewing wooden surfaces
Wood is a great material for decoupage. Even old surfaces look amazing after proper treatment. What can this technique be used on? Decorative boards and saw cuts, photo frames and tabletops, cabinet doors and shelves, trays and boxes are quite suitable.
Note!
Master class on decoupage: step-by-step do-it-yourself decoupage schemes. Master classes on creating products for beginners (130 photos)Bouquet of candies: TOP-170 instructions for creating a bouquet of candies + DIY design ideas
- Bouquet of Raffaello: the best instructions for creating a bouquet of Raffaello with your own hands + simple diagrams with photo reviews
Materials
The decoupage technique for beginners does not require large financial investments. At first, the craftswoman will need decoupage cards; they are denser than ordinary napkins and are guaranteed to stick without holes, tears or folds. Yes, it’s more convenient and easier to work with them.
In the future, when the technique of decoupage with your own hands is mastered almost perfectly, you can even use paper napkins from the store or newspaper sheets (such crafts look especially good in retro or simple city style).
An acrylic primer will help ensure better adhesion between the base and the design, and it will also eliminate minor surface defects.
Glue. To begin with, you can use the most ordinary PVA, but over time, such a craft can turn yellow from the inside and even crack, so in the future it is better to buy acrylic glue or adhesive varnish, which can be applied to the base and used as a final coating.
The varnish will help fix the picture and give the homemade product durability. It is best to use water-based acrylic varnish. It does not have a strong odor, washes well and dries quickly.
Note!
- Kinusaiga technique - TOP-140 photos of the best ways to create crafts using the Kinusaiga technique with your own hands + instructions for beginners
Do-it-yourself passe-partout - a master class with step-by-step do-it-yourself schemes. Making tips + photos of the best examples
- Decoupage with napkins: TOP-150 photos of ways to decorate with napkins. Simple instructions for beginners at home
Acrylic paints are useful if you want to make a colored base or beautifully inscribe the selected image on the surface. To begin with, you can buy two or three colors, one of which will be the base color, and the rest will become an accent to underline the design.
Napkins
To create stylish antique items, you can use special napkins, but a good option for saving the family budget would be to use ordinary multi-layer paper napkins. For decoration, you only need their upper part with a beautiful image.
Note!
- Ideas for LD (a girl’s personal diary): step-by-step instructions for making it yourself, photo reviews of the best options
Educational soft books made of felt: materials for making, detailed instructions + reviews of plots for books (100 photos)
- Original do-it-yourself valentines - design options, necessary materials, master class for DIY work
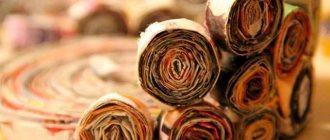
Often instead of napkins, newspaper and magazine clippings, postcards and other suitable images are used.
However, for the very first works it is better to buy napkins for decoupage. They have a special density that helps to glue the image evenly or, if necessary, quickly remove it. The paper of such napkins does not tear or deform when applied.
Tools
The technique of decoupage from napkins will require preparing a small set of tools for comfortable work. It will include synthetic brushes for painting and underpainting, as well as for varnishing the finished product (it is better to purchase one wide flat and one thin brush, and later buy what you need), a spatula for sealing cracks (if any), sandpaper for leveling and cleaning surfaces, small pieces of foam sponge for applying primer or background.
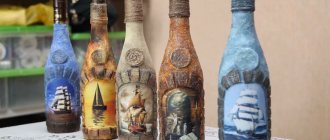
Bottle decorated with eggshell
Necessary materials:
- bottle;
- eggshell;
- acrylic paints, brush;
- PVA glue;
- napkin with the selected composition;
- varnish;
- scissors;
- sponge.
Using PVA glue, glue pieces of eggshell onto the bottle. Press with your fingers and let dry well.
Cut out the necessary fragments from the napkin. Prime the bottle with white acrylic paint, carefully so as not to damage the eggshell. Glue the fragments from the napkin and open them with varnish. Decorate as desired.
The basis
Wooden cutting boards or straight plywood boxes and drawers will be useful as a basis for the first experiment.
Although you can use plastic, iron, porcelain or glass surfaces of any shape and size.
But in this case, it is necessary to take into account that all these smooth materials give poor adhesion to other materials, and the rounded or convex shapes of the object for decoration are difficult even for experienced needlewomen.
So it’s better to start decorating Easter eggs using the decoupage technique after gaining experience in creating crafts in this area.
Pictures of the decoupage technique will help you decide on your first creations and select everything you need for creativity.
Types of decoupage
Different decoupage techniques will help you elegantly design different types of surfaces.
Easter themes and motifs
On the eve of Easter, you always want to add an atmosphere of spring, brightness and emotion to a variety of fakes. Easter pictures for decoupage are quite varied. You can choose themes with bunnies, eggs, or focus on church and religious themes.
Speaking of the latter, seals and prints of various icons, images taken, thematic inscriptions “Christ is Risen”, “Holy Trinity”, “Easter Holiday” and so on are perfect. As an original idea and a replacement for the usual painted eggs and Easter eggs with amulets, you can make decoupage boiled eggs. Despite the fact that the idea is very time-consuming, externally it is definitely worth the effort.
Reverse decoupage
The reverse technique allows you to place an image on transparent objects. In this case, the design is applied to the inside facing outwards.
The principle of creating such decor is the same as that of direct decoupage, but it will require much more attention and concentration. But a decorated table or vase will definitely impress your household or guests.
Classical
The easiest type of decoupage to perform. The decorative element is glued to the prepared object, leveled and varnished. An additional tone or desired visual effect is applied using varnish and paints.
Sometimes craftsmen apply more than 50 layers of varnish to give the paintings volume and a finished look. Multi-layering allows you to create the look of earthenware and enamel crafts.
Decopatch
This technique differs from the first two types of creativity with paper and glue. In this style, the entire surface is covered with a pattern (or patterns), leaving no free space at all.
Very often the main image is complemented by patterns or ornaments that resemble patches. Therefore, sometimes such decoupage is compared to patchwork.
But it will be very difficult to rip up the area you don’t like and redo it. So the principle “measure seven times, cut once” will have to be followed 100 percent
Artistic decoupage
This technique is often called smoky decoupage. To create it, artistic drawing skills will be useful, since in it you will have to blur the edges of the pictures with the help of paints, gently combining it with the base.
If you are not sure that this technique will work out the first time, you can first practice on a sheet of paper, simply attaching a picture and finishing it with paints.
Basic Rules
A master class on decoupage technique will show the entire sequence of actions. It is not as complicated as it seems at first: the surface is primed, covered with paint, glue and an image are applied to it, and all this is varnished.
But before that, it’s better to learn the basic rules that will help you make a good craft the first time.
It is necessary to paint the entire surface that will be visible. For example, for a flower pot you will have to take care of painting the bottom and inside all the way to the ground, and maybe a little deeper. And if you plan to give the pot without flowers or greenery, then you will have to cover all surfaces with paint.
If imperfections are visible in the paint, you will have to repaint the entire surface, achieving the ideal tone.
Light background colors will help make the image more realistic and expressive. In addition to white, all pastel shades will look great.
Before applying each subsequent layer, the craft must be dry. Rushing through the creative process is a great way to ruin everything.
Small pictures are easier to apply. Therefore, for the first work it is better to use them. Before gluing, you should once again make sure that the picture is suitable for the selected area in size, color or subject. To do this, it is simply leaned against the base.
The glue is applied from the center to the corners, thoroughly covering the entire surface. The pattern is carefully smoothed out, straightening out all the folds.
Applying an image
There are several ways to fix a drawing on a base. But the simplest thing will be simply gluing a picture.
Decoupage for beginners step by step with photos will help you visually evaluate this method of decoration.
The whole process looks like this:
- A picture is applied to the prepared surface.
- The entire piece is carefully coated with glue, starting from the center of the image and gradually moving towards the edges of the picture (if the layer of paper does not allow the glue to penetrate to the base, then the picture is glued like a regular applique, carefully leveling out the folds and fixing all the ends).
- Leave the almost finished product to dry completely.
- Several layers of varnish are applied on top. Sometimes up to a hundred layers are used to achieve the result, but for simple homework you can limit yourself to 4-6 layers. Each of them must be dried.
Some advice from experienced craftsmen
Thick paint is harder to apply than liquid paint, so don’t be afraid to thin it. A couple of thin layers will be preferable to one thick application.
Slow drying in natural conditions will help the product retain its attractiveness longer.
You can't apply too much varnish.
Sandpaper will help correct most imperfections.
Following these simple rules and tips will help you achieve even quite complex decor, such as the technique of decoupage of bottles, glass jars or eggs.
A photo of the decoupage technique will help you see what has already been done by craftswomen and choose a suitable craft for beginning needlewomen.