Basic tips for beginners
Before starting, it would be a good idea to remember the following nuances:
- the walls of a homemade basket must “breathe”, that is, ventilation is needed for laundry;
- the container must withstand the weight of the things placed and certain loads;
- eliminate protruding objects on the surfaces of the basket, to which laundry items may cling;
- It is better to immediately provide a closing lid to prevent additional contamination of the laundry;
- if space allows, it is better to make a container with two compartments (for pre-sorting things).
Now it’s time to decide on the size and shape itself: after all, too bulky containers will unnecessarily clutter up the space, and small sizes may simply be impractical to use. You can choose a corner shape or build a folding basket, or choose a hanging option.
If you liked the article, please share it
Previously on the topic:
Share
Materials used for baskets
You can make baskets from many materials:
- Made from wooden components that are selected for their environmental performance and durability. There may be rods (willow, for example), slats and boards, provided they are well treated with agents that prevent them from “swelling” from moisture. More often chosen by lovers of the Provence style.
- Textile materials, which have a huge selection of colors, fit into absolutely any interior. Here, to achieve rigidity, thick paper and cardboard are additionally used.
- The use of grapevines, bamboo (even newspaper tubes) in a variety of weaving options makes it possible to obtain strong, unique structures that are in no way inferior to store-bought containers.
- Made of plastic, it is distinguished by its durability and resistance in a humid environment, and is easy to clean and wash.
Even jute ropes can act as a full-fledged material for creating full-fledged laundry baskets.
Preliminary preparation
Before you make a laundry basket with your own hands, you need to stock up on the selected material and auxiliary products and tools, which you cannot do without during the work process.
For gluing you need high-quality glue and the glue gun itself, in other cases frames, ropes, twines, cords, etc. To work with wood you will need screws, sandpaper, a jigsaw; to work with other materials, scissors, an awl, wire cutters, etc.
Product options
There are many reasons to make your own laundry basket. Firstly, you can choose the style of the product. Secondly, there are no size restrictions. Thanks to this, you can profitably use the free space. Thirdly, such a functional element will be much cheaper than those offered in a hardware or furniture store.
You can place the finished basket for dirty laundry in the dressing room, bedroom, bathroom, hallway or closet. In any case, now the untidy mountain of clothing will be camouflaged, and small items of clothing do not need to be searched throughout the house to wash.
There can be many options for manufacturing:
- standard laundry container in the form of a round or square basket;
- corner drawer, which allows you to make maximum use of space in the house thanks to its shape;
- the wall version is suspended on special mounts, you can even create a multi-level system;
- The collapsible basket is functional and can be hidden away in a closet or pantry when not needed.
Basket
Corner drawer
Wall mounted option Folding basket
Basket made of rope and plastic frame
To begin with, you purchase the form itself (finished frame), twine, glue and a gun. Additionally, you will need to prepare thick fabric to finish the bottom.
Before starting work, the frame is turned upside down and the rope begins to be wound, not forgetting to apply glue to the rope every centimeter and a half. After decorating the side walls, the end is brought to the bottom of the product, secured and covered on top with a fabric overlay.
Sew a bag
To cut the bag correctly, you need to take the dimensions of the frame. Next, cut out five pieces from the fabric: the bottom and four sides. Connect all the parts and stitch from the wrong side. Then turn it inside out and iron it. If desired, you can sew the lining in the same way. All that remains is to sew four strong loops to the corners of the bag. To do this, duplicate the pieces of fabric and sew three layers of material. For greater strength, it is advisable to lay several lines along and across the workpieces. A laundry basket for the bathroom, sewn with your own hands using this method, is very convenient to use. When empty, you can fold it and put it against the wall or put it in a closet.
«>
Fabric basket on frame
A ready-made frame (metal mesh) is first purchased, which comes in rolls. To make a mold with a diameter of half a meter, you will need to take a meter of mesh, which itself will take on a cylindrical shape.
Note!
DIY feeder - step-by-step instructions for creating a feeder + detailed diagrams with photo reviews- Do-it-yourself rugs - TOP 120 simple patterns with master classes on how to make them yourself + photo reviews of finished rugs
- Do-it-yourself dolls: a master class on making a beautiful doll. Simple instructions with photo examples of ready-made options
You just need to secure the edges with wire along the entire length (work strictly with gloves) and then sew the laundry basket.
Sheathe the resulting frame with the selected fabric (preferably dense), folded in half along the entire width. All that remains is to sew it on the sides, achieving a cylinder shape that stretches over the frame.
Fabric use
Many bathrooms have a curtain, so the idea of creating a basket from the same material will harmonize the interior design. To implement this option, you will need to construct a wooden frame from four slats 60 cm long and two tubes, two of which are 40 cm and two are 36 cm. They can be wooden, metal or plastic. For fastening, bolts (10 pcs) and a pair of nuts are purchased.
Note!
DIY furniture made from pallets (140 photos) - step-by-step master class with diagrams and drawings, design ideas
DIY coffee table - manufacturing guide with a full description of the steps, choice of materials (120 photo ideas)
Do-it-yourself illuminated mirror - step-by-step master class on how to make it yourself, photos of types of lighting
The fabric is cut into five identical squares and stitched. It turns out something like a bag. Fastenings with fasteners are sewn on the edges on opposite sides. They are removable. The basket is placed on the base.
The frame is foldable - it is very convenient. A little laundry has accumulated, then it folds and frees up the necessary space. The material can be easily removed, washed and put on again.
Do-it-yourself wooden baskets
Prepare slats of wooden materials 2x1 cm, a piece of plywood and self-tapping screws (3.2 and 5.5 cm). You will also need a jigsaw and a piece of sandpaper. In accordance with the dimensions of the basket, plywood is marked (10 mm), parts are cut out, and sanded. Then the wooden pieces are glued together and secured with self-tapping screws. Wooden slats will act as decoration (preferably at an angle of 45 degrees), which are glued to the finished walls. It is better to secure the plywood lid with a hinge. The finished box is varnished.
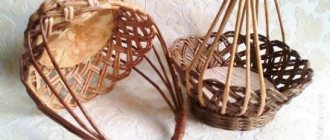
Wicker weave
In this case, you will need to stock up on scissors, wire cutters, an awl, and also pliers. At the first stage, the very bottom of the basket is prepared, for which 8 rods will be needed, with small slits made in four. Then take the remaining 4 twigs and secure them in the shape of a cross.
Next, take two thin rods that are woven around the prepared base. To obtain the side walls, “stands” (made of wicker) are attached to the woven bottom, which are braided with thin twigs to the desired height. To secure the row, you will need to bend the material down using pliers. The result is a wicker laundry basket.
Note!
DIY satin ribbon bows - step-by-step instructions for creating unusual bows + detailed diagrams with photosDo-it-yourself furniture restoration: step-by-step master classes on restoration at home (120 photo ideas)
Do-it-yourself rack: step-by-step instructions with photos and descriptions on how to make an unusual rack
Peculiarities
Of course, plastic products are more affordable, but wicker baskets are the undisputed leaders in popularity in terms of aesthetics and attractiveness. Using natural wicker, it is easy to realize very original options for laundry containers that fit perfectly into almost any interior design style.
The main advantages of a wicker basket or box are presented:
- environmental purity of the material;
- ensuring complete air circulation;
- low weight of the product;
- mobility;
- ease of use;
- stability and capacity;
- external attractiveness;
- low maintenance requirements;
- durability.
A properly chosen wicker laundry basket is quite spacious, but it is advisable to give preference to models equipped with a lid and practical handles.
A clear advantage will be the division of the internal space of the basket into several sections, allowing you to conveniently sort colored and white laundry.
If the rules of use and care are followed, a wicker product can last for many years without losing its original presentability and attractive appearance.
Newspaper tubes as material for baskets
In addition to the newsprint itself, you will need to prepare a water stain, a knitting needle (diameter 2.5 mm), acrylic varnish, stock up on clothespins and scissors. Stages of work:
- Sheets of A4 size paper are divided into three identical strips.
- A knitting needle is applied to them (at an angle of thirty degrees) and tubes up to 30 cm long are rolled from them.
- The tubes are placed in a stain and then dried for 12 hours.
- The bottom is cut out of cardboard (two pieces), the tubes are evenly distributed around the perimeter, glued together and secured on top with a second sheet of cardboard and clothespins.
- Next, the wicker weaving method is used.
- The basket is then varnished.
Crochet baskets
Sometimes housewives wonder how to tie a laundry basket. First, 30 air loops are formed using a large hook and appropriate yarn; a rope of a suitable shade is applied near the resulting row.
Next, stitches are knitted through the rope (single crochet), adding three stitches at turns, to the required diameter. All that remains is to knit the sides and handles using the same method.
Step-by-step master classes on knitting
Jute baskets (you can crochet not only jute baskets, but also small decorative elements, such as flowers) can be of different sizes and shapes. The functionality of the product depends on the size. Large baskets can be used to store laundry, toys or knitting supplies. Small baskets are suitable for room decor, as well as for storing small items.
Christmas tree basket
This is a large basket made from tied rope. The diameter of the bottom is 60 cm. This product is created so that you can hide the stand holding the spruce. When the holidays are over, the basket can be used in everyday life to store things and organize things.
Basket bottom
How to knit the bottom of a basket:
- Using a thin jute thread, cast on a chain of 4 air loops. Close it in a ring.
- Knit 11 single crochets through the ring. Straighten the workpiece.
- Inspect the end of the rope. If there are protruding threads, they need to be cut off.
- Attach the rope to the workpiece and begin tying it. You need to knit very tightly. Knit 2 single crochets into each loop.
- Next, the rope needs to be twisted in a spiral and tied around it. For convenience, experienced craftsmen advise beginners to use plastic markers. First, the marker must be placed on the 1st loop, and then moved along the rows, every 11 loops. In places where the marker should hang, you need to knit connecting loops.
- The new row must be knitted alternating 1 single crochet and 2 double crochets.
- In the 3rd row, knit in reverse, alternating 1 double stitch and 2 regular stitches.
- It is important to ensure that the rope fits snugly. To do this, the jute needs to be tightened. You can maintain the desired tension by securing the end of the rope with a hairpin or a large pin.
- 4th row: alternating 3 regular stitches and 1 double stitch, until the end of the row.
Crochet jute baskets
Next you need to knit by analogy, making increases until the bottom diameter is 60 cm.
Basket walls
At this stage you need to lift the knitted fabric up. In this case, the bottom should remain flat, and the walls should become voluminous. When baskets are knitted without rope, they stop making increases to create a rise. The canvas begins to wrap itself in the right direction. With a rope, lifting the canvas is carried out differently.
Thick jute is cut and re-fastened, positioned above the edge of the bottom. The first row is knitted by inserting the hook through the front loop of the previous row. This way the rope will not roll down and will be securely fastened.
Decor and binding of edges
The edges of the basket are tied with thin jute, making connecting loops. They need to be knitted in 2 rows.
To decorate the basket, at the beginning, a jute rope can be tied not with jute thread, but with white or colored yarn. However, if you knit only from jute, you get a product with a beautiful woody color that fits perfectly into any interior.
You can decorate the basket under the Christmas tree by tying it with a satin ribbon around the edges. You can sew thin tinsel along the binding line. Using hot glue, you can glue a composition made up of fir cones and small Christmas balls to the stack of the basket.
Tapered jute and rope basket
Baskets made of jute (with hook No. 3 you can tie a rope with woolen thread with the addition of lurex, then the basket will look more festive) with a narrowed neck are suitable for decorating a New Year's tree, and are also used as a stand for artificial or dried bouquets.
Such baskets are created by tying a rope with single crochets, as in the previous master class.
How to knit:
- Cast on a chain of 4 chain stitches. Close it in a ring.
- Knit 11 single crochets through the ring.
- Knit rows with increases, tying the rope tightly. Until the diameter of the circle is 35 cm. If the basket is tied to hide the Christmas tree stand, then before work you need to measure the legs of the stand so that they fit inside. The stand should be installed in the basket before the knitting stage of the narrowed part of the product begins.
- Next, you need to cut the rope and lay it over the edge of the bottom. Work 1 row, passing the hook under the front loops of the previous row.
- Knit 10 rows, tying the rope with single crochets.
- In the new row, knit 11 single crochets, make 1 decrease.
- Knit 9 single crochets, make 1 decrease.
- Next, knit by analogy until there are 4 stitches left in the row.
- Knit 12 rows without increases or decreases.
- Tie the edges of the basket with jute thread and connecting loops.
For decoration, you can use lace ribbons or brown leather straps.
Jute laundry basket with lid
You can crochet a jute basket with a lid. This product is useful for storing dirty laundry, as well as for things that are “awaiting” ironing.
How to knit:
- Using a jute thread, cast on 4 air loops. Close it in a ring.
- Connect the rope and begin tying it with single crochets, making increments until the diameter of the circle is 50 cm.
- Cut the rope. Secure the tip with glue.
- Lay the rope over the edge of the circle and begin tying it with single crochets in a spiral until the height of the walls reaches 60 cm.
- Tie the edges of the basket with connecting loops.
The lid is knitted by analogy. The diameter of the bottom of the lid should reach 55 cm, and the height of the sides should be 10 cm.
Additionally, you can sew a bag from cotton fabric. It is inserted inside the basket, and the edges are folded so that they fit the top edge of the product. The lining will protect the inside of the basket from dirt and the absorption of unpleasant odors.
Square basket with handles
To make a square basket with handles, you will need a ready-made wooden bottom with perforations. It can be purchased at craft stores. You also need jute threads and a hook number 3.5.
How to knit:
- Fold the thread in half.
- Tie the bottom of the basket with single crochets, passing the thread through the holes.
- The next 4 rows need to be knitted with increases.
- Next, knit the walls of the basket in a circle, using single crochets. In the corners you need to knit 3 stitches coming out of 1 loop.
- When the height of the walls reaches the desired size, the edges of the basket must be tied with connecting loops.
- To start knitting a handle, you should cast on a chain of 8 air loops.
- Next, knit the fabric in single crochets. You should get a strip 15 cm long.
- Tie the workpiece around the edges with connecting loops.
- Knit the second handle by analogy.
- Sew the handles to the edges of the basket using jute thread and a large sewing needle.
- The seams can be covered with wooden buttons.
In this way you can knit small baskets for storing small items. Large items knitted using this principle will not hold their shape.
Easter basket
Baskets made of jute (you can crochet a strong square-shaped product without using a wooden bottom, if you knit the bottom of the basket based on a granny square) for storing Easter eggs should be strong and stable. An oval-shaped product with low sides and a handle, like a wicker basket, will turn out to be roomy and beautiful.
How to knit:
- Cast on a chain of 20 chain stitches.
- Knit 1 row with single crochets.
- Through the last loop, knit 3 single crochets.
- Expand the product. Continue knitting on the other side.
- In the last loop, knit 3 single crochets.
- Next you need to knit in stitches, making increases along the edges of the product. You should knit 22 rows.
- Continue knitting without increasing or decreasing until the height of the walls reaches 7 cm.
- Tie the edges of the basket with connecting loops.
- To knit a handle, you need to measure the length of the basket and add 7 cm to it. This will be the length of the handle.
- Cast on 11 chain stitches.
- Knit the fabric of the required length using single crochets.
- Tie the handle around the edges with connecting loops.
- Sew 1 edge of the handle to the side of the basket using a large sewing needle.
- Throw the handle to the other side. Sew it on.
How to decorate a basket:
- Use a white lace ribbon to cover the edges of the basket. Sew the ribbon with sewing threads.
- Twist rosebuds from strips of burlap measuring 4x15 cm. Sew their lower parts.
- Glue 1 large pearl-colored bead into the center of each flower.
Glue flowers to the center of 1 of the walls of the basket.
New Year's basket
To create a New Year's basket, you can use any master class presented earlier in the article. To make a New Year's basket, you need to decorate it correctly.
Decor options:
- trim the edges of the basket with thin tinsel;
- glue plastic snowflakes to the walls of the basket;
- tie the edges of the basket with a cord of satin ribbons in 2 colors: green and red;
- glue a composition of pine cones and spruce branches to the wall of the basket;
- During the knitting process, weave “rain” into the walls of the basket.
You can fill the basket with paper noodles or a lining of gift paper, then add a small souvenir, a set of cosmetics or sweets.
Learning how to crochet jute baskets is easy. The main thing is to choose high-quality material and knit the product tightly, slightly stretching the threads so that it holds its shape well.
Ways to decorate a basket
All of the listed options, if desired, can also be decorated with suitable improvised means to give them uniqueness and chic. Here they are more often used:
- on fabrics it is more convenient to use buttons, ribbons, bright appliqués, cords, embroideries, etc.;
- painting or painting wood, tubes;
- weaving satin ribbons between twigs;
- gluing rhinestones, beads, shells, sequins, etc.
Any housewife can figure out how to decorate a laundry basket, taking into account the surrounding interior. Things created on your own are always pleasing to the eye, they allow you to create a unique “zest” without extra costs, if only you had the desire and a little patience.
Note!
- Corrugated paper flowers: TOP 100 photos of ready-made options + instructions on how to make them yourself
- DIY family tree: instructions for creating a family tree + DIY design ideas
- Do-it-yourself sun lounger: photos with instructions for creating sun loungers + detailed diagrams of the stages of work