Owners of small apartments often face a lack of space. This problem is especially acute in the kitchen. For example, how to store pot lids? After all, due to their non-standard shape, they take up too much free space. Below are the most successful solutions. The list includes both store-bought devices and those that you can make yourself.
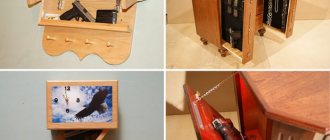
Table stand
An excellent device that helps during cooking. No more searching for a place for a hot lid covered with condensation droplets. All moisture will drain onto the stand, and the heated elements will not damage the tabletop. It is also recommended to place a spatula or ladle here.
What materials are suitable
Kitchen decor uses things that have been kept idle at home for a long time: old baskets, boxes, napkins, scraps of fabric, knitting threads, colored bottles, jars, food. Use whatever you find interesting.
To make crafts for the kitchen, you will need:
- fabric, including scraps;
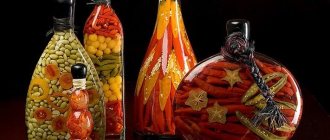
- transparent glass bottles, jars;
- yarn;
- felt;
- paper, cardboard;
- glue;
- beads, beads;
- openwork braid;
- wooden blanks.
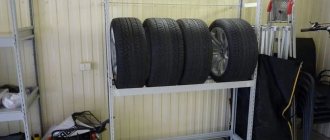
Sliding stand
An interesting, versatile device that can be adjusted in length to suit your storage needs. For this reason, the stand can be used on a countertop, open shelf or wall cabinet. Reliable as it is made of stainless steel.
Suitable not only for storing boards and pot lids, but also frying pans, baking trays and baking dishes.
Tools for storing pot lids
To properly organize a storage system for kitchen accessories, you need to competently carry out measurements, calculations and drawing up a diagram. It happens that one of the largest lids does not fit anywhere, but the rest can be compactly placed in one drawer or part of the cabinet. Here it is advisable to make or buy holders for small and medium-sized items, and put the largest item in some other place. It could be a stove tray, an oven, a corner, a pantry.
To carefully place the lids inside the set and maintain the presentability of the kitchen, you can use the following types of holders:
- Railings. These devices are attached to the hinged doors of both floor-standing and wall-mounted cabinet furniture. Users have at their disposal single and group products of a wide variety of sizes and shapes. You can combine them in any way you like, the main thing is that the dimensions allow, and the dishes do not stand close to the doors. Another advantage of choosing roof rails is that with the help of hooks you can hang various accessories on them - graters, brushes, cutlery.
- Stands. They are a structure with horizontal parallel cells for lids. The direction of the cells can be vertical or inclined. The second option is slightly longer, but allows the use of low shelves and drawers. The stands are made of metal or plastic and are usually equipped with a tray for draining water.
- Separators. Quite a massive retractable design. In its center there are containers for pots, pans and other containers, and along the perimeter there are lids, trays and cutting boards. Installed inside large cabinets or large drawers. The design is convenient and effective, but rather bulky, requiring free space for manipulation.
- Towel holders. Each product is located at a certain distance from the base, and it is quite enough for the passage of the lids. Depending on the width of the holder, you can insert 2-4 items into it.
- Hooks for clothes. The products are made of plastic and iron, with Velcro and thread. It is advisable to choose metal hooks and screw them onto self-tapping screws - it’s more reliable. If you don’t want to make holes in the furniture, you can use acrylic glue.
- Pin field. Cylinders are screwed to the floor of the box, between which kitchen utensils are inserted. This is convenient because they can be placed in any order.
Note! If there is not enough space inside the headset to install the holders, then they can be placed where it will not be visible. For example, on the wall behind the refrigerator or under wall cabinets next to the sink, where the lids will look quite organic.
We recommend:
How long does jellied meat last in the refrigerator?
Wall holder
A budget solution for those who are not embarrassed by open storage of kitchen utensils. This product can be hung on a railing or fixed directly on the wall. An alternative option is to place the holder on the inside door of the cabinet or on its side wall. The height depends on the number of covers, and finding a suitable device is not difficult.
Storage methods
Quite often there are options when housewives approach the issue of placing dishes haphazardly, simply placing them in random order in one or several drawers. This may be the simplest solution, but over time you will regret it. Each time you will need to take out half of the items, there is a risk of dropping and breaking the glass lid or tiles on the floor. Therefore, it is better to choose a certain order in which the dishes will be stored in such a way that it will be convenient to use and will take up little space.
There are the following ways to store kitchen accessories:
- Vertical. The first type is that the lids are placed upside down on the pans, others are placed on top of them in the same way, and so on until there is enough height. In such cases, the dishes are always included, but you have to work hard to get the right one. The second approach is to stack the lids on top of each other. This will require guides, since such a design requires lateral support. And also, it is not very convenient to get the desired product, especially if it is at the very bottom.
- Horizontal. As an analogy or basis, you can consider standard plate dryers. The ideas for such designs can be very diverse, but the essence is the same - each item has its own vertical cell, into which it is lowered from above vertically or at a slight angle. The size of the openings is selected to match the width of the lids, taking into account their bends and the height of the handles. The advantage of such a system is that the usable space is used as productively as possible, every item is in sight, and removal does not cause any inconvenience.
Note! Stands can be shared or individual. As for the location of the holders, it can be not only cabinets and drawers. A life hack regarding door mounting shows how you can effectively use the free space inside the headset.
Compartment in the cabinet drawer
If you are the owner of wide and deep kitchen cabinets, then the question of how to place the lids can be solved without difficulty. A spacious compartment should be provided inside the roll-out box, which will allow you to ergonomically organize its filling. Compartments can be built-in or purchased separately.
Pull-out narrow shelves for lids above the tabletop
When creating a kitchen project, take care of your comfort and provide a special narrow drawer directly under the countertop. Its height can be from 5 to 15 cm: in a horizontal position, up to five covers of different sizes can be placed there. When choosing the height, pay special attention to the shape of the handles on the lids - the more they protrude, the higher the drawer should be.
This is interesting:
Pots for cooking jellied meat - how to choose the right one.
Pots with a capsule bottom - what are they?
How to remove burnt carbon deposits from an enamel pan.
Hanging holder
A clever way to store lids is to string them onto the handles of saucepans and frying pans and hang them on special hooks. It’s convenient that everything is sorted immediately and does not require time to search and select a set. The method is suitable for those who cook a lot and have a whole collection of pots, ladles and other utensils.
Container
Pull-out containers are made when creating a kitchen set. They can be plastic, wood and metal. Some are presented for storing exclusively lids and pans, while others are universal for small kitchen appliances.
The disadvantage of this method is that you need to plan this at the initial stage of installing the kitchen, then it will be economical and practical.
Storing dishes in drawers has become popular. A deep box is suitable for this, which is divided by metal dividers and holes are created for the lids. This item can easily be made with your own hands.
How to make a stand for caps from plastic bottles, see the video below.
IN
Source
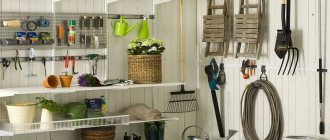
Railings
The simplest solution for large-scale storage of dishes and cutlery on the wall. You can hang everything you need for cooking on the rails: items will always be at hand, and the worktop will remain free. It is worth considering that the surface underneath must be resistant to mechanical stress and easy to clean.
Life hack: small roof rails can be placed on the inside of the facades.
Door mounts
This method is only suitable for storing lightweight pot lids and durable doors. It saves space in the closet because it does not take up interior space. The device is fixed with adhesive tape. To secure, you can also use hooks, which are sold in construction and hardware stores. If the cabinet door does not allow this, use the front part of the kitchen facade for storage.
A more convenient form of holder for storing pot lids consists of two parts, since they can be installed at any distance. The device is made of durable plastic and is fixed to the wall with adhesive tape.
Fixation with hooks
Idea 4. Topiary for kitchen or home decor
Topiary is a small decorative tree that is used to decorate a dining or coffee table, chest of drawers or mantelpiece. And topiary is an excellent addition to a gift, especially if you decorate its crown, say, with candies or flowers. Making such a craft with your own hands does not take much time, does not require the use of expensive materials, and even beginners can do it. Once you master the basic principle, you will be able to create topiary for any occasion, any shape and design. Take a look at our selection of DIY home decor photo ideas, you're sure to find something you'll like!
Kitchen Decor Idea for Halloween
To make this craft you will need:
- Base made of polystyrene foam, plastic or floral foam in the shape of a ball or other desired shape;
- A trunk (a straight tree branch, a pencil or any other small stick);
- Decorative elements for creating a crown: coffee beans, artificial flowers, pine cones, colored beans, etc.;
- Decor to disguise the pot filler, for example, moss, pebbles or sisal fiber;
- Flower pot;
- Filler for a pot that will fix the trunk. For example, cement mortar, the same polystyrene foam or alabaster (the best option) will do;
- Thermal glue in a gun;
- If necessary, you will need paint to decorate the trunk, base or pot. The trunk can also be decorated with ribbon or twine.
- To begin with, it is advisable to paint the base in the color of the crown elements so that possible bald spots are not noticeable. You can also paint the trunk and pot and leave them to dry.
- Cut a hole at the base of the crown, a couple of centimeters deep, for the trunk, fill it with glue and secure the trunk.
- Take the base of the crown and start gluing the decorative parts one by one. The principle of action at this stage is simple: first, large parts are glued, then medium-sized and, finally, small elements fill in the bald spots. You need to glue the decor quickly, before the glue is absorbed into the base.
- Dilute the mixture to fix the trunk in the pot according to the manufacturer's instructions and fill the pot with it, not reaching a couple of centimeters to the edge. Next, insert the barrel, hold it for a while and then leave it to dry for a day.
- Disguise the filling of the pot with a decorative “cover” (you can fix it with a little glue).
For detailed master classes, see the materials:
Homemade handle for a teapot or pan made from cork.
- Samodelkin August 9, 2014
- DIY homemade kitchen
Wine corks are an excellent material for DIY lovers! In particular, they can be used to make excellent handles for teapots, pots and other kitchen utensils in a matter of minutes.
A homemade cork has one undeniable advantage over its low-quality original competitors. The cork handle does not heat up like cheap plastic, and you can absolutely safely handle it with your hands without fear of getting burned.
Materials and tools you will need to make a cork handle:
- wine cork or champagne cork
- small sharp knife
- ruler
- pencil
- self-tapping screw
Photos of the stages of making a cork handle for a pan lid
So, let's get back to our traffic jam. Procedure:
- measure the dimensions of the metal ear protruding from the lid.
- draw the outline of the eyelet on the cork strictly in the middle
- Using a sharp knife, we make slits in the cork along the marked contour to a depth equal to the height of the eyelet and remove everything inside the contour
- put the plug on the lid
- We screw in the self-tapping screw so that it goes inside the ear, touching its upper edge. This will prevent the handle from wobbling.
Source
Varieties
The range of such products is more than extensive. The most popular are wooden coasters. Silicone, ceramic and textile models are also in great demand. Each material has certain characteristics, so before purchasing you need to understand the pros and cons of all options.
Wooden
The group is represented by lattice, prefabricated or monolithic models made of juniper, oak, red rosewood and similar heat-resistant aromatic woods. Coasters made of wood are considered classics; they are in demand due to their high decorativeness (a number of products made from saw cuts or solid wood cannot be repeated), lightness, variety of options, and affordable cost. The disadvantages include the risks of darkening and cracking under the influence of excessively hot steam and moisture.
Cork
Cork stands are affordable, are not afraid of hot steam and insulate surfaces well; the only disadvantage of products in this group is considered to be fragility. They can be solid, multilayer or combined; in some cases they are coated with varnishes and/or special film compositions.
Quick, gentle washing helps extend the life of cork products.
Silicone
This group of products appeared on the market relatively recently, but due to ease of care, flexibility, ease of use, versatility, and variety of colors, silicone hot pads quickly occupied their niche. Such products do not scratch surfaces and equally successfully protect furniture from steam or cold. But they are not insured against accidental cuts.
Ceramic
Heat-resistant glass and ceramics are optimal materials for making serving and decorative coasters for hot dishes. The range of such products includes transparent, colored and stone-imitating protection for pots, baking dishes, tureens or cups. Most of them have special holes for hanging, making them great for decorating the kitchen after use. Ceramic and glass varieties can withstand frequent washing without problems; the only disadvantages of this group include fragility, risks of splitting due to sudden temperature changes and high cost.
Textile
Woven, knitted, felted, or felt coasters add coziness to the kitchen and provide good thermal protection. Such products can be sewn with your own hands from any non-flammable textile; their sizes, functionality or design are not limited in any way. The only drawback of textile coasters is their short service life.
Woven or knitted elements easily become dirty, wearing out faster than other varieties.
Metal
Forged or cast products made of cast iron, alloys, and stainless steel can withstand any temperature and weight loads, but for obvious reasons they are a poor insulator. The risk of damage to the surfaces of kitchen furniture is reduced when using metal varieties with rubber pads on the legs, but such models are a little more expensive. Another feature to take into account is the problem of washing stands with small grates or an abundance of forged elements.