Nowadays smoking is the scourge of our society. Despite the fact that tobacco companies systematically raise the price tag for the product, some heavy smokers are still willing to pay any money for their addiction. Along with this, there are those who support the possibility of quitting smoking without harm to health. So, following fashion, people switch to smoking electronic cigarettes. However, some such devices are very expensive, so more and more craftsmen are interested in how to make an electronic cigarette themselves. It is for this category of people that this article was written.
Components
Electronic cigarette at home
Making an electronic cigarette at home is a great option to save money. By making the device yourself, you can understand how a vape works. Another advantage is the fact that you can decide for yourself what type it will have.
Security measures
When operating, you should adhere to safety rules, in particular:
- Vape liquid should not get into the eyes;
- Swallowing liquids should also be avoided;
- the device should not be placed in direct sunlight, and should not be stored indoors at high temperatures;
- the device should not be given to children; a working vape cannot be cleaned;
- It is prohibited to smoke while driving a vehicle, as the vapor that is generated when smoking can obscure the view and cause a traffic accident.
Assembly instructions at home
To make a vape, first of all, you need to take care of purchasing the necessary materials. For those who ultimately want to have a high-quality device, all components for it must be selected appropriately: the batteries must be so powerful.
So that their charge is enough for long-term use of the vape; wires and clamps must be strong; All necessary containers must be leak-tight.
Required tools and materials
It’s not enough to know how to make a wipe; you need to know exactly what you need for the device.
So, to adapt a simple modification (for example, made from a cardboard tube), the following materials and tools will be useful:
- batteries in form factor C or D (3-4 pieces);
- insulating tape;
- scissors;
- pliers;
- screw;
- clothespin clip;
- thin metal plate;
- electric drive;
- cigarette cartridge, which is purchased in a store;
- cardboard tube.
Procedure
For those who are interested in how to assemble an electronic cigarette, we offer the following algorithm:
- We connect three form factor D batteries in series, with the positive pole placed at the very top.
- We take a piece of wire, the length of which should be 3 cm longer than all the batteries combined. From the ends you need to remove the insulation by about 5 cm on one edge and 2 cm on the other. In the place where more is exposed, a spiral is made. A clothespin is attached to the other side. The resulting part is crimped with pliers.
- The side with the spiral is connected to the negative side of the top battery. The structure is secured with electrical tape.
- Cardboard is used for the body.
- A loop is made at the bottom of the wire and attached to the bend with glue.
- Batteries are placed in the resulting tube so that the negative contact extends downwards from the end that was bent. The clip is secured with an elastic band.
- We form a plug to secure the cigarette cartridge.
- A T-shaped piece is made from a metal plate, which is bent around a screw.
- For the vape to work, we connect the ring base of the cartridge to the clamp.
- Then we connect the central terminal to the positive pole of the batteries.
Assembling an electronic cigarette
For those who are thinking about how to make a cigarette at home, the issue of assembling the device is also important. So, the easiest option is to purchase all the necessary components in the store and assemble them according to the attached instructions.
The advantage of this option is the guarantee of the quality of the device.
Is it worth risking your health?
There are cases when amateur activities directly lead to a hospital bed. And there are a lot of them.
Therefore, those who want to make their own cigarette must be very careful and have experience in assembling electronic devices.
Improper assembly and operation can result in burns to the face, hands, and respiratory tract . To reduce the risk of burns, you need to buy liquid for cigarettes rather than make your own.
Additionally, the vape can explode and cause serious injury.
How to make a mechanical mod: master class
For those who prefer a homemade mechanical mod, we offer step-by-step manufacturing instructions.
So, if you decide to make a mechanical mod with your own hands, you will need:
- consumables: brass and duralumin (rods with a diameter of 25 mm), caprolon or fluoroplastic;
- lathe and tools: metal dies and taps, spacer.
Stage 1. Glass
- Take a duralumin rod as a base. It is softer to process, so it is better to make the main body from it. Saw off the required size for the job.
- In the machine, using a through cutter, align the end and outer parts of the workpiece.
- Prepare a place for working with a drill: make a mark on the sanded end side with a centering drill, then drill a small hole no more than 7 mm. Then you can safely take a drill of a larger diameter.
- Then use a boring tool to expand the inner diameter to the required size. The thread will be M 20x1, which means the diameter should be 18.91-18.92 mm.
- The next step is to use a tap to cut the thread inside the part - it is advisable to do this manually to avoid defects. Do the same on the other side of the workpiece.
- An important point is that it is advisable to make a bevel on the inside of the thread (at the beginning) so that the parts can be screwed on more tightly.
As you can see, to make a mechanical mod with your own hands, you don’t need to know much at the initial stage of work. In fact, even a beginner can handle this.
Stage 2. Cover
- It will be made of brass and have a flat shape. Therefore, you need to cut off a piece of the rod, with a little margin. You need to do the same manipulations with the end edge as you did with the glass of the mechanical mod. The same applies to the outer edge. And the thread will be exactly the same - M20x1.
- When you have ground part of the workpiece to the required diameter, try on the die. You first need to make an entry for it to make it easier to cut the thread and prevent defects.
- After the thread is ready, check whether the body fits tightly to the head. If everything is done correctly, the parts should be firmly connected.
- Now you can align the diameters of both parts using a cutter.
Stage 3. Prepare the connector
- The head compartment needs to be threaded for a 510 connector. First, you need to center the hole.
- Then use a 6.5 mm drill to make a hole for the future connector. Also make the thread go inward, as in the first stage of working with the glass. This is done so that the different connectors fit more tightly to each other.
- Now you need to manually cut the thread with an M7x0.5 tap. Make sure that the tap is at a right angle, otherwise the thread will be damaged.
- Check the threads by touching any connector.
- Next, you should prepare the head for installing the insulator. To do this, you need to bore it to the required diameter, then grind out an insulator from caprolon to a slightly larger size.
- Insert the insulator into the cover, in its center make a hole and a thread for the “+” contact, a thread for adjustment to any connector. Take measurements and cut off excess height, if any.
Stage 4. Positive contact
- Make threads for the contact to install it in the insulator. Check the thread by screwing it into the caprolon part. Install the spring onto the contact.
- We make a part for the button block from brass, and we also make threads like on the lid.
- Next you need to connect all the parts and trim them.
- We make a blank for the blocker from brass. The same operating principle: trim, bore and thread. The thread should sag a little so that the locking ring rotates by inertia.
The homemade mech mod is almost ready.
Stage 5. Button pusher
- Prepare a place for the spring.
- On the other side, you need to trim the surface (take duralumin as the base of the workpiece).
- Make a negative contact from brass - the size and thread should allow it to be screwed into the pusher.
- Next, the caprolon part needs to be inserted into the body of the button itself. Make sure that it enters with force, tightly and does not fall out.
- Insert the insulator and install the button. Make a hole in it for the “-” contact.
Preparatory stage
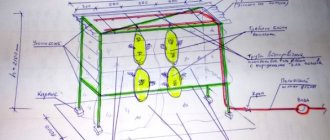
Our work begins with making a pattern for the product. To do this, place our Eleaf iStick on a sheet of paper and trace it with a pencil. Next comes a very important point - in accordance with the thickness of the device, we need to make allowances for the seams. The diameter of our Eleaf iStick is 20 mm, therefore, on each side we add 8-9 mm. If you are in doubt about the dimensions, then based on observations, during operation the material will stretch a little, so it is better to let the device fit into the case quite tightly at first. We give seam allowances and cut out our pattern. We attach the pattern to the material for the future case and trace the pattern with a pencil. We cut out 2 halves of the future cover.
Not every leather substitute will be dense enough, so, as in our case, it needs to be thickened a little. We need to take white adhesive interlining, cut out rectangles a little larger than our blanks and iron them with an iron. If anyone doesn’t know that in order to glue interlining, the workpiece needs to be placed on the wrong side, with interlining placed on top.
The glue pimples on the non-woven fabric should be on the workpiece side. Placed and glued with an iron. In our case, it was necessary to glue it twice to achieve the desired rigidity. Once the required number of layers have been glued, the excess interlining from the workpiece must be removed.
Why is a homemade box mod better than a store-bought one?
The disadvantage of box mods made at home is frequent breakdowns. Without professional skills, not everyone can successfully solder and connect parts. However, there is also an advantage: it is easier and cheaper to repair such mods.
Servicing branded mods is a problem with finding original components from the manufacturer. The monolithic body of some configurations cannot be disassembled at all. In this case, if it fails, all you have to do is throw away the vape gadget.
It’s easy to remove the “filling” from a homemade device, clean it, change the wires, and adapt the electronics to the number of spirals and the required voltage. You can change the body design and shape. This gives not just creative freedom, but the opportunity to experiment with different methods and methods of vaping.
Component ratio
The liquid according to the traditional recipe usually contains 47-50% propylene glycol and glycerin, and 5-6% distilled water. If you add 5% water to a polypropylene glycol mixture, you will get a hard mixture with little vaporization. Conversely, if you mix glycerin with water in a ratio of 8:2, you will get a soft liquid with abundant vaporization.
The amount of nicotine added to the self-mix depends solely on your preferences and the strength of the liquid you want to get. For example, if you take 10 ml of zero and add 0.5 ml of nicotine, you will get a liquid with a strength of 5 mg/ml, which corresponds to light cigarettes. An electronic cigarette containing a liquid with a strength of 12 mg/ml is identical to regular cigarettes, while 18 mg/ml is stronger.
In order not to overdo it with flavorings and spoil everything, it is recommended to add one or two drops of them for every 10 ml of base. Once you have determined which proportions suit you best, you can begin execution.
Cardboard vape? Are you seriously?
If you decide to assemble an electronic cigarette on your own, you can try making vaping devices from a cardboard tube.
Experts advise giving your preference to either the 3 Ds or the 4 Cs. Both options are great for DIY electronic cigarette assembly. It all depends on individual preferences and ease of use.
Having decided on the choice of battery, you need to connect and assemble them into a serial chain using electric wire. The length of the latter should be approximately 30 mm longer than the total length of the folded batteries.
Wire preparation
At this stage, it is necessary to remove the insulating coating from the wire using pliers.
If the wire is twisted, you need to straighten it with your hands.
Making a contact spiral
The production of a spiral is carried out using bare wires.
In this case, the clamp must be installed at the opposite end of the wire, while the wire itself is crimped with pliers.
Case manufacturing
Due to the fact that our sample vaping device is budget-friendly, all the savings come from the body part of the device. It is made from a cardboard tube cut along the entire length.
Next, you need to adjust the tube until its diametrical size allows you to insert the battery pack without much effort. But at the same time, the batteries should not fall out of their tubes.
Next you need to install one battery, check the loop at the bottom of the wire, and firmly attach it to the bend with glue. The top of the tube is wrapped with an elastic band.
Installing the battery into the body of the device
At this stage, you need to install the first battery into the resulting device, but this is done in such a way that the minus point is facing the bent end.
The wiring is installed in such a way that the clamp on top of the cardboard case protrudes slightly. All other batteries (and there are only 3 of them) are installed according to the same principle.
Cartridge re-twisting
The most difficult part in completing the task will be creating the plugs through which the cartridge will be installed. In most cases, V2 cartridges are already equipped with a special connector. All that remains is to come up with something with the plug.
To do this, take a screw and simply wrap it with electrical tape. Having cut out the letter “T” from ordinary metal, we bend it around our “plug”.
Assembling a homemade cigarette
To finally prepare the device for vaping, you need to attach the clamp to the outer rings of the output of the installed cartridges. The E-cigarette is activated by connecting the central terminal in the cartridge and the plus of the battery from the very top.
If the cigarette is not used, then it is necessary to ensure that these contacts do not touch each other. Otherwise, the fibers that are inside the device may overheat, which will lead to quite disastrous consequences.
In addition, it is necessary to protect the homemade vaping device from short circuits. By following these tips, your homemade electronic cigarette will last a long time, and the vaper himself will be able to save money.
Material properties for manufacturing
Polyethylene terephthalate (PET). It is plastic, has high impact resistance, mechanical strength, resistance to organic acids, alkali, metal salts, alcohols (including propylene glycol - the main component in smoking refills). Sensitive to ultraviolet radiation (decomposes slowly). Operating temperature range from –40 °C to +60 °C. Abrasion resistant.
Seal:
Flexographic method (use of flexible printing forms). Used on elastic, rounded surfaces. Bright, clear image (circulations from 10,000 copies).
Scope of application:
- Companies producing nicotine-containing products;
- Tobacco stores;
- Specialized enterprises for the preparation of certified smoking mixtures.
Main characteristics of polyethylene terephthalate:
| Index | Meaning |
| Density of amorphous PET, g/cm3 | 1,33 |
| Density of crystalline PET, g/cm3 | 1,45 |
| Density of amorphous-crystalline PET, g/cm3 | 1,38-1,40 |
| Coefficient of thermal expansion (melt) | 6,55·10-4 |
| Thermal conductivity, W/(m K) | 0,14 |
| Compressibility (melt), MPa | 99·106 |
| Dielectric constant at 23 °C and 1 kHz | 3,25 |
| Dielectric loss tangent at 1 MHz | 0,013-0,015 |
| Elongation at break, % | 12-55 |
| Glass transition temperature of amorphous PET, °C | 67 |
| Glass transition temperature of crystalline PET, °C | 81 |
| Melting point, °C | 250-265 |
| Decomposition temperature, °C | 350 |
| Tensile strength, MPa | 172 |
| Tensile modulus of elasticity, MPa | 1,41·104 |
| Moisture absorption,% | 0,3 |
| Permissible residual moisture, % | 0,02 |
| Frost resistance, °C | up to –60 |
How to make an electronic cigarette from a flashlight
Who needs a hand-made electronic device, what is the point of this, you ask. However, oddly enough, there are categories of people who prefer to tinker with the hardware and assemble the device themselves. There are a number of reasons that we will look at in this article. Here we will tell you how to make a gadget at home. Let's go.
Who needs to make electronics?
We have identified 4 segments of people who will be interested in this for their own reasons:
- Thrifty people. Those who believe that throwing out a lot of money for the pleasure of vaping is inappropriate, or those who simply cannot afford such a purchase due to low income or lack of pocket money (students).
- Technical monsters. These are people who are closely friends with a soldering iron, microcircuits and technical literature. They accept the challenge from themselves and create a more complex and technologically advanced model each time. The main excitement lies in making yourself a device that will also emit a pleasant aroma.
- Vape perfectionists. This is a category of professionals in their field. Those who could not find harmony and zen in purchased units. They make the device themselves with the aim of surgical precision and achieving the desired effect.
- Those who like to stand out. Buying a vape is not a problem. Those who have the means will always have the coolest device. But vaping comrades will be more surprised by the self-assembled device from a cartridge case, polished, in the steam-punk style.
As it turns out, there will be many more people willing to make a device than just one or two. Let's figure out how to make an electronic cigarette at home and what you need for it.
Vape from a flashlight
Be sure to follow safety precautions when working with a soldering iron, and also learn about the risks of incorrectly connecting the battery to the mech mod. Safety comes first. The electronics assembly circuit is extremely simple. Microcircuits and complex parts will not be needed.
Battery contacts to atomizer contacts. But first things first. First, disassemble the flashlight and remove all the insides from it. It may be difficult to remove the button, but this is not a problem. The main thing is not to use physical force. To assemble your first device you will need the following things:
- flashlight;
- 26650 or 18650 battery;
- textolite;
- soldering iron and consumables;
- connector from an old electronic device;
- evaporator, preferably purchased in a store.
So, before you:
- flashlight body;
- glass;
- LED module;
- spring to support the module;
- plate for fixing the filling in the flashlight body.
Tags
How to make an electronic one yourself make an electronic one How to make an electronic one yourself make an electronic one It’s better to do it for yourself make the most you can make it How to make an electronic one how to make an electronic one and make it yours Electronic cigarettes Electronic cigarettes electronic cigarette from homemade cigarettes electronic cigarette into an electronic cigarette by Electronic cigarettes Electronic cigarettes make an electronic cigarette make an electronic cigarette Electronic vaping with your own hands with your own hands. with your own hands. with your own hands and hands. with your own hands. with your own hands the body is assembled with your own hands.
article flashlight vaporizer own ready-made
What types of flavorings are there?
The classification includes the following types of components:
- Natural. These are substances made from natural ingredients. The disadvantage is that the range of tastes is limited to natural limits.
- Artificial. Includes an assortment of hundreds of items. Developed on the basis of food mixtures. Despite the synthetic base, they do not pose a threat to the human body.
If we talk about taste, we can highlight:
- Tobacco flavorings. These are fillers that imitate real cigarettes and types of tobacco. They have a similar name and are characterized by a tart, bitter taste.
- Fruit and berry. The lightest and most common flavors. The expressiveness of fruit and berry liquids is not for everyone. Citrus and lemon mixtures easily cover others. Because of this, when changing the liquid, you have to change the wick.
- Drinks and baked goods. An exclusive category includes flavors of creams, pies, ice cream, hot and cold drinks. The taste of such liquids is dense, rich and, in most cases, warming. The best option for vaping in the winter season.
Preparing artificial fragrance at home is problematic. To do this, you will need laboratory instruments, equipment and highly specialized chemical mixtures. Natural flavors can be obtained without breaking the bank.
Disadvantages and risks
Knowing how to assemble an electronic cigarette, this process does not seem so difficult, but for this a person must already have some experience. In this matter, it is important to choose everything with a degree of scrupulousness, from tools to materials that will be used.
If you assemble the electronic cigarette incorrectly, then when using it you risk not only external burns to your face, but also severe burns to your respiratory tract. This is another reason to think about how often a cigarette is near your face, and how important it is to protect yourself from incidents. Naturally, you are unlikely to be able to make liquids yourself, without proper knowledge in the field of chemistry, so you will have to buy them in any case.
However, there are craftsmen who manage to create their own fillers with a couple of simple reagents and oils, mixing everything at random. At such moments, thinking about saving now, they hardly think about how much money they can spend on treatment in the future!
After all, if you don’t know the proportions in which all this needs to be mixed, then it’s not at all difficult to harm yourself, and sometimes those around you. It is quite normal for special sets that have already been purchased to simply be mixed in different proportions to create unique flavors. But there are craftsmen who, using glycerin and other ingredients, go through the entire manufacturing process on their own. Moreover, they often buy all the components through Chinese stores or secondhand in order to save as much money as possible.
As a result, from all of the above we can conclude that it is much safer to simply buy a cigarette than to create it yourself. Without the proper knowledge and skills, you risk harming your health, so the further content of the article is recommended only for experienced vapers!
What to consider before reconstruction
To place the tank on the fur, you need to wind the thread correctly. This must be done to ensure optimal steam concentration. The amount of steam released will depend on the winding resistance. Those who have installed a resistance of 0.05 - 0.08 Ohm on the evaporator will be able to enjoy concentrated and thick vapor. Remember, the lower the resistance, the stronger and faster the spiral will heat up - this is elementary physics.
However, one important circumstance should be taken into account - if the resistance is made too low, this can lead to an explosion of the energy source. Be extremely careful in your experiments. The resistance should not be lower than 0.05 Ohm, these are standard values
The resistance should not be lower than 0.05 Ohm, these are standard values.
In order to find out the resistance of the spiral, it can be measured using an Ohmmeter. It is not recommended to measure this parameter using various winding calculators, for the reason that the initial results can vary dramatically depending on the type, structure and cross-section of the wire used.
Below we will give an example of how you can connect a tank to a mechanical mod. This step-by-step instruction is exclusively for experienced steamers who know what's what.
Precautionary measures
As practice has shown, the most dangerous thing in making electronic cigarettes yourself is a rash idea - to create a flavored liquid at home. Therefore, if you do not have a good education as a chemist, then do not even try to do something. This is fraught not only with facial burns (at best), but also with serious damage to the respiratory tract (including not only burns, but also dangerous diseases). Today you will save money, and tomorrow you will spend 10 times more on treatment (at least).
Advantages
- Despite the fact that most devices are not so expensive, they are still not affordable for everyone. Plus, it’s worth considering that the cost of any original/branded product includes warranty service and other extra charges. From which there is no escape. That is why, making electronic cigarettes with your own hands, as an option (in a quiet home environment), is profitable. Moreover, this process is not so complicated.
- Quite “tricky” (branded) parts, batteries (and chargers for them) very often break down (due to “economical” Chinese production). And this is where the problems begin. Firstly, they are not cheap, but that doesn’t matter. And secondly, it’s difficult to get them (especially if the device has already been discontinued). Therefore, one of the main advantages of all self-made devices is the absolute availability and low cost of all spare parts.
- Most people don’t even look for answers to the question: how to make an electronic cigarette with your own hands? It is easier to buy a ready-made device. But experienced vapers (especially foreign fans) sometimes have a completely different opinion. Indeed, in this case, you can not only understand the intricacies of your favorite device and the mechanism of its action (i.e., learn the whole process “from the inside”), but also create a masterpiece “tailored” to your personal preferences. The envy of all your friends! Don't believe me? Read foreign articles on this topic.
Example: how foreigners make electronic cigarettes (with their own hands)!
What is the role of the atomizer
The atomizer is the main part in the electronic cigarette in which the liquid evaporates. The atomizer can be a tank, drip, or bakodripka. The atomizer is equipped with spirals, for which Kanthal, nichrome, or stainless steel wire is used. Cotton is inserted into the spiral and e-liquid is poured. If you press a button on the box mod, the circuit will close, and voltage will be supplied to the atomizer coil from the batteries, due to which they will heat up. As a result, the liquid will evaporate from the cotton, and the design of the atomizer will allow the vaper to inhale the vapors that are in the evaporation chamber. Due to special holes for blowing the spirals, the “strength” of your tightening is determined. Making an atomizer yourself is a rather complicated matter; creating it is more difficult than a box mod. The price of this device is low, so a simpler and more reliable way is to buy it in a store or online market, as opposed to the self-assembly option. Now we have a homemade and safe version of the box mod and an atomizer that is wound with a spiral. Now you only need ready-made e-liquid - you can also easily buy it, or you can use e-cigarette liquid made by yourself.
Important rule
Those who want to know how to make a vaporizer need to learn the most important rule - the compatibility of the drip resistance with the power of the power source. The best option would be to choose a variable battery. Thanks to this, the device will be able to adjust the voltage it needs.
If you use a varivolt battery, you need to install a spiral in which the voltage will be from 2.9 to 3.5 ohms. This is the optimal range.
As you can see, assembling the evaporator yourself is not difficult. All you need is basic knowledge of physics, the necessary parts and a little skill.
Why is the designated reboot being done?
Modern Droid devices have many applications that can crash from time to time. But each phone has an internal independent area that stores system files. If your operating system began to behave badly or you configured something by mistake (for example, you installed a pattern, but forgot the pattern), the manufacturer predicted in advance a special combination of buttons, when used, the phone’s software platform will return to its initial state.
To do a factory reset, you first need to go to “System recovery”, for this purpose you need to find out the combination of buttons set by the manufacturer. Now we are already in the menu, where a huge number of curious lines are displayed. Using the volume buttons, you should go down to the wipe data/factory reset item. We activate the function by using the Power or Home button. A new menu appears, in which there will be a huge number of lines “NO”, and somewhere in the middle there will be a line “Yes”. You should go down and activate it.
As a result of completing all the steps outlined above, the phone will reboot and then return to the initial settings. If you are not convinced of your own abilities, turn to specialists.
We thank each reader for their attention and hope that we were able to answer the question posed completely. A user who is going to sell his mobile device may be interested in how to make wipe on Android. Smartphone owners often use them to store personal information
This could be business correspondence, email invoices, contact information, photographs, etc.
Smartphone owners often use them to store personal information. This could be business correspondence, email invoices, contact information, photographs, etc.
A user who is going to sell his mobile device may be interested in how to make wipe on Android. Smartphone owners often use them to store personal information. This could be business correspondence, email invoices, contact information, photographs, etc.
A wipe data/factory reset is a good idea, but in some cases this function may not be enough. For example, when Avast employees purchased 20 used Android smartphones from eBay, they were able to recover photos, Google search history, emails, text messages, and contact information.
There is a method that will help the user completely erase all information and avoid troubles associated with leakage of personal files.
Summary
A mech mod is a difficult item to handle and maintain, and is in no way intended for a beginner in electronic vaping. Also, fur is not suitable for those who are not ready to care for the device, devoting enough time and close attention to it.
Finally, those looking for a universal vape device with many functions for several atomizers or clearomizers should shift their attention from mechanics to electronic mods
True fans of electronic vaping always have in their arsenal at least one setup assembled using an original mech mod. Standing on a table or glinting in your hand, such a vape device emphasizes the style no worse than an expensive watch or smartphone from a famous brand. The mechanical mod is the absolute choice of the cloud chaser, for whom sub-ohm winding is the only way to create a victorious cloud size. For everyone else, mechanics will become the most interesting hobby, the most practical approach to vaping, and perhaps even a collector's hobby.
The author of the article hopes that the explanations provided will be useful to you and will help make your choice simpler and clearer. If you would like to purchase one of the original mechanical mods for your collection, please refer to the corresponding section of our catalog.
Mechanical mods are a special type of vape device, consisting of a hollow metal tube, a button and a connector. This device is designed to short-circuit the battery to the atomizer, followed by heating the coils to produce vapor. These devices are intended for more experienced users rather than beginners. Despite the simplicity of design, mech mods can pose some danger in the hands of a beginner. But if you decide to get a mechanical mod, then we will help you make your choice and tell you about the main nuances of using these devices.
Externally, mechanical mods can have different shapes, colors, and materials. Mech mods do not have a board, display or control buttons, like most box mods. Accordingly, you will have to control the temperature, voltage and resistance yourself. As you can see, there is nothing special to break there, so mechanical mods last much longer than their counterparts with a board.
Mech mods have a very simple design and consist of only three main parts: a button, a housing and a connector. The basic elements are very simple, but have many options and modifications, each of which has its own pros and cons. The main task of a mechanical mod is performance and power; each part of it must have minimal voltage drops. To better understand why the power of the mechanical mod and voltage drops depend, it is best to disassemble each part separately.
Let's move on directly to the materials from which mechanical mods are most often made:
- Copper;
- Brass;
- Stainless steel;
- precious metals (silver, gold, platinum).