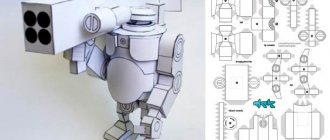
There are diagrams on how to make a TV out of paper. It is enough to cut them along the contour and glue the parts together.
The finished model must be coated with varnish or PVA glue and left for some time until completely dry.
There is another way to invent a “blue box” for a little princess.
In order for a Barbie doll to have a TV in her house, the owner needs to get to work. First, let's prepare the materials for work:
- Matchbox;
- scissors;
- paper;
- paints.
Following simple instructions, even children can make a TV on their own:
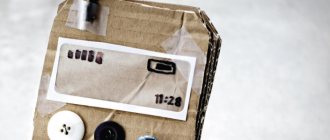
- From a matchbox you need to cut a window in the middle of the front part.
- Place the lid on the box and paint it the desired color. You don't have to choose a dark color scheme - a blue and pink TV will fit perfectly into the bright palette of a dollhouse.
- Roll several small balls from plasticine - these will be buttons for the blue screen. Glue them to the side. Use the same principle to make legs for the TV.
- There are several options for a screen image: insert a certain picture or animated magnet into the “TV”. But you can do it differently. Cut out a long strip, divide it into squares and in each part draw different scenes or a character who periodically changes pose.
- We insert such a tape into the screen window from the “first frame” and slowly pull it towards ourselves. The image moves, the TV “works.”
Article on the topic: How to connect dlna to a Samsung TV
Dollhouse
You will need:
- box
- scissors and stationery knife
- paints or colored tape/adhesive tape
There can be a lot of variations of such a cardboard house! The simplest option would be to cut off the top flap from the box that opens and make a shelf out of it that needs to be inserted through the hole from the rest of the box.
More complex designs can be made by cutting the box in half into 2 parts, making niches for shelves in each of them, and then connecting several parts.
Cut out windows and doors in the house using a stationery knife. To make the design look more fun, outline the holes with colored paints or cover them with multi-colored tape.
Master class: mini-fireplace from one box
Sometimes you want to festively decorate not only your home, but also your office or your workplace. In this case, it is enough to make a mini-fireplace that can be placed on a windowsill, an open shelf or a desk.
For the craft you will need:
- 1 medium size box;
- 3 small elongated boxes;
- glue gun or regular PVA glue;
- a piece of cardboard for the mantelpiece;
- a piece of wallpaper with brickwork or self-adhesive oilcloth;
- white water-based paint;
- decor (fir branches, garlands, candles);
- scissors and pencil.
We present step-by-step manufacturing instructions:
At the bottom of the box we glue all the doors. On the front side we bend one long flap (it will serve as the protruding base of the fireplace), and glue the other to the two short flaps.
We place small boxes around the perimeter of the resulting window and make markings with a pencil.
Using the markings made, we expand the window, cutting off the excess cardboard with scissors. Then we glue the boxes.
We cut out decorative elements from cut cardboard (you can come up with something original). We glue the blanks and planks onto the fireplace.
We glue the cardboard mantelpiece; it should protrude 4-5 cm, forming a canopy. We paint the craft with white paint in several layers. It is advisable to paint on all sides.
We fix the decor made of plastic or metal with polymer glue. On the inner wall and on the protruding bent base, glue a piece of wallpaper cut to size.
We complete the decoration with New Year's decor and candles.
What you can do yourself
Next, we will consider in detail what you can make from match elements with your own hands, both for children and adults.
Toys
Various matchbox toys are convenient as they fit perfectly into a child's hand. It could be a boat or a mini pencil case for “important” little things, a mini TV, a composition that comes to life, or a large doll house made of several dozen boxes.
Animals
Original matchbox animals are made simply:
- For the silhouette of the dog, use 1 pc. for the head and 1.5 pcs. for body. The blank is pasted over with colored paper to match the color of the animal, pre-cut ears, paws, and tail are added, and the face is decorated.
- An elephant is made from 9 pieces. boxes laid horizontally in three rows. For the legs you will need 2 more pieces. Further work is similar to step 1.
- The cat is made from 2 elements, gluing them together with the letter T. Then, as in step 1.
Article on the topic: Why the TV does not pick up channels
You can also make a horse, zebra, Cheburashka and many other animals. A simple monkey made from 2 boxes will look surprised with his mouth slightly open if the inner element of the box is slightly (by 5 mm) pulled out. The edges covered with red “lips” will “revive” the toy.
Doll furniture
You can create any furniture from matchboxes, for example, an armchair. You will need 4 pieces for assembly:
- three boxes are glued together - “armrests” are attached to the future seat;
- the fourth element is glued to the back of the workpiece - this is the back.
For decoration, you can use colored paper or any material.
To make a sofa, you should use 3 boxes for the seat and back, the assembly procedure is similar to the assembly of a chair.
It’s even easier to make a chest of drawers for a Lol doll:
- three boxes are glued one on top of the other;
- the workpiece is covered with colored paper;
- they create dresser handles from convex buttons and beads, gluing them to the “drawers”.
They add design, you can completely cover each “box” with bright paper.
To create a cabinet, 6 match elements are used:
- modules are glued together - 2 pieces in a row, 3 pieces in height;
- for open “mezzanines” only internal inserts from boxes are used;
- they make doors by cutting off one side of all the boxes in each row;
- The workpiece is covered with wood-like paper.
You can make legs from plasticine or foam.
Unboxing
To provide additional protection when transporting large-diagonal TVs and monitors, manufacturers use packaging that protects the contents from external influences. It also creates the necessary conditions for storing equipment.
When removing the TV from the box, you need to understand how the box opens and which side the screen is on. Otherwise, you can hit the display or press hard, drop the device, or deform the case. Considering the fragility of the panel of large diagonal TVs, the chances of damaging the equipment in these cases are very high.
Recommendations for unpacking the TV:
- Read the instructions and directions on the packaging box.
- Before unpacking, you should remove rings and other jewelry from your hands.
- To remove a TV with a diagonal of more than 32″ from the box, at least two people are required. The exact number of people is indicated on the packaging.
- To remove a TV with a diagonal of up to 32″, two people may also be required, if this is explicitly stated on the packaging or in the instructions.
- To lift the TV, the lower part of the case must be placed in the center of the palm, but not on the fingers. At the same time, you should not squeeze your fingers and touch the screen with them. The correct hand position is demonstrated in the image below.
Article on the topic: Which is better: a TV with smart TV or a set-top box
Equipment with a screen diagonal of more than 55″ can bend under its own weight, breaking the matrix, so you cannot carry the TV horizontally. It is also recommended to move your grip away from the edge - as shown in the picture below.
If you need to place the TV on its front side, do it as carefully as possible and do not turn the TV into a horizontal position while in the air. First place the TV on the bottom edge, and then smoothly lower the top edge, holding the bottom edge with your other hand.
Choose a perfectly flat surface without differences in height over the entire area of the device. The edges of the housing should not protrude beyond the selected surface. For example, if the table is smaller than the TV itself. At the same time, it is prohibited to place the equipment on the screen without the protective bag included in the package, as well as to move the device in this position on a table or other surface.
What else should not be done when unpacking:
- Do not touch the TV screen when removing it from the box. Even slight pressure can damage the matrix.
- Place the TV with a curved display with the screen facing up (on the back of the case).
- Do not place a device with a curved display on a table or other flat surface without the special foam backing that comes with it.
- Remove the TV through the “top” if there are special fasteners on the box. First you need to unlock the latches, and then lift the box as indicated in the instructions.
Some more ideas and tips
- There can be any number of floors, depending on the size of the home.
- In cardboard houses, you can make a door by simply cutting it into the wall.
- Large houses can be made from several cardboard boxes, gluing them together with side walls.
- A small bookcase, such as one from IKEA, can be used as a base for the home. In this case, you won’t have to make anything, you just need to cut a few windows and put a few walls inside.
- You can screw wheels to the plywood base or shelving so it can be moved.
The big advantage of dollhouses is that you can make them with your child with your own hands, unless, of course, the future home for dolls should not be a gift.
The baby can help cover the walls of the house with wallpaper, arrange furniture, and come up with accessories. This is a great way to bond even more with your child, as well as help him express his creativity and fulfill his fantasies.
Article on the topic: How to unlock a USB port on a Samsung TV
In addition, children will love a dollhouse that you made for a child yourself much more than the most luxurious purchased option.
Inspire us - share the material with your friends on social networks:
Where to begin?
Like any other home craft, building a fireplace starts with planning. This stage may seem unnecessary and boring when an idea is already growing in your head and you want to quickly bring it into reality. But it is mandatory. Without the right sketch, “building” a fireplace will take a lot of time and effort, and the result may be disappointing.
At the planning stage we do the following:
- we carefully select a place for the decorative element, since it is undesirable to move the finished structure;
- we determine the style and predominant colors in the interior: a decorative fireplace should fit harmoniously into the decor, and not stand out with its absurdity;
- we collect “construction” material (any cardboard boxes will do) and select the appropriate shape and size;
- We make a drawing of the desired design with a detailed indication of all dimensions;
- we select a method of decorative finishing and prepare a sketch of the fireplace in color (very often what we draw in our imagination turns out to be far from ideal, but on paper all the flaws will be immediately visible).
When choosing a decoration method, we recommend visiting a hardware store. If you haven’t done renovations for a long time, you will be surprised how many new materials and mixtures have appeared on the market. Perhaps such a walk will lead to an original idea for painting or covering with an imitation material.
Don’t rush to simplify everything as much as possible, because the manufacturing process itself is already quite simple. You need to pay enough attention to decorating the structure. Otherwise, you will get a craft at the level of a school labor lesson, which will not deceive or surprise anyone.
Laptop
If your child really wants to imitate you and have his own laptop, then provide it in this safe form.
- To make it somewhat functional, use chalk paint to create the “screen.
- Thus, the child will be able to change the screen images by drawing them with chalk, wiping them, and drawing new ones again.
TIP: You can also sew a laptop case so that your child can take it with him to kindergarten or to visit his grandmother, because the laptop folds up like a real one.
see also
Your TV is broken and you don't know what to do? Take this short test and find out the best way to repair your TV.
Vintage suitcase
All small things for dolls and accessories do not have to be made from the same material as for people. You just need to turn on your imagination and use any available materials.
To make a suitcase, we need:
- box;
- two beautiful stickers;
- textile;
- black narrow braid;
- openwork braid;
- 4 beads;
- glue, scissors, paper knife.
Work order
Glue a rectangular box measuring approximately 9x7x3 cm completely, tightly, without leaving a lid. Then carefully use a razor or sharp knife to cut it in half lengthwise.
- We decorate the top with beautiful stickers. Our suitcase belongs to a girl, so we choose an elegant sticker.
- Glue the fabric inside, cut off the excess ends and glue black tape to the ends (on 3 sides).
- We bring the two halves closer and connect them into a suitcase using openwork braid.
- Glue black stripes and 4 wheel beads onto the top of the suitcase.
- We glue the Velcro fastener and the handle from the same braid. You can decorate your suitcase with rhinestones.
Article on the topic: How to replace a TV on a VAZ 2110
Making a solid base
The lower part of a homemade fireplace, which serves as a stand, must be strong and rigid, since in addition to the entire weight of the structure, it must withstand all objects placed on the hearth over a long period.
You can strengthen the lower border using additional inserts; they will be secured inside the cardboard frame. Such “ribs” can be placed along the entire length at certain intervals or simply glued randomly along the entire bottom.
Article on the topic: 100 to 1 husband can’t find the TV remote control, where do you think it is?
Strengthen all parts for structural reliability
The lower part in the form of a stand should always be longer and wider than the main structure of the fireplace, by about 100-120 mm. To make a support, you can use the 2 simplest and most effective methods:
An easy way to make a fireplace with your own hands
How to decorate a stand
Like any other element, the stand needs decoration. The simplest thing you can do is to choose original side panels for it, cover the cardboard with self-adhesive tape with a pattern, wrap it in wallpaper or paint it. But there are other, more original ideas.
Self-adhesive with a pattern in the design of the fireplace
If the homemade fireplace was made in honor of the Christmas holidays, the base can be painted red or white and wrapped in rain and garland.
Step by step creating an imitation
For standard, people often use wide baseboards with beautiful patterns. They can be bought at any hardware store and installed in the lower and upper parts of the fireplace; it always looks very beautiful and complete.
Elegant fireplace with wide baseboard
VIDEO: The most beautiful DIY fireplace
Installation of a decorative fireplace
Installation of a decorative fireplace
DIY cardboard houses: diagrams and nuances of construction
To create a house, first of all, you need to draw a sketch. You can download a finished house drawing on the Internet or try to draw it yourself, based on your child’s requests. If you wish, you can make a model of the house from plain paper.
House project:
- According to the drawing, cut out sketches of the future toy house from a cardboard box.
- Cut through windows and doors. Remove unnecessary pieces of cardboard.
- The joints need to be taped.
- If the folds are glued correctly, the house can be folded, and in this form it will take up very little space.
- The roof of the house is made from the end parts of the box. They are fastened together with tape, and the roof can be covered with colored paper on top.
- To make a second floor, you need to install an interior partition. Place a sheet of cardboard on top and secure it firmly along the edges with the walls of the house.
- The staircase between floors is also cut out of cardboard.
Now you can decorate the house with doll furniture or make it yourself from cardboard.
Helpful tips for making:
- The door of the house should open outwards;
- To make the house stable, you need to install cardboard pipes in the corners;
- For safety reasons, only adults should cut cardboard.
My Amazing TV Workshop | Country of Masters
“Amazing TV” is a fun toy craft. A good idea for something to keep children occupied during technology clubs and lessons. To make crafts, it is recommended to conduct 2 classes with children. First, we draw and make a TV. Second lesson - create a paper film - “baguette” * see the dictionary.
We draw the TV on cardboard; you can experiment with color and shape. For example, floral or pink for Barbie... A TV can be made using the applique technique - there are a lot of ideas. This is an old idea, once about 30 years ago, it was very fashionable in school to make such filmstrips, but the possibilities at that time were limited. Yes, it seems the filmstrips were made with stills, i.e. Each frame is an illustration for a story, a fairy tale..
Following safety precautions, an adult should make the cuts or help the child make the cuts with scissors, having previously indicated the location and made small cuts.
In this photo (I apologize for the quality), there are four stripes in the making process, each child independently makes a drawing-film on a long sheet of paper (it is better to draw with colored pencils, crayons and felt-tip pens), the drawing must correspond to the height of the TV screen, you can glue A4 sheets together, but the joints should not interfere with the passage of the sheets, gluing everything in one direction. I excluded drawings with slides and frames from the assignment. The idea is to draw freely
Themes for long “baguette” drawings: “Underwater world”, “In the edge of the mountains”, “Magic castles”, “Mysterious forest”, “Endless space”, “Sea spaces”, “Strawberry meadow”….
“Fairytale Forest” is a fragment of the film. Ah, now you can play!
*Dictionary-Baguette >>>>>>==============>>>
stranamasterov.ru
Doll house
Now there is a wide range of toys, including doll houses. But the advantage of a homemade house is that it can be decorated and rebuilt the way you want. Necessary materials: box (size will depend on the desired number of floors), scissors, glue, tape, cardboard for partitions, colored paper and pictures for wall decor.
Article on the topic: How to update Samsung apps on TV
First, cut off the top flaps of the box and turn it on its side. The result was the frame of the house. We make a small hole in the side of a cut piece of cardboard and glue it in the middle of the box with tape. The house is divided into two floors. If desired, you can make more of them. A small strip attached between the ground floor floor and the hole in our glued piece of cardboard will serve as a ladder.
Using a utility knife, we cut out windows on each floor, having previously marked them with a pencil. Using the finished frame, we decorate the walls. There are no restrictions here. You can paste wallpaper, paint it with one or more colors, or glue pictures. All that remains is to add furniture and residents to the house and you can start an exciting game.
Noah's ark or ship
Sometimes it is difficult to teach a child to put toys in their place and not leave them scattered around the apartment. Such an ark will help turn the process of collecting toys into real entertainment, because you need to save animals from the flood. This is a little trick to ensure order in the house and instill in a child a love for animals.
Necessary materials:
- Strong cardboard box
- Sturdy cardboard tube (the one here is from a large roll of gift wrapping paper)
- Sail fabric (the size you need depends on the size of your cardboard tube and box)
- Empty round plastic container (ice cream, for example)
- Pencil
- Thick thread
- Pins
- Glue
- A small piece of colored paper for the flag
- Scotch
- Scissors and stationery knife
Doll house
- You can make a miniature imitation of your apartment or a separate room, a school classroom, or some other room. And all these shoebox crafts.
- To do this, cut out windows and doors with a stationery knife, stick on frames made of white paper (or another color of your choice) or adhesive tape, place toy furniture in the middle,
- decorate the walls with poster stickers, and place small figures of people and pets.
TIP: You can do the part where you need to cut it out with a knife yourself, and entrust the decor to the child himself, or do it together.
Table soccer
Pass, kick, and...goal! Table football delights children, so why not make it at home. Moreover, the phrase “everything basic is simple!” fits perfectly here. For the field, you need to take a shoebox and cut holes on both sides - gates, and the role of football players will be played by clothespins. Throw a small ball onto the field and the game begins.
Cardboard laptop
You will need:
- box
- black gouache
- sponge
- PVA glue or double-sided tape
- scissors
Source: handmadecharlotte.com
Process:
- Cut the bottom off the rectangular box and fold it in half.
- From the leftover cardboard, cut out a rectangle for the keyboard and touchpad.
- Paint over these elements with black paint using a sponge (you can take a new dish sponge or a piece of foam rubber)
- On one of the halves of the cardboard “cover”, draw a black screen or carefully tape a sheet of white paper with tape (depending on what crayons the child will use to draw on it).
- Glue the keyboard and touchpad onto the bottom of the future children's laptop with double-sided tape.
- Cut about 30 small squares from a piece of box and glue them on top of the keyboard. You can draw a letter on each key.
- On the back of the laptop (lid), write the child's name and glue his cut out photo or some kind of drawing.
Related article: Why megogo doesn’t load well on TV
Conducting a TV report
For a noisy children's game, there is another way to make a TV out of paper. It will be a large, voluminous blue screen, with the help of which the guys will be able to tell the news themselves, host shows and various programs.
To invent a large TV you will need the following items:
- cardboard box;
- wire;
- buttons;
- scissors, stationery knife;
- hot glue;
- paints.
The operating procedure is quite simple:
- Mark the TV screen on the box and carefully cut it out with a utility knife.
- Decorate your TV with bright paint. Attach a wire in the form of an antenna on top.
- Glue buttons to the side of the screen. These will be the channel switches. Attach buttons to a piece of rectangular cardboard so that the toy TV has a remote control.
- The TV is ready. To broadcast, remove the back wall of the box or the bottom.
Article on the topic: How to change the brushes on the electric motor of a washing machine
Now the baby and his doll have their own TV.
Useful things
You can make many small but necessary things from matchboxes.
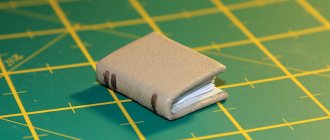
Mini notepad
To work, you will need the top part of the box, from which one side part is cut off. You get ready-made “mini book” crusts. They are decorated. The paper is cut into sheets to suit the size of the crusts and glued together. The finished notepad is fixed to the crusts with glue. You can add a bookmark or elastic band for strength.
Organizer
The principle of creating an organizer repeats the assembly of a doll chest of drawers:
- elements (6 pcs.) are covered with bright paper from the inside;
- glue together 2 modules, each of 3 boxes located on top of each other;
- The modules are fixed together with glue, pasted over with paper and decor.
Beaded handles are added.
Garden
Many children grow up in apartments and have no idea what a garden is, but they see vegetables already prepared at home. Such a toy vegetable garden will help explain to your child how vegetables and flowers grow and learn their names.
It is also useful for educating a child to understand that various plants go a long way before ending up in the store, and that we need to respect what nature gives us.
And such cute plants are fun to play with! To make it you will need multi-colored felt for vegetables and a cardboard box (painted) for the garden bed.