Felt bear patterns
In the gallery below you will find more than 30 felt bear patterns.
Below we have prepared for you the best master classes on sewing wonderful bears from simple materials.
Teddy bears in historical style Napoleon and Josephine
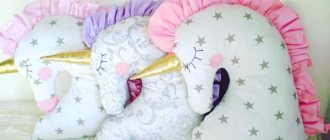
The Napoleon and Josephine teddy bear pattern is close to the classic one. In these models, the undercut nose is made of mohair of a different color. For sewing, choose short-haired mohair-brush. The patterns are adapted for 1/8 mohair - the finished item is 50x35 cm in size. It is important to choose the right mohair color. The classic option is light and dark brown. They are combined in different ways. For example, if the bear is dark in color, make the eyelids, nose, heels, palms and the inside of the ears light. If light mohair is used as the main one, dark one is used in the same way.
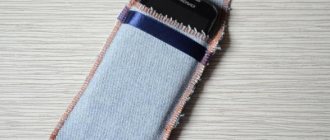
Felt bear on the moon
Below you will find a step-by-step master class on sewing a bear on the moon from felt. This teddy bear can be used for a mobile phone or as an interior decoration.
And here is another master class “Bear on the Moon” for a felt mobile. In the gallery below you will find a step-by-step description of the actions and a pattern on 2 sheets.
And some more cute felt bear patterns on the moon. Be careful, some patterns consist of several sheets, so don’t lose some!
Bear toy pattern
Making a soft teddy bear toy is quite simple and easy to do yourself. To do this, just use any popular pattern.
Some tips on how to choose it:
- All patterns can be divided into simple (with a minimum number of details) and complex (where additional design is required in the form of accessories and decor, such as dresses, ribbons, seam processing).
- Beginners should start with easier ones, these include: a Barney bear (or a simple bear made of fabric), a sock bear, a Tilda-style bear.
- Other popular but difficult patterns for sewing are: Teddy bear, ballerina bear, polar bear, mother bear with babies.
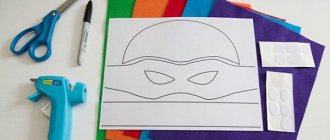
Teddy bear with a set of clothes
Your child will definitely like this toy, because in addition to the bear itself, you can make him several sets of clothes that can be taken off, put on, and even combined with each other. So, the materials you will need:
- Beige felt for the base pattern, black for finishing, bright colors for clothes.
- Threads for sewing to match the main color of felt, black threads.
- 4 buttons of medium diameter.
- Sintepon for filling the base.
- Pattern or drawing of a teddy bear of the desired size.
So, if all the materials are ready, we can start sewing a cute felt bear.
- Trace the prepared pattern onto beige felt. In total, you need to prepare two such bases (for the front and back). Next, carefully cut out the blanks along the contour, trying to keep the parts symmetrical. To do this, you can fold them in half when cutting, and when you have two parts ready, attach them to each other and align them if necessary.
- Next, cut out two small circles from black felt for the eyes and one slightly larger oval for the nose. Sew the eyes parallel to each other and the nose just below with black threads. Then use regular stitches to form a smile on the face.
- Place the buttons as shown in the photo - two approximately in the shoulder area and two just above the base of the legs.
- Now you can sew two beige bases together. To prevent the seam from moving out, you can secure both parts together with clothespins or small stitches. It’s better to start with the ear, and when you sew through the whole body and approach the second ear, fill the body with the prepared filler. Do not stuff too much, but use a long needle or pencil to try to fill all parts of the body. When the whole body is voluminous, you can sew up the head. Your wonderful bear is ready, all that remains is to make clothes for him.
Sewing clothes depends only on your imagination and the wishes of the child. You can take any color as a base, make holes for buttons and then shape any type of clothing. Additionally, you can make various appliqués on clothes - embroidery, pockets, figures, etc.
That's all, your felt bear is not only completely safe, but also a very interesting toy for a child.
For the little ones
Around 4 months, the baby begins to grab objects with his hands. It's time to make soft felt toys for him. This material is pleasant to the touch and does not cause allergies. With it, it will be easier for the child to explore the world around him.
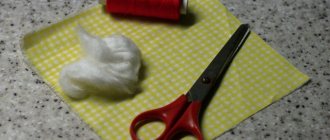
Caterpillar
This fun craft is super easy to make. Collect pieces of felt of different colors and cut out two identical circles with a diameter of no more than 10 cm. Decide for yourself how many sections the caterpillar will have. The best option is 9.
Place circles of the same color in pairs. Insert a foam pad inside each pair and begin sewing by stitching the “legs” on both sides. Assemble the structure by gluing pieces of Velcro to the center of each piece. Only attach Velcro to the head and end of the track on one side.
Sew or glue on the eyes, mouth and nose, as well as two horns that stick out in different directions from the front. Now all that remains is to connect all nine elements with Velcro. A child will play with pleasure with such a bright toy.
Seven-flowered flower
A flower with seven petals with different fillings will not just be a toy for a 6-7 month old baby. This will also develop tactile sensations. The product is very easy to work with. Cut out two circles from felt - the center of the flower. Make a pattern of petals and cut 14 pieces in pairs according to color.
Apply fillers to each petal:
- pipes from the handle shaft.
- twisted snake rope;
- buttons;
- beads;
- foam;
- crispy packaging;
- pimple film;
Cover the top with the other half of the petal. Sew them together in pairs with the filling, and then sew them onto the felt circle one by one. You have now turned the toy into a learning resource.
Puzzles
These educational toys are suitable for one-year-old children. Select a model of simple and high-quality schematic images from the photo:
- car.
- apple;
- locomotive;
- curly;
- flea;
- boat,
Transfer the design to felt and cut out the shape along the contours. Prepare a square of lightweight felt so that it is larger than the cut out figure. Sew the hedgehog in the center of the square. Mark the cutting line of the puzzle. It does not have to be strictly horizontal or vertical. You can also make curly ones.
Cut the product along the line. Place light felt inside one half and sew along the edges. Trim off any excess felt. Do the same with the second half of the puzzle.
To make it fun for your son or daughter to solve puzzles, you will need to create several images of this type with different applications. Then mix them up and let your child try to choose the two “correct” halves and put them together.
Little soft bear
To make such a wonderful bear you will need a few materials.
- Plush felt in a light shade.
- Threads to match.
- White felt.
- Pink threads.
- Printed teddy bear.
- Sintepon for filling.
So, as mentioned above, to make such a bear you need plush felt, or you can look for plush fabric. The stages of working on a toy are simple:
- Pin the pattern with two layers of felt, pay attention that the fabric needs to be connected with the fleecy side inward.
- Using a machine, sew along the outline of the entire pattern, with the exception of a small section through which you will fill the body.
- If you don’t have a machine, then you need to cut blanks from two layers of fabric at once. Secure the two layers of fabric together with a pin and carefully sew along the edge almost the entire base, leaving a small area for filling with padding polyester.
- Turn the toy with the plush side out.
- Fill through the hole with padding polyester.
- Sew the remaining area.
- Using black thread, embroider eyes, nose and mouth on the face.
- Cut out two small circles from white felt and sew them with pink thread in place of the cheeks.
- To give it an even cuter look, you can cut out a heart from white felt and sew it onto the bear with pink threads.
A toy of incredible beauty is ready to delight its owner.
The general principle of creating light, beautiful toys
The main principle of creating a beautiful and neat felt toy is the use of pre-prepared patterns that will be transferred to the material. Many templates can be found on the Internet. If you wish, you can make a pattern yourself if it is not available online. To do this, a model of the future toy is outlined, and then each detail is transferred to thick cardboard.
Hippo pattern
In addition to the basic rule, it is also important to adhere to the basic principles of working with felt during the sewing process:
- select threads for the product. They must match the fabric in color or, conversely, be contrasting against its background;
- use step-by-step instructions and a diagram to create a particular toy, which describes the execution steps in detail;
- Sewing spare parts for a future toy requires a seam of 2-2.2 mm. The parts are small, if the needlewoman sews them with a standard three-millimeter seam, they will all be angular and ribbed at the seams.
You might be interested in: Making your own doll things
Soft teddy bear for playing and sleeping
This toy is suitable even for the little ones. You can put the bear in bed, take it with you for a walk, etc.
To make it you will need:
- Two sheets of A4 felt.
- Milky and black felt.
- Threads in color.
- Sintepon for filling.
Process of creation:
- Draw a pattern yourself or download the one you like. Trace the outline of the pattern and cut out two parts.
- Prepare three round circles of light felt and three more smaller black round pieces.
- Sew the large circles to the base of the toy first, then the smaller ones. Form the bear's face in this way.
- Sew two large pieces, leaving a small hole for filling with padding polyester.
- Fill the bear with soft stuffing and stitch the rest.
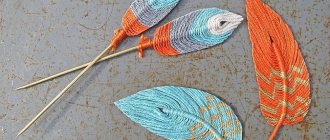
Bird for a flower pot
A cute yellow bird with green wings can decorate any flower pot. The manufacturing process is so simple that you can safely involve little helpers.
This activity will be useful not only for playing together, but also for teaching children perseverance and patience.
We will need the following materials:
- 2 sheets of felt in green and yellow colors;
- Threads of the desired color;
- Sushi stick;
- Sentipon for stuffing toys;
- Two ribbons of different colors;
- Buttons.
Main stages of work
- On thick paper, draw the outline of the bird and a small wing and cut it out with scissors.
- Pin the template to the yellow felt and trace the outline with chalk.
- Carefully cut out all the parts with scissors. For the wing, use green felt.
- Sew the pieces together using even stitches. Stitch length is 0.3-0.4 mm.
- Stuff the bird loosely with centipon so that the toy is soft.
- Connect the wing to the bird using a button.
- Insert a sushi stick between the loops on the bird’s belly and secure with glue.
- Tie two bows from satin ribbons of different colors on a stick.
- Embroider eyes on a toy or glue ready-made eyes.
You can make a bright cockerel with feathers from multi-colored felt or an original chicken. You will need yellow felt for the chicken and white felt for the eggshell. Such toys will decorate even the simplest flower pot.
Felt bear
You can make a more detailed toy. To do this you will need some materials and diligence. The sewing process is simple, and the result will definitely please you.
- Print out the pattern details for the body, as well as the muzzle, ears and tummy.
- On the main color of the felt, trace the base of the pattern twice. From a contrasting color, cut out individual parts - ears, muzzle, tummy.
- Attach contrasting pieces to the base. Sew the two parts together, after filling them with padding polyester.
Additionally, you can sew a moon from yellow felt and make a composition of a felt bear on the moon. This toy is perfect both for decorating a nursery and for playing.
DIY felt mouse: ideas and patterns
A felt mouse can become a cute mascot toy for the new year 2022. But strictly speaking, the symbol of the year according to the eastern calendar is a white metal rat. Don't be surprised, but in the East the rat symbolizes success and prosperity. And those who are lucky enough to be born under this sign are gifted with charm and attractiveness from birth.
Rats and mice have a fair amount of cunning, tenacity and dexterity. They wisely avoid the traps that life sets for them. In addition, they are talented and love art and creativity.
So, what does 2022 bring us according to the eastern calendar? The year of the rat is good for saving money, changing your place of residence, or finding a job you like. All doors will be open to those who are not afraid to change their lives and start new projects.
As you can see, the mouse is full of surprises. We believe that she will pass on to all of us a little of her charisma, perseverance and success.