Any girl’s favorite toy is a doll, because the child imagines her as her daughter, whom she can put to bed, change clothes, treat, and educate. Parents strive to make their little princess's dream come true and give her a plastic doll, Barbie or Lol. Only a girl can never have enough dolls, and her wallet can be ruined if she always buys toys in the store. Try to make a doll with your own hands using the simplest felt. We will explain in detail how to do this in this article.
Felt doll pattern, 3 options
For needlewomen who have at least minimal experience in creating felt dolls, we will present several interesting patterns. We did not specifically indicate the sizes so that you can decide for yourself which doll you need - large or small. Note that a felt doll will look beautiful in any format; here it is better to be guided by the wishes of your princess.
These versions of dolls can be made flat and voluminous by stuffing them with cotton wool. The simplest option is flat dolls, they are made quickly - sew all the parts and the doll is ready. Therefore, you can make several dolls for your daughter at once, and she will be incredibly happy about it. If she likes bulky toys, then it will take a little more time to make the product look neat. However, with experience, you will get the hang of it and be able to make three-dimensional felt dolls quickly.
General recommendations for sewing a doll
- use a fine needle. Thick may leave holes in the fabric
- sew the doll from the wrong side or right side, using different types of seams
- when sewing from the wrong side, leave seam allowances sufficient to prevent the seams from coming apart
- select threads for making according to the color of the product
- Small dolls are easy to sew by hand, large ones are more convenient to stitch on a machine.
How to remake a pattern
The size of the pattern can be changed directly on the computer (for example, use the Paint program for this) and printed on a printer. But you can do it differently. Enlarge the image on the monitor, attach a sheet of paper to the screen and redraw the diagram.
To make most felt dolls, you can use universal patterns. You just need to change some elements to your taste. Use your imagination, feel like a stylist and create. Hairstyle, eyes, lips, cheeks, jewelry - all this will add novelty, individuality and extraordinary charm to your doll. Here are some examples showing how different doll models are created from one pattern.
Images created based on this toy.
By changing just our doll's hairstyle, we get this beauty
We depict closed eyes on the doll's face, paint on the eyelashes - we get such a shy princess.
We make hair from yarn - and we get a completely new image of our doll. And all this beauty is made on the basis of one simple pattern.
Or you can do it like this - having some painting or embroidering skills, depict expressive eyes on the doll’s face, draw on or embroider eyebrows, eyelashes and lips with thread, and decorate the hair from yarn into a voluminous hairstyle. She turned out to be such a wonderful girlfriend.
or this cute dreamer, sewn using the same, completely simple technology:
The flight of fancy is not limited. Once you start, ideas will flood your head. You definitely can’t buy such toys anywhere; each creation can only be in a single version. And, of course, any girl would be happy to receive such a cute felt doll as a gift.
Seams used when sewing parts together
Needle forward Quite simple. The stitches are made small.
Back stitch This stitch replaces the use of a machine. The stitches are made uniform.
Overcasting It is used to overcast the edges of the product.
Loop stitch for beautiful finishing of the edge of the product.
Zigzag Used when cutting out appliqués on dresses.
Secret Used when assembling from the front side.
Do-it-yourself felt doll, step by step with photos, 3 options
For those who have never tried their hand at needlework or worked with felt, we will present step-by-step master classes so that you can learn how to create toys for your child yourself.
Option #1
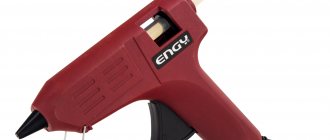
- First, prepare the necessary material: beige felt to sew the doll’s body, as well as felt of a different color, from which you will create the image of the doll. In addition to felt, you will need padding polyester or other filler, needles and threads.
- Next you will need a pattern. Print this one:
- All body parts must be cut out in duplicate. They will be stitched and stuffed with filler:
- Sew 2 small buttons to the head from the side of the face, which will be the doll’s eyes. Using a regular stitch, sew a smile on the future doll.
- Next, hair is cut out from brown felt and clothing elements. You will only need to sew on the hair because the clothes are simply put on the doll. At any time you can sew another and change the doll. By the way, it will be more interesting for your daughter to play with such a doll, because she will be able to create a new image for it every day.
Option No. 2
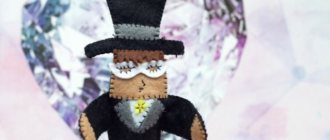
- To make such a beautiful doll, you need to prepare beige, brown and several options of green felt (light green and lemon shades are suitable). Also purchase threads that match the color of the felt. Be sure to buy red threads. To decorate the doll, you will need several types of 10 cm ribbons. One of them must be green. Also buy green beads, green and white beads (literally 2 pieces each). You can simply paint the doll’s pink cheeks with lipstick or real blush.
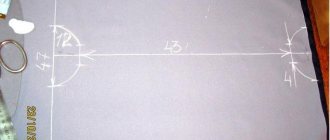
- Next we prepare paper patterns for the future doll. They will need to be cut out, and felt elements will be made from them so that they are all the same:
- When you make felt blanks according to the pattern, they should look like this:
- First, sew the parts for the body together. While sewing, fill it with holofiber or other filler so that it is evenly distributed and the doll turns out neat.
- Next, work on the head of the future doll. Sew on the eyes - use black beads for this, embroider the mouth with red thread, draw the cheeks.
- Next you need to sew the head to the body:
- Next, we sew the dress to the doll using green elements, which need to be alternated in a checkerboard pattern, as shown in the photo below:
Please note that each petal must be securely sewn together, and also sewn to the body not only on top, but also in the middle:
- When the doll's skirt is completely ready, then proceed to sewing on the corset:
- Next, we make slippers for the doll - we simply sew pieces of green felt to the legs and decorate it all with a green shiny ribbon, thus creating an imitation of ballet shoes:
- We make a belt for a dress from a green ribbon for a dress:
- Next we work on the wings for the doll - we take 2 blanks and sew them together in the center. We decorate the wings with beads along the contour:
- Next you need to sew the hair with bangs - these are brown felt blanks:
- Once the felt hair is completely ready, sew it to the doll's head:
- All that remains is to make decorations in the form of flowers for the hair, to which you need to sew only a white bead:
This completes the process of preparing the pupa. You can, of course, choose any other color of felt you like, not just green. Only in this case, select other decorative details in suitable shades.
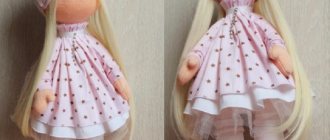
Option #3
- Choose felt in two colors. One of them should be beige, because you need to create the doll’s body from it, and the other should be any color. Also prepare threads of appropriate shades, 2 black beads to make eyes, sewing needles and filler. It is convenient to work with holofiber. Also, take beads and beads for decoration.
- Next, we make paper patterns so that all the felt parts turn out perfect:
- Using the blanks, we cut out the felt elements and sew them together with neat stitches, gradually filling them with halofiber:
- After all the elements for the body have been made, sew the hair blank along the contour with threads:
- Next, we sew together the parts of the body, put a dress on it (it can be removed from any doll that your child has not played with for a long time), and only then sew on the head:
- After this, we sew the felt bangs to the doll’s head:
- Then we sew on the hair from the back and the handle:
- After this, you need to decorate the doll’s hairstyle with beads and beads:
- The last step is to sew eyes and eyelashes to the doll’s face:
Any of the products we offer will look very decent. Once you get your hand on felt, you can turn your hobby into a whole business in the future. Because now plastic toys are not in fashion, and mothers are happy to buy their girls fabric dolls, especially those made of felt.
What is needed to make a doll
- Felt. We choose the colors ourselves, not forgetting about the flesh tone for the body
- Threads: to match the felt - for sewing together parts of the toy and multi-colored - for embroidering individual elements
- Filler. You can use padding polyester, holofiber, padding polyester, cotton wool, the remains of unnecessary pieces of tane or threads, previously finely chopped
- Pins with colored heads
- Beads or buttons for eyes – 2 pcs.
- Scissors
- Chalk for drawing.
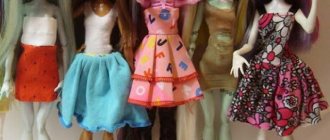
Felt dolls with clothes, details with photos, 3 options
It is enough to simply make only the torso of the doll, so that it is convenient to change her clothes and change her hairstyle every day. If your daughter is a dreamer and loves to change the looks of her favorite doll, then you will definitely like the master classes below.
Option #1
In this version, we will immediately tell you how to make a tablet in which you can store a felt doll and her entire wardrobe made of felt. Although you can also store paper dolls in such a tablet.
What do we have to do:
After this, we make a felt doll and clothes for it. First, we make a blank out of paper - draw the silhouette of the future doll on it. From the pattern we make felt blanks:
We sew both felt parts together. We fill it with holofiber and make very neat stitches:
Next we make the doll’s eyes and sew them on. At the same time, we make clothes for the doll. So that it can be changed, we sew Velcro onto each item of clothing:
Using the same principle, we prepare other clothes for our doll, which will be stored in the tablet.
Please note that an ordinary paper doll was attached to the tablet in the photo, so that you can simply guess where and how the felt doll and her clothes should be located.
If you are going to a girl’s birthday party, then you can 100% consider this gift option. You will not only please the birthday girl, but you will also save money, because such a set in a toy store will cost a lot of money.
Option No. 2
You can cut out blanks for a paper doll, and use the same principle to make felt elements. The paper pattern is applied to the fabric, the fabric is simply cut out and decorated with any decor. Essentially, the doll and her wardrobe are ready:
Option #3
For a felt doll, which you can make using any of the options presented above, you can sew a dress from fabric.
We suggest you make this interesting outfit for a doll in ethnic style:
- First, prepare the necessary material for the dress - choose a fabric of your favorite color, select decor for it in the form of ruffles, lace, ribbons and buttons. You will also need literally 6 cm of hat elastic, needles, threads, scissors and a sewing machine.
- Next, make a paper pattern for a dress designed for a doll 19 cm high:
- Using this pattern, cut the fabric of the same shape:
- Sew a ribbon with lace to the places where the sleeves are. Cut out the neck:
- Make loops from the hat elastic, and then finish all the edges of the fabric to make it look neat:
- As a result, you should end up with a bodice like this for your future dress:
- Next, we make a skirt - we simply grind a piece of fabric, sew decor on it, and then connect it with the top:
- Sew buttons to the dress on the front and back:
As a result, the felt doll will get a very original outfit:
So that you have ideas on how else you can sew a dress for such a large felt doll made of fabric, we will share with you some options:
Different types of seams
You can sew the parts together by machine or by hand. It makes sense to machine stitch large seams. Small toys with a lot of small details, turns or bends in the seams are easiest to sew by hand.
To connect the parts you will need different types of seams:
- Simple, when the parts are stacked on top of each other, and the needle moves forward all the time. This stitch is used to baste or temporarily hold pieces together.
- Back the needle. In this seam the stitches go in loops. The needle is stuck behind the place where it originally came out. This makes the seam stronger and neater.
- Overcast. With this method, the parts are connected edge to edge, and a thread is wrapped around both edges. If you then turn the part out, the seam will be invisible. Also, loops of thread around the edges hold the pieces together more firmly.
- Looped. It is similar to overcasting, but it creates an additional, tight loop around the edges of the fabric. Thanks to this, the seam is the strongest. This seam is most often used to sew together pieces that then need to be turned out.
In addition to these main types of seams, there are also their varieties, when the stitches are made hidden or, conversely, artistic. In this way, you can sew on external parts or even sew all the clothes for the doll. For example, details of a dress can be sewn with contrasting color threads and wide stitches.
Maggie Iacono felt dolls
Many people know such a self-taught American needlewoman as Maggie Iaccono. She created a very large collection of felt dolls with her own hands, although initially she just wanted to make a voluminous fabric toy for her daughter.
Since most of the dolls that we have already presented in this article are girl dolls, in this section we will tell you how to make a boy doll:
- First you need to make head patterns from beige or pink felt:
- Next, the cut parts need to be connected to each other using a sewing machine:
- In the process, when you sew together parts of the future head, stuff it with holofiber to make it voluminous. On the front of the head, draw the eyes, nose, and mouth of the doll with felt-tip pens:
It is very convenient to draw parts of the face by placing the head on the neck of the bottle:
- Next, cut out parts of the body of the future doll from beige felt and sew them using a machine, stuffing each part with filler:
- Cut out clothing items for the finished doll from felt and then sew them on. After this, all that remains is to supplement the image of the doll with some details that you consider necessary to add:
Preparing the pattern
Before creating a doll, you should choose the image of the doll. If the toy is planned for a small child aged from six months to two years, then it is better to make a small doll with more rounded details.
This way it will be convenient for the child to hold it, shake it and roll it around. The subtlety of the details and the presence of fingers on the baby’s hands are especially uninteresting. It is easier to start sewing dolls with such models, since they are easier to sew, turn inside out and design.
An older child from 2 to 7 years old is already interested in playing with a new, soft friend and inventing different stories. For such purposes, a doll with a good figure, clearly detailed arms and legs, the ability to change clothes and a beautiful, expressive face is suitable. Patterns for such heroines will also be very complex.
Instructions on how to make and transfer the pattern onto fabric:
- First you need to decide on the size and model of the doll. Select the desired pattern template.
- Select paper for the pattern. This could be tracing paper or thin office paper.
- There are two ways to transfer a pattern to paper: print it on a printer or attach it to the screen and trace it. It is more convenient to print large and complex patterns. It's easier to trace small pictures.
- If you plan to use the pattern several times, then you need to transfer it to cardboard. Then you will get a semi-professional pattern that can be used for cutting.
- The pattern needs to be cut out, placed on the fabric and outlined with chalk or pencil. The pattern line should be clearly visible.
- After this, all that remains is to cut out a piece of fabric, leaving 0.5 cm around the perimeter for seams.
Advice. To create several different dolls or a whole family, you can use different patterns, but give the characters different hairstyles and clothes. Sewing dolls using one pattern is faster and easier. And playing with the whole family is more interesting.
Hair for felt dolls
You can make hair for a felt doll from any material. We will present you the most common options used by needlewomen:
- You can use regular wool threads. Fold them in half, cutting off the required length in advance, and then sew them to the head by hand:
- You can make hair from felt. In all the master classes that we presented to you above, we used exactly this option, because it is the simplest and most understandable of all:
- Curly hair for a felt doll can be made from satin threads. To make it clear to you what can come out of them, we have attached photo instructions for you:
You can also use natural hair if you have the opportunity. A felt doll will look beautiful in any case, no matter what material you choose for making hair.
Benefits of felt for dolls
Felt is a natural fabric made from the down and wool of sheep, goats or rabbits. In its structure, it is a little similar to felt, but much thinner and more flexible.
It is for its naturalness and plasticity that felt is so valued. It is for these reasons that it is well suited for making dolls, since the plasticity of the material makes the dolls more natural. It is easy to make a face from this material and paint it.
Complex elements - arms and legs - also turn out very natural. The fabric can take on natural, rounded shapes.
Advantages of felt when making dolls:
- The fabric does not have a reverse side, you can use any side;
- Does not crumble, does not crumble;
- Moderate stretch in any direction, suitable for cutting in any direction;
- Suitable for cutting in any direction, which saves material;
- Easy to cut out small parts;
- The material is easy to sew by hand and by machine;
- It is easy to apply drawings to the material with a felt-tip pen, paint and other means;
- Many different colors with a uniform texture.
Advice. Felt is not only comfortable for adults, but also for children. This is the material that can be offered to a child for his first sewing experiments.
Felt dolls with clothes, template 3 options
Doll for a felt house
Making a doll for a felt house is very simple. Necessary:
- Cut out the details of the future doll from felt in one copy:
- Sew all the parts together - the doll is ready:
Even a child can handle making such a doll. But, if you want it to have a beautiful and neat appearance, then it is better to stitch each element using a sewing machine.
Dolls for felt books, 2 options
Once you try to make a felt doll, you will be hooked. Making a doll is inspiring, relaxing and uplifting. This kind of creativity will especially appeal to mothers of girls and grandmothers. Therefore, if you have free time and don’t find anything to do with yourself, try your hand at creating a felt doll.
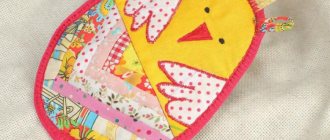
Charlotte felt strawberry with template
Felt boy
Dolls dressed as Mickey Mouse
Mickey Mouse is very popular, so I’m also sharing my master class on creating Mickey Mouse ears on a headband, by the way, MK brings me new visitors to the site every day, which means the topic is in great demand, I’m in a hurry to share it with you.
DIY Mickey or Minnie Mouse ears. Step-by-step master class on creating Minnie Mouse ears.
Felt ballerina
This is interesting: Swimsuit pattern (size 34-42 euros)