Photo: mokrausova-ds11.obrpro.ru Autumn comes and brings with it an invaluable treasure trove of materials for amateur activities. Yellow leaves, acorns, dried herbs with flowers - all this allows you to bring new and new ideas to life. This is especially true for kids. So, here are 8 ideas for beautiful autumn crafts for kindergarten with your own hands!
Topiary of cones or chestnuts
To make a charming tree, you will need a pot, a foam block filler and the pine cones themselves. Make the base of the tree with plasticine or take a small ball and glue the pine cones with glue. For decoration you can use scraps of fabric, ribbons, buttons - anything!
Photo: fishki.net
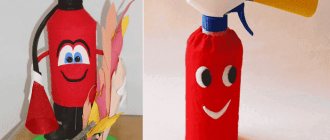
Men's accessory
If you think that a hat is an exclusively female accessory, then you are deeply mistaken. Check out all the great options for holiday hats for boys.
Get inspired, get creative ideas and create your own unique craft hat for kindergarten for the Golden Autumn holiday.
Chestnut figurines
Animals and fairy-tale characters made from chestnuts will be no worse than those made from cones! And sometimes it’s even better, because the shape of the chestnut is more neutral. For connections, arms and legs, toothpicks and matches are suitable.
Photo: pinterest.at
Paper crafts for children: 8 simple and beautiful ideas
To make such a cute hedgehog in an autumn meadow, we will need:
- Styrofoam
- Glue
- Napkins
- Acrylic paints
- Leaves
- Rowan
- Cones
- Coffee beans
- Glue Moment
Make a blank for the body of a hedgehog from a piece of foam plastic
Glue the workpiece with napkins using PVA glue, creating several layers
Leave the workpiece to dry.
Glue coffee beans in rows
Paint the face with white paint and glue on the eyes
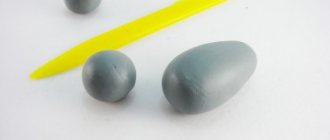
Squirrel from cones
You can’t do without a cute squirrel in the autumn forest.
We will need:
- 2 cones
- 2 acorns
- Plasticine
Attach 2 cones with plasticine, connecting them to each other with their wide sides.
One cone stands vertically, and the second at an angle of 45 degrees (this will be the tail).
Glue the acorn in place of the head and decorate it with eyes, ears and mouth.
Make paws out of plasticine and give the squirrel its harvest.
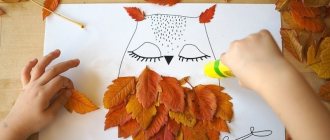
Herbarium
Dry autumn leaves of all colors and shades are a godsend for applications. And this is real creativity that develops imagination and fantasy. No two leaf crafts are the same!
Photo: fishki.net
What to give a 5 year old boy: ideas for the best gifts
DIY top hat
For a hussar costume (in kindergartens), it is often necessary to make a hat in the shape of a cylinder. This model, despite its complex shape, does not present any particular difficulties.
To work you will need a compass, a sheet of cardboard of sufficient size, glue, templates, textiles and ribbon for decoration.
Sometimes a large feather and a bright buckle are used instead of a ribbon. Instructions on how to make a paper hat with your own hands:
- On a prepared sheet of cardboard, draw a circle with a compass. The diameter of the circle should correspond to the size of the hat (basic size).
- A second circle is drawn around the first figure, which should have a larger diameter. This part is a blank for the bottom of the future hat.
- On the second sheet of cardboard, the pattern is repeated, but a third circle is added in the center.
- The first blank is cut out with scissors, and then the surface from the first ring to the second is cut in the form of wide strips. Set the part aside until final assembly.
- Next, continue working with the second sheet of cardboard. Cut out the drawn part according to the outlines of the outer circle. Then the central figure is cut out, thus obtaining the brim of the hat. For subsequent fixation, it is necessary to cut a section of cardboard in the form of strips or fringes.
- The walls of the cylinder are rolled up from the third sheet of cardboard, fixing the free edges with glue.
- The very first circle is glued to the top of the resulting cylinder, using paper strips for fastening.
- The second ring is “put on” the cylinder, and then fixed to the base using strips of paper.
For the simplest model, it will be enough to paint the craft in bright colors. To bring a more complex idea to life, you will need to cover the walls of the cylinder and the brim of the hat with textiles, on top of which a feather or edging in the form of a satin ribbon is attached.
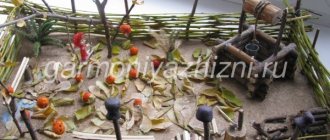
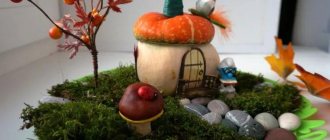
Houses and cities
If all the figures and materials have already been mastered, you can assemble a whole house or a small city from several. Plasticine, small kinder toys, twigs, sticks, pebbles and the like will come in handy.
Photo: culture.ru
10 ideas on how to make a lapbook with your own hands
Materials for creative work
Today it is customary to create homemade hats from paper, cardboard or fabric, depending on the skills and experience of the master.
To work, you will need to prepare a workplace, including a table, lighting and the following set of materials:
- Thick cardboard and colored paper. For individual performances or creative exhibitions, you can use illustrated paper and foil.
- If you plan to work on sewing doll clothes, it is better to prepare fabrics (felt, guipure, satin) in advance.
- To decorate finished crafts, you can use satin ribbons, a veil or any mesh fabric, bows or flowers made of corrugated paper.
- Hats for boys can be decorated with paper fringe, ribbon or border (for example, a pirate model); brooches, cockades, and other insignia can be placed on the cap.
- For most types of work, you need scissors or a sharp stationery knife, glue, thread and a needle.
- For textile crafts, it is better to prepare patterns or templates according to which the main parts will be cut out.
For inexperienced craftsmen, it is better to familiarize yourself with video lessons on preparing parts, as well as the final assembly of the craft. Detailed instructions for making fashion accessories or decorative elements will come in handy.
Autumn crafts for kindergarten - photos and ideas
This is just a small part of the interesting crafts for children that are suitable for kindergarten. Get more ideas!
Photo: culture.ru
Photo: podelunchik.ru Photo: c-deco.ru
Photo: joy-nt.rf
Photo: vplate.ru
Photo: iwoman.bg
Photo: vplate.ru
Photo: tytpodelki.ru
Photo: pinterest.se Photo: pinterest.com
Photo: culture.ru
Photo: fishki.net Photo: paper-land.ru
Photo: kalinovkasch.minobr63.ru
Photo: megamaster.info
Photo: vidtube.ru Photo: tr.theanswerexperts.com
Photo: dop.pskovedu.ru
Photo: vapezen.ru
Photo: detkisovet.ru
Photo: vsesvoimirykami.ru
Photo: list-vk.com
Photo: sadpodelok.ru
Photo: kids289.ru
Photo: pinterest.ru
Did you like the post? Subscribe to our channel in Yandex.Zen, it really helps us in our development!
How to preserve maple leaves for crafts, how to process them?
Important: Autumn foliage is a short-lived material; the leaves quickly darken and curl. Therefore, many people ask the question - how to preserve leaves? It turns out there are several ways.
Method 1 . Dry the leaves in a book under pressure. Method 2 . Iron the leaves between two sheets of paper. A solid base must be laid down.
How to Preserve Maple Leaves for Crafts
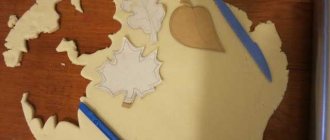
Method 3 . Dip the leaves into melted paraffin. The temperature of the melted paraffin should be medium so that the sheet does not turn black. This is done as follows:
- Melt paraffin in a wide bowl
- Dip the sheet into warm paraffin
- Place the maple leaf on a piece of paper to dry
Method 4 . Soak the leaves for several days in a solution of glycerin and water. The solution should be in the following proportion: 1 part glycerin, 2 parts water.
Even toddlers love corn!
Contained in sections:
Vegetables. Everything on a vegetable theme for children 8848
Showing publications 1-10 of 272. All sections | Corn
New
Photo
The best
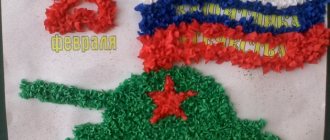
Summary of the master class on appliqué from corn grits “Gift for Dad” Summary of the master class dedicated to February 23 “Gift for Dad” Master-teachers: O.S. Pronina, N.S. Eckhardt Date: 02/18/2021 Time: 9.00 Venue: group Duration: 20 min. Goal: Creating a gift for dad for Defender of the Fatherland Day...
OOD summary for the regional component “Where did corn khinkal come to our table”
Author's OOD on the topic: “Where did corn khinkal come to our table?” The purpose of the OOD: to introduce children to the traditions, customs and way of life of their people and their native village. To promote the preservation and transmission of spiritual and ethnocultural values to subsequent generations. Tasks:…