If you don’t know what craft to make for school on the topic of fire safety, then read the article and look at the photo.
It is very useful for a child to know that fire is not a toy. Thanks to classes in kindergarten or school, children clearly learn how to behave in the event of a fire or how to prevent it. Teachers or educators, in order to reinforce the material, assign homework - to do work on the topic of fire safety. Some parents can't figure out what to do.
Don't worry - the task is only difficult at first glance. In fact, crafts can be made from various materials, and they come in varying degrees of complexity. Even five-year-old kids can do some of them under your guidance.
Plasticine models
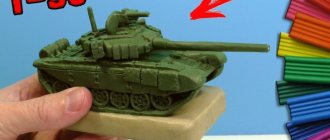
One of the first craft materials that a child gets acquainted with in early childhood is plasticine. You can make a beautiful fire truck out of it.
- Two large parts are formed from red plasticine - the base and the cabin, which are connected to each other.
- Windows made of thinly rolled white plates, yellow circles of headlights, a small blue signal light and a black bumper (a strip of black plasticine at the front bottom of the cab) are fixed to the cab.
- Thin strips and a number (01) made of white plasticine, as well as a fire hose coil in the form of a spiral made of gray plasticine flagellum, are installed on the base.
- The wheels are made of 2 parts: first, a disk is formed from black plasticine, a notch (tread) is applied to it along the perimeter, and a yellow circle is attached in the center.
- The ladder is made of gray material: cylinders with a diameter of 5-7 mm are formed and installed in parallel. Steps of the same color are attached to them.
Plasticine is a very malleable material. In addition to the car, you can make figures of firefighters out of it. A firefighting helicopter or airplane looks modern.
Homemade cereal products
Simple DIY creations are made using various cereals: semolina, millet, rice, buckwheat, pasta.
To create a panel, the grains are first painted by mixing them with paint of the required color in a special container. Then dry on a napkin or newspaper.
To create a fire truck, the contours of the car are drawn on a solid base. Spread glue inside it and sprinkle with cereal to form an even thin layer:
- Red – cabin, body, stairs;
- White – doors, stripes;
- Gray – bumper, glass, small parts;
- Black - wheels.
Gently shake off excess cereal. When the car is ready, you can create a general background in the same way - road, smoke, fire, etc.
More complex crafts
As you gain certain skills, you can move on to more complex crafts. Already at school age, interest in other technologies appears. Attention is paid to quality of execution, volume and layout.
Volume projects
Volumetric crafts are created in different ways:
- Volumetric figure. An example would be a campfire, a common cause of fire. Logs (cylinders of thick paper) are laid out on a sheet of cardboard; a bunch of “flames” cut out from colored paper in red, yellow and orange are collected in the center.
- Three-dimensional pictures are made in the form of a double-leaf postcard made of thick paper. On the inside of one of the halves, various figures are glued to the bent edge: an image of a fire, trees, which are pressed by the second flap, but when it is turned away, they take a vertical position. On the second half, a drawing or appliqué is made. When positioned vertically, it creates the main background of the picture.
Firefighter
A real fire extinguisher is obtained from ordinary plastic containers. The outside is covered with paper or a red cloth bag is put on. Attach mischievous eyes and mouth. The cap will fit any sprayer. If desired, it can be painted black. A cone is rolled out of colored paper and glued to the top. Thus comes the cheerful first assistant to fight the fire.
Every year thousands of fires occur, from which not only people, but also defenseless animals suffer and die. Very often the cause of fire is improper handling of fire. That is why children already in kindergarten begin to be taught that they need to take care of themselves, those around them and nature, and not play with flammable objects.
Joint creativity with parents helps children better understand and remember all the information presented in a playful form.
Making a smoke generator from a fire extinguisher with your own hands
To manufacture a device that increases the productivity of smoking semi-finished meat products and cheese, no significant investment is required. To assemble a smoke generator for smoking we will need:
- Fire extinguisher housing;
- smoke exhaust pipe
- compressor for air supply or fan (cooler)
- Nipple 3/4"
- Long 3/4" squeegee (for smoke removal)
- Tee 3/4"
- Union
- Copper tube, diameter 14 mm
The fire extinguisher is taken with a diameter of about 100 mm and a length of 400 - 500 mm. These dimensions will allow you to produce enough smoke for a smoking chamber with a volume of up to 1 m³. At the bottom of the container, two Ø 10 mm holes are drilled for the blower. It is located at a height of 50 mm from the bottom. For the top part we use a fire extinguisher cap with a 3/4" internal pipe thread.
From the fire extinguisher, smoke enters the smoking chamber through an inch pipe 150-250 mm long, screwed into the tee.
Various compressors with low capacity are suitable as a compressor:
- for aquarium;
- in this case, a computer (laptop) cooling fan.
Four options for using homemade products
The device is ready and can be used in four options.
PHOTO: YouTube.com The cylinder is filled with the appropriate liquid through the central tap. Do not fill the container to the top, you still need to pump in air with a compressor, leave room for it
PHOTO: YouTube.com The first use of the unit is pressure washing. You can easily wash your walls or car. You can also use a foam nozzle
PHOTO: YouTube.com For the second option, you only need to pump air into the cylinder. A stream of air will blow any dust and dirt out of any gaps. Suitable for cleaning instruments
PHOTO: YouTube.com If you pump oil into such a cylinder, you can easily lubricate the engine or prime the car
PHOTO: YouTube.com Finally, this unit will come in handy for gardening work as a compressor for pollinating plants. The pressure will be enough to reach the branches on the highest crowns
This homemade product, useful for everyday use, can be made from an old small fire extinguisher. A little fuss with assembling the adapters, but there are so many application options! Agree, all the work is worth it.
In addition, here is another idea from the same fire extinguisher for motorists:
Fire extinguisher
You will need: 2 spray bottles, black, white, yellow and red tape, scissors, water.
Master Class
- Partially cover the plastic body of the sprayer with yellow tape.
- Cover most of it with red tape.
- Add white and black stripes as decoration.
- Fill the spray bottles with water and let the kids play firemen.
The fire extinguisher is ready! I recommend watching this video!
“Ort kauіpsіzdіgі” balabakshaga arnalgan koloner.” “Fire safety” craft for kindergarten. Fire extinguisher
Applications
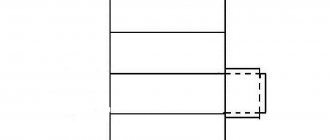
One of the most common trends in fire themes is applications. A simple craft in the shape of a fire truck is made from colored paper. The photo shows a cutting diagram. The outline of the parts is drawn on paper and cut out. On a thick sheet of paper on which the desired color background is created, the largest parts are first glued, and then the small ones are attached to them.
It is more difficult to make a composition. The photo shows a firefighter fighting a fire. His figurine can be cut out from a magazine or printed on a color printer, assembled from a certain number of parts cut out of colored paper. Lines and very small details are drawn with a felt-tip pen.
Brave firefighters - warm hearts!
In order for the kids not to be afraid of their uncle the fireman, but to know that he is always ready to come to their aid, we perform the “Fireman” applique.
- Take sheet A 4 and place it horizontally in front of you. It would be better if it was blue or dark blue.
- We find a picture for the blank and transfer it to regular cardboard. We cut out the blanks.
- We trace the blanks on colored paper from the back side.
- We cut out parts of our applique picture.
- We collect them on a blue sheet of paper and glue them.
- Now the fire. It will consist of several flames of different colors. You can draw it yourself or use blanks. Let's not forget about firewood. If you choose birch trees, then draw them. If there is another tree, colored paper will always come to the rescue.
- A fire hose can be cut out of paper, as well as water used to extinguish a fire.
All that remains is to learn a song about fire rescuers and the job is done with an A plus!
Do-it-yourself fire extinguisher - from a bottle, dry mixture, toilet paper
A fire extinguisher should be in every home, because despite its seemingly insignificant significance, such a device can prevent a fire in the room or even save someone’s life. Often, when it is necessary to use a fire extinguisher, a homeowner who bought it “just in case” is horrified to discover that the device has long expired. The cost of even a small fire extinguisher is quite high, so you can try to make a fire extinguisher yourself.
DIY fire extinguisher
For manufacturing, you can use improvised means, so the cost of a manual fire extinguisher will be low. How to make a fire extinguisher from a bottle, dry mixture and toilet paper without experience? This will be discussed in more detail in this article.
What is a fire extinguisher
A fire extinguisher or extinguisher is a special device whose task is to extinguish a fire . The extinguishing process is carried out using a special substance located inside the fire extinguisher. It extinguishes the source of fire. The device can be mobile or portable. The first type is used to extinguish large areas of fire, and a portable fire extinguisher is mainly used at the early stage of fire spread.
A fire extinguisher is the primary equipment that is used in the event of a fire being detected and allows it. Design and use of a fire extinguisher
Note! For larger fires, more powerful devices must be used, so home fire extinguishers are only suitable for use in a house or apartment. They are more effective at extinguishing small fires.
Classification
There are manual and automatic fire extinguishers - this is a classification based on the principle of operation. Manual devices are started by a person immediately after detecting a fire. Automatic fire extinguishers do not require human presence to operate Such devices are installed in rooms with a high level of fire hazard. As soon as the temperature exceeds preset values, the fire extinguishing system is automatically activated.
Types of fire extinguishers
Fire extinguishers are also classified according to their operating principle. There are such designs:
In domestic conditions, powder and carbon dioxide fire extinguishers are most often used - they are more practical. Now we will consider each of the listed types of devices separately.
Additional recommendations
If you made a fire extinguisher with vinegar and baking soda, do not allow these components to come into contact while storing the product. When combining soda and vinegar, you must open the bottle cap. If the flame is too large and a homemade fire extinguisher is not able to cope with it, leave it and leave the room.
Rules for working with a fire extinguisher
Only a properly manufactured fire extinguisher and compliance with safety rules will eliminate the source of the fire and prevent unpleasant consequences.
Benefits of crafts
The purpose of such children's creativity:
- introduce children to the rules for handling flammable objects;
- create an algorithm of actions in case of fire;
- teach respect for property and nature.
Children get great pleasure from creating masterpieces with their own hands. At the same time, they master fire safety standards and develop their imagination.
Given the complexity of the topic, the child will need adult help. Making crafts together brings parents and children closer together and evokes a lot of positive emotions.
Skills such as fire safety are studied in special classes.
To reinforce the material, children are often given an assignment: to make a craft on a fire theme. Where to start and what technique to choose?
Road traffic
Applications on the topic of traffic rules are especially interesting. Since using paper it is easy to depict traffic lights and road crossings.
Sometimes it happens that a child can confuse the traffic lights and start crossing the road at the green traffic light intended for cars. If an adult does not react in time, this can cause irreparable consequences for both sides of the movement.
People should look at their traffic light, which has two lights, green and red. Accordingly, the red path is prohibited, and the green path allows movement. Picture it that way!
On a large traffic light with three colors, draw a large red cross. And on the second there is a green tick in a circle.
Through these activities, you can learn all the basic aspects of traffic that your child will need. And when the child goes to school alone, he will be able to easily navigate and not get lost when he sees two traffic lights.
Be careful about your child's safety. Crafts are just a way to explain the correct actions in the event of a fire or other threat. Or behavior to prevent such dangerous phenomena. You can use photographs of a burning forest. They will definitely evoke sympathy for the inhabitants of the forest.
Source
How to prevent fires and accidents in the process with children and adolescents? Parents, kindergarten teachers, and school teachers are puzzled by these questions. Competitions are held to make fire-fighting crafts. Festivals of propaganda teams, songs, poems and dances. But again and again the power of fire escapes control. After all, every 6th fire occurs due to children's pranks with fire.
Somewhere, a child struck a match to see a beautiful light that appeared in his mother’s hands after she picked up the magic box. Somewhere, elementary schoolchildren set poplar fluff on fire to demonstrate to the kids a “fiery snake.” And apartments, houses and forests are burning. And it’s good if it ends with a burnt house. It is much worse when fire sacrifices human lives. Because again they listened to it somewhere, watched it, started playing it. Therefore, it is necessary to clearly and specifically remember not only the basic actions in case of fire, but also the rules for handling matches and electrical appliances. But monotonous cramming will not help here.
It is necessary to memorize consciously. How, if not when making fire-fighting crafts and wall newspapers, can you remember this? By creating crafts on this topic, children begin to be more conscious about fire safety. Continuity helps a lot. 4th or 5th graders prepared a performance by the propaganda team, came up with models of fire-fighting crafts, and went to grades 1, 2, 3 to conduct master classes on making them.
Fire safety crafts made from matches
When you make crafts from matches with your child, explain what dangers can arise if the material is not used correctly. From this raw material you can make both simple applications, like in the first picture, and entire layouts, which will require a lot of time and matches. But the job will be perfect.
Trimming
This technique of three-dimensional crafts is so simple that even a small child can handle it. The material for crafts is paper: napkins, corrugated paper, plain colored paper.
This is a mosaic method of laying out rolled pieces of paper in the shape of a cone. The paper, cut into squares, is twisted into a cone using a rod, pencil or ballpoint pen.
The resulting trim piece is glued onto the base paper. You can make a panel from plasticine and glue paper blanks onto it. The end pieces are pressed with a wooden stick, match or toothpick. Paintings made in this way from corrugated paper look like terry voluminous appliqués.
Crafts from plastic bottles for children
Don’t rush to throw away plastic bottles, it’s better to give them a second life. Plastic is an excellent material for crafts; you can use it to make almost anything you or your child wants. In this article we will look at how to make simple and original crafts from plastic bottles with children.
Bunny from a plastic bottle
You will need: a transparent plastic bottle, cupcake packaging (multi-colored cupcake liners), scissors, satin ribbon, markers, glue gun, eyes, multi-colored candies or colored pebbles, paper, cotton wool.
Master Class
- Print or redraw the templates for the hare's paws and ears.
- Cut them out.
- Glue the eyes and draw a nose, antennae and mouth.
- Fill the bottle with candy.
- Place a cupcake liner over the lid.
- Make a slit in the cupcake liner and insert the ears.
- Tie a ribbon bow and glue it to the cupcake liner.
- Glue the legs to the bottle.
- Roll up a cotton ball and glue it in place of the ponytail.
A charming bunny made from a plastic bottle is ready!
Pirate ships in a bottle
You will need: a transparent plastic bottle, a stationery knife, a wine cork, 2 toothpicks, a glue gun, a wide wooden branch or block, colored paper.
Vase made of plastic bottle and threads
You will need: knitting threads of any colors (thick yarn), a wide plastic bottle, scissors, a strip of fabric, threads, a needle.
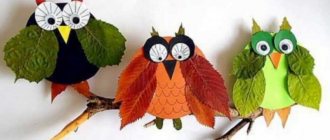
Owl from a plastic bottle
You will need: a plastic bottle, black and white paints, a brush, scissors, a simple pencil.
Pencil case made of plastic bottles
You will need: 2 identical transparent plastic bottles, a glue gun, scissors, a stationery knife, a zipper.
Vase “Cat” from a plastic bottle
You will need: a two-liter plastic bottle, a stationery knife, black and pink markers, a can of white paint.
Hedgehog made from a plastic bottle and pine cones
You will need: a plastic bottle, cones, paints, black wire, a glue gun or superglue, scissors.
Compressor
Another ideal way to make good use of your old fire extinguisher is to turn it into an air compressor with a receiver. This will be an excellent solution for those who do not intend to use the compressor often, but at the same time it is very necessary for some type of work. Such homemade equipment will help you save a lot of money.
You will need the following tools and parts:
- body from an old fire extinguisher;
- power unit;
- compressor;
- hose;
- tee;
- self-tapping screws;
- drill;
- soldering iron;
- screwdriver.
It is best to choose a large volume fire extinguisher. All you need from the device itself is the housing. Everything else needs to be pulled out and dismantled, and the insides must be thoroughly washed. It is recommended to check the receiver separately so that later it works properly together with the compressor.
Next, install the safety valve and pressure gauge. Then a ball valve is installed to supply compressed air. The main thing is to pay attention to all places where parts are fastened: they must be airtight. The tightness will be ensured by a special fume tape. The last step will be installing the compressor. It must be tightly screwed to the structure and work properly. After checking the equipment, you can consider the device ready for use.
Fire hose
You will need: 6 toilet paper rolls, tape, scissors, white paint, brush, blue colored paper.
Master Class
- Fasten the bushings together using tape.
- Paint the bushings with white paint and leave to dry.
- Cut out “water” from blue paper.
- Attach the “water” to the hose using tape.
The fire hose is ready!
How to make a fire extinguisher with your own hands from a plastic or glass bottle
Every homeowner should have a fire extinguisher in their home. Despite the fact that this device seems to be a useless thing that gathers dust idle in the pantry, but in practice, having a fire extinguisher in the apartment can save someone's life or avoid a fire.
There are often situations when a homeowner purchases a fire extinguisher “just in case,” but when a fire occurs, it turns out that its expiration date has long expired.
Since the price of even a small home fire extinguisher is quite impressive, and many simply do not have the financial ability to buy one regularly, you can try to make a fire extinguisher yourself from improvised materials.
There are quite a lot of answers to the question of how to make a fire extinguisher. It is worth noting that making a fire extinguisher is a fairly simple matter, and even a child can handle it. Therefore, you can start creating a home “rescuer” together with him - such work will be interesting and very useful for children.
#BetteratHome How to use a car fire extinguisher to your advantage: 4 practical options
A fire extinguisher has a service life, this is not a very happy fact, because you have to periodically change this device. But what to do with an old or used device? Just throw it in a landfill? Take your time. Yes, you won’t be able to make a barbecue from a small-capacity fire extinguisher like you can from a large cylinder, but there are other, no less useful options for its secondary use. For example, the author of the YouTube channel Stroyhak proposed as many as four options for consideration, but first you need to do some manipulations, which we will discuss in detail in this article.
Marking
All necessary information about the fire extinguisher can be found on its body. The text must be written in Russian. The body contains information about the type of fire extinguisher, manufacturer's address and trademark. The owner of a fire extinguisher will be able to read what types of fires can be extinguished by this product, what it is filled with, etc.
Marking of fire extinguisher cylinder
A set of pictograms allows you to find out how to activate the device and what classes of fire cannot be extinguished with its help. The body must also indicate the total weight of the fire extinguisher and the weight of the substance with which it is filled.
Classification by trigger method
Steam generator
The steam generator is made in almost the same way as previous devices. The list of tools and equipment is also almost the same. You will need to get rid of the old fire extinguisher's internal parts and thoroughly clean the inside of the housing. A liquid squeegee is installed in the neck, which will then be converted into steam.
It is necessary to weld an additional pipe for the hose through which steam will be supplied. For reliability, check the tightness of all connection points and eliminate problems using fume tape. Using a home steam generator you can iron things perfectly.
An old fire extinguisher can be transformed into a useful household appliance. Some equipment is very expensive, but it is easy to do it yourself, giving life to unnecessary and old things. It all depends on your imagination and desire, so you shouldn’t limit yourself to just this list in order to make good and free things that will be useful in the household.
Poster “Matches are not toys!”
Fire-fighting crafts are aimed at strengthening safe life skills. Very often, parents and children follow the path of least resistance and use matches in crafts.
Inspectors from the Ministry of Emergency Situations and the All-Russian Fire Department categorically do not recommend doing this! Because now the child has glued a match to give “vitality” to the drawing, and then he decides to set fire to the piece of paper in order to stick it, burnt, also for vitality. Therefore, no matter how much you want to save time and effort in this way, it is better not to take risks.
Craft product Fire extinguisher Waste material
This fire extinguisher is made of waste material: a plastic bottle, a cup of yogurt, a tube of liquid soap, polyurethane foam. To make it heavier, concrete was poured into the bottom and stuffed with polystyrene foam. We selected very good poems:
Their armor sometimes does not save them from pain, But no matter what fire stands in the way, Until victory they do not leave the battle, And I ask fate: “Save them in battle”!
In general, the whole family worked. They tried very hard, they did it with soul. When the work was handed in, the organizers were very delighted. But as a result, they didn’t even mark it! We were very upset. I wanted to take my work back after the results were announced, but they didn’t give me anything like that. So it’s standing there, at the exhibition, in the fire station.
The work is original! A big minus for the organizers! In our competition regulations it is immediately stated that prize works are not returned and are then kept in the Museum of Fire Glory.
I finished writing: great poem!
Thank you, Irina, for your support! I was really sad, so I didn’t even post my work on the blog.
Elena, such an attitude really leaves an unpleasant aftertaste. I think there is only one way out for children - to write thanks themselves on behalf of the firefighters and send them by mail or via the Internet. Of course it’s easier when Santa Claus congratulates.
Couldn’t the school itself congratulate you on its own?
Please convey to your boys our congratulations from all site users.
And special thanks to you! Do not despair! C'est la vie, as the French say. Even children's competitions have their own intrigues.
We will definitely use your ideas.
PS While I was writing, I saw that Dvataya had a similar solution.
The school will definitely congratulate you at the end of the quarter, at the line. Thank you!
Dough crafts
Salt dough successfully replaces plasticine. It is also malleable, but when hardened it becomes hard and can retain its shape for a long time. This blank can be painted and varnished. Dough recipe:
- For 200 mg of flour add 150 mg of table salt and 5 tbsp. vegetable oil.
- The components are diluted with water to the desired consistency.
From the prepared plastic mass you can easily fashion a fire truck and a helicopter, houses engulfed in flames, emergency workers, etc. The workpiece is placed in the oven and dried at a temperature of +70...+80 0 C for 1 hour. Accelerated drying is provided at a temperature of +110...+120 0 C for 25-30 minutes. After cooling, the hardened workpiece can be painted in any color using acrylic paints.
Milk carton fire truck
You can make a beautiful fire engine out of a painted milk carton.
Fire truck made from a milk carton
The wheels of the machine are a cardboard circle and are connected to the box using metal clips.
Fire truck wheels
The top of the car is decorated with matchboxes and a cardboard ladder.
Matchboxes and ladder
Wheels made from rims look very impressive on a fire truck.
Fire truck with rim wheels
You can make a wonderful fire truck out of a cardboard egg cart.
Fire truck made from an egg cart
Drawings on the theme of fire safety
PB pictures are drawn with pencils, felt-tip pens, gouache or watercolors. If a child is familiar with the technique of working with oil paints, then he can paint an oil painting.
The pictures depict different themes. For example: a fireman extinguishes a burning house, explosive and flammable objects, a fire in the forest
Preschoolers draw pictures with their favorite characters: Smeshariki starts a fire in the forest, Luntik and Kuzya help the ants cope with the fire.
Templates and stencils for drawings are easy to find on the Internet. A short warning phrase is written on the top of the picture: “Beware of fire!”, “Matches are no fun for children!”, “Stop the baby, don’t let him play with matches!”
Pictures are drawn for Fireman's Day, for thematic competitions, and for life safety lessons. They help children learn the rules of behavior and life, occupational safety and health.
Home Security
Home safety plays an important role in a child's development. Once children are taller and able to take things off the shelves, new safety topics need to be introduced.
Create a short comic. For this you will need felt-tip pens or pencils.
Classification
There are manual and automatic fire extinguishers - this is a classification based on the principle of operation. Manual devices are started by a person immediately after detecting a fire. Automatic fire extinguishers do not require human presence to operate Such devices are installed in rooms with a high level of fire hazard. As soon as the temperature exceeds preset values, the fire extinguishing system is automatically activated.
Types of fire extinguishers
Pros and cons of homemade products
The advantages of a homemade device include:
- simplicity of design;
- ease of manufacture;
- high maintainability;
- no manufacturing costs;
- efficiency, ability to perform assigned tasks.
Disadvantages should be considered:
- relatively low strength;
- the device can only work in small pools with low volume;
- the quality of work depends on the level of training and mastery of tools.
Craft according to fire safety rules
The impossible task of teachers - to teach a child the rules of fire safety - is solved with the help of such simple methods. Or rather, through creative activities to create various works on this topic. This is the method that makes it easier to explain to children how to protect themselves from fires, how to act correctly in a critical situation and not panic.
DIY crafts. Fire safety rules
How to assemble the main unit: materials and technology
So, the main operating principle of all four future homemade products is the use of high pressure. And to control it, you need to modify the cylinder, and this will require additional parts.
PHOTO: YouTube.com The main problem in finding parts is the M22 metric thread with a pitch of one and a half, which is located in the neck of the cylinder. Finding an adapter for such a thread is not easy, but you should look for it in plumbing stores
PHOTO: YouTube.com For such an adapter you need to prepare a suitable crosspiece, an adapter with a tap, an adapter with a tap and fitting, and a pressure gauge to control the pressure in the cylinder
PHOTO: YouTube.com You can see the assembly sequence in the photo: an adapter for a cylinder is attached to the crosspiece, at the opposite end there is a valve for releasing pressure, on the sides there is a pressure gauge through an adapter and a valve with a fitting for connecting a compressor and hose
PHOTO: YouTube.com For a sealed assembly, the author used plumbing thread. In order for it to hold well, the threads of the adapters must have notches, this will prevent it from slipping. If they are not there, notches can be made using attached pliers. You need to wind the thread along the thread and the end - several skeins crosswise. It would be a good idea to apply sealing grease over the thread.
PHOTO: YouTube.com The assembled structure looks like this. Be sure to check it for leaks: fill the container with air, then close it and apply foam to the joints. Such a cylinder can easily withstand pressure up to 8-10 atmospheres, and you won’t need more
Tags
how to make crafts Make an inscription Make 2 cars make it white Make a helmet You can make it and Make it and forget to make ears. Crafts with your own Crafts for Crafts for Crafts from Crafts from Crafts from Crafts from Crafts from Crafts from New Year's crafts with your own hands with your own hands with your own hands with your own hands Make sleeves out of a fireman's hand. with your own hands with your own hands with your own hands
need soda toys instructions vinegar necessary idea and follows reaction solution traces read topic syringe cereals table of contents