“Rocking chair and sandbox” technology 3rd grade
The Perspective technology textbook is full of interesting master classes. But the fact is that the authors of the textbook successfully scanned them from somewhere, without going into details, whether they drew everything there correctly or not. Without a textbook, and most schools don’t issue technology textbooks, it’s even more difficult to figure it out. Here, for example, is the topic for grade 3, “Rocking chair and sandbox.” There is only a rectangle from the rocking chair and it is said that this is only 1/2, that is, half. How is a child without a textbook supposed to find out what this outlandish rocking chair is? We are coming to your aid, you will have a rocking chair and a sandbox with fungus.
We will need: a rocking chair and sandbox template from a 3rd grade technology notebook, scissors, a pencil, glue, colored paper and colored cardboard, a toothpick and the most original thing - a popsicle stick! Where can I get a popsicle stick when a child starts making a craft at 21 zero zero or even later?? We will look for a replacement for her. Replace it with a cardboard strip.
Instructions for making a rocking chair and sandbox
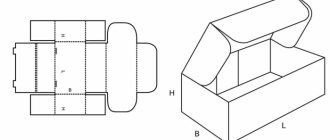
This is what the part templates look like in the workbook:
It is said that you need to transfer the template using carbon paper onto colored paper. For those who don’t have carbon copies, you can print out our picture, cut it out and put the details on colored paper and cardboard, and trace it.
The sandbox with the mushroom should ultimately look like this:
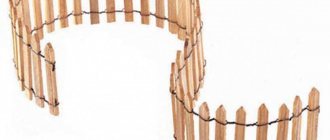
And the mysterious rocking chair is like this:
Step-by-step master class
We cut out the parts according to a template from colored cardboard or paper. A piece of 7 by 7 cm is the side of the sandbox. We need 4 of these squares. But the question arises: why is the square divided into 6 stripes when we need 5? 1 strip will bend unsightly inside, and we personally cut it off as unnecessary. We bend the parts along the fold lines and glue the “blocks”.
Next in the textbook it says to glue them onto a sheet of cardboard and then cut them out. You can do it this way, but we’ll do it simpler - first we’ll cut out the bottom of the sandbox from cardboard - a square of 8 by 8 cm, and glue the sides along its edge to make it even.
We also glue the semicircle together - we get a cone-shaped fungus roof.
We screw the “fungus stem” part onto a pencil, coat the edge along the entire height with glue and glue it so that the tube holds its shape.
It is easier to attach the stem to the cap if you make several cuts at the end of the stem, as we did in the lesson about the TV tower. But here the fastening is different. Cut out 3 thin strips. We glue each end into the middle of the cone with one end, and glue the other end to the tube-leg.
Attaching the bottom of the leg: glue the strips crosswise to each other.
Next, you can glue the middle of this cross into the center of the sandbox and then insert and glue the fungus. But the round leg is difficult to glue, and therefore it is easier to glue this cross to the leg first.
And only then glue it all to the base of the sandbox.
Actually, the fungus is ready, all that remains is to decorate it and you will do it yourself at your own discretion. Let's move on to making the rocking chair.
We cut out the template strips, taking into account that only half of the template is drawn in the workbook and in fact your stripes will be twice as long. You need 2 of these strips of colored cardboard. We bend them along the fold lines, glue them together, we get triangles. These are the bases of the rocking chair.
Instead of an ice cream stick, we took a strip of cardboard, rounded it and made small notches in the middle on both sides to tie it more tightly to the toothpick. You can tie it with a thread or with an elastic band.
We put a toothpick in the center, tie it crosswise with a string (elastic band), and tie it at the bottom.
In the bases of the swing, at the points indicated on the template, we make holes with a thick needle or awl. In principle, they can be made directly on the template, but if you forget, it’s okay.
Insert the ends of the toothpick into the holes. You can already swing, but there are no seats.
We cut out squares or rectangles from something soft - felt, foam rubber or velvet paper, and glue them to the edges of the rocking chair.
The craft is almost ready.
You can decorate it by gluing spots and flowers. And then in the textbook it is supposed to make swings and other attractions, so don’t throw away the craft and you will have a whole children’s playground