Home » Lighting » Street lighting » DIY street lamp
Every person wants to arrange the area around their home in the best possible way. However, in many situations, financial opportunities do not allow you to buy expensive and beautiful lighting fixtures. But in such a situation there is no point in being upset, since everything can be done on your own. In this article, we decided to talk in detail about how to make a street lamp with your own hands. Let us immediately note that it simply won’t happen, but the result will certainly surprise you; at the end of the article you can find several interesting videos.
How to make a street lamp with your own hands
Lesson #1: Flashlight on a string
They will decorate any room. They can be hung on a Christmas tree, made into an openwork garland, or used as a cover for a miniature electric candle.
Place fewer stars, tweak and improvise to make them look as neat as possible.
Once the top half is done, turn the lantern upside down and glue the stars onto the other half.
Once the glue is dry and your origami lantern is ready, hang it using the wire structure. When it lights up, you'll notice how the light makes the pattern stand out nicely as the "holes" appear lighter.
- Take a rectangular piece of construction paper and cut a strip about 1cm wide along one of its narrow sides. Set this strip aside; you will need it later.
- Fold the remaining paper in half lengthwise so that the right side is on the inside.
- Measure 2 cm from the edge of the resulting rectangle, along the long side opposite the fold line. Draw a line parallel to the edge with a pencil.
- Cut the fringe along the other edge of the rectangle, along the fold line, without going beyond the pencil line.
- Unfold the rectangle and fold it in half again along the fold line, only in the opposite direction (turn it right side out).
- Roll the sheet into a tube and secure the top and bottom with tape. Glue a “handle” to the top rim from a strip of paper cut from the sheet at the beginning of the work.
Another option is to make small holes in the headbands and thread a string through them. By moving the top rim along the cord, you can adjust the curvature of the central part of the flashlight.
In this tutorial you learned how to create an origami paper lantern. First, you learned how to fold square paper to create an origami star. Then you learned how to create a 3D star pattern. By applying this with your handmade stars, you have created your own designer pendant lamp.
You can create different projects using the origami technique. You could try creating paper star ornaments for your tree or gifts. And for a completely different look, don't forget that stars look amazing if you make them with single-sided construction paper.
How did you go with this tutorial?
Attention!
Paper can only be attached to garlands with LED bulbs that do not heat up when lit!
Forged partitions
Simple zoning of any room in a home can be done using metal partitions. The intertwining patterns of the individual parts of the divider do not “load” the space. Filigree decor is suitable for conditionally highlighting a relaxation or work area. They are used to divide the dining room area into two parts: for cooking and eating. The metal of the partitions can be painted. The most unusual are the models covered with gold or silver colors. The antique effect emphasizes the originality of their design. The shapes of the partitions can be any: trapezoid, rectangle, crescent. They can be installed in wooden frames or mounted without additions. Ceiling partitions are a separate type. They are mounted above the thresholds. Non-standard dividers do not take up room space. Ideal for creating oriental decoration.
Master class No. 2: Diamond-shaped tissue paper lanterns
Light and elegant - that's what we can say about these flashlights. They may take a little longer to make than others, but the results are worth it. They will look especially impressive if you place a small battery-powered candle inside.
They are charming, elegant, create a magical atmosphere: these are traditional oriental paper lanterns, in China in particular. Initially, these thin light sources were made with very light rice paper, but of course you can use any type of paper, be it. from beautiful colored cardboard, for example, if we want to make our lanterns for a party.
For lovers of mastering perfect Chinese lanterns, this will be a game, especially as recommended in our video tutorial. There are actually several ways to implement these "lamps", depending on whether we want to match the eastern orientation or less. In fact, Chinese lanterns are cylindrical or spherical, but we can also choose other geometric shapes such as cubes or stars, of course, if we have skills in working paper. The following materials are indispensable.
1. Place two sheets of tissue paper on top of each other and fold them in half lengthwise. Iron the fold.
2. Next, unfold the paper and gather it, without separating the sheets, into an accordion of folds approximately 1.5 cm deep
Other manufacturing methods
The most demanding job is cutting the paper, which allows you to filter the light to create magical games, and this will make our lanterns absolutely gorgeous.
The simplest, but always very effective shape is the cylinder. You have to cut two perfectly identical to the card you have chosen, get the stripes and then combine the two cylinders by matching them. At this stage you need to create a base. Also, make a small handle to place the light where you want it. A more artistic and elaborate version of your lanterns - this suggested video tutorial is all you need to try. Chinese fairy lanterns are ideal for a party, perhaps you can use them alternating with a special evening in your garden, a romantic candlelit dinner, simply or simply create a charming homely atmosphere at a cost of zero and above all very eco-friendly.
3. To make a smaller lantern, trim the edges of the accordion at an equal distance from the center. Then unfold the paper and turn it over so that the convex side of the center line faces the table.
4. Take a needle with a thick thread threaded into it. Gather one side of the sheet into an accordion again and pull the thread through the paper. Tie the ends together to make a closed circle.
Korean traditional paper has now been rediscovered to meet the needs of today's people. As mentioned elsewhere, Hanji paper is made with the bark of mulberry trees known as Dak, which are native to Korea. In ancient times, the use of this kind of paper was limited to making lanterns, window paper, fans and baskets, as paper was very rare and expensive. However, today, the art of hanji paper items ranges from simple dishes, sewing object boxes and lamps, to cabinets and tables since construction techniques were developed, and more paper equipment is available at prices lower than in the past.
Choosing gas
You can only make a gas burner using propane, butane or a propane-butane mixture with your own hands, i.e. on gaseous saturated hydrocarbons and atmospheric air. When using 100% isobutane (see below), it is possible to achieve flame temperatures of up to 2000 degrees.
Acetylene allows you to achieve a flame temperature of up to 3000 degrees, but due to its danger, the high cost of calcium carbide and the need for pure oxygen as an oxidizing agent, it has practically fallen out of use in welding work. It is possible to obtain pure hydrogen at home; a hydrogen flame from a supercharged burner (see below) gives temperatures up to 2500 degrees. But the raw materials for producing hydrogen are expensive and unsafe (one of the components is a strong acid), but the main thing is that hydrogen cannot be smelled or tasted, there is no point in adding a mercaptan fragrance to it, because Hydrogen spreads an order of magnitude faster, and its admixture with air of only 4% already produces an explosive explosive gas, and its ignition can occur simply in the light.
Methane is not used in household gas burners for similar reasons; in addition, it is highly poisonous. As for flammable liquid vapors, pyrolysis gases and biogas, when burned in gas burners they produce a not very clean flame with a temperature below 1100 degrees. Flammable liquids of medium and below average volatility (from gasoline to fuel oil) are burned in special liquid burners, for example, in burners for diesel fuel; alcohols are used in low-power flame devices, and ethers do not burn at all - they have low energy, but are very dangerous.
Instruction No. 3: Round lanterns made from strips of paper
They look like Christmas tree balls and can be of any size: from very small to huge. A definite plus is that they are quite easy and quick to make.
1.Cut 15 strips of paper 1 cm wide
Master Khur He-jai, artist of hanji paper objects
Fifty-six-year-old Hur Hye-jai said there is only one thing in his life that matches pure joy: the art of creating objects with Korea's traditional mulberry paper.
As they enter, visitors immediately notice the display of countless colored paper objects stretching from one wall to the next. The next room is the owner's study, which also serves as a showroom and storage area for items. The entire interior environment is replete with works created by Khur and his students over almost twenty-five years. 2. Make holes at both ends of all strips along the hole, retreating about 3 mm from the edge
3. Stack the strips so that the holes line up and insert a rivet into each end (you can buy these at a craft store)
Among the various objects, it attracts the attention of visitors with a long ground lamp, which was used for reciting poetry. Ur also creates urns that are difficult to imitate. Hanji paper objects are part of a traditional art that relates paper to underlying structures. Here we can appreciate the wisdom of our ancestors. The strength, color and motifs of Hanji art make them valuable because they are handmade and therefore unique.
Therefore, I had to struggle alone, search for new methods and develop projects and motives. Nowadays there are many people who dedicate themselves to creating hanji paper objects, and many of my students teach this art in community centers and schools. Although the owner's research offers many items to purchase and desire, especially for their beauty, Ms. Hur bases her work and her business on very good principles: she believes that items created by traditional crafts are not the only ones they should have beautiful, but also have a practical function.
You can attach a loop for hanging to the top rivet, and a tassel made of paper, beads or thread to the bottom one. In addition, such lanterns make excellent garlands!
This philosophy has helped the artist expand his horizons into producing everything from delicate paper lanterns to durable cabinets that come with removable drawers. But what made her fall in love with the traditional Korean mulberry card?
Hanji paper is said to last for a thousand years. says Ms. Hur. — The paper, which may seem thin and fragile, is actually very durable and lasts a long time. The original colors and motifs of Hanji crafts are made from soft yet durable paper, a material that does not fade and that gains its elegance from time as it ages. This is the real beauty of traditional mulberry paper.
Which gas to choose
A gas burner for do-it-yourself soldering is made exclusively using fuel such as:
- natural gas;
- propane;
- butane;
- propane-butane mixtures.
In other words, on hydrocarbon mixtures with atmospheric air. If you use fuel consisting of 100 percent isobutane, you can get a combustion temperature of 2000 degrees Celsius.
Acetylene is a substance that allows you to get temperatures up to 3000 degrees. But such a device is currently not popular for several reasons: the need for constant oxygen, a high level of danger, the need to use expensive calcium carbide for work and other reasons.
It is more than possible to obtain hydrogen at home, and such a device is capable of producing a temperature of 2500 degrees. But the starting materials for producing this substance are also very expensive (the main mixture for production is hydrocyanic acid). Besides, they are unsafe. Another disadvantage of hydrogen is that it can be smelled.
A substance such as methane is not used in household burners for obvious reasons. In addition, the gas is very poisonous. If we talk about methane fumes, they do not produce a large flame when burned, and the average temperature of the structure is 1100 degrees.
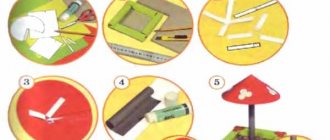
Option #4: Lantern made of paper or cardboard circles
This type of lantern is also perfect for interior decoration and for the Christmas tree. If you make them from thick multi-colored paper, you will get a toy for children. And if you decorate them with various decorative elements or draw something on the finished product, you will get an absolutely unique thing.
Paper lantern in the shape of a house
Master Hong spent nearly 25 years creating traditional items and teaching the art to others.
The creation process begins with modeling the simple paper structure of the object being created by the creator. A layer of glue is then applied to the raw structure before it is placed on top of thin hand-made hanji paper. Compete with each artist to get the right balance between paper color and object shape. The bonding and delamination process is then repeated, making the object more secure. To achieve excellent results in your work, you must be very patient as each stage requires time for drying, styling and finishing. There are colorful hanji paper items, and there are also similar old ones that use black black paper to give color tones. The methods are varied and varied and go from twisting a stack of paper to scratching the surface to achieve the shape the creator wants to achieve.
1. Cut out 10 identical circles from thin cardboard
2. Fold all the circles in half, right sides inward
3. Glue the circles together in pairs, side to side, until the circle is complete.
Unlike other limbs, hanji is very practical. Once an object is created, we can use it immediately. Many students love this feature, and it often makes these popular items into gift items, he adds. The beauty of Hanji paper is the variety of objects you can create. There's nothing you can't get, from your dresser to your coffee table to your paper box, business card box, or paperclip holder. It's also a great starting point for crafters at the beginning because it's easy, within reach and practical, but at the same time contains all the passion for art, tradition and ability.
4. Before gluing the last two halves together, insert a straightened paper clip into the center of the sphere and secure it with a drop of hot glue. Bend the outer end of the paper clip with a hook - you will use it to hang the flashlight
The artist emphasizes that the art of creating Korean paper objects is suitable for everyone, especially women. It is a very calm and stable activity. It is very environmentally friendly and suitable for making containers for any product.
Hur exhibits his work in art galleries in Seoul, as well as abroad, such as Italy, France, China and Indonesia. He is also planning an exhibition in Germany next year. His next step is an exhibition in Japan, but lately greater demand for his work has prevented him from starting preparations.
5. Decorate the lantern with ribbons, tassels or other decorative elements.
Assortment for choosing a model
A street lamp has its own responsibilities, it:
- plays the role of a decorative element, without at the same time depriving the area of its harmonious appearance;
- provides sufficient lighting so that owners feel comfortable on the premises even in the dark.
If a classic street structure almost always has a leg with a device on it, then you can choose a model for a homemade lamp that will serve as a decoration for the area from several types of lamps.
- Ground lamps-pedestals. These devices, installed directly on the ground, are often located along the perimeter of pedestrian paths. Other suitable places are beautiful flower beds, swings, gazebos or other recreation areas. Such ground structures are usually made either round or square.
- Wall lanterns. Such lamps are the optimal solution for illuminating the entrance to a house, veranda, or at the gate. Wall lighting comes in a variety of shapes, but the most popular are those in a retro style. Quite unexpected “raw materials” are often chosen as materials for them.
- Suspended structures. These are the most undemanding devices that can be attached to roofs, on verandas or directly to tree branches. The most popular, simple option is a long chain on which the lampshade is attached.
- Floor lamps. They are attached to the ground, and the appearance is often no different from a home device. This is a stand that ends in a round lamp. There are also more original models, when the shapes, sizes and number of shades are far from the usual classic floor lamp.
Lesson #5: Flashlight “Drop”
This is another type of flashlight assembled from the same parts, but in this case you will need a template.
Ready-to-use materials and products are stacked in a corner of his studio. I look for inspiration from fabric, antiques and display work. They are all good reference points for learning colors and motifs. We create our styles from what we see and feel in the world around us, says Gur. His personality peeks across the room, illustrating his many interests: Chinese characters, vine poppies, butterflies, lemons and calendula.
Making classic paper lanterns
Hair says there is nothing that cannot be expressed in traditional hanji paper. We hope to show the potential of this Korean art to the majority of people who use their lives as a canvas for painting. He adds that he hopes to one day build an entire house with hanji paper, from wallpaper to the smallest decorative pot.
As in the previous case, you need to cut, fold and glue a number of parts in a circle. The ones in the photo consist of 16 “drops”.
As a component of such decoration, you can use almost any figure, including openwork. Other options for New Year's lanterns of this type:
Tradition and modernity
Split bamboo slats were used as the frame for Chinese or Japanese lanterns. The burner was attached to a thin wire and looked like an oiled rag. The dome was made of rice paper.
In the production of modern replicas of antique lanterns, almost the same materials are used, but with additional processing. For example, instead of rice paper, they take cheaper tissue paper made from cellulose and impregnate it with fire retardant compounds to increase fire safety.
The shape of the dome is cylindrical or spherical, divided into 8-12 sectors. Standard stearin (paraffin) candles in aluminum cup holders are used as a burner.
The optimal dimensions for an aerial lantern have evolved over many hundreds of years of production and use. And there is no reason to radically change these parameters when making them yourself:
- Weight – 50…100 g;
- Dome height – 70…170 cm;
- Dome diameter – 50...100 cm for cylindrical domes;
- The diameter of the lower hole is 28...50 cm;
Provided that a standard stearin candle burns for about 20 minutes, such a flashlight can rise to a height of about 500m. At an ambient temperature within 15...20°C and relative humidity not exceeding 40%.
Master class No. 6: Indian lantern
This simple-to-make decoration looks quite unusual and pleasant. Choose beautiful colors, decorate ready-made lanterns, and give free rein to your imagination!
The flashlight consists of two sheets of paper in contrasting colors.
Outer layer (fringe):
- Take a sheet measuring 12.5x25cm and make a fold about 5cm wide on both short sides. Smooth out the fold line and unfold the paper.
- Using a ruler and a paper cutter, make parallel cuts with 1cm intervals between the two fold lines.
Inner layer (tube):
- Take a 15x19cm piece of paper and place a strip of double-sided tape along each of the 15cm edges.
- Roll the sheet into a tube and glue the two sides overlapping so that they overlap each other by about 5 cm.
Connection of parts:
- Attach a strip of double-sided tape to the short sides of the outer layer of paper.
- Glue one of the edges along the top edge of the tube, then, without creasing the fringe, glue the bottom edge.
- Punch holes on opposite sides of the tube at the top of the lantern and thread ribbon or string through them for hanging.
Step-by-step instructions No. 7: Flashlight made from strips of paper and tube
Another project using two or more sheets of paper in contrasting colors.
1. Glue a tube from a shorter sheet.
2. Place a strip of double-sided tape along the top and bottom edges of the tube.
3. Cut long thin strips of contrasting colored paper.
4. Start gluing the strips one at a time, slightly overlapping, strictly parallel to the tube or slightly at an angle.
This is what the strips look like, glued at different angles.
5. Mask the gluing areas with a horizontal strip of paper or tape glued to hot glue or double-sided tape.
6. Attach a hanging loop to the top of the flashlight. Its ends can be glued under a horizontal tape or secured to the inner walls of the tube.
Master class No. 8 “Glowing flashlight”
A cardboard box of juice or milk is a wonderful material for making a New Year's lantern. The easiest way to make this New Year's toy with your own hands is as follows:
1. Take a juice or milk box, cut off the bottom, and cover it with white paper. 2. Make a New Year's themed applique on both sides of the package. 3. Now the adult must make holes with an awl along the contour of the drawing. If you place such a box on a flashlight or LED candle, the design will glow in the dark. Link >>>>
Attention! If you are using a regular candle, be sure to place it in a glass cup for safety reasons.
You can also make this DIY New Year's craft from a regular paper bag.
or a tin can.
Holes in a tin can will have to be made using a sharp nail and a hammer. Helpful advice: to prevent the tin from becoming warped when making holes in it, first pour water into it and freeze it in the refrigerator.
At the end, paint your New Year's lantern with spray paint and attach a wire handle to it.
Holes in a paper lantern can be made not only round, but also, for example, in the shape of hearts or stars, as in the photo below.
If the holes are large enough, it is better to seal them on the reverse side with special parchment paper. In other words, it is also called wax paper or baking paper.
Assembly
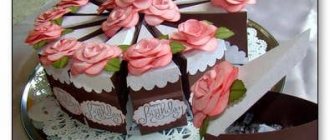
Next, we take up needles and threads. We bring together the lower edges of the petals and sew them, leaving a decorative tassel on the outside. We repeat the operation on the opposite side - we also sweep all the parts together and form a loop. Now the decoration can be hung on the Christmas tree. Traditionally, this Chinese lantern uses shades of deep red and gold as a symbol of prosperity.
However, to ensure an enchanting festive mood for the New Year's celebrations, it is worth getting creative with colors. By the way, since the paper lantern was made with slits between the edges, you can insert LED garlands into the upper hole and illuminate it from the inside. The result is a mysterious lighting effect.
Master class No. 9 “Bird in a cage”
We invite you and your child to make an original paper lantern in the shape of a bird in a cage. To make this Christmas tree decoration you will need:
Colored paper and cardboard - awl - scissors - double-sided tape or glue - plastic cover
Work plan:
a. Cut colored paper into strips of the same length and width (for example, 1.5 cm - width, 30 cm - length). To make one lantern you will need 4 strips of paper.
b. Use an awl to make a small hole in the center of each strip.
c. Print the bird on heavy-duty paper. Cut it out. Use an awl to make a small hole in the center of the bird's back.
d. Pass a thread through it, tie the end of the thread with a knot. Make a second knot about 4 cm from the bird.
e. Now you need to thread the paper strips onto the thread. Slide the strips along the thread to the top knot.
f. Tie another knot on top of the paper strips, onto which you can put a bead for beauty.
g. Now take the plastic cover and place double sided tape around it.
h,i,j. Spread the strips apart and symmetrically attach their ends to the lid.
k. Cut a strip of colored paper and glue it around the lid. The New Year's lantern is ready!
Master class No. 10 “Amazing flashlight”
Cut out a lot of these blank shapes from paper.
Their number should vary from ten to fifty at your discretion. The main thing is that they are all the same and neatly cut. Each cut piece should be folded in half. Let's start gluing the flashlight. To do this, all the blanks are first carefully glued at points 1. Pay attention to the fact that the same side is glued together if the paper has only one side that is colored. Then the blanks are glued on the other side at points 2. Then we connect the edges of the ovals to each other, stitching them with a needle or gluing them with double-sided tape. At the end of the work, you need to glue the two extreme edges. The flashlight is ready!
Remaking a burner from an old stove
You can make a burner for a forge from a device used in gas stoves. To do this, you just need to correctly calculate the power using the following formulas:
- determine the power of the stove (W) from which the burner is removed (you can find it out from the instructions or data on the unit body);
- multiply W by the fuel efficiency (0.89-0.93) to obtain the required power for the forge (W1);
- find out the calorific value of gas (Q). If propane is used, it will be 3600 kJ/m3;
- calculate fuel consumption: T = 3.6 × W1 / Q.
Having manufactured the burner according to the drawings, it is necessary to check its functionality
Particular attention is paid to the tightness of the system. If you detect a gas odor, immediately close the regulators, ventilate the room and look for leaks to prevent an emergency during operation.
Other manufacturing methods
By using your imagination and imagination, you can easily figure out how to make unique lanterns to decorate your home. For example, if you glue corrugated paper into cylinders, as is the case with the classical technology, but do not make a second layer, but simply attach these forms to ribbons, and cover them along the bottom edge with light colored ribbons that will sway and flutter with the slightest movement. Such New Year's lanterns also look beautiful in a large garland.
If you want a candle to burn inside the product, then take two layers of paper for the base: plain paper for the top, and white parchment for the bottom, which will transmit light. Or use safe LED candles.
Another simple craft is a flashlight made from multi-colored stripes. To make it, you need to cut a lot of paper strips (their length and width should be the same; the longer the strip, the larger the flashlight will be). These strips must be folded and holes pierced at both ends. Then take a beautiful lace and fasten it first on one side, and then thread it through the other hole and pull it well so that the strips bend in a semicircle. All that remains is to straighten the flashlight so that the stripes form the shape of a ball.
You can also make a beautiful craft in the form of an openwork lantern, which will decorate any holiday table for the New Year at the Christmas tree, for a birthday, and for other holidays.
- To make such a romantic decorative element, you will need special cutting templates. If you are trying to make such a craft for the first time, then first it is better to take a blank drawing in which there will be a minimum number of gaps, since cutting out this part can take a lot of time and require some skills.
- The selected template must be printed and carefully cut along the contours.
- Select glasses, glasses, jars or other transparent objects that will serve as the base for the wrapper (candles can be placed in them). Measure their height and width. You need to cut the templates so that the containers can be completely wrapped.
- Try on the templates again and adjust if necessary.
- If you want to make colored lanterns, then you will need to attach sheets of colored parchment under the openwork templates (you also need to cut them to the size of the vessels). They are attached with tape.
- Then you can attach the openwork templates, also carefully attaching them with tape.
Light the candles and enjoy the romantic atmosphere of a New Year's fairy tale.
Choose any method of making lanterns you like and create small crafts that will uniquely decorate your home for any holiday.
Types of street lamps
A street lamp must easily cope with and withstand weather conditions such as heavy rain, wind, snowfall, hail, high and low temperatures, and various types of physical impacts.
One of the most popular types of lamps for street lighting are wall-mounted devices that are installed near doors, in gazebos, and on buildings near paths. Such lighting is good because the lamp takes up practically no space, and its location does not in any way interfere with movement around the yard.
Wall lantern made from cans, an original solution
Thanks to the lampshade, the light is perfectly diffused and well illuminates a fairly large area, and by placing several of these lamps on the porch, you can easily organize an evening dinner outside or immerse yourself in your favorite book.
Floor lamps
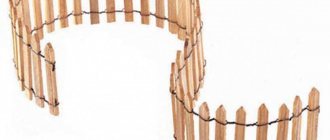
Outdoor floor lamp made of wire and LED garland
Ground lamps for cottages and homes have quite a wide range of possibilities. Using such lighting, you can illuminate the facade of the building, highlight the main objects in the yard, divide the area into zones, create various glow effects, etc.
Pendant lighting fixtures
Pendant lighting fixtures are usually used under various covers, such as a gazebo or porch. They have a structure similar to a regular chandelier, can accommodate several light bulbs, and serve as the main source of light in your area.
Glass bottle pendant lights
Video lesson: How to cut a New Year's lantern from paper?
Option 1.
The easiest way to make a New Year's paper lantern is as follows.
Cut colored paper or old postcards into strips of the same width (for example, 2 cm) but different lengths. You should get one central shortest strip, the remaining strips should be in pairs, each pair a few centimeters longer than the previous one.
Place the strips together in the correct order, aligning them at one end, and then secure them with a stapler or glue. After this, align the strips at the opposite end and also fasten them with a stapler or glue. The flashlight is ready!
Option 2.
One of the most popular Christmas decorations is New Year's lanterns. They are very easy to make, and thanks to their spectacular shape, the lanterns will become a real decoration for the New Year tree.
Fold a sheet of rectangular colored paper in half lengthwise. From the fold line we make parallel cuts at an equal distance from each other (the cuts should end 2 centimeters short of the edges of the sheet). Unfold the sheet of paper and roll it into a tube, gluing the ends of the sheet together. Now, at the same time, we squeeze this tube a little from below and from above - we get a flashlight.
But that is not all. You can make a core for a flashlight. To do this, we glue a tube from thicker paper, but with a smaller diameter. We connect the two parts together (we place the core inside the flashlight) using glue or a stapler. The flashlight is ready.
Paper lanterns can be used in a variety of ways. And just like a Christmas tree decoration. And as a design for a small vase or glass (only in this case there is no need to make a “core” for a flashlight). And several New Year's lanterns suspended on a ribbon or serpentine will turn into a multi-colored garland.
You can insert a candle inside the New Year's lantern. It is better to use safe LED candles. If you are using a regular candle, be sure to place it in a glass cup for safety reasons. See link >>>>
Option 3.
A cardboard box of juice or milk is a wonderful material for making a New Year's lantern. The easiest way to make this New Year's toy with your own hands is as follows:
1. Take a juice or milk box, cut off the bottom, and cover it with white paper. 2. Make a New Year's themed applique on both sides of the package. 3. Now the adult must make holes with an awl along the contour of the drawing. If you place such a box on a flashlight or LED candle, the design will glow in the dark. Link >>>>
Attention! If you are using a regular candle, be sure to place it in a glass cup for safety reasons.
You can also make this DIY New Year's craft from a regular paper bag.
or a tin can.
Holes in a tin can will have to be made using a sharp nail and a hammer. Helpful advice: to prevent the tin from becoming warped when making holes in it, first pour water into it and freeze it in the refrigerator.
At the end, paint your New Year's lantern with spray paint and attach a wire handle to it. For a detailed New Year's master class, see the link >>>>
Holes in a paper lantern can be made not only round, but also, for example, in the shape of hearts or stars, as in the photo below.
If the holes are large enough, it is better to seal them on the reverse side with special parchment paper. In other words, it is also called wax paper or baking paper.
Since we are talking about paper lanterns with large windows, it’s time to move on to the next section of our article.
Option 4.
Home is a symbol of comfort, warmth, and family. That's why on frosty, winter days, a New Year's lantern in the form of a paper house will look most appropriate.
It's very easy to make a house from a juice or milk carton. Just be sure to cover the windows with parchment (wax) paper. We already wrote about this a little higher.
We suggest you use ready-made templates for making three magnificent paper houses as in the photo below.
To make one house, you need to print the same template twice. Each house consists of two identical halves (front and back), connected to each other at the sides.
Cut out the templates; to do this, cut off everything marked in gray. Cut out the windows. Seal them on the back with parchment paper. Connect the two parts of the house together. Place the house on a light source (LED or real candle). Attention! If you are using real candles, be sure to place them in a glass container for safety. For a detailed New Year's master class, see the link >>>>
If you liked New Year's lanterns in the form of houses, then there are a few more templates especially for you.
Option 5.
A New Year's lantern can be made not only in the shape of a house. You can simply make holes in a homemade cardboard box and seal them with parchment. The lantern will be decorated with a New Year's applique.
For detailed instructions on how to make New Year's lanterns with Christmas trees as in the photo above, read the links:
New Year's lanterns of the same shape as in the photo below look impressive. To make such a New Year's lantern out of paper with your own hands, use a ready-made template. Decorate the finished flashlight with purchased stickers.
Option 6.
An interesting option is to cover a glass jar with corrugated paper. To do this, you need to cut the paper into long strips, and then use PVA glue to cover the jar with it. Cut out some New Year's picture from ordinary colored paper and paste it on top of a layer of corrugated paper. Decorate your New Year's lantern with your own satin ribbon. Place a candle inside. The original New Year's decoration is ready!
You can also cover a glass container with pieces of corrugated paper of different colors. It will turn out very beautiful too!
Option 7.
You can simply draw a padlock on parchment paper with a black permanent marker and wrap it around a light source: a flashlight, an LED candle, or a regular candle in a glass cup.
You can use a photograph of the castle, cut out along the contour. For detailed instructions on how to make such original lanterns, see.
Option 8.
You can also paste silhouettes of some images cut out of black paper onto parchment paper. See link >>>>
Option 9.
To make these wonderful New Year's lanterns, you will need to cut colored paper into strips of the same length and width. The length and width of the strips depends on the size of the lantern you want to make. To make one paper lantern you will need an average of 14-16 strips of paper.
Stack the paper strips together and use an awl to make a hole at one end and the other. Pass the thread through one of the holes, secure the end of the thread with tape, glue or a sticker.
Thread the thread through the second hole.
Pull the thread so that the strips of paper bend. Tie the thread in a knot. The knot should be large enough so that it cannot slip through the holes in the paper strips.
Flatten the strips to form a ball shape. The flashlight is ready. All that was left was to find a place to hang it.
Option 10.
We invite you and your child to make an original paper lantern in the shape of a bird in a cage. To make this Christmas tree decoration you will need:
Colored paper and cardboard - awl - scissors - double-sided tape or glue - plastic cover
Work plan:
a. Cut colored paper into strips of the same length and width (for example, 1.5 cm - width, 30 cm - length). To make one lantern you will need 4 strips of paper.
b. Use an awl to make a small hole in the center of each strip.
c. Print out the bird on high-density paper (download). Cut it out. Use an awl to make a small hole in the center of the bird's back.
d. Pass a thread through it, tie the end of the thread with a knot. Make a second knot about 4 cm from the bird.
e. Now you need to thread the paper strips onto the thread. Slide the strips along the thread to the top knot.
f. Tie another knot on top of the paper strips, onto which you can put a bead for beauty.
g. Now take the plastic cover and place double sided tape around it.
h,i,j. Spread the strips apart and symmetrically attach their ends to the lid.
k. Cut a strip of colored paper and glue it around the lid. The New Year's lantern is ready!
Option 11.
A very original New Year's craft - a lamp made of lace.
The technique for making it is similar to creating balls from threads, only lace is used instead of yarn. How to make a ball of thread, see the link >>>>
To make a lamp from lace, you need to find a large-volume ball, inflate it and hang it on a thread. Soak the laces thoroughly in wallpaper glue and stick them onto the ball so that they intersect and overlap each other. Let it dry thoroughly overnight, then pierce the balloon, deflate it and remove it. We insert a small light bulb into the resulting lampshade and hang it. That's all, a great DIY New Year's decoration for your home is ready! Read the detailed New Year's master class at the link
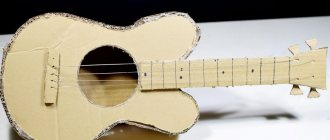
Japanese and their differences from Chinese
We make Japanese lanterns with our own hands using the same bamboo skewers or, if the decorative lantern is made of a large volume, birch slats. The simplest form of a Japanese lantern is cubic.
For the base, it is necessary to make recesses in the wooden slats with inscriptions at the fastening points. This procedure is necessary if the rivers have a circular cross-section. For square slats, gluing along a plane is quite acceptable. The base is a square with a side of 10-15 cm.
The square is assembled in such a way that the shanks protrude beyond the main frame by 5-7 cm. The river is installed vertically in this corner from the outside. If necessary, they should also extend beyond the frame, forming the legs of the lantern. The frame is covered with colored paper.