History of origami
Nowadays, origami captivates mainly children. However, this was not always the case. Most animal figurines were created as iconic figures in Chinese and Japanese mythology. Photos of origami toys are still motivating to create something new.
Ship
To fold this simple three-dimensional figure, we only need a sheet of A4 paper.
First, fold the sheet in half, connecting the short sides. Then cut in half again, again along the short sides.
Folding the boat
Unfold, leaving the short sides underneath. And we attract the upper corners to the resulting middle line. We get a large angle. We turn the free sides from below upward from different sides. We take the middle line from both sides and unfold it so that it turns out to be a square. We lift the free corners of the square up from different sides, pull and unfold the boat.
This little magic, created in a few minutes, will keep your child busy for a long time.
Folding the modules
A standard A4 sheet of paper is suitable for the module. We divide it into 4, 8 or 16 equal parts, depending on the size of the figurine that we plan to assemble.
Fold the resulting rectangle in half, pulling the long sides towards each other. We determine the middle along the fold line and turn the corner, like an airplane.
We turn the workpiece over and at the ends of the “airplane” we bend the outer corners up. We wrap the lower free ends up and fold everything inward along the middle line. You should get a triangle with two caps inside.
Flashlights
To decorate a New Year's lantern you need to follow these steps:
- Fold a colored paper sheet in half.
- Using scissors, make cuts from the bend side, not cutting 1.5-2 cm to the edge.
- Unfold the workpiece, then roll it widthwise into a tube, gluing the edges.
- Cut a handle out of paper and fix it with glue.
- Alternatively, a cut paper sheet can be wrapped around a painted cardboard roll.
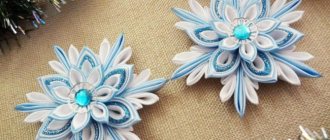
Types of balls
Kusudama balls have a variety of shapes: these are classic balls, diamonds, stars and even flower balls. Let's consider collecting the simplest of them.
Pinwheel
Step-by-step methodology for decorating a turntable:
- You need to prepare 4 yellow and 4 red squares from paper.
- Fold the red shape in half, then unfold it and fold the side edges to the center line.
- The straightened square should be divided by kinks into 4 longitudinal strips.
- Such folds should be made across. As a result, the figure will be divided into 16 squares. In one of them (located in the second bottom right row) diagonal bends should be made. Make symmetrical bends on the left side.
- Bend the side corners at the bottom.
- The right edge of the part must be bent back, while its lower segment must be at an angle.
- Do similar actions with the left half.
- Bend the top of the module back (to the width of 1 square).
- Complete 7 more similar modules.
- To connect, take 2 fragments, and place the protruding segment of one of them in the pocket located on the reverse edge.
- Connect all the parts in a similar way and close them into a ring.
Folding the modules
To fold the modules we need a square sheet.
Fold the sheet in half to determine the middle. We open and pull the sides towards the midline. Let's unfold it again. It turns out that the sheet is divided into four parts.
We bend the lower corner of the first quarter and the upper corner of the last. Fold the sides towards the center.
We turn the corners of the workpiece so that we get a rhombus of two triangles. We tuck the corners of the triangles inside the pockets. We bend the workpiece along the resulting lines so that the corners are at the same level. Unfold and bend the corners outward. Collecting the ball
To assemble the ball you will need 29 such fragments.
Assemble the ball moving from right to left, inserting five modules in a row. The final row will have four modules. The modules are inserted into each other with corners. The modules must be inserted tightly, otherwise the ball will crumble.
Volumetric Christmas tree decorations made of paper step by step
Bell
Using this template or any other from the Internet, trace and cut out 6 bells in a flat version.
Fold each one in half, being careful to fit the edges together.
Glue together one half side of one piece to the half side of the second.
Glue all 6 pieces together, then place a string in the center and secure it with tape. In principle, glue will also cope with this task, but with tape it is faster and more reliable.
Glue the last two sides together to create a complete three-dimensional bell for the Christmas tree.
Complex DIY Christmas tree toy
Redraw or print the template.
Cut out 6 shapes.
Fold them in half.
Take one part and apply glue to its half, also glue the second part to it with one side, adjusting the ornament.
Repeat until you have glued all 6 pieces together.
Before gluing the remaining edges, do not forget to place a rope or thread in the middle of the toy, making a loop out of it.
Christmas tree toy in the form of a multi-colored spinning top
Now we complicate the work a little, although it still remains as easy as the previous ones.
Using the template, cut out 6 parts, but in different colors. Alternatively, some may be repeated in color.
Then follow the same steps as in creating previous Christmas tree decorations from paper. Fold all the pieces in half.
Glue the sides together after placing a loop of thread inside.
Paper bear
Children will especially enjoy making this Christmas tree decoration and then viewing it on the tree. Using the template, cut out 6 bears.
Fold them in half.
Glue one side of the bear-shaped blank to the other side of the second blank.
Before gluing the last sides, tape a thread in the middle, making a loop out of it.
Finally, on all parts you can draw the bear’s eyes and muzzle. You can also color it completely. Draw a smile, claws, outline the ears.
Volumetric Christmas tree toy made of paper in the shape of a star
The craft is made in the same way as the previous ones, but you can also add an insert of a different color in the middle.
Cut out 6 stars from paper of the same color according to the template. And 6 slightly smaller stars made of paper of a different color.
Glue the small stars in the middle of the larger ones.
Fold in half.
Glue the half sides together, place a string inside and glue the remaining two halves of the sides together. The star is ready.
This is how the paper Christmas decorations turned out for the Christmas tree. They can be very different, because it all depends on the template used, of which there are thousands on the Internet. The Christmas tree can even be completely decorated with hand-made paper animals, birds, and decorations of various shapes, which are made in the same way as the step-by-step photo instructions for creating three-dimensional objects presented above.
Kusudama toys
The kusudama ball is an interesting toy in itself. However, here you can also get creative and make, for example, a fish. To do this, cut out eyes, tail and fins from colored paper. Glue them to the ball and the magic fish is ready.
Origami is always a lot of interesting ideas for play and creativity. It keeps kids busy and is a fun hobby for adults.
Christmas tree decorations using quilling technique
You will need: newspapers or magazines, a ruler, scissors, baking tins, glue, decorative elements, braid, beads, glitter...
Master Class
- Cut strips 5 cm wide.
- Fold each strip in half lengthwise, then unfold and fold the edges of the strips back toward the center and then in half.
- Lubricate the strip with glue and start twisting. Do this process with all stripes.
- Take a baking dish and place it in it without curling a strip around the edges of the mold.
- Fill the mold with twisted strips, securing them together with glue.
- Wait for the glue to dry.
- Remove the toy from the mold.
- Attach the braid.
- Decorate to your taste.
Christmas tree decorations using quilling technique are ready!