It is believed that repeatedly folding an origami water lily from paper has a calming effect and lifts your spirits. The flower has high decorative properties and can be used to decorate gifts, jewelry or interiors. A lotus made from a three-layer napkin deserves special attention, which will be an effective addition to a festive table setting.
We study techniques for folding paper water lilies with our own hands
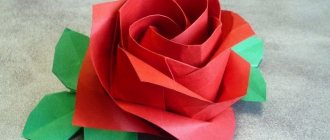
Modular origami.
Using different techniques, you can layer water lilies that are as beautiful as real ones.
The most common option, however, is not the simplest, making a flower using the origami technique.
To fold a water lily, as in the photo, you will need:
- 4 sheets of A4 paper (red or pink);
- 2 sheets of A4 paper (green);
- a piece of wire.
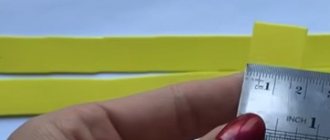
A sheet of paper of the main color (red or pink) is divided into 4 even parts, arranged along the width. To do this, you need to use a ruler and a simple pencil. The drawn lines are cut using scissors.
Now the strips of paper are folded in half in the longitudinal direction, that is, along the length. Then the corners and long sides of the strip are folded.
Now the resulting workpiece needs to be carefully folded in the middle in the other direction, outward, as if folded in half.
All 16 pieces of colored sheets, both red and green, must be prepared in this way for further work. Only one, the very last green piece, should not be turned outward, but rather inward.
Now the work with module failure begins.
To do this, two red ones are superimposed on the green blank.
You need to make exactly 8 such sets, using all the parts prepared earlier.
All modules fit tightly to each other.
The middle is fastened with wire, carefully wrapping the center several times, and securing the ends of the wire and carefully cutting them off. The blanks are straightened. To straighten it out evenly, you can use the wire as a support, pressing on it when bending the leaves and forming a circle.
Now you need to straighten the centers of the future petals. To do this, the inner layer of the sheet is bent inward. The depth and height of the bend can be adjusted at your discretion. The main thing is to do it carefully, so that if something needs to be corrected, you can do it without leaving creases on the paper.
The second layer of petals is folded in the same way. They should fit more or less tightly to the previous one. The bottom of the workpiece, where the green leaves will be, is straightened in exactly the same way.
If the leaves are not straightened evenly, making the bends larger or smaller, then the water lily will look even more like a real one.
Classic origami.
To make a snowflake using the classic technique, you need to bend a sheet of paper strictly along the lines shown in the diagram. The diagram is detailed and clearly shows the directions of the folds with arrows. However, it will be more convenient for novice masters to familiarize themselves with the description of addition.
- At the beginning of the work, an initial shape is made from a sheet of paper, which is called “Pancake”.
A square sheet of paper (this is important, the sides must be equal to each other, otherwise the flower will not be folded) is folded diagonally. The intersection lines of the diagonals are smoothed out well using a ruler or the back of the nail. Each corner of the vertex is folded in the direction of the center, with the vertex facing the other corners.
- After this, all corners of the workpiece are folded towards the central point.
- The same corners are bent again, and again to the middle.
- All lines must be marked. To do this, the sides of the triangle are bent in the opposite direction, towards the middle.
- All corners of the flower blank are bent like a mountain. Before this, folds are made along the lines so that the corners are turned out.
- The petals are also folded back into a “mountain”, thus marking folds. The workpiece turns over and the pockets of the petals seem to be flattened. To do this, you need to press them down well.
- The workpiece is turned over again. The inner corners are folded into a “valley”. To do this, they are turned outward.
- Similarly, it is necessary to open all the corners of the inner “pancake”.
- The workpiece is turned over again. If desired, you can pull out additional petal corners. This will give the water lily a more natural and open look.
The resulting flower can be used as table decor, to decorate a room with it, or as a craft for a child.
More ideas can be found in video lessons dedicated to the topic of the article.
Basic option
Before collecting the bud, cut out the petals according to the template. Each of them needs to be stretched from the sides, giving the paper the desired shape. The petals are glued in a circle onto a cardboard base. This is a cardboard circle that sets the size of the entire water lily: the larger its diameter, the larger the flower.
We glue the petals in rows, one follows the other, but in a checkerboard pattern. You will need approximately 20 petals. Please note that there are three rows of petals of the same size and only the last one, which frames the middle, is made from smaller petals.
Once the entire areola of the petals around the stamens is glued, we proceed to forming the center of the flower. To do this, we cut a strip of paper along the edge into a fringe, then simply twist it, cut the bottom part so that we can glue this paper tube, grease it with glue and place it in the middle of the flower.
That's it, the flower is ready. Please note that we used soft pink paper to create it, and made the middle yellow. To create a composition of water lilies, first come up with its appearance, and then make the required number of flowers from the sketch. Add leaves to the flowers. These can be pieces of green cardboard cut out according to a template.
Master class on making flowers
It is better for novice craftsmen to take on the simplest jobs. It must be borne in mind that, for example, manipulating crumpled paper requires some skill, while modular origami also requires precision, perseverance and takes a lot of time. You should thoroughly prepare for working on the chosen version of the water lily (water lily, lotus). Before starting, it is recommended to read the instructions, watch the corresponding video lesson, and print out the necessary diagrams and templates.
Paper water lily
Without much effort, you can make a rather impressive paper water lily with your own hands. Master class on its creation:
- Two circles of different diameters are cut out of a white sheet, for example, 10 and 7 cm.
- Each of them needs to be divided into 8 sectors. It is more convenient to do this if you first fold the circle in half, then bend it twice more through the center of the original circle. After this, the workpiece must be unfolded. You can also draw a circle by drawing 4 lines intersecting in its center.
- According to the folds or pencil markings, each of the circles is cut from the edge, slightly short of the middle.
- Opposite corners of one sector need to be brought together. Along the line of contact between the edges, the paper is fixed with glue. The result is a pointed petal. The rest of the petals are glued together in this way.
- Both pieces processed in this way are turned over, the smaller one is placed on top of the larger one and glued together in the center.
- A leaf is cut out from green cardboard according to the template. A water lily is glued onto it.
- From yellow paper you need to cut out a small circle 1-2 cm in diameter. It is smeared with glue and glued into the middle of the flower. The craft is ready.
Involving children in work
There are various ways to make a water lily from paper, differing in technique, level of complexity and type of paper material. Even children can master the simplest models of water lilies. Such activities are very useful for them, because they:
- develop perseverance and creativity;
- develop skills in working with scissors, glue, and craft materials;
- have a beneficial effect on fine motor skills;
- promote aesthetic education;
- help organize the child’s leisure time.
The production of water lilies can be timed, for example, to coincide with March 8th. It is not a shame to present such crafts at any exhibition of children's creativity, which are regularly held in educational institutions.
Quick diagram of a modular origami water lily
Cut the A4 sheet into 4 identical rectangles. You need 16 pink and 8 green such blanks.
Stages of work:
- Fold the rectangle in half. Expand.
- Fold the corners towards the center line.
- Fold to the center line of the side.
- Fold the workpiece in the opposite direction, with the folds facing outward.
- Make 16 of these elements.
- Green modules are made in the same way, only in the last step the fold is made inward.
- Make 8 elements.
- Take a green blank and place two pink ones on top of it.
- Make 8 such sets, fold them evenly together.
- Tie with wire in the middle.
- Straighten the pieces to make a circle.
- Fold the petals of the first layer up.
- Fold the petals of the second layer.
- Spread out the green leaves.
- The water lily is ready.
Video instruction:
What materials will you need?
Water lilies are made of paper. Any one will do - corrugated, crepe, landscape, color or intended for a printer. Color doesn't really matter either. Typically these flowers are made white, yellow or pink. But nothing prevents you from using other shades. Crafts with petals of different colors also look interesting.
Instead of paper, you can use cotton fabric, felt, satin ribbons and other materials. You'll need a few more things to get the job done:
- Scissors. For a child, it is better to take one with rounded ends.
- Glue. It is convenient to use a PVA tube with a brush.
- Yellow and green cardboard.
- Ruler, pencil.
- Table (desk) backing. This could be newspaper, oilcloth or a hot pad.
For one of the water lily models you will also need a piece of yellow foam rubber or a round magnet of small diameter.
Origami
A fluffy and beautiful origami-style water lily can be made from just one sheet of paper. To work, you need to prepare one pink and one green leaf, as well as glue.
The paper for making crafts should be double-sided; besides, it is best to choose less dense sheets - they are much more convenient to fold.
The first step is to mark the diagonals by folding a square sheet of paper in half twice. Next, each of the four corners needs to be bent towards the center to create a smaller square.
The paper square must be bent again, just like the previous time. Similar actions need to be repeated a third time.
After this, the protruding corners are bent again, but not towards the center, but just a little. At this point it becomes clear why you need to choose thinner paper.
The paper blank is again turned over to face itself and the petals of the water lily begin to open. First the first row is folded back, then the second, third row - the final one - the smallest. Additionally, the water line can be decorated using a green leaf cut in the shape of a real one. The two parts are simply glued together. Now you won’t have any questions about how to make a water lily out of paper using the origami technique.
From paper you can make a large number of a wide variety of flowers, which, unlike living ones, will not wither and will delight the eyes of others for a long time. Today, such products are actively used in decorating halls, banquet tables and festive arches. Water lilies look original and can be made by both adults and children. And if you don’t know how to make a water lily out of paper, then arm yourself with patience and the necessary materials, and the recommendations presented in this article will help you cope with the task.
You can make a paper water lily that looks like a real flower yourself. Water lily is a beautiful flower that grows in ponds. It is called a mermaid flower.
How to make a water lily from paper? Let's look at a master class on the process of creating a paper water lily step by step.
To create a paper water lily, you need to prepare some materials
. To get started you will need:
- yellow corrugated paper;
- pink corrugated paper;
- a small piece of cardboard;
- ordinary stationery scissors;
- PVA glue.
Using scissors, you need to cut seven strips; they should be 1.5 centimeters wide. Then six strips 1.2 cm wide and five more - 1 cm. We begin to make petals from the strips. In order for the strips to take the shape of petals, you need to stretch them with your fingers, creating a boat shape. It is necessary to cut a circle with a diameter of 4 cm from corrugated paper. Seven strips must be glued on top of the cut out paper circle. You should start gluing in a checkerboard pattern.
Final manipulations
You can make a paper water lily even easier with your own hands. Take a sheet of paper in the shape of a square. We bend it diagonally. Then we unfold it. Bend the corners of the square towards the center. The sides must match. Then we rotate the square so that the corners are perpendicular. As a result, the square will turn into a rhombus. We bend the corners again towards the center. We turn the craft towards us with the wrong side. We bend the ends again towards the center from this position. Next, move the triangle a little to the side. We look for the next similar geometric figure from the back side. We bring this triangle to the top. We smoothly bend it towards the front of our workpiece. We press on the base. We wrap using circular movements at the corner of the square. It is important not to damage the paper. You can bring the petal to the front side.
The use of plastic bottles for making various crafts is not new at all and, moreover, is very popular. What our craftsmen, especially amateur gardeners, don’t do with them when decorating their garden plots. Many of us also used plastic bottles not only for economic purposes, but also for creative ones.
Although it’s difficult to surprise anyone with crafts made from plastic bottles for the garden, new ideas always arouse interest. This material is considered waste and does not require material costs, but you can make a useful and original thing from it. An important advantage of plastic, along with its low cost, is its strength and ductility.
In our article we will talk about such a product made from plastic bottles as a water lily. It is this plant that gardeners often plant in decorative ponds. It is not for nothing that water lilies enjoy well-deserved popularity, because they bloom very beautifully above the surface of the water among a mass of large floating leaves.
That is why there are no people indifferent to a water lily with large petals and colors of a wide variety of shades. And plastic water lilies are a worthy alternative to water lilies, since such flowers are the highlight of a personal plot, regardless of the time of year.
Gift box with lotus
Using an alternative origami water lily pattern, you can make an original gift box. It will require three types of paper, for example, craft paper in two shades and packaging paper with a pattern. The squares for all parts of the box should be the same size and harmonious in color.
Step-by-step instruction:
- Cut 3 squares 21x21 cm.
- Let's start with the lid. Take light craft. Make diagonal folds.
- Fold one of the corners towards the center.
- We repeat the action for three more sides. We get the basic “Pancake” shape.
- Opening the folds. Bend the corner to the line from step 3.
- We repeat the action for the other sides.
- Fold the triangle along the lines from steps 3 and 4.
- We form a square “frame”.
- Turn the product over. Fold the right edge to the middle.
- We do the same with the left one.
- Open the folds from step 10.
- We lower the top edge to the center and raise the bottom.
- Open the valve on the right side.
- Fold the top right corner to make a triangle along the line.
- Repeat the action symmetrically for the bottom.
- We return the valve to its place.
- Fold the left side in the same way. We insert our fingers into the gap.
- Open and push apart the walls of the origami box lid.
Let's start assembling the flower:
A. Take the two remaining squares. Make diagonal folds.
B. Bend all corners towards the center.
C. Repeat the previous step again. We turn the figure over.
D. Fold the product again.
E. Turn the box over again. Bend one of the corners towards the middle and fold it back until it touches the starting point on the bottom layer.
F. We do the same with the other parties.
G. Bend over the 4 points of the second layer to connect them to the flaps above.
H. Place the square on top of the box lid made earlier. Insert the triangles from step D into the slots on the four sides of the lid. This will secure the decorative lotus to the base.
Ready.
For fans of Chinese origami, water lilies made from modules have been developed. You can easily make them yourself by following the video tutorial:
How to choose paper
To make origami, you need paper that holds its shape well, that is, of sufficient density. This could be copier paper, white or colored, or ready-made sets of colored paper for children. You can use matte wrapping paper; corrugated and different types of embossed paper look good. Sets of special paper for origami – “kami” – are also available for sale.
To make a craft, you may need thin paper, but it does not hold wrinkles well.
In this case, you can make a so-called sandwich, that is, place thin foil between the sheets - the product will hold perfectly.
If a child is interested in this type of creativity and already has certain skills, it is recommended to purchase special Japanese washi or washi paper - this is a soft handmade material that is sold in specialized stores and will ensure high quality products.