Origami is a unique art. With its help, you can create not only beautiful crafts or decorative elements, but also birthday gifts for your family and friends. These can be various flowers, gift boxes, bows and many other things that the birthday person will be pleased to receive. Thanks to origami, you can decorate an existing gift in an original way - make an envelope or a box. In any case, an origami birthday gift will be unique and unforgettable for its recipient.
DIY cards with flowers inside
Even a child can make a heart-shaped card with a three-dimensional flower inside:
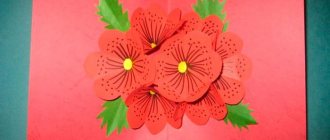
A lush flower for the inside or outside of the card can be made from colored or even plain paper painted with watercolors or pastel crayons. You can cut flowers using this template:
Print out the flower template and color it with paints. Fold it according to the marked fold lines and glue the resulting flower onto the base of the card.
Such a lush and bright card with flowers inside, made with your own hands, will undoubtedly delight the recipient.
She explains how to make it in her master class TheJulianaHappy :
The option with delicate, pastel colors looks very cute. Making stamens for flowers is not difficult!
Flowerbed with flowers in the window
The original master class is in English, so for your convenience we offer a brief translation of the process of creating this flower card.
Standard materials and tools: colored paper, cardboard, scissors, glue, plastic to imitate glass in a window.
Take thick colored paper and fold it in half. Cut out a square window in one half.
We make a frame from colored paper of a different color. The glass for the window can be made from a protective film for your phone or transparent plastic. Glue the resulting window frame to the base of the postcard. You can do without “glass” at all.
Window frame
Glue it into the hole
We glue a flower pot out of cardboard and glue it in the middle of the card on the fold line. Glue the sides of the resulting pot together so that when you close the card, the pot folds up.
Glue the pot
Adding up the edges
Decorate along the edge
Next, from colored paper we cut out green stems and all kinds of bright flowers: crocuses, hyacinths, daffodils and tulips. Perhaps your bouquet will not be spring, but summer, which means that cornflowers, daisies, pansies, etc. will appear.
Stems first
Then we cut out the flowers
Glue the flowers into the pot
The height of the flowers should be such that they do not stick out from the card, but are visible through the window!
Gluing flowers into a pot
This is how they stack up
The window can be decorated with a cozy curtain.
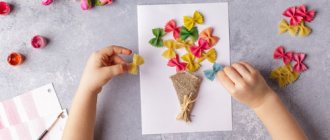
Using the same principle, you can make a card with flowers from felt or painted cotton pads. Additionally, insert a laconic but warm congratulation along with the flowers!
In addition to flowers, balloons, stars, and bows may appear from the card.
TheWorkshop shows how to make a panoramic flower card along with a greeting envelope in his master class :
Postcard with a pot of flowers inside
We take thick paper - the basis for our postcard. Create a rectangle in the center of the fold line of the card. The width of the rectangle is 3 cm, length is 7 cm.
We make cuts along the pink lines with a stationery knife. Then we fold the resulting rectangle inside the postcard. We attach the base of the card to another sheet, larger in size than the original base.
Then we make a floral design: a flower pot, the flowers themselves, fluttering butterflies and grass. We combine all this and glue it to the front of our postcard.
Making a floral design
Closer photo
Using the same technique, you can make an original vase postcard. You can also make flowers in such vases with your own hands from paper or other available materials.
Postcard-vase for flowers
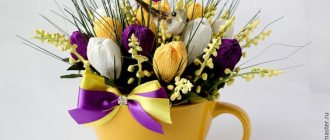
Paper bouquet
Volumetric children's card
We bring to your attention a master class on making a very delicate three-dimensional card, which will not only congratulate the recipient, but will also fit perfectly into the interior of, for example, a children's room.
First we make a box frame. To do this, take thick blue paper and cut out a template for the box from it. We fold the edges of the template 4 times, 5 mm on each side, thereby forming a frame. Glue the resulting frames together.
On top of them we glue colored or scrap paper in a color that matches your composition.
Next, we will prepare the elements of the future composition. Glue together a balloon from paper circles. We fold the circles in half and glue them together. A waxed cord is glued into the base of the basket and directly into the circles, forming a ball.
We cut out clouds from scrap paper and a sun from yellow paper. Glue the elements of the composition into a frame. We glue the balloon as follows: we glue the base of the balloon with bulk tape, and the balloon itself with glue. We glue the clouds using the same principle: one with glue, the other with bulk tape.
We make green grass from a simple napkin. First we cut it, then glue it. On the right side of the box we glue a tree made using a hole punch for Scrapbooking. The final touch is to glue serpentine, butterflies and a congratulatory inscription into the empty spaces! We glue a ribbon with embroidery or lace to the bottom of the box. The original three-dimensional postcard is ready!
Module assembly diagram
Let's first figure out how to assemble an origami module. To do this, we need an A4 sheet, it needs to be cut into 32 equal rectangles. We take such a piece of paper and fold it in half, we get a rectangle. Next, we bend it again so that we have a guideline in the middle. We take the leaf horizontally and pull the upper corners to the fold in the middle of the workpiece. Thus, we will have a corner on top, and free tails of the sheet below. We bend these tails up from the back side, and then straighten and bend the protruding corners inward, and again raise the tails to the top. We get a triangle. Fold this triangle in half with the tails bent inward. Now we have a finished module.
Origami postcard
Giving gifts is no less pleasant than receiving them. The instructions below will show in detail how to make a greeting card with your own hands from paper, which in itself will pleasantly please the recipient of the gift. Beautiful flowers for dad or mom will be a wonderful surprise and a nice holiday gift.
To make this model, you will need seven square sheets with a side of 10 cm and the same number of squares with a side of 4 cm. Fold the large square, as shown in the figure, into eight layers. Cut the edge with scissors in a circle. The result was a blank flower with petals. In a similar way, cut out the core of the flower from a small square. Connect both parts using glue. From the resulting part, cut one segment with scissors. Let's give the workpiece volume. To do this, place the outer segments on top of each other and secure the connection with glue. Fold the resulting bud in half (1).
Let's make six more flowers in the same way. Now you need to assemble all the elements into a single whole to get a postcard folded using the origami technique. The assembly diagram is shown in the figure. Place the flowers folded in half in accordance with the diagram. Apply glue to the areas marked with circles. We will place the parts one by one on top of each other, without turning them over or unfolding them (2).
As a result, all the buds will be combined into a single bouquet. Take a postcard that, when folded, should completely hide the flower. We attach the central petals with glue to the walls of the card, arranging the bouquet so that the left edges of the flower rest against the fold (3).
The paper postcard is ready. When opening the craft, the flowers will be voluminous and open.
Video master class of our three-dimensional postcard:
creative indoor flower
You will need: a pot, polystyrene foam, skewers, artificial grass, glue gun, candy bars, chewing gum, gift cards, etc...
Master Class
- Glue sweets, chewing gum, cards to the skewers.
- Place the foam in the pot.
- Place artificial grass.
- Insert the skewers with the sweets into the pot, arranging them to your liking.
The creative indoor flower is ready!
Volumetric postcards-dioramas
We present to your attention a master class on making a 3D postcard - a small three-dimensional scene. On such a stage, everyone can place various fancy figures and decorations)
To make a postcard, we take 4 sheets of thick cardboard, in this case we take cardboard in four shades of orange. You can choose colors to suit your taste.
On sheets of cardboard, draw the outline of the frames with a pencil and cut them out. Make the frame outline 1 cm wide.
From the remaining fragments of paper we cut out two strips, each measuring 10 by 4 cm. We line each one into 4 parts of 1 cm each. We cut off all the corners of the resulting strips. Fold the strips along the lines to form a paper zigzag. These zigzag pieces will support the diorama fragments. Glue the zigzags to the frame on both sides.
Glue the second frame clearly along the line on the other side of the zigzag.
Combining frames
Very neat
The top of the zigzag should cover one side of the frame. The same must be done with the opposite side. Thus, the first scene of the diorama is ready!
Using the same principle, we make the remaining frames of the diorama.
It's better to decorate each of the frames (especially the last one) in advance than to try to squeeze decor into the finished card.
The back wall does not have to be solid; you can make a transparent diorama without a back wall.
Decorate not only the “wall” of the diorama, but also each frame. Use more voluminous decorations, such as beads, bows, feathers, ribbons, etc. This will make the card seem more voluminous and will enhance the 3D effect!
You can come up with absolutely any plot! Create your own little theater!
For example, the waiting Assol!
Or a hot air balloon in fluffy clouds.
Bright meadow with lupine and butterflies!
Birdhouse with birds and flowers:
Cool and unusual crafts
- The symbol of the holiday - a beautiful cake - can be made from paper or cardboard! Not only is this a beautiful souvenir, but you can also make it in the form of a box and put some small surprise inside.
- Another useful gift is holders for photographs and various paper small items. They can be made from thick cardboard in the form of funny sheep - just cut out the figures and glue them together, using the applique principle. It turns out impressive and very cute.
- A good memorable gift is cardboard flowers with small photographs glued inside. This “bouquet” will delight the birthday boy, decorate his desk, and will keep a valuable and joyful memory for a long time. Simply cut out identical flowers from colored cardboard, and use tubes or skewers as stems. Make the flowers colorful and cheerful, and choose the best photos so that every glance at them will lift your spirits and make you happy!
Paper gifts can be very creative, and most importantly, valuable to the soul. Give your crafts with sincere love and wishes of the best - for your loved ones!
Cards with flowers
They are made following step-by-step instructions:
- Wrap a ribbon around a toothpick to create a roll. Carefully remove it from the stick.
- Loosen the rolled donut to the desired diameter and secure the edge.
- Use tweezers to squeeze on one side, forming a droplet.
- Create another 6 - 8 such droplets and place them on the surface, connecting them together with a flower. Apply a little at a time, straightening the strips until they dry.
- Create the middle from a tight roll, also fixing the edge. Stick it on top of the petals.
- The leaves should be made in the same way, but when unrolling, press the tape on both sides so that it forms a shape similar to an eye with its pointed edges.
- You can add a few more flowers, butterflies and other elements to the picture. In the same way, by twisting all kinds of curls, they create magnificent animal figurines, toys and gorgeous paintings.
So, if you are wondering how to make a beautiful card, then quilling is a win-win option! There is sophistication of form, elegance and grace. And the children will be delighted with such an activity.
Bookmark "Crane" by Joe Nakashima
A new look at the traditional tsuru crane is offered by a famous Brazilian designer. Of course, his origami model requires experience and patience, but analyzing each step step by step makes the task much easier.
Video description of the model:
DIY postcard for teacher
Even a first-grader can create such a stylish card.
For this he will need:
- Gold and yellow cardboard;
- A piece of notebook paper (preferably in an oblique line);
- A few yellowed leaves;
- Small pencil;
- Satin ribbon 2.5 cm wide;
- Scissors;
- Glue.
1. Fold a sheet of gold cardstock in half. The postcard will be positioned horizontally.
2. Cut out a rectangle from a notebook sheet of such a size that when applied, there will be a few centimeters left from its edge to the edge of the postcard. We write congratulations on it. Clumsy childish handwriting is not a problem; it will look quite appropriate here.
3. Glue the tape at the bottom using glue. We bend the ends inward.
4. Cut out three circles from yellow paper and glue leaves to them. Paste on top of the tape.
5. From the remnants of the ribbon we fold a bow, decorate a pencil with it, and glue it in the upper right corner of the card.
Any teacher will be happy with such a sign of attention from his little student.
DIY Happy Teacher's Day cards photo
To create a postcard, you can use any school items at hand: notebook leaves, colored pencils and even shavings from them.
This card combines the design with the quilling technique.
You can focus on the subject that the teacher teaches.
An interesting thing - a chalk board
Visit the store and buy cut wood and slate paint. This paint is perfect for creating a board for writing and drawing. In general, that's all, the craft is ready. Write your congratulations on this board in advance and give it to your father. We assure you that he will be overly surprised by such an unusual gift. The board is unique in every sense. The thing is more interesting than a purchased board from an office supply store.
Paper envelopes
Nowadays, more and more people use money as a gift. Even in this case, you can show your imagination and give the birthday boy banknotes in a beautiful and original envelope made of paper with your own hands.
Simple envelope
To make it you only need a square sheet of paper, a ruler and a pencil.
- We measure the sheet and find its center.
- Fold the right and left sides inward until they touch the center.
- Fold the bottom side up so that it overlaps the center.
- Glue two bent parts to it.
- Fold the top corner and the envelope is ready for use.
Beautiful envelope
To give your gift envelope an attractive look, you can use paper of different colors. The simplest decoration is to use different colored paper for all sides of the envelope.
For the envelope you will need:
- 2 sheets of different colors;
- glue or double-sided tape;
- pencil;
- ruler;
- scissors.
The manufacturing process consists of the following steps:
- We cut out a blank for one of the sides of the envelope from colored paper.
- From another sheet we cut out a blank for the inside of the product.
- We make the inner part a little smaller than the outer part so that it can be easily glued.
- Glue the inside of the envelope.
- We bend the edges and seal them.
Money envelope
You can make this simple origami envelope with your own hands using colored paper and ribbons. It looks great, and it won't take you much time to create.
To make an envelope you will need:
- glue;
- colored paper;
- Ruler and pencil;
- ribbons;
- scissors;
- matches.
Scheme and operating procedure:
- Fold the prepared sheet of paper with the edges inward.
- We bend the sides in the same way inward towards the center.
- We unfold the side parts and fold the corners like a triangle.
- Unfold the blank and glue colored paper.
- We bend the protruding parts inward.
- Glue the corners in the form of triangles to the base of the envelope.
- Glue a ribbon in the center of the workpiece and tie it with a bow.
- Do the same for the thin tape.
- Use matches or a lighter to trim the ends of the tape.
There are many ideas for birthday gifts. Using the origami technique, you can create unique figures and delight the birthday boy with them.
Interesting master class with photos and videos: DIY sweaters for teenage boys
Adviсe
- We advise you to take your time and put more effort and ideas into making the gift come true. It is important to try and put your love into the craft. The energy is assigned to the thing forever, and if you don’t see each other for a long time, the craft will help you survive this period.
- Crafts are the easiest way to congratulate your father. Create a craft and write a poem or story at the same time. Believe me, this will greatly increase the effect of joy from receiving a gift.
- Few people are able to invent blanks with their own hands. You can find everything you need in homemade stores and buy it without any problems, and you can also get some advice on choosing from a store consultant.
- Create functional gifts that can be used or displayed for everyone to see. In the latter case, keep in mind that many people will see the homemade product and you shouldn’t place anything unnecessary on it.
Fathers are people who invest strength in us. They have the fastest reaction and thanks to them we were definitely saved from irreparable consequences several times. You first learned to ride a bike thanks to your father. Who laughed at your falls and supported the bike until you managed to balance. The love they gave cannot be compared to someone else's.
The attention of mother and father is very different. Don't forget about your parents. We must compensate for the love and attention they gave, and we can start with crafts made with our own hands with love invested. Homemade items are much better than store-bought items. Uniqueness is achieved through individual efforts without the help of other people.
How to make birthday cards with balloons
YouTube channel Crafting Hours
What do you need
- Thick gray paper;
- double-sided paper of different colors;
- ruler;
- a simple pencil;
- scissors;
- double sided tape;
- compass;
- regular glue and/or glue stick;
- glue gun;
- twine or other thick threads;
- White paper;
- felt-tip pen;
- glue stick;
- colored tape.
How to do
1. Fold gray construction paper in half crosswise. Cut a rectangle with sides 20 and 14 cm from a pink sheet. Cut a rectangle measuring 16 x 10 cm from gray construction paper.
Using double-sided tape, glue the small gray part onto the pink one, and secure the latter onto the cover of the future card.
YouTube channel Crafting Hours
2. Cut many strips of colored paper of different thicknesses, but the same length. These are blanks for balls. Conditionally divide one strip into three parts and bend it twice along the lines.
Draw a circle on the resulting part using a compass. Cut along the contour - you will have three circles.
YouTube channel Crafting Hours
3. Prepare circles from the remaining colored stripes in the same way.
YouTube channel Crafting Hours
4. Cut small triangles from the remaining folded paper. Glue them to the bottom of each circle.
YouTube channel Crafting Hours
5. Fold a small strip of paper in half. Unfold and fold each side like an accordion, as shown in the photo and video below.
YouTube channel Crafting Hours
6. Make as many of the same parts as you have balls. Glue them to the circles so that the accordions are on top.
YouTube channel Crafting Hours
7. Using a glue gun, attach a piece of twine or other thick thread to each ball.
YouTube channel Crafting Hours
8. Fold the long edges of the white paper about 2 cm and cut along the contour so that you get two strips folded lengthwise. Fold each one in half crosswise three times. Cut out identical triangles from them so that the bases of the shapes are on the fold. Details are in the video below.
YouTube channel Crafting Hours
9. Write one letter from the phrase “Happy Birthday” on each triangle. Lubricate the inside of the flags with glue, put them on two pieces of rope and glue them together. Tie the ends of these two strings together.
YouTube channel Crafting Hours
10. Lubricate the accordions with glue on the back of the balls and distribute them beautifully inside the card. Save a few for the cover.
YouTube channel Crafting Hours
11. Tie the ends of the twine, twist and cut off the excess. Using a glue gun, attach the letter flags to the card.
YouTube channel Crafting Hours
12. Write a congratulatory message at the bottom of the cover. Glue a few balls at the top. Cut off the excess twine and tie it with ribbon.
What other options are there?
You can make a three-dimensional postcard with balls flying out of the box:
Here's a similar option:
Here's how to make balls using the quilling technique:
And this is a simple postcard made using the appliqué technique:
Sticky Note Organizer
The practical dad needs a functional gift. Using the origami technique, you can make a variety of organizers for small items. Let's say a small wall model to store important notes or business cards.
Step-by-step instruction:
- We fold the album sheet in half in both directions. We open all the folds.
- Place the sheet vertically. We bend the bottom edge so that it does not reach the central transverse axis.
- Turn the workpiece over.
- The right half is conventionally divided into three parts horizontally. Fold the corresponding edge 1/3. Repeat the same steps for the left side.
- We lower the upper part down “valley” along the dotted line. It should extend 1 - 1.5 cm beyond the bottom edge. We make a hem.
- We open the sides of the figure, place the flap we just folded there and close it again.
- We tuck the side parts of the top layer into the resulting “pockets”.
- Turn the workpiece over.
- This is what we get in the end.
An alternative version of a stand for business cards, tabletop only:
Step-by-step instruction:
- Fold a 21x21 cm square in half from top to bottom. Let's reveal.
- We bend the top and bottom edges towards the middle. Straighten out all the folds.
- We mark the center of the figure with a small fold.
- Repeat step 2 in the other direction.
- We turn the figure over. Fold the bottom edge to the nearest fold.
- Turn the product over again. Fold the left and right edges towards the middle.
- There will be a “pocket” of a different color at the bottom. We make three horizontal folds using the previously outlined lines.
- We insert the upper edge of the workpiece into the “pocket”.
Now dad will definitely not lose important reminders and cards - they will always be in front of his eyes.
Multicolored parrot
When choosing what can be made from colored paper and cardboard, you should pay attention to a bright parrot. This bird will be a wonderful decoration for your room and will give you a lot of joy and positivity.
To make a Mother's Day gift, you will need two square sheets of paper of different colors. From one we will make the body of the bird, and from the second we will make the tail. The second sheet of paper should be 2/3 the size of the first. We fold the body according to this algorithm:
- Take a large square and fold two corners to the middle line.
- Now fold the two sides towards the middle.
- Fold the workpiece in half.
- We form the parrot's head by turning the tip of the figure inward. We bend the tail inward.
The paper craft is almost ready, all that remains is to make the tail. To do this you need to take a small square. After several folds, it needs to be glued to the parrot. The gift bird is ready.
Master class on making an airplane
Now we will talk throughout this section only about airplanes and helicopters. Let's start with an idea made from clothespins and popsicle sticks.
We have a lot of different round and oval toy packaging. You can use them too. And for the propeller and tail, take all those hedgehog ice cream sticks.
A helicopter was made from straws, a tennis ball and a plastic bottle. Original and unusual.
Using the same matchbox and cardboard, make an aircraft.
Ideas from a plastic bottle are simply captivating. Someone came up with the idea to use it.
Paper models can be of different configurations and volumes.
For such an application, take the template located immediately below.
You need to make cuts along the lines in the middle.
Top most popular and sought-after gifts
Let's make an interesting alternative to store-bought gifts using simple materials, let's try to create exquisite decorative items that are no less beautiful than the store-bought version.
To begin with, we will select the top most popular and sought-after gifts that are traditional in nature and at the same time can look unique depending on your imagination. Gift ideas:
- Handmade candles;
- Paper flowers;
- Soft toy;
- Crafts using origami technique;
- Frame;
- Postcard.
Geometry is in fashion today, so the idea of giving a gift in the form of a mobile decor of geometric shapes, which will become a wonderful decoration for a chandelier, will be appreciated.