The article presents a variety of paper accordion leaves, templates and step-by-step instructions for creating a particular leaf. Such leaves can be in very different colors, for example, if they are dedicated to autumn events, it is better to use colored paper in yellow, orange and red colors; for spring events, leaves of light green and light green shades would be a good option. Even for winter celebrations, you can make leaves from silver or white paper.
For work you will need the following materials:
- Colored paper of various colors suitable for leaves;
- Scissors, glue stick, simple pencil.
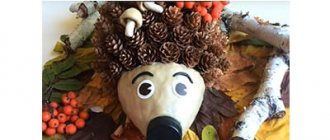
Fruit bowl
It's time to move on from small, easy children's crafts to crafts suitable for home decoration. For this purpose, you can start working on a fruit vase.
Before work, we collect material:
- glue;
- balloon;
- a tube of Vaseline;
- scissors;
- leaves (maple leaves are better).
Actions in order:
Inflate the balloon to the size that suits you. Coat it with Vaseline over the entire surface, then the leaves will not stick. Fix the ball firmly so that it does not move, for ease of work. Grease the leaves with glue and stick them to the ball. It is advisable to glue the leaves in several layers. Lubricate the last layer with additional glue and dry for 3 days. Carefully pierce the ball and remove its pieces from the craft. All that remains is to place the vase in the prepared place.
protruding leaves
The silhouette cutting technique, beloved by many, can also be used in autumn crafts and cards for Teacher’s Day. This work is already for older students:
You can go the simplest way: cut out leaf silhouettes from several sheets of colored paper and assemble an autumn bouquet from them. As in the poem by T. Pogorelova:
I have an autumn bouquet, Multi-colored and the last one. It contains a leaf and a painted viburnum leaf. A modest aspen leaf And a bunch of rowan berries are turning red. Here is a yellow birch leaf, and a carved yarrow. The oak tree has a red, bright leaf. I looked and it became hot. I’ll dry my bouquet and invite you into autumn and winter.
Motherhood wishes you creative success!
Photos used from the sites: krokotak.com, stranamasterov.ru, vdorogy.ru, ovtr.ru.
Master class on how to make autumn leaves from paper
But it’s a pleasure to make such leaves. Be sure to try to diversify your crafts. Using different fall colors: yellow, red, green, orange and even pink. And I’ll tell you a secret what I especially liked about this master class.
1. Take a square of double-sided colored paper 8.5 by 8.5 cm.
The author of the master class immediately noticed that the size of the square does not matter; you can take a larger or smaller piece of paper.
2. Bend the square in half.
3. And once again bend the workpiece in half.
4. Unbend the last fold. We bend two corners diagonally to this fold line.
5. Bend the diagonal folds. We turn the workpiece over so that the fold lines bend upward.
6. Bend the workpiece from one edge: apply the fold line to the edge. We make a fold under the workpiece.
7. Apply the fold in the middle of the workpiece to the edge. We make a fold.
8. Apply the next fold line to the edge. We form a fold.
We get a triangle.
9. Apply a design of half a leaf and a petiole to the workpiece.
10. The shape of the leaf is drawn with an arc or teeth. Now we are making a drawing with teeth. We cut the workpiece along the line.
11. Remove unnecessary things. We unfold the workpiece.
12. Using the same pattern, fold the workpiece. Just draw the leaf in an arc and don’t forget about the petiole.
13. Cut out and get a blank.
14. On ready-made leaves, make all the folds in one direction, up.
Another leaf option.
We do all points from 1 to 5 inclusive in the same way as in the previous version.
6) Also, we begin to bend the workpiece from one edge. But we don’t apply the fold line to the edge, but step back a little from the edge. We make a fold under the workpiece.
7) We bend the middle line in the same way, moving it down a little.
 We move the next fold line down again.
9) Draw the outline of the leaf, like the wing of a dragonfly. Don't forget to draw the petiole.
10) Cut out the workpiece along the drawn line.
11) Unfold the workpiece.
12) Make all fold lines facing upwards.
We got an asymmetrical leaf. You can try to apply different contours of the leaf. Then we will get several leaves that are interesting in shape.
Palm maple
In addition to kaede, in Japan there is another endemic of the Maple genus, called “momiji” in the national language. This is also an elegant low tree with a tent-like crown, which is valued in world gardening for its decorative value. The leaves of the palmate maple are distinguished by a wide variety of shapes and colors. Particularly prized are varieties with crowns of purple, wine-red and pinkish-coral shades. The palm-shaped maple is also reflected in the art of origami. For example, in the model from the classic of modern paper plastics - Joe Nakashima.
Step-by-step instruction:
First, we fold the basic “Bird” shape as in the previous master class.
- We position the figure with the forked end towards us. Draw a diagonal fold on the right.
- Apply the second fold.
- We lift the right side in the direction of the arrow and flatten it, as shown in the diagram.
- We get one of the leaf blades. Let's move it forward.
- We open the resulting “pocket”.
- Fold the blade in half.
- We tuck all the “extra” folds inside.
- We give the blades a triangular profile.
- Using a zigzag fold, we form the smallest, lower part of the leaf.
- Repeat steps 1 – 9 on the other side.
- Turn the sheet over.
- We bend the layer closest to us down.
- Open the left side along the arrow and flatten it.
- We repeat the same on the right.
- We fasten the side blades with the lower protrusions using small triangular valves.
- Turn the product over.
The origami maple leaf is ready:
It is suitable for garlands decorating the interior and for jewelry.
Another way to fold a similar model is presented in the video tutorial:
Houtiwa-kaede
Japanese maple (hautiwa-kaede) is endemic to the islands of Hokkaido, Honshu and Kyushu. It differs from its European “brothers” in its relatively small height, wide spreading crown and fan-shaped leaves. It is rare that a temple garden is complete without hautiwa-kaede, which are especially beautiful in autumn. Then the leaves of the Japanese maple are painted in fiery shades, in harmony with similarly colored bridges and religious buildings. Every year in September-October, hundreds of tourists from among the country's residents and guests go to the mountains to admire this spectacle.
This aesthetic pilgrimage is called “momiji-gari,” which literally means “hunting for maples.” The Japanese, as followers of the Shinto religion, see trees as beings endowed with a soul and not only contemplate them, but communicate with them as if they were part of living nature. The temple gardens of Kyoto are especially beautiful, where special night lighting is arranged for the maple trees. You can recreate something similar in your own home using Japanese maple leaves folded using the origami technique.
The scheme is quite simple, so it will not be difficult to make not only a single copy, but also a lush crown. The optimal size of the initial square: 15x15 or 10x10 cm.
Step-by-step instruction:
- Fold the square diagonally from top to bottom.
- Turn the resulting triangle with the free end towards you. Fold in half from left to right.
- Open the left side in the direction of the arrow.
- Flatten the fold.
- Turn the workpiece over.
- Repeat steps 3 and 4 on the back.
- We outline three folds along the dotted lines.
- We open the workpiece from bottom to top. Flatten the side edges.
- Turn the product over. We repeat the same steps on the back. Lower the top of the first and second layers.
- Fold the right and left corners along the dotted lines. We repeat the same on the back.
- We lift up the middle part using a reverse fold.
- Fold the left side to the right.
- Raise the inside again.
- Repeat step 12.
- We make another fragment of the sheet using the next reverse fold.
- We form the last part along the arrows.
- Rotate the sheet 180°.
- We make a petiole for it by folding a narrow strip of paper lengthwise several times.
Modular maple leaf
This craft, like the previous one, will be made from separate segments. Modular origami maple leaf will consist of three parts. They can all be the same color or different. The main thing is to maintain the autumn color and not make the leaves blue or purple. A detailed diagram for making an origami maple leaf is given above. A module is created from a square. To make folding the paper easier, you need to make the necessary folds. To do this, fold the two corners of the sheet and bend them back. Now you need to pull the two corners to the center. Then you need to bend the remaining untouched part. At this stage you should get a triangle. Now you need to pull the two corners to the center, and then form them into rhombuses. One blank is done. By analogy, you need to add the other two. The parts should be glued with a slight overlap to create the effect of a beautiful and lush leaf. This craft can be used to decorate a costume for a matinee, a postcard, or you can use a paper creation to make an autumn wreath.
Craft from origami leaves No. 3 (Postcard)
If desired, origami from “Maple Leaf” paper can be made even more original by painting the finished leaves in a variety of colors.
Coloring the leaves
Trace one such sheet along the contour of half of the cardboard sheet folded in half.
We trace the sheet along the contour
Go along the contour with a stationery knife and glue the sheet to the other half, opposite the resulting hole.
Glue the leaf
You will get an original postcard! We sign “September 1st” on it, color the free space to your taste - and now you have something to congratulate the teacher with!
Making a congratulatory inscription
Origami autumn card
You can use origami leaves for a variety of purposes, as long as you use your imagination!
A video master class will help you make a beautiful maple leaf using the origami technique:
Video instruction
This video shows the actual process of making origami modules for a maple leaf and subsequent assembly. If necessary, you can scroll through a particular moment several times.
From this article you learned how to make origami “Autumn” with your own hands. A composition or appliqué of autumn leaves is also good, but it’s not a shame to show children’s origami-style work, even if your child is no longer in first grade. What types of creativity using paper do you prefer? Write your tips and wishes in the comments.
Paper crafts on the theme of autumn
You don’t have to wait until the New Year holidays to decorate your home with garlands. Now there are many options for autumn garlands made of leaves and paper.
Making autumn leaves from corrugated paper for decoration
For the absolute naturalness of our leaves, it is worth choosing “autumn” colors of corrugated paper. Then our models will not differ at all from real leaves. The idea of making crafts from the author of these models is so cool that I myself couldn’t resist and immediately decided to repeat it all.
Oak Leaf
We will need a rectangle of crepe paper measuring 12 by 8 cm.
Cut the rectangle diagonally.
Lubricate the diagonal of one triangle with glue. Glue the wire to this edge, lightly wrapping the wire with paper.
Apply glue to the diagonal of the second triangle. We glue the triangles together, connecting the sharper corners; they should be on one side of the workpiece. Less spicy - on the other hand.
Using our fingers, we smooth the paper at the gluing site, so as to highlight the edge of the leaf - the wire.
We attach a template of an oak leaf to the workpiece. Let's circle it.
You can take the template a little lower in the article, or you can make it yourself (circle an oak leaf).
Cut out an oak leaf along the marked line.
Using paints (dark green or light green) we draw veins on the leaf.
If you don’t have gouache, you can use colored pencils or a thin felt-tip pen.
Cut a thin strip of paper the same color as the leaf. Lubricate it with glue.
Wrap the strip around the wire.
Using your fingers, slightly bend the leaf at the veins to form a pattern on the leaf.
You can give the leaf a more autumnal tone by drawing “rust” along the edges of the workpiece with red chalk.
Using a brush, shade the orange edging of the leaf.
We slightly bend the edges of the oak sheet inward.
Maple Leaf
We will need 5 rectangles:
- Two – 7 by 4.5 cm,
- Two - 7 by 3.5 cm,
- One – 9 by 4.5 cm.
We cut each of the rectangles diagonally.
And right away, to make it easier to navigate the work, we place the halves next to each other in the shape of an irregular diamond (that is, the upper part is wider, the lower part is narrow).
Cut 3 pieces of thin wire. Let's align them.
We take a blank 9 by 4.5 cm. Glue the two halves diagonally.
We glue the wire to the joint at the back of the workpiece. We wrap the wire with the edges of the paper.
Similarly, we glue the halves of the remaining four blanks.
We do not glue the wire only to the smallest pieces (7 by 3.5 cm).
We lay out the blanks on the work surface in this order: on top in the middle - a rectangle blank 9 by 4.5 cm. Below this blank on the sides - 7 by 4.5 cm. And at the very bottom on both sides - 7 by 3.5 cm .
In this order, we will then connect all the blanks together.
Let's start with the little ones. We draw on them the edging of the lower fraction of the maple leaf.
We do the same with the rest of the blanks. Just draw the middle and then the top of the maple leaf.
We cut out each part of the autumn leaf along the lines.
We glue the sides of the smallest piece (7 by 3.5) with the middle piece (7 by 4.5).
Glue a large piece (9 by 4.5) to the side of the middle piece.
We continue to glue all parts of the autumn leaf to each other one by one (to the large one - medium, to the middle piece - small).
When all the parts of the maple leaf are assembled, twist the wires together.
Cut a thin strip of paper and wrap it around the twisted wire.
Using green, red and yellow crayons we make an autumn ornament on a leaf. Use a brush to blend the color and make it more natural.
Using red chalk we draw a pattern of veins.
Slightly bend the edges of the leaf inward.
And at the same time we make a corrugated pattern on the workpiece.
The leaves look natural. It was as if they had just fallen from a tree and fell at our feet.
I always say chalk. But, in fact, this is a soft pastel pencil. They are very comfortable working on craft paper, including corrugated paper.