As you know, statistics know everything, so they probably know how many plastic bottles each of us throws into the trash every year. And even without serious research, it is clear that this figure is quite impressive. That is why many craftsmen are trying to invent various ways to use plastic bottles. Among them, the palm belongs to the creation of crafts for decorating the home and garden, as well as various toys. For example, a frog made from plastic bottles will bring a lot of joy to children. Making it with your own hands is quite simple. Depending on the option, it can serve as a box for storing small items or decorate an artificial pond in a summer cottage.
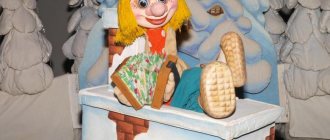
Frog Princess from a plastic bottle: step-by-step instructions
To make such an original craft for decorating your garden, you will need the following components:
- two plastic bottles with a capacity of 2 liters;
- acrylic paint black and green;
- sharp knife (scissors), glue.
Progress:
- Remove labels from bottles, wash and dry containers well;
- cut off the bottoms at a height of 10 cm;
- 2 legs are drawn on parts of the bottles with a neck and cut out;
- paint all parts, including the bottoms, from the inside so that the paint does not fade or wear off in the future;
- wait until the paint dries;
- glue the bottoms together to form a head with a body, having first poured a little earth or a handful of pebbles into the lower part so that the figure does not blow away in the wind;
- glue the paws and draw a face with eyes, mouth and eyelashes;
- If desired, a crown is cut out of another plastic bottle, painted golden, placed on the frog’s head and secured with glue.
Path made from old car tires
Garden paths made from waste tires have amazing qualities. For example, they are completely non-slippery, easy to clean, and resistant to negative influences.
For very narrow paths, use car tires. If you want to make a wide track, then you are better off using truck tires for the job.
Making a path
In order to make a track, perform the following manipulations:
Beautiful path at the dacha Please note that the distance between the ribbons should be a maximum of 5 cm so that the sprouted plants can decorate the path.
Movable Frog Princess
Instead of a garden decoration using the previous method, you can make a toy. For this you will need:
- two two-liter plastic bottles;
- paints and scissors;
- half-liter plastic bottle, preferably transparent and colorless;
- wire and awl.
Making a movable frog from a plastic bottle is quite simple. First they make the crown. To do this, turn the half-liter bottle upside down and cut out the rays. The result is a crown, at the base of which there is a bottleneck. Then the head and body of the frog are made as in the first case, and the legs are cut out. Holes are made on the legs in the upper parts. Attach them to a plastic bottle, making holes in the right places and fixing the parts with wire. Do the same with the crown.
At the end, they draw a muzzle, make holes behind the crown on the back of the frog's head and thread a ribbon on which the frog can be hung in the children's room.
Funny flowerbed cat
The next master class is suitable for craftsmen in the matter of creating plaster crafts for the dacha. And if you have practiced with previous master classes, then you can safely proceed to more complex tasks.
We suggest creating a flower bed in the shape of a funny cat. To do this you will need the following materials and tools:
First of all, we cut the bottle, which will serve as a flower bed. Afterwards, the form needs to be well wrapped with wire, which will cling to the cement solution, because otherwise it will simply slide along the plastic. Then you need to knock down a frame from the slats and attach it to a plastic blank (photo 5).
Let's start mixing the solution. This must be done at a rate of 1 part sand to 1 part cement. Gypsum is already added to the finished mixture, since the solution with this component will harden quickly. Don’t forget to wear gloves and mix the solution itself with a separate stick.
Now you can begin the most difficult part of the process - sculpting the desired shape. You need to take the prepared solution in your hand and add 1 tbsp to it. l. plaster, then knead it in your hand and, rolling it into a sausage, attach it to the frame. So, the solution should be applied step by step, separating the necessary bulges and smoothing the surface of the workpiece.
While the frame dries, you can create a cat's face. This will require experience from childhood, when various figures were sculpted from plasticine. Using the same technology, we create an animal’s face from a small ball. And for better bonding of small elements, it is necessary to first lubricate the body with water, exactly those places where a new layer will be applied.
Finally, with wet hands, polish the surface of the craft. For better drying, the product must be covered with cellophane and set aside for at least 3 days. However, you shouldn’t forget about the cat. On the first day of drying, it must be additionally moistened with water. When the craft is completely dry, it should be sanded using sandpaper (photo 8).
All that remains is to paint the cat. This can be done with water-based paint, car paint or enamel. After painting, it is necessary to coat the surface with varnish so that the garden flower bed does not deteriorate under the influence of unfavorable weather conditions.
Gypsum is flexible and environmentally friendly, so fakes made from it are increasingly becoming fashionable among handicrafts.
The softness and flexibility of the material allows you to make realistic figures, cut out small details and patterns, which makes plaster crafts excellent decorations for your apartment, garden, and vegetable garden.
Crafts made from gypsum are attractive due to their simplicity and accessibility, and master classes on such creativity can be shown to young children.
Moreover, in the process the child improves his skills in working with bulk materials, repeats or studies colors, and develops fine motor skills.
Creating with children
If you want to keep your child busy, make some crafts with him. For example, a funny frog made from a plastic bottle would be a good option. The step-by-step instructions presented below are very clear. Need to:
- cut off the ends of two plastic bottles of the same size;
- cut out a tongue from red glossy paper;
- make eyes or purchase such parts in a specialized store;
- glue the bottoms together, placing a tongue between them;
- stick the eyes on the frog's head using double-sided tape;
- if you wish, color the toy
- For greater durability of the craft, stick wide transparent tape to the junction of the bottle bottoms, with the exception of the place where the tongue is glued.
Beautiful frogs with your own hands
In order for your frog to turn out beautiful and neat, you need to carefully study the step-by-step instructions for making it. One wrong fold, one uneven cut and the whole craft will turn out awkward and unattractive. Detail to detail, straight folds, precise lines - and your frog is ready!
Many non-standard solutions and ideas from experienced craftswomen can be found at the link: https://podelkisamodelki.ru
How to make a frog from a plastic bottle in the form of a container
To make such an original craft, which can be an interesting gift from a child to a grandfather, grandmother or other relative, you need:
- cut off the bottom of the bottles at a height of 7 cm;
- grease the edges of the bottoms with glue;
- glue a red lightning bolt to represent the mouth of a frog;
- wipe off excess glue;
- if you wish, paint the frog’s body with paints;
- draw eyes on white paper tape;
- cut them out and stick them on the top bottom of the bottle.
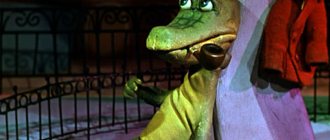
"Gluttonous Frog"
You can make a toy from a plastic bottle that will capture your baby's attention for a long time. To do this you will need: acrylic paint, brushes, a knife, glue, double-sided tape, string and a small ball. This frog made from plastic bottles (see photo below) consists of two parts: the head of a frog with an open mouth and a bug on a string.
It is better to make such a craft together with your child. If he is already going to school, then he can be entrusted with making an insect and some other parts of the toy.
Plastic crafts in landscape design
Spending time at the dacha among the older generation often evokes associations with hard work. You can abandon stereotypes at any age and devote part of your time to landscape design of your site. Not everyone can afford exquisite sculptures, fountains and bowls. Simple crafts made from waste materials will help you get aesthetic pleasure from staying at the dacha. A striking example, literally and figuratively, is a frog made from plastic bottles.
The rich colors will delight both the grandchildren who come to visit and the owners of the dacha themselves for a long time. Products based on plastic bottles have many advantages:
- Their production requires a minimum of funds. For example, for a frog you only need to purchase paint; every owner has everything else in their home.
- Both a small child and an experienced woman can master the simple design process.
- Creative gatherings bring the family together. And frogs made from plastic bottles will delight the eyes of others for a long time.
Dacha owners should not worry about the safety of plastic animals; they are unlikely to attract the attention of vandals. But even in winter, when the delights of landscape design are covered with snow, a plastic frog from bottles will refresh the untouched whiteness of the area.
Operating procedure
First of all, a frog must be cut out of plastic bottles.
Step-by-step instruction:
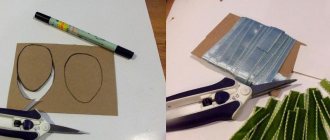
- a line is drawn on the surface of the plastic bottle at a distance of 20 cm from the neck;
- draw two semi-ovals directed towards the bottom, at a distance of 3 cm from each other, which will serve as eyes for our frog;
- stepping back from the ovals to the right and left by 5 cm, draw the contours of the folded paws with a marker;
- cut out all the parts and bend them outward so that the result is a funnel with eyes and legs;
- paws and eyes are painted with green paint;
- draw a green stripe 3 cm wide along the edge of the funnel;
- decorate the eyes by gluing white and black parts or painting the whites and pupils with acrylic paints;
- cut a long strip of plastic and roll it to form a curl resembling a frog tongue;
- paint this part red;
- glue the tongue.
Next, a bug is made from the remains of the bottle. To do this, wings cut out of plastic are glued onto the ball and painted, for example, red, adding black spots to make a ladybug. Attach the ball to one end of the rope, pull it out through the neck, then through the hole in the lid and tie it with a knot.
All! The result was an original toy - a frog made from plastic bottles. You can make several of these “grabs” with your own hands and organize competitions in kindergarten. Exercises with a frog-grab will help coordinate your baby's movements and bring him a lot of joy.
Paper crafts - options, methods
There are many techniques for making animal figurines from this material. You can choose an easy method that even a child can handle, or a complex one that origami lovers will enjoy. A paper frog can jump, “talk”, it is made in the form of applications, hand figures for puppet theater.
Application
The youngest craftsmen can be invited to make their own applique with a frog princess - the heroine of their favorite fairy tale.
For work you will need
- white, yellow, green A4 paper;
- small leaves of brown, blue and gray;
- felt-tip pens or watercolor paints with a brush;
- glue for working with paper, preferably in the form of a pencil.
If children under 4 years of age will be working on the applique, the details must be prepared in advance - draw them on paper and cut them out. With older masters, you can do them together - draw a head, a round body, two upper and two lower legs, a water lily leaf from green paper, a yellow “breast”, a flower or clouds from blue, elements of an arrow and cut them out.
Children, regardless of their age, should work with scissors under adult supervision. Children under 3 years old can be allowed to cut with a tool with rounded blade tips.
Work begins with gluing the body. Already on the body a yellow “breast” is glued, then the head and paws. Next comes the finishing - design of the flower, arrows. It is important not to forget to draw eyes, a mouth, and a nose on the face.
The frog princess can also be made in the form of a three-dimensional applique. The technology is more complex, suitable for older groups of kindergarten and primary schoolchildren.
Need to prepare
- sheets of paper green, orange, yellow;
- pencil and ruler;
- glue and scissors.
Step by step video tutorial
A ball of paper ribbons can be replaced with a paper cylinder. It will be easier for small children to work with such a part. In addition, it can be painted and turned into a jacket or blouse.
"Talking" frog
For an original congratulation, children's games or a mini-play at home, you can make your own talking frog - with an opening mouth, which you can put on your hand.
You should have green paper, glue, a pencil, or ready-made eyes from a craft store on hand. The work will take no more than 30 minutes.
We make a square of paper measuring 21*21 cm, bend it in half, and unfold it. Fold the bottom and top edges towards the middle and iron the folds.
Fold the rectangle in half. On one of the sides we begin to make eyes - we turn in the free edges of the lapels. We bend the part with the eyes up.
We bend the side protruding parts of the workpiece towards the middle of the figure. We turn the corners protruding beyond its limits inward.
We turn it over, bend the bottom edge, turn in the corners and straighten the figure. We tuck the resulting triangles inside the fold, creating an internal fold.
We fix the lower “pocket”. We make a narrow strip, bend its corners along the contour of the figure, and tuck it inside.
The talking frog is almost ready. We attach or draw eyes, slightly move the “pockets” apart, and put them on our fingers.
There are many options for creating a talking frog. You can choose equipment for any age, purpose, from any suitable material.
Jumping
A paper frog can not only speak, but also move, literally come to life. You can make such a souvenir with your own hands by mastering the origami technique.
We stock up on desire, patience, a square of green paper and a black felt-tip pen. We make a pyramid out of paper, bending the sides of its sides towards the center. This is how we form the paws.
The paws are ready, you can “put” the toy on them and start creating the body.
We turn the lower corners of the triangle up, with the sharp edge towards its base. We have a square. We fold it again according to the same principle.
We make eyes and a fold - without it the frog will not jump. The “jumpiness” of the figure depends on the depth of the fold.
Video tutorial
Green glass
Want to know how to make a frog from a plastic bottle? Everything is very simple. If you are going to make a craft to hang it, for example, on the wall in the bathroom, then it is recommended to use a green plastic bottle with a tapering neck, flattened on both sides, for shampoo or detergent. As for the tabletop option, a round bottle will also work.
Procedure:
- At a distance of 10-15 cm from the bottom of the bottle, use a marker to draw the outline of the frog’s head with its legs raised up, and then glue on the eyes and cheeks.
- Using acrylic paint using a thin brush, paint the mouth and dots representing the nostrils.
- The legs are cut out of the remaining part of the plastic bottle and glued to the glass, leaving the “fingers” of the wah free.
- Flowers are cut out from multi-colored paper or colored oilcloth and decorated with them in a glass.
If such a frog from a plastic bottle was made to decorate a child’s desk, then pencils are placed in it. For wall-mounted options, you must also make two holes for nails on the side opposite the one where the wah head is located.
Funny frog opening its mouth
- Fold a square sheet of paper folded into a rectangle (edge up) in half.
- Fold the top corners of the rectangle to the vertical fold.
- Bend the remaining strips at the bottom on both sides like a boat.
- Bend small triangles outward on the “sides” of the boat.
- Open the product from the bottom, making it flat so that these triangles are in front and back.
- Bend the corners with small triangles up.
- Pull the vertical folds to form a diamond shape.
- Fold this diamond in half along the fold and insert your fingers into the pockets.
- Draw the eyes.
- By stretching the frog's muzzle with its mouth open in different directions, like an accordion, you can imitate a talking and funny singing amphibian.
Option with lids: what you need
There are many answers to the question of how to make frogs from plastic bottles. Instructions for making one of the options are presented below.
A distinctive feature of this craft is the use of not only bottles, but also their caps.
Required:
- one bottle;
- stapler;
- green cardboard;
- scissors;
- two bottle caps, preferably green;
- scotch;
- green paint;
- doll eyes;
- brush;
- glue gun
Ideas for making crafts
Frog number 2 is prettier, but more difficult to assemble. How to make this frog craft:
- Cut a square sheet as in option 1. Paint green on one side. Fold in half with the white side facing in. Fold at the top.
- Fold in half again from right to left.
- Bend the upper left corner of this right part of the sheet down and smooth the fold well with your fingers.
- Return the bent triangle to its original position, open it, and smooth out the middle fold with your hand.
- Holding the left fold, move the triangle to the right. A photo of a frog craft will help you better understand this action.
- Rotate the figure and do the same on the other side.
- In the resulting triangle, fold the lower corners into the middle so that a small triangle (legs) protrudes.
- Turn the product over to the other side and bend the lower corners to the center without joining them (leave a gap of the same shape).
- Bend the ends of the second pair of legs upward.
- Fold the top corner to create the head towards you.
- Bend the side corners of the upper legs.
- Draw or glue on eyes.
- It is easy to bend the frog in the center so that it becomes convex.
Option with lids: operating procedure
The frog is made in the following order:
- cut the bottle into two parts at a height of 8 cm from the bottom;
- a head is cut out from the upper part as shown in the photo;
- all parts from the inside are covered with green paint;
- two protruding “tongues” that are located behind the mouth are stapled together to create a flattened mouth;
- All parts are painted on the inside with green acrylic paint and wait until it dries;
- The back part is placed over the mouth and secured with transparent tape;
- use a glue gun to attach the lids and eyes to the body of the wah;
- glue cardboard legs under the frog's belly.
Technical execution
For this craft, you only need a set of colored paper. It is worth knowing that thicker paper allows you to perform this craft better.
For example, you can try coated paper.
The work is performed in the following sequence:
- A piece is cut from the sheet in proportion one to two;
- The sheet should now be folded in half so that the colored side is on top. Now we have a pair of equal squares;
- The leaf unfolds. Now you need to fold each end of the resulting square towards the middle and fold it in half;
- After this, the sheet is unfolded again to mark diagonal lines to the center for each of the squares. Therefore, the sheet must be folded in both one and the other direction;
- The square should now turn into a triangle, for which the fold is tucked inward along the fold along the square. The action is repeated on the reverse side. Now we have one module that includes a couple of double triangles. They touch each other through the base;
- The corners of a triangular shape rise from the base to the level of the top. The operation is performed symmetrically with each of the triangles;
- Bend small triangles outward towards the fold (paws);
- The module is unfolded so that the fold goes vertically, and the corners of the square at the top and bottom are bent to the central horizontal line;
- By bending the corner of the square upward, pockets are formed into which the corners will need to be tucked;
- This creates a trigger mechanism that sends the frog.
Jumping frog
Every child loves toys that can move. For example, a frog made from plastic bottles (the instructions will help you make it in a matter of minutes) jumps funny as soon as you lightly press on its head.
To work you will need:
- green plastic bottle, you can take either transparent or opaque;
- glue gun;
- white silicone or rubber ball (not hollow!);
- sharp scissors;
- acrylic paints.
A frog from a plastic bottle that can jump is made as follows:
- Cut off the neck of the bottle at the point where it takes the shape of a cylinder.
- Cut the resulting large “glass” along the entire length into 6 strips, not reaching the bottom by 5 cm. You should get 5 strips of equal width and one - 2 times wider than the rest (the last one should be under one of the tubercles at the bottom of the bottle, which will represent frog nose).
- Cut a wide strip at a right angle and two more according to the “every other” principle.
- Fold all the strips inward, wrapping them to form legs.
- The ball is cut and glued onto the frog’s head on both sides of the “nose”.
- Pupils, nostrils and a mouth are drawn, in which a small slit is made and a part in the form of a tongue, painted red, is inserted.
A frog that jumps using the origami technique (step-by-step folding patterns)
Let's start with origami, because this technique is familiar to us from childhood, or from school. It develops motor skills, logical thinking, attentiveness and accuracy.
But I propose to make not just frogs, but ones that will jump. To do this, you just need to fold a piece of paper correctly and press your finger on the back of the craft.
I offer you three step-by-step diagrams that describe the entire work process in great detail.
So for such beauties we will take a square double-sided piece. And by folding it in half and diagonally, we will find its middle.
Then bend the side parts marked with red dots towards each other inward.
The edge marked with a blue dot must be turned outward.
We also turn out the left corner.
Now look at the diagram, the red dot marks the corner of the already folded edge. So we wrap it towards the center. And we repeat the same actions with the neighboring one.
Next we repeat from the photographs. Turn the inner edges out. And from the bottom of the frog we fold the accordion 2 times. The paws should face the other way.
Here is another detailed diagram of this frog, maybe it will be easier for someone to repeat it.
Or another option.
Few people know that there is also modular origami. The product is assembled from many identical pieces.
Usually schoolchildren do origami. This technique is a little difficult for preschoolers, so I suggest making appliqués and postcards with them.
Tall frog
This garden decoration craft can be done by simply cutting off the neck of a bottle and turning it upside down.
Then, on both sides of one of the tubercles at the bottom, two halves of a white rubber ball are glued, on which pupils are drawn. Two legs, a “smile” and a tongue are cut out of another bottle.
The bottle is dug into the ground. Glue the prepared parts. Painted with acrylic paint. Place several pebbles around the base of the craft to prevent the bottle from blowing away.
This frog made from a plastic bottle can also be used as a lamp if you install a small light bulb or a garland of spotlights inside.
Any frog made from plastic bottles, the master class for making which is presented above, will bring a lot of joy to children, and some of them will become a wonderful decoration for a garden or summer cottage.
Origami. Performing jumping frogs
This option develops intelligence and is intended for those who consider themselves not only smart, but also intelligent. In a certain sense, this is a kind of art that not everyone can master.
Therefore, when starting to make a paper frog using the origami technique, you should stock up on attention and patience if you do not know how to quickly grasp everything on the fly.
What is attractive in this matter is the possibility of using the simplest and most widely used material - paper, for which, except for certain skills, nothing else is required.
Moreover, the happy owner of a whole set of colored paper is able to create a real “little miracle” in the form of a whole funny paddling pool filled with cheerful jumping frogs.
The origami frog is interesting because:
- It's extremely fun to do;
- She can be admired and admired;
- You can use it in different games;
- She is jumpy and active;
- If the opportunity arises, you can always start playful competitions to find out which of the frogs can jump further and jump faster.