If you want to add a touch of uniqueness and originality to your interior, make a chair cushion with your own hands. You will make a unique and useful thing, and your home will become more comfortable and warmer!
Soft new cushions for chairs with your own hands
Pillows can be sewn from new fabric or give a chance to an old blanket, an out-of-fashion knitted blouse, or a sweater. A cover for a stool or chair seat can be crocheted or knitted.
Knitted seat cushion for an original stool
The manufacturing process will take a little time - 2-3 hours is enough. What is needed for this?
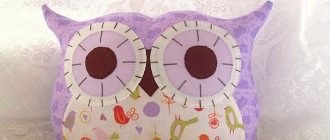
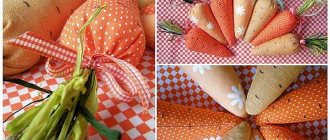
DIY small round chair cushion
Textile
When choosing a material, it is advisable to pay attention to wear-resistant, durable fabrics: rep, teak, satin. If the chair is in a cold room, then wear-resistant felt would be an excellent choice. The length of the fabric depends on the size of the chair.
Stylish stripes will add brightness to the interior
It is better to choose the color of the material so that it is in harmony with other interior items - for example, with the colors of curtains, a painting decorating the wall.
Original soft cushions for kitchen chairs
Pillow care
All items that come into contact with people in one way or another need sanitary and hygienic procedures. Seats for benches will be no exception. It is noteworthy that proper care of them prolongs their operation, maintaining an attractive appearance and shape. The appropriate procedures depend entirely on the design features and type of filler.
Bright decorative pillows have a great effect not only on the mood, but also on the entire environment as a whole.
In some cases, washing is allowed (hand or gentle in a washing machine). If light and monochrome products can be placed in water with a temperature of 40 degrees, then the presence of bright and combined shades forces the use of exclusively cold water. Some items can only be dry cleaned by a professional dry cleaner.
The product must be dried in a horizontal position. This is the only way to prevent the filler from clumping. When unfolding the seat, do not allow any folds to form. The item should be turned over from time to time. As for ironing, it is not recommended.
To change the mood and dynamics of the interior of the room, just change the covers on the decorative pillows, and you will get new unforgettable impressions from the comfort and relaxation zone.
If all instructions regarding sewing, operation and care are followed, things will delight us with comfort and aesthetic appeal for a long time. Moreover, making cushions for stools and chairs does not require any special skill. It is also important that working with your own hands increases self-esteem and serves as an excellent opportunity to decorate your own home without additional costs.
Decorative elements
Beautiful buttons for pillow decoration
Buttons are a universal item. They are sewn on so that the filler does not bunch up into lumps, and at the same time they will decorate the product.
It is better to avoid using rhinestones, beads, and decorative stones when decorating. This is not very practical to use.
Where can it be used?
It's amazing how a simple covering of furniture can radically change the appearance of the entire room, hide a boring color or defects in the upholstery, and add a bright accent to a boring interior. The use of these accessories on chairs in a children's room, kitchen or dining room is especially popular. Sewing covers is much cheaper than changing upholstery or furniture. You can’t do without them during special events, for example, when decorating interiors during holidays and wedding ceremonies.
These covers will decorate your interior
DIY cases
Today you can find furniture covers of various colors and styles in many stores, and order the tailoring of the desired model in any studio. But it’s much more interesting to make them yourself, choosing the right fabric and deciding on the style of the future product. This will also help save money, especially if you are decorating several pieces of furniture at once.
The cases are distinguished by their beauty and possibilities of use, as well as ease of manufacture. Even a not very experienced craftsman can sew such an accessory on his own.
The ability to radically change the look of an entire room
How to make large flowers from corrugated paper with candies with your own hands. Step-by-step master class + 75 PHOTOS of luxurious bouquets
Ties
Soft white cover with bow ties
The purpose of the ties is to prevent the pillow from sliding down. Ribbons, laces, ropes, just strips of fabric will help solve this problem.
When all the preparatory work is done, you can get to work. Let's look at the algorithm for the simplest option for sewing a pillow.
Knitting covers for stools
In almost every home there are stools in the kitchen, faceless and unattractive. You can add a bright personality to the stools and fit them into the color scheme of the kitchen by tying covers on them. Knitted stools create comfort, coziness and a cheerful mood in the room.
To knit covers, you can use a three-dimensional crochet pattern made from “popcorn” elements, which is a cone of columns. The knitted pattern of cones will make the stool seat lush and original in appearance.
For knitting covers, it is better to use thick acrylic yarn and a thick hook. Choose yarn colors to suit your taste.
In the example, the covers are connected to square stools. To knit a square, make additions at its corners by knitting two elements from one arch. You can knit a cover for a round stool using the rules of addition for knitting a circle.
Description of knitting a cover for a stool:
To start knitting a square, cast on a chain of 8 chain stitches. and close it into the ring of the connection art. To knit the first row, make 3 chain stitches. lifting, tie 4 tbsp. s/n from the ring.
Now form the first bump, to do this, remove the hook from the working loop and insert it first into the 3rd lifting loop, then again into the working loop. Pull the working stitch through the first one and the group of stitches will come together into a knob called “popcorn”.
Next *knit 4 chain stitches, 5 stitches from the ring. s/n. Insert the hook into the top of the first stitch, then into the working loop, pull the working loop through the top of the first stitch.* Repeat from * to* 2 more times, complete the row - chain 4, joint st. to the top of the first bump.
To knit the second row, make 3 chain stitches. rise. In the second row, knit 2 cones from each arch, 4 chain stitches between them, and make 3 chain stitches on the sides of the square. The first bump consists of lifting loops and 4 tbsp. s/n, and all the following cones from 5 tbsp. s/n.
In the third row of corner arches, knit 2 cones, 4 chain stitches between them. On the sides of the square there are 3 air points, a cone from an arch, 3 air points. Finish the row of joints. to the top of the first bump.
Knit all subsequent rows using the same principle. From the corner arches, knit 2 cones, 4 chain stitches between them, and on the sides of the square from each arch, knit one cone through 3 chain stitches.
Come up with the color of the square yourself. A case with a bright center and transitioning to darker colors towards the edges looks good.
To transition colors, after finishing a row, fasten and cut the thread, and to knit the next row, attach a thread of a new color.
Having knitted a square along the seat of the stool, knit 2 rows of cones without adding in the corners, and in the last row knit cones through 2 chain stitches. Having thus narrowed the cover at the base, pull it over the stool, fixing the corners along the seat.
Knitting pattern for a square of cones:
Pattern
Pattern for making chair cushions
To make a pattern, you need to determine the shape of the product. The round cushion is more versatile; it will fit any shaped chair or stool. A circle is drawn on a sheet of paper according to the size of the seat, and what we get is cut out.
To make a pattern exactly according to the shape of the chair, it is better to use tracing paper. Place a sheet of tracing paper on the surface of the seat and trace it with a marker. The pattern is ready!
Crochet
A stool seat can even be knitted from leftover yarn. The needlework algorithm, which is described below, allows you to create a soft stool with a minimum of cost.
Round form
It is best to make a round seat with an ornament - small flowers with 6 petals. Necessary tools and materials for crocheting - diagram, 4.5 mm hook, a lot of black yarn, multi-colored yarn for flowers.
Flowers are knitted separately, from the center to the edges; the petals are knitted one at a time, starting with stitches from the center, then additionally tied. Black yarn is used as a background. It needs to be knitted until it forms a round shape slightly larger than the seat. An elastic band is threaded through the bottom and the cover is pulled over the stool.
The knitting pattern for a round seat will take up to 4 hours of work.
Square shape
The square shape is created in 2 hours. You will need:
- skeins of multi-colored yarn;
- more yarn of the same color for tying;
- hook 4.5 mm.
We knit from multi-colored strips of different colors: one strip is yellow, the other is blue, etc. They should be knitted with a double crochet. A stool requires 22 strips.
When the stripes are knitted, along the smaller edge they need to be knitted in one line (in two groups - 11 strips together, then 11 more), all the loops are a connecting post. Then the resulting two groups should be intertwined with each other so that a pattern of squares arranged in a checkerboard pattern is obtained. The last steps are to tie the entire structure around the perimeter, creating a large strip along the edge instead of an edging. It is better to do all binding work with gray, white or black yarn.
Completing of the work
It is better to make the pattern rigid (from cardboard or plastic)
- Fold the prepared fabric in half.
- Attach the pattern, outline with chalk, leaving 1.5 cm (allowances), cut out.
Materials needed to make a fabric pillow
- Sew three sides of the finished parts.
Sew the parts together - Place filler inside.
- Carefully sew up the remaining edge.
- Sew on the ties.
We baste, and then attach the binding to all sides and make ties on both sides - Decor according to your wishes.
Ready-made soft cushion on a chair seat
This algorithm is used in the manufacture of any type of pillow. Only the material and execution technique changes.
Sewing a cover for a stool with a fold
The stool seats often fly off and do not hold well without additional fasteners.
You can create additional fasteners, but rarely such small details can be successfully made with your own hands. It's better to try a folded pillow. A fold is a small “extra” piece of fabric that can be placed next to the seat of a chair. The edges of this area are adjacent to the bottom of the wooden seat; Equipped with an elastic band for a perfect fit to the chair.
For such a seat, you will need foam rubber with a cover (you can make it quilted or simply cover the foam rubber with fabric) and a strip of fabric to match the cover, which will be used for fastening. You can take a ready-made case and add a holder, or you can sew it from scratch.
A strip of raw cotton or cotton is attached to the perimeter of the stool cover. It should be wide enough to allow about a third to be glued to the sides of the lid, with the rest lying below. The strip is roughly sewn to the cover, first folded in half and sewn in half. You need to leave room to put the elastic on.
When the strip is already sewn to the sides of the seat, you need to thread the elastic and finally sew it. Machine processing can be used for strength.
Crazy patchwork technique
Chair seat made using crazy patchwork technique
Necessary materials:
- scraps of fabric in bright colors;
- filler;
- threads, braid to make ties.
Progress:
- make a pattern;
- cut out the shreds - if it is a circle, the shreds look like slices of pizza, if it is a square, then the shreds are rectangular or square;
- cut out a whole part - you get the second side of the pillow;
- sew patches;
- sew two parts of the pillow, fill with foam rubber or holofiber;
- carefully sew up the remaining edge;
- sew strings.
Artichoke style rug
Patterns for embroidering stool covers and rugs using the “stuffing” technique.
Chair rugs made using the artichoke technique look no less impressive. When making it, you can use small pieces of fabric that are left over after sewing other models, as well as old things. The base of the rug is made of thick drape-type fabric based on a pattern taken from the chair seat using newspaper. Next you need to make “scales” for the future pattern. To do this, squares of the required size are cut from fabric scraps (often 6x6 cm), which must be folded in a special way.
The resulting triangles need to be fastened with tailor's pins or steamed with a hot iron so that they keep their shape (depending on the fabric). Then, on the base in the center, you need to mark two perpendicular lines and attach four triangles to the middle of the resulting cross so that together they form a square, which needs to be sewn using a sewing machine. The seam margin in this case should be about 0.7 cm.
A second row of elements with a total number of 8 pieces is laid on top of the resulting square. The laying must first be done along perpendicular lines, then new triangles must be added to the space between the first four. The elements are also pinned and attached using a machine. The third row may already have 12-16 elements, etc. until the entire base is filled. An elegant braid is usually sewn along the edge of the base to hide the place where the last row is attached.
Tools and materials:
- Thick fabric base, braid and scraps of various fabrics.
- Centimeter, tailor's chalk.
- Tailor's pins, threads, needles, scissors.
- Sewing machine, iron.
Related article: Wooden doors: ways to age wood
Knitted pillow
Crochet pattern for soft chair cushions
Both knitting needles and a crochet hook are suitable for knitting. If there are leftover threads, then this is the case when they need to be used. It is advisable to knit in a tight knit. Pattern according to your wishes. The corners are decorated with tassels.
Chair cushion “Chess”
Knitted cushions for a chair or stool made of brown melange
How the interior is decorated in Japan
The above methods for making rugs are available to almost any housewife, and to make the products proposed below, you will need to be proficient in crocheting and the ability to read knitting patterns.
For example, such a rug for a chair, designed by craftswomen in Japan, will require thick yarn, a thick hook, optional padding inside and many hours of work. First, the top of the rug is made, then the bottom, after which both sides are connected with a strap (can be done in a crawfish step), the filler is inserted, and the tassels are made and attached. Made from woolen materials that are not scratchy, this rug is almost always loved by children who do not like to sit on cold surfaces.
For making chair rugs, more opportunities are available to those needlewomen who know how to crochet rather than knit, since this tool allows you to knit complex shapes, including animals, flowers, etc., as well as numerous patterns. Therefore, a rug made from thick yarn can be made according to many patterns for napkins with a dense pattern. In some countries, such products are made on the basis of a simple chain of air loops, which is twisted into a spiral and stitched between the rows.
Stygis textile applique
Stygis textile is a material treated with hot melt adhesive.
Progress:
- make a sketch of the desired picture;
- transfer it to tracing paper (tracing paper is placed on top of the drawing and outlined with a marker);
- cut out a picture from tracing paper - a stencil;
- using a stencil, cut out a picture from fabric with an adhesive layer;
- attach the cut out picture to the finished pillow, press with an iron (2-3 seconds);
- it is important that the iron is warm; hot will burn through textiles.
Do-it-yourself chair cushions will not only “color” the kitchen or country house with the colors of joy and warmth, but they are also a great gift for friends and acquaintances.
Cushion for a chair or stool “Blue peas”
Variety of models
They can be whole or separate. The second subtype can consist of several parts or be connected with Velcro. There is a wide variety of half-cases. They are intended mainly for seats, but at various special events and ceremonies you can see options only for the back. Products are also classified according to the method of planting. On sale you can see covers that do not stretch, but are simply placed on the chair, and if the model is also designed for the back, then the second pillow is attached to the chair with ties or straps. This is the so-called free variety. “Dense” models fit over the entire chair from top to legs and hold tightly to it. Euro covers are tight at the top and looser at the bottom. The covers may have a comfortable seat, but there are options without it. Such capes perform only decorative and protective functions.
Mounting options
To prevent the seat cushion you made from sliding on the chair, it must be fixed. There are several mounting options.
- For square chairs, it is enough to sew 4 small elastic bands in the corners of the cushion.
- The round one is fastened with an elastic band around the perimeter, for which a drawstring is sewn to the product.
- You can attach the seat cushion to a chair with a backrest by connecting 2 laces at the corners and tying them in a knot under the seat. They are usually made from the same material as upholstery fabric.
- The easiest way to attach it is with regular Velcro, which is attached to the edges of the pillow.
All fastening options are selected taking into account the type of finished product.
Lace
With elastic around the perimeter
Velcro
Decoration
Whatever option is chosen for making pillows, they can later be decorated with additional decorative elements. But here it’s worth thinking about what this piece of furniture is needed for. If the pillow is needed only as a room decoration, it can be decorated with beads, beads, sequins and much more. If it is to be used for its intended purpose, it is better to discard such items.
You might find it interesting. Fantastic models of women's vests - sew them yourself
Applications
To ensure that nothing causes discomfort when sitting in a chair, it is necessary to decorate the pillows with materials that are not too bulky. These can be various applications, fringe or buttons. The latter not only decorates the product, but also prevents the filler from moving in clumps.
Buttons
It is best to trim buttons with fabric. The color is chosen as a pillow or under it. After this, the surface of the product is marked so that the decorations are located at an equal distance from each other. In the indicated places, the buttons are tightly sewn to the pillow.
DIY pillows
Therefore, it is clear that sitting on stools with your own hands is quite simple. It is enough to stock up on the necessary materials and patience. And ready-made decorative elements will decorate and subsequently update the appearance of the apartment.
Popular sizes
There are various models of garden swings from different manufacturers on the market. You can also buy spare covers, a mosquito net, and a swing awning separately. When purchasing such accessories, please pay attention to the indicated product dimensions. Products from different companies have some differences from the standard. Therefore, when purchasing, it’s easier to focus either on the brand, or we advise you to measure the mattress and pillows in advance so as not to make a mistake in the sizes.
Standard ready-made dimensions of accessories that you can find on sale:
- 170x50 cm;
- 170x60 cm;
- 175x55 cm;
- 178x65 cm;
- 180x60 cm.
READ MORE: Plastic ceiling plinths 30 photos installation on the ceiling How to install PVC fillet and baguette How to file them correctly Types and sizes of plinths
Many models of such swings are designed to use a mosquito net. It is stretched along the perimeter over the awning and is equipped with a zipper for ease of use. Protective covers for swings are also available. They will protect from any bad weather and can be stored during the winter.
Tips for choosing the right finished copy
In the manufacture of the main structure of the swing, various materials are used - from plastic (lightweight) to metal, more stable. Plastic swing supports are lightweight and inexpensive, and are designed for children. They present no difficulties during transportation and assembly.
Choose the softest material for greater relaxation pleasure
The metal supports are strong and reliable even when used by adults.
When choosing a finished product, you should take into account such important criteria as:
- what kind of load is expected for this structure (children or several adults);
- how often this swing model will be used (permanently or occasionally).
In accordance with these requirements and the instructions for the model you like (the maximum load is not indicated), make your choice.