A few seasons ago, super stylish accessories came into fashion - removable collars. Now every fashionista can decorate her look with a variety of such women’s false “things”. Don't spend a lot of money chasing trendy things like removable collars; try making them yourself. The time spent on “handmade” will bring a lot of pleasure, and the made thing will be unique, not like everyone else’s! Go for it!
DIY collar patterns
Here are patterns for triple “composition” collars. They consist of two layers of fabric from which the collar is made, and a lining material that helps the product attach to clothing.
This collar cut is suitable for both women and men; it will successfully complement any item from your wardrobe. And in the end, such a stylish collar deserves to be a separate piece of jewelry.
- Transfer the collar template to a sheet of cardboard or thick paper and cut out the future model.
- It is advisable to measure the neck length in advance.
- For accuracy, fold the fabric in half (the cuts should match), pin them along the shoulder seams, sides, and neckline.
- Then measure the length of the neck of the women's dress with which the collar will be worn.
- It is better if the neck length is half a centimeter or a centimeter longer than the size of the pattern on the basting sections.
- If the length is less than planned, then you need to make a new pattern by moving the center of the collar down, thereby lengthening it.
- Trace the pattern twice or fold the fabric in half. To do this, use a pencil, pen or pale marker.
- The intended layout should not remain on the cut out parts; cut off the marks close to the edge.
- Cut out the intended material with the necessary allowances. Cut out the second part of the collar without allowances. Now you have two equal parts for the top and bottom, you can start sewing.
- Next, grind the details of the collar, that is, connect two pieces of fabric and turn it inside out.
When you are dealing with a collar that is cut out in one piece, keep in mind that after cutting out the allowances, you need to make cuts in the corners, as indicated in the figure. Otherwise, it simply cannot be turned right side out.
There is no need to rush to stitch the product: when such a collar is turned right side out, place a stitch connecting the collar with a wardrobe item (blouse, jacket, dress, etc.).
Below are patterns for a one-size-fits-all collar; its size will not and should not fit neatly along the lines of the neck of the garment.
Here are the most basic patterns for homemade detachable collars with allowances and fold lines.
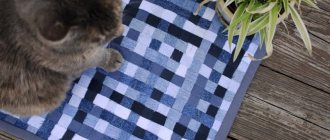
DIY beaded collar: diagrams and photos of products
Making a collar from beads is quite difficult work, requiring painstaking work and perseverance. But a beaded product will turn even the most boring dress into a luxurious outfit. High-quality and beautiful things are expensive, and not every fashionista can afford them, but a beaded collar will add shine to the image and will look rich.
Here is a fairly simple collar pattern. It doesn’t matter what you string the beads on - fishing line or nylon thread, the main thing is not to tighten it. The collar should lie freely on the surface, and not “stand” on the neck.
The next collar will consist of beads and be held on a fabric base:
- using a cardboard pattern, cut out two parts of the collar and the third from dublerin, which will be the base of the product;
- sew all the details from the wrong side and turn them right side out;
- attach ties from satin ribbons;
- Start beading: in places where the beads or beads are larger, hook the stitches to the fabric backing of the collar. Thus, the beads will not hang chaotically, but will be harmoniously attached to the fabric.
Many patterns of beaded collars can be borrowed from the models on which beaded necklaces are woven. Instead of ties, attach special fasteners along the edges, which are mainly used to fasten bracelets and baubles.
Everything ingenious is simple. Even such extraordinary designs can look amazing, and even a novice needlewoman can master them.
Necklace Making Tips
In order to make it easier and easier to make a necklace with your own hands, you should follow some tips from the masters in this type of creativity. The most common and really useful recommendations:
If you are not good at drawing a necklace template by hand, then it is better to print a template from the Internet. Otherwise, the necklace may turn out to be out of proportion.
If you use beads, then you should take a Czech manufacturer, they are all the same size, well painted and do not fade so much, you can even get them wet.
When using fabric in a necklace, it is better to first wash it and iron it so that it does not become deformed during operation.
In cases where the necklace is quite heavy in weight, then use special clasps for jewelry; there is no need to risk ribbons or threads so that the necklace does not break.
For the base, use only durable materials: fishing line, thread, leather.
When working with a glue gun, squeeze out a minimum of glue so that it is not visible from under the beads and stones, but at the same time press down well to firmly fix the element.
DIY lace collar with photo ideas
If the width of the lace is less than the specified size, then the collar is made of two parts using a connecting seam. Fold both laces for narrow and wide frills and fasten the side sections by hand, stitch the braid to it with threads of the same color.
Fold the two collar pieces together, placing the top piece with the wrong side facing the right side of the bottom piece. Trim the edges and secure. If the idea is that the product should be attached to clothing and not removed on its own, then you can sew it into the neck of a blouse, dress, etc.
If the collar will be removable, then you need to trim the neck with cambric braid and sew a small button and loop on the inside.
You can make these lace collars yourself:
Embroider with satin stitch
Another original, but more labor-intensive and requiring special skills method is to decorate the patch collar with satin stitch embroidery:
These could be flowers, birds or any other patterns that come to mind. The main thing is that they all look neat and match the clothes with which you plan to wear a similar collar.
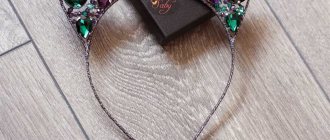
Collar made of beads, rhinestones and stones: how to make it at home?
Collar in the form of a necklace made of felt fabric and rhinestones with a chain
- Stock up on the following materials:
- Cut out two identical pieces of fabric - one from felt, the other from satin. Using glue, attach the rhinestones to the material, starting with the largest one, from which the design of the entire composition will proceed.
- Glue on both edges of the chain as shown in the picture.
- From the wrong side, glue the ribbons on both sides of the edges of the collar. At the end of the design, apply glue along the entire perimeter of the wrong side of the product and attach a satin scrap: this way the stages of work on the collar will not be visible and the ties will be better secured.
- Now the update is ready, wait until the glue is completely dry before trying it on!
Materials for making a necklace
There are many beautiful options for necklaces made from different materials. You can combine not just one material, but several, in one product, the main thing is that they match and look good.
The most popular materials for making necklaces:
- leather;
- beads;
- beads;
- natural and decorative stones;
- shells;
- textiles (felt, jeans, velor).
DIY fur collars
Making a fur collar is as easy as shelling pears. To do this, take a collar from your old coat or down jacket. Most often they are sewn removable. The collar itself is already ready; there is no need to cut, stitch or perform other sewing manipulations. You can decorate this collar in different ways:
- sew braid or ribbons to its edges, which will then be tied into a bow;
- pin its edges with a large, bright brooch;
- come up with a knitted piece that will help the loose edges stay together;
- connect the collar parts with a light ladies' scarf.
And you will get, for example, such cool collars:
Working methods used
A beautiful collar can be sewn or knitted. This approach is understandable to most people. The product can also be woven from beads and assembled from various decorative elements. The finished item can always be supplemented with rhinestones, feathers, and ribbons. Overhead fur collars are especially popular.
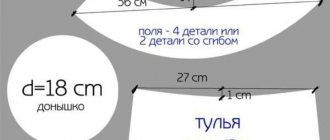
DIY frill collar
At the time of its origin, the frill collar adorned men's toilets, and only after a long time was it borrowed by the opposite sex. This decoration will make even the most boring business outfit more romantic.
Instructions for sewing a detachable frill collar:
- First, cut out the pattern; it will have a shell-like shape. The larger the pattern, the more magnificent the collar will be. Fold the fabric material in half, with right sides facing each other, and cut out the two components of the collar. Stretch the resulting shreds a little.
- Sew both flaps along the inner edge, placing them right sides together. Turn the collar right side out and iron the seam. Make a zigzag stitch on the front side right along the seam of the collar - this will help it retain its shape better.
- Elevate the product by decorating it with bright buttons. From the inside, attach two fasteners with pins, at the bottom and at the top.
It's so easy and quick to make a unique and beautiful thing.
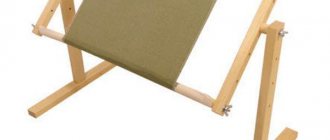
Learn how to correctly create a patch collar pattern with your own hands
All the equipment needed for the job can be purchased at any craft store, as well as in the stationery section.
- black thick fabric;
- pins;
- needle;
- threads;
- rivets;
- adhesive interlining;
- album sheet A4;
- pencil.
When all the necessary materials are ready and at hand, you can start sewing an overhead homemade collar.
Instructions:
1) The collar pattern is cut according to the shirt itself, for which we will make a new part.
2) Place the resulting pattern directly onto the adhesive interlining and onto the fabric. Take a piece of chalk and trace around the edges of the collar.
3) Using scissors, cut out the resulting templates.
4) Then we take pins and pin them to the wrong side of the product with the interlining applied with the adhesive side.
5) Using chalk, mark the middle of the collar with a strip. It will not need to be sewn on a machine.
6) Place any thin fabric on the fabric with non-woven film, and then iron the elements of the product with an iron. Without the use of additional fabric, the iron may simply become damaged.
7) Take both parts of the collar and apply them to each other with the wrong side out.
 Again, take a piece of chalk and mark the inner frame with it, retreating 1 cm from each side of the collar.
9) Place the product on the machine and stitch along the frame.
10) We take scissors with teeth in our hands and use them to cut off unnecessary parts around the edges.
11) Through the previously left hole in the middle of the collar, turn it inside out, and then iron the front side of the product.
12) If desired, you can stitch the edges of the product again, but from the front side.
13) Take the rivets and arrange them in the desired order along the corner of the product, and then insert them. In addition to rivets, you can use other accessories that will make the collar even more original.
Your DIY patch collar is ready! It can be used immediately as a new addition to your shirt.
Crochet
The technique of making an overlay collar is not much different from tablecloths and napkins. Therefore, with a great desire, any craftswoman will be able to knit it using an ordinary crochet hook and her own imagination.
But here it is important to remember: in order for such a collar to have a beautiful shape, it must be very well starched.
If all these methods seem complicated to you, watch the following video, and you will immediately see that you can make such a collar even from improvised means:
Well, here we are talking about the most popular ways to create false collars. Choose one of your favorites and immediately get to work to make yourself a beautiful accessory just in time for the holidays.
Overhead collars are a universal detail that can be used to give a finished look to an ensemble. Crocheted or tatting, embroidered with beads or sequins, collars with or without embroidery - there are so many false collars! Recently, overlay collars embroidered with beads, sequins and stones, which are easy to make yourself at home, have become especially popular.
Trying to make a modern leather collar
A beautiful leather collar is perfect for any outfit.
Necessary materials:
- medium leather piece;
- pattern;
- thick needle;
- dense threads matching the color of the skin;
- awl;
- ribbon;
- pencil;
- leather glue;
- scissors.
When all the necessary devices are ready, you can start working.
Instructions:
1) We will use the following template as a pattern.
2) Place the leather on the wrong side in front of you, place the collar template on it and transfer it to the fabric using a chalk.
3) Turn the pattern over to the other side and make a second template.
4) Using scissors, cut out the collar elements.
5) On the same leather, measure and cut out two strips measuring 1x6 cm and 1x4 cm.
6) Using glue, connect both parts of the collar.
7) Let's start with the bow. Take a 1x6 strip and glue its edges on the back side.
We take the collar and wrap the resulting strip at the junction of its two elements, and then fasten them with a small strip.
9) Using a thread and a needle, secure the bow.
10) Using an awl, we mark and make holes into which we then thread the ribbons.
So, the fashionable leather collar is ready! It will perfectly complement any outfit of a sweater, turtleneck, or dress with a low neck.
Popular examples with descriptions of implementation
There are different patterns for sewing collars with your own hands. Everyone chooses a model according to their own taste. Last but not least is the assessment of the complexity of the process.
We create our own patch collar on a transparent basis
Such a beautiful collar with a transparent base will refresh any look. It will effectively highlight any outfit thanks to the impression it creates of stones fluttering on the chest. With its help, you can transform both an ordinary turtleneck and an old dress that has become boring over the years.
Necessary materials:
- transparent plastic film;
- rhinestones;
- pattern;
- chain;
- carbine;
- connecting ring;
- transparent glue;
- pliers;
- needle and thread;
- scotch;
- scissors.
When all the necessary materials are at hand, you can begin to work.
Instructions:
1) Attach the pattern to the plastic film in front of you using tape.
2) Extend the upper “tails” of the product by 1 cm.
3) Lay out a drawing of the future accessory in front of you.
4) Then we transfer the rhinestones to the base of the product.
5) And attach them with glue.
6) Measure the collar to determine the required distance for the fastener.
7) Cut two chains of suitable size.
Fold the first chain in half and connect the ends with a connecting ring.
9) We perform a similar action with the second chain, but connect its ends with a carabiner.
10) We bend the tail of the collar and hide it inside, then sew up the edges.
That's it, the wonderful collar in the form of a necklace on a transparent base is ready!