The process of creating beautiful things with your own hands brings a lot of pleasure. It is especially pleasant to work with beads. Multi-colored beads resemble precious gems; a rich color palette allows you to embody the most extraordinary ideas. Beads are one of the most suitable materials for creating New Year's crafts; try making beautiful miniature Christmas trees from multi-colored beads.
New Year's decorations made of beads
The following master class clearly demonstrates how to assemble a Christmas tree from beads step by step.
For this craft you will need:
- thin wire;
- green and golden beads;
- beads for the top.
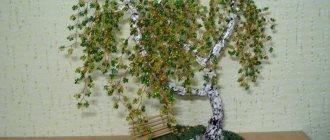
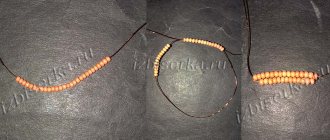
The photo shows the step-by-step process of creating a toy. The branches and tops are collected separately. To make one branch on a branch, you need to string 3 green beads, 2 gold beads and again 3 green beads onto the wire.
For the upper branches, three such branches are enough; the lower ones are made more magnificent. A tree is formed from branches. The Christmas tree turns out very beautiful and elegant.
The golden color on the branches can be replaced with silver to create a frosted effect.
A Christmas tree on a toothpick rod looks unusual. An ordinary coin can become a pedestal for it. To make a Christmas tree, insert a toothpick coated with glue into a flat bead and glue it to the coin. Make branches following the diagram and string them onto the “trunk” of the tree. Stick a star in the form of a figured bead on a pin on top.
To make a keychain on a chain in the shape of a Christmas tree you will need:
- large transparent green beads;
- small opaque gold beads;
- large transparent figured bead in the shape of a flower;
- gray bead for base;
- thin wire.
Assemble the craft according to the diagram shown in the photo.
Christmas tree earrings
Earrings in the shape of a Christmas tree are an unusual decoration that will create a festive mood for you and those around you. They can be a great gift for a friend or beloved sister.
Accessories for making earrings are sold in specialized craft stores. There you can purchase several loop-locks on which the entire structure will be attached.
The photo shows ideas for creating such products. You can combine colors at your discretion.
To create New Year's crafts, purchase bright beads and do not forget about the decor in the form of small bows made of ribbons, multi-colored curly beads, chains, etc.
Source: https://new-year-party.ru/elka-iz-bisera-masterclassy/
Craft with snow branches
This option involves using only green and white beads. Also, if desired, golden-colored glass beads can be used to decorate the Christmas tree. To make a tree with snowy branches, you must follow the following rules:
- Branches are made separately. 8 green beads and 2-3 white beads are put on a piece of wire. The wire is threaded through the beads in the opposite direction and the last bead is put on and a loop is formed. Several loops are made in this way and tied into a bundle.
- In the next step, another wire is taken and a similar action is performed with it. It is advisable to form branches of different lengths.
- A barrel is installed from a large piece of wire. After making the rod, work begins on attaching bundles of branches to the trunk. The work is done from top to bottom.
To prevent the top of the spruce from being boring, it is recommended to weave a star or other object that will decorate the creation. This pattern of a beaded Christmas tree is quite simple. Instead of green, you can only use white and blue. The spruce will look impressive.
Beaded Christmas tree and New Year's decorations: the best master classes
Beadwork has long been one of the most popular types of needlework. Using simple materials, incredibly beautiful and original crafts are made. A beaded Christmas tree looks elegant and festive, which even a child can make. There are several techniques for performing it, which are not difficult to master.
You can weave a Christmas tree from round beads, or from bugles or cuttings, or you can combine all types of beads, and even add beads as toys. The Christmas tree can be flat, like a pendant or wall panel, or fluffy, like a real small tree. How to weave a New Year's beauty step by step - read the new tutorial in our article.
Beadwork has long been one of the most popular types of needlework.
Christmas tree made of beads: how to make it yourself
Making a Christmas tree even for novice needlewomen will be simple and interesting. To do this you only need a minimum of materials and a little patience.
What is necessary:
- wire;
- white beads;
- insulating tape;
- cement mortar;
- small decorative bucket;
- green beads.
This is interesting! Read the article about how to make your own Christmas tree from threads and yarn.
Description of work:
- Place a couple of white and seven green beads on the wire.
- Pass the top tip through the second of the white pieces and all the green pieces.
- The top element remains locking on all branches.
- Pick up a couple more white and nine green beads and thread the second of the white and five green beads.
- Repeat this manipulation seven more times.
- Wrap the trunk of the finished branch with electrical tape to make it tougher.
- Make the required number of branches in this way.
- Place them in a bucket filled with cement.
Gallery: Christmas tree made of beads (25 photos)
Christmas tree made of beads using needle weaving technique: master class (video)
Christmas tree made of bugles: weaving pattern
A Christmas tree woven according to this pattern turns out to be quite large and reaches a height of about twenty-five centimeters . By using glass beads instead of regular beads, it is possible to ensure that the product looks not only beautiful, but also natural.
What is necessary:
- 250 g of green glass beads;
- wire;
- electrode;
- silk threads;
- glue;
- small pot;
- floral tape;
- gypsum.
By using glass beads instead of regular beads, it is possible to ensure that the product looks not only beautiful, but also natural
Progress:
- Using the coral technique, weave needles, each of which should have six parts. There should be a total of eleven needles on the wire.
- Weave 280 needles in this way.
- After this, take a thicker wire, wrap it with tape and fix all the needles in a spiral, forming branches.
- Screw all the resulting branches to the electrode.
- Wrap the barrel with tape and thread, and glue everything with glue.
- Place the structure in a pot of plaster.
Additionally decorate with sparkles.
New Year's ball made of beads: step-by-step instructions
Despite the fact that on the eve of the New Year holidays, store shelves are filled with all kinds of Christmas tree decorations, it is much more interesting to make them yourself. A handmade ball looks more impressive and original than simple store-bought items.
What is necessary:
- beads with a diameter of 2 and 5 mm;
- fishing line;
- needle.
A handmade ball looks more impressive and original than simple store-bought products.
Progress:
- Place five beads of smaller diameter on the fishing line and pass the needle through the first of them, tighten, leaving a small piece of fishing line free.
- Now alternately string three large and a couple of small elements, pass the needle through the bead of the previous row, forming an edge.
- In this way, perform four circles.
- After this, alternately string large and small beads (five pieces each) and pass the line through the middle part of the previous circle.
- Continue working in this way until a full-fledged ball is formed.
- Close the last circle and secure the line tightly.
Attach a ribbon or regular thread to the top so that you can then hang the ball on the Christmas tree.
Blue Christmas tree made of beads: master class
Beautiful blue spruce can also be made from beads. This craft looks no less festive than the traditional green beauty and is even more elegant. By following the instructions, even a beginner can do this job.
What is necessary:
- beads;
- sequins;
- beads;
- button;
- wood beads;
- wire;
- wire cutters;
- napkin.
If you don’t have blue beads, don’t be upset: the Christmas tree can be any color, the main thing is the right combination
Progress:
- Place the first so-called stop bead on the wire.
- String the parts, alternating beads with sequins, and only use identical elements in pairs at the beginning and end to make it easier to twist them.
- Twist each loop.
- Make four loops at a distance from the retaining piece.
- Connect the top of the workpiece with the top of the tiers, twist it several turns.
- Insert the remaining wire into the wooden piece.
- Using this principle, connect all the tiers together.
- Divide the pieces of wire that come out of the last element into two equal parts, pass them through the button and twist them tightly.
Hide the remaining ends into the recess.
How to make a lace Christmas tree from beads
The weaving technology in this case differs significantly from the traditional one. That is why such a craft attracts special, closer attention. Without a doubt, everyone around you will be delighted with this unusual decoration.
Progress:
- String beads onto the wire and make a loop in the center by twisting the wire twice.
- After this, make an indent of several beads on both sides and make loops again, directing them in different directions.
- Retract five elements again and twist the wire again, marking the trunk.
- Continue according to the given pattern.
- When forming the last branches, it is enough to indent only three elements.
- Add beads to the wire as needed.
Without a doubt, everyone around you will be delighted with this unusual decoration.
Separately, install the most stable base on which all branches will be fixed, starting from the top and moving to the bottom.
Christmas tree decoration: beaded minion
One of the favorite cartoon characters, a funny minion, is ideal for decorating a Christmas tree. The scheme for making it, although not the simplest, can still be figured out by anyone, even a beginner in beadwork.
What is necessary:
- beads;
- needle;
- scissors;
- fishing line;
- ribbon.
Progress:
- The body of the minion is made using weaving technique, using a special loom.
- Connect all the edges and fold the workpiece in half.
- Form the panties by indenting just one part from the edge, as if rounding the figure.
- After finishing weaving the panties, take black beads and make boots for the hero. At the very end, weave three rows of two beads towards the op.
- Form a red cap of the correct shape at the top of the workpiece.
- Make a white pompom at the very top.
- In order for the minion to be voluminous, additionally attach beads to the glasses and white areas of the cap.
- Weave hands, also using weaving techniques.
- Using the same principle as the shoes, weave the fingers.
What is needed for making
For beginners in beadwork, creating a spruce tree will be an interesting and easy task. In order to make a Christmas tree with your own hands, you will need a minimum set of materials and a little time.
Necessary:
- wire;
- insulating tape;
- white beads;
- green beads;
- cement mortar;
- small bucket.
DIY New Year's gifts: making Christmas trees from beads
Let's make New Year's gifts with our own hands! For example, these Christmas trees are made of beads. Trees made of beads symbolize a talisman for the home, a talisman of good luck. You won't find a Christmas tree like this in a souvenir shop! And it’s not difficult to weave, all you need is a little patience and a minimum of material. Our step-by-step guide to making your own beaded Christmas tree will help you with this.
Beaded Christmas tree: the simplest technique
To weave a Christmas tree from beads, we will need:
- White beads - 20 - 25 g, green - 80 - 90 g;
- Wire coil - 0.3 - 0.5mm;
- A lid made of cream, or a small toy bucket;
- Plasticine or cement.
Making branches for a beaded spruce
We start by making twigs.
We string 2 white beads and 7 green beads onto a 30-35 cm long wire. Then the end of the wire is threaded through the second white bead and through all the green ones. The first white bead will be the trailing one, that is, the top of the branch.
Next, we put on 2 white and 9 green beads, we also repeat the manipulation of threading the wire into the white and the remaining beads, on the other hand we repeat stringing 2 and 7 pieces.
In this way we make 12 “needles” of our spruce.
The first branch will be the top of our tree, and all the other branches will be attached to the wire. To make the barrel stronger, you can wrap it with electrical tape.
There are 15 - 20 such branches, depending on how tall your tree is. Add 2 green beads to each lower branch to add fluffiness.
Assembling a Christmas tree from beads
Have you formed the required number of branches? Now let's collect the Christmas tree. We take the first branch - the crown, weave another into it, while twisting the wire into the main trunk. Using this principle, we twist the remaining branches.
Installation of our craft
When our spruce is ready, we need to install it on a stand.
If you have a toy bucket, fill it halfway with plasticine, install our tree and fill the remaining space. Or we take a tube cap, put a Christmas tree in it and fill it with cement mortar. If desired, the lid can be covered with colored adhesive paper.
We looked at the most affordable option, how to weave a Christmas tree from beads.
How to weave a Christmas tree from beads in a spiral
Another beaded Christmas tree has the easiest weaving pattern for beginners - Christmas tree - spiral.
Here you will need rigid wire and large beads of green, red, white. Weaving this tree is very simple; it consists of stringing beads in the sequence that you like. Having secured the ends, the product is given a conical shape, in the form of a spiral.
Master class on weaving a Christmas tree using complex techniques
More experienced craftswomen can try weaving a lace Christmas tree. This fake differs from the previous one in a different manufacturing technique. First, they put a lot of beads on the wire, like beads, and only then weave lace patterns from it.
Make a loop from 9-11 beads, twisting the thread 2 times. Next, we make more of the same loops on both sides. For the top, 3-5 loops are enough, and for the bottom 9-11 loops. So we make 5-6 branches of the same length.
This beaded Christmas tree has a very different weaving pattern. The main thing is to repeat the pattern of the same size.
Earrings in the shape of a herringbone made of beads
Beaded earrings in the shape of a Christmas tree are a decoration that will become a memorable gift for a close friend or sister.
An image with such earrings will add a festive mood and will not leave their owner unnoticed. Special accessories can be purchased in handicraft departments. The colors of the beads can be combined as desired. Below is a video on making spruce from beads. It is worth remembering that the New Year is just around the corner. This means that you need to prepare gifts in advance.
Source: https://okuhnevse.ru/master-klassy/rukodelie/elochka-iz-bisera
Plant symbolism
Spruce - an evergreen, fluffy beauty - has been held in high esteem by people from different countries of the world since ancient times. She was valued and respected not only because she was a symbol of the New Year. The tradition of decorating a Christmas tree appeared only in the era of Peter I. However, long before that, believers of the Orthodox custom began to respect this coniferous plant.
The fact is that, according to legend, spruce branches covered the Virgin Mary and young Jesus Christ, who fled from their hometown to escape the plague. For this, the Holy Spirit rewarded the spruce, making it evergreen, unlike other trees that lose their foliage every autumn.
With the passage of time and the improvement of science, the production of small multi-colored glass beads was entrusted to special mechanisms. However, the technology itself was kept strictly secret. Only in the second half of the 18th century was the first book devoted to all the intricacies of bead production published.
Around the same time, beadwork became popular in Rus'. This craft was considered noble and honorable, and in addition, it allowed women trained in weaving techniques and decorating objects with beads to make good money.
A legend is a legend. But scientists have proven that spruce needles have an anti-inflammatory effect. So in our time, spruce has not lost any of its value for humans. And, of course, let’s not forget that this is a very beautiful plant. It is this that, appearing in our homes, foreshadows the approach of the holiday and the fulfillment of cherished desires.
This concludes our master class. Now you can please your loved ones with a handmade gift. On our website you can find many video lessons, diagrams and descriptions that will help you make your first masterpieces using the beading technique.
Christmas tree made of beads for beginners - step-by-step photos
I suggest you weave such a Christmas tree-candlestick. This is a functional souvenir, a simply magical decoration for the New Year's table and an excellent gift for friends and relatives. And also a good idea for handicrafts for sale.
3 coils of 3 mm wire (see photo on the right). This is a special wire for beading, it comes in different colors and is usually sold together with beads. Green beads - 80 g (about 4 bags). White beads - 20 g (1 bag).
Bags of beads come in different contents; it’s better to buy with a reserve.
We begin to weave the top of our Christmas tree. Upper needle - put on 7 green and 2 white beads.
We pass the end of the wire from the side of the white beads backwards, passing the first bead.
Pull up the beads. The top needle is ready.
Now we make the side needles. We string 4 green and 2 white beads onto the wire, as in the photo.
We pull the beads tightly to the base and again thread the end of the wire in reverse, excluding the first bead.
The first side needle is ready.
We make the second needle in the same way.
Then the third and fourth. It turns out to be such a twig.
We put 3 beads on the barrel and repeat 2 more times. 2 more circles of side needles.
This is what the top should look like. The top needle and 3 side circles with an interval of 3 beads on the trunk.
Now using the needle weaving technique we have mastered, we make 3 branches, as in the photo below. Top needle and 1 row of side ones.
We attach our branches to the top of the Christmas tree. We apply it as in the photo below, tighten the beads on the barrel and twist the wire together.
The first branch is ready. Twist the wire tighter to make the barrel stronger.
We also screw on the other 2 branches. This is what happened.
Now we make branches for the 2nd and 3rd circles. The principle is the same as at the top of the Christmas tree, but the side needles are 2 rows longer than the first. 1 row, as at the top, 6 beads: 4 green and 2 white.
- 2nd row - 8 beads: 6 green and 2 white.
Now, pay attention, the lower needles are longer than the upper ones. We make 8 such branches for the 2nd and 3rd circles.
We screwed 4 branches of the 2nd circle. The Christmas tree looks like the photo below.
I show the view from below from the side of the trunk. Twist the wire well, tightly and neatly.
- These are 4 branches for the 3rd circle, the same as for the 2nd.
- Attach 3 circles of branches.
- The branches for the 4th circle are simply 1 row longer.
Added 4 circles of branches. Our Christmas tree is already lush.
Last 5th row. The branches are the same as for row 4, but we make 8 of them and connect two at a time.
- That's it, our Christmas tree is ready!
We make a stand for our Christmas tree from plaster or alabaster. We wrap the beaded Christmas tree in foil or cling film so as not to get dirty. We prepare a mold for filling the base, for me it’s my daughter’s plastic plate. I wrap it in cling film so that I can easily remove the stand when the plaster has hardened.
We dilute gypsum (alabaster) with water until it becomes a thin sour cream. You need to pour plaster into the water, not pour water into the plaster!!!!
We dilute the plaster and pour it into a plate. We twist the wire tail of the Christmas tree into a loop and quickly place it in plaster. We press a tea light next to it. I don’t know how long it takes for plaster to harden, but alabaster takes 15 minutes. Plaster takes longer to dry.
My stands were made of alabaster, it is gray in color, so I then had to paint them with white paint. I made a garland of red beads for the green Christmas tree. I also decorated the stands with rhinestones for cell phones. I just glued them to Moment, because... The original glue on the rhinestones was weak.
- This is such a beauty!
Source: https://domoteya.ru/elka-iz-bisera-nachinayuchshim-poshagovoe-foto
Registration of work
A beaded Christmas tree should be placed on a stand.
You can use a tray for flower pots, if this is not the case, then another method will do: take a five-liter water bottle, move 10 mm away from the base, and draw an even line around the circumference (you can use a newspaper, wrapping it around the circumference of the container so that the ends of the newspaper come together and form a smooth edge, then a line is drawn with a pencil). After this, the tree should be secured in the middle of the container on plasticine. Stir alabaster or gypsum and pour into a container. Until the mixture dries, the plasticine will not allow the tree to fall. If there is no plasticine, then you can use supports. As soon as the plaster hardens and the tree stands firmly, it is necessary to create a clearing relief, stick a snowman on the site, make snow mounds from plaster, and so on.
At the end, ribbons are attached, and shiny stones are placed under the tree. Weaving a Christmas tree is not difficult, and if you show your imagination, you can make a craft of even greater beauty.
Beaded Christmas tree diagram
In winter, the most long-awaited holiday for us is New Year. At this time, I want to believe in fairy tales and miracles. It is a tradition for everyone to decorate the New Year tree. But not many people know that you can make it with your own hands from beads, and thereby decorate your home.
The master class on weaving a Christmas tree from beads with your own hands, given in the article, will help you do this easily and quickly.
Spruce beading includes the following components:
- rectangular beads of emerald color;
- chocolate-colored beads;
- plaster or alabaster solution;
- wire;
- pot or decorative vase;
- beads;
- glass beads
All our accessories are ready, let's get to work.
Creation of spruce
A homemade beaded spruce, according to the diagram shown below, consists of an upper part and ten levels of branches. Let's start with weaving with our own hands, the covering part of the Christmas tree.
We cut off the wire, fifty in length, and string a golden-colored bead, an amber bead, and a straight emerald bead. Through the two ends, insert a white, amber, silver and green thing.
Next, on each edge, string four green colors.
We move on to the third level and begin beading branches. We unwind four pieces of fishing line, each thirty in length. We make five loops with beads on them, only on each one. Make the primary loops the same as in the second tier. In the final two loops, string four emerald stones.
The first half of the tree is finished. We cut off eight pieces of our fittings, thirty centimeters each. We make five loops, such as in the previous diagram. Combine two branches at a time, twisting them with wire. As a result, you get four branches. A voluminous homemade spruce made of beads, the weaving pattern of its sixth row branches is shown in the photo.
The tabletop homemade spruce is ready, now you need to assemble all the parts.
Spruce assembly
Wrap the wire around all rows in a helical motion. The trunk of our tree is thick and will not bend. The gap between rows needs to be increased.
- Place the finished spruce in a suitable pot or vase.
- Pour the foundation with plaster or alabaster solution to secure the spruce well.
- Decorate the tree with decorative stones, foam snow or moss.
Under the spruce you can put small figures of forest animals, gifts and Santa Claus. The master class using beadwork and Christmas tree patterns is over. In the end, such a spruce appeared. You can also watch a video for beginner needlewomen.
Now you will have a festive mood that you can give to your loved ones. The spruce is always green and pleases with its juiciness. It is not possible to grow it on a window at home, but you can make beadwork with your own hands according to the pattern. We offer a master class on a pattern showing the beading of a Christmas tree.
Video: Spruce weaving for beginners
Forest tree diagrams
It is necessary to prepare the accessories:
- a couple of green beads;
- bugles of the same color;
- beading material;
- decorative decorations.
Let's start making the holiday tree.
We connect two meter lengths together and twist any of the edges.
- We look at the drawing and continue to do it.
- After creating the required number of branches, they must be twisted together with a distance of one centimeter. The base of the fishing line is secured in several ways:
- it is allowed to fill the mold with a solution of alabaster or plaster, sprinkling sand, pieces of cones or shiny pebbles on top;
- tie the ends to the stone;
- You can attach it to plasticine with your own hands.
This is interesting: Diagram of a dragonfly made of beads
Spruce weaving patterns
We showed you excellent beading options and a master class on how to weave a festive Christmas tree with your own hands. We hope that after this, you will not want to cut down a real spruce in the forest for the New Year and Christmas holidays. After all, it is much more interesting to do beadwork with your own hands, together with your children, on a cold and frosty evening.
And if you don’t have enough space in your house, then the option of weaving a tabletop Christmas tree from beads with your own hands is just for you. And small children will not be able to get it and get hurt with toys.
Handicrafts, home decor, crafts and hand-made
Christmas trees made of beads. 20 ideas
- We continue to prepare for the New Year!
- Look how beautiful Christmas trees are made from beads and wire!
- For lovers of beads, we have selected 20 master classes on how to make a Christmas tree from beads.
- 1. Christmas tree made of beads
- 2. White Christmas tree and Christmas tree with gold tips
- 3. Spiral beaded Christmas tree
- 4. Beaded Christmas tree earrings
- 6. Christmas tree made of beads and pins
- 7. Three-color beaded Christmas tree
- 8. Beaded Christmas tree with pattern
- 9. Herringbone pendant
- 10. Another Christmas tree earrings
- 11. Simple Christmas trees
- 12. Beaded Christmas tree, another option
- 13. Herringbone pendant made of beads and seed beads
- 14. Christmas tree with toys
- 15. 2 more Christmas trees made of beads
- 16. Golden openwork Christmas tree
- 17. Christmas tree made of bugles
- 18. Christmas tree in the snow
- 19. Christmas tree made of sequins
- 20. “Gingerbread” Christmas tree
- We wish you creative success.
Another idea for home decoration using beading technique
To create a Christmas tree we will need brown and green beads, two large beads, and brown copper wire. This Christmas tree consists of ten tiers. When creating it, we will be guided by the diagram.
- Cut a piece of wire 45 centimeters long. Place a golden bead in the center. We will pass the two ends of the wire through two beads and a green bead. We string four green beads on both sides of the wire.
- Twist the wire four turns, string the beads according to the pattern on each side and twist the loops.
- We secure the ends with two turns and also create two more loops.
- Take four pieces of wire 25 centimeters each, twist four branches with three loops on each and wrap the wire three turns.
- For the next third row, take four wires of 30 centimeters each and create five loops in the same way as in the first tier.
- To create the fourth tier, eight 30-centimeter wires are needed. We twist two branches together.
- From four pieces of wire 35 centimeters each we create a fifth tier, seven loops per branch.
- We create the sixth tier in the same way as the fourth. We collect two branches at a time, cutting off another 20 centimeters of wire. First, we create 12 curls on one branch, then attach the second branch with 15 turns.
- To create the seventh tier, we will cut four wires of 60 centimeters each. We make the first loop in the center of the wire, then string six loops around it using one end of the wire. We also make seven loops on the second side.
- For the eighth tier, you need four pieces of wire of 30 centimeters each and four of 60 centimeters each. We make branches from the long ones, as for the seventh tier, and string five loops on small sections. We attach a small one with 15 turns to a large branch.
- We create the ninth tier as well, but there should only be 18 turns.
- For the 10th tier, we will take four wires of 70 centimeters each and 4 of 35 centimeters each. We make nine loops on a large branch and seven on a small one.
- Using wire, we assemble all the prepared tiers and wrap it in a spiral.
- We place the Christmas tree for delivery.
how to make a Christmas tree from beads
Making your own Christmas tree from beads is not at all difficult if you carefully study the master classes that you will find on the pages of our large handicraft encyclopedia https://pro100hobbi.ru. The authors of MK describe in great detail the process of making Christmas trees and provided step-by-step photos of the work. Christmas trees made from beads are charming and original. You can decorate the interior of the room with them or give them to your friends or loved ones. Visit our website, choose the Christmas tree that you like and try to weave it from beads with your own hands)
#6965 post number limonchik posts by this user
Look at this beauty! The Christmas tree is simply lovely. If you study this article, you can easily cope with weaving such a Christmas tree yourself. The author provided step-by-step photos of the work and described in detail the entire process of making the New Year's beauty. Watch and try to make the same one with your own hands.
0 liked 133 number of views I like it! keep it for yourself
#6964 post number limonchik posts by this user
If to weave a Christmas tree you take beads of several shades of green and alternate colors, then the Christmas tree will shimmer and look very beautiful. A master class will tell you how to weave such a Christmas tree yourself, in which the work process is described in great detail and step-by-step photos are posted. Watch and create)
0 liked 146 number of views I like it! keep it for yourself
#6963 post number limonchik posts by this user
Not a single New Year is complete without a lush, beautiful Christmas tree. You don’t have to put up a live Christmas tree; you can make one yourself. There are a lot of manufacturing options, for example, you can weave a Christmas tree from beads, and then decorate it at your discretion) The Christmas tree, which is described in this master class, is very fluffy and looks like it’s alive. Study the master class and try to make the same)
0 liked 123 number of views I like it! keep it for yourself
#6962 post number limonchik posts by this user
In order to make such a Christmas tree from beads, you will definitely need a template according to which you will cut out the base of the Christmas tree.
The beads are not strung, but simply glued in a certain sequence that you choose to your taste. The master class will tell you how to make a Christmas tree. Watch and try to make the same one.
You can hang the New Year tree on the tree, or give it to friends for the New Year)
0 liked 143 number of views I like it! keep it for yourself
#6959 post number limonchik posts by this user
It is impossible not to appreciate such a beautiful Christmas tree, which is made of beads. A candle lit next to the Christmas tree illuminates all the branches, and the lights play on them. Watch a master class with a detailed description of how to make such a beauty, and try to make it yourself. Try it, go for it)
0 liked 145 number of views I like it! keep it for yourself
#6956 post number limonchik posts by this user
What a beautiful Christmas tree is made from bead threads) The master class contains a very detailed description of the work with step-by-step photos, and you can easily cope with making such a Christmas tree. There is no need for a special weaving pattern, and the branches bend very well due to the fact that the beads are strung on a wire. Study the master class and make the same New Year's beauty with your own hands)
0 liked 160 number of views I like it! keep it for yourself
Source: https://pro100hobbi.ru/tag/master-klass-novogodnyaya-elka
Required material
After choosing a model, you need to purchase materials. It is advisable to buy beads of the same shape. What you will need during the work process:
- for a large model of a Christmas tree you will need a lot of green beads, it is preferable to use different shades (light, dark);
- The shape of beads can also be varied: oval, round, oblong and square;
- to string beads you need fishing line or wire;
- wire is great for craft elements that need to be hard, and fishing line is great for softer parts;
- thick aluminum wire is always selected for the tree trunk, since this part holds the entire structure;
- plasticine is suitable for fastening small objects made of beads, but for large objects gypsum is used; it can also be used to decorate a clearing on which a spruce tree will stand;
- multi-colored threads, ribbons and flowers for decoration;
- a tray for a pot with low sides or a plastic base for a five-liter bottle (the craft will be installed on them).
To secure the decorations you will need PVA glue.
Christmas tree made of beads - step-by-step master class and photos for beginners
If you are wondering how to make a Christmas tree from beads, then this master class is just for you. The master class contains step-by-step photos of weaving, after viewing which you will understand that weaving a Christmas tree from beads with your own hands is not so difficult.
To weave a Christmas tree you will need the following materials:
- Czech beads No. 10 in two colors - green (30 g), white (10 g).
- Wire with a diameter of 0.3 mm.
Christmas tree top
We will start weaving the Christmas tree from the top. We take a wire 50 cm long, collect 1 bead and 1 white bead (a bead can be replaced with 3 beads). We place everything in the middle. The bead will be the top of the tree, but if you want, instead of a bead, you can make a star.
Holding the white bead with your hand, take the end of the wire and pass it through the bead (or 3 beads) in the opposite direction. Tighten well.
Next, we collect 4 green beads on the right and left ends of the wires.
Putting both ends together, string 1 bead on top. We move the ends apart so that the bead linen is pressed against the previous ones.
- Now you need to put beads on the wire on either side in this order: 5 green, 3 white, 4 green.
- Afterwards, the same end of the wire needs to be passed back through the first bead, moved close to the top, and tightened well.
- Next, on the other side of the wire, you need to collect beads in this order: 5 green, 3 white, 4 green.
- Then we pass the same wire in the opposite direction through the first bead and tighten it until it is pulled out to the end.
Then, following the same pattern, you need to make one more loop exactly like this on each side. When finished, twist the ends together.
Now we need to form the top of our Christmas tree. To do this, take the central loop and bend it so that it fits in the middle of the loops.
Beaded Christmas tree branches
We take a piece 40 cm long and string the beads in this order: 5 green, 3 white, 4 green.
Having placed it in the middle, pass the right end of the wire in the opposite direction through the left bead and tighten it. When tightening, make sure the wires remain the same length.
Next, we collect beads on the wire on the left side in order: 5 green, 3 white, 4 green. Now we pass the same wire back through the first collected bead and tighten it.
We weave a similar loop on the right side.
At the left and right ends we weave one more loop of the same type.
There should be 5 loops in total. This time we do not twist the ends together.
You need to weave 3 such pieces. When assembling, we will screw them to the trunk of the tree between the rows of main branches.
Let's start weaving the main branches.
On a piece 60 cm long, string the beads in this order: 6 green, 3 white, 4 green.
Let's mix everything in the middle. Take the right end of the wire, pass it through the left 2 beads and tighten.
- Next, from either side we collect beads in order: 5 green, 3 white, 4 green.
- After that, we pass the same wire in the opposite direction through the first collected bead and tighten it.
- We weave a similar loop on the other side.
Next, we collect green beads on both wires. There are 3 pieces on the right side, 4 pieces on the left side.
Take the right tip and pass it through the fourth bead, which is on the left side. We tighten it. We got a small branch.
We twist the ends of each wire together. We need to make 4 such branches. This will be the first row of branches for the Christmas tree.
Next we make the same branches, but we just need to add another tier of loops to them. We also make 4 of these things. This will be the 2nd row of branches.
Using similar weaving and adding another tier of loops, we make branches of the third row for our Christmas tree. You need to weave 5 such branches.
For the fourth row of branches, we make them similarly to the previous ones, but don’t forget to add 1 more tier of loops. We make 7 such branches.
Weaving the second and subsequent rows
For the second tier you will need 5 branches with 5 legs, for the third – 6 branches with 7 legs, for the fourth – 7 branches with 9 legs, for the fifth – 8 branches with 11 legs, for the sixth – 9 branches with 13 legs.
Since the number of legs on a branch increases with each row, the length of the wire must be increased by 5 cm for each tier.