Sisal is a natural plant fiber. It is extracted mechanically from the long leaves of the agave plant, which grows in the subtropics. Since ancient times, residents of America and Africa have valued it for its durability and strength. Sisal is used to make threads, ropes, ropes, and create a variety of household items. Mattress padding and carpets are renowned for their quality. Ship ropes were woven from thick threads. However, natural fibers are gradually being replaced by artificial ones.
Handicraft masters use both threads and fabrics made from them in their creative works. In this article we will look at a master class on a sisal Christmas tree, different options. Readers will also learn how to create canvases and balls from threads on their own, and even use natural and undyed rope. Nowadays it is fashionable to decorate the interior with jute crafts and burlap, and here we use sisal. The color of the threads is lighter than jute ones, stronger and harder to the touch, you also need to know that they are prickly.
Some people use artificial sisal. However, these are just thin plastic threads. In our article we will describe a master class on a Christmas tree made from natural sisal, grown by the hands of workers in Brazil and Tanzania. The craft you make will delight you for a long period of time. After all, this material is durable and does not absorb dust and moisture. So you can make the version of the New Year's craft presented below as a gift.
Christmas tree made of threads
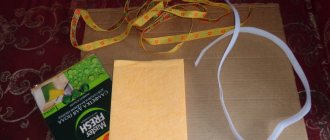
To make a Christmas tree from sisal with your own hands according to the master class described below in the article, you need to buy the following materials necessary for the work at a sewing accessories and handicraft store:
- foam cone;
- green sisal threads;
- golden ribbon;
- gold and red beads or half beads;
- red satin ribbon for the bow at the top.
You will also need scissors, PVA glue and a Christmas tree garland, it is advisable to buy a lightweight plastic one.
Fabric base
You have learned how to make a Christmas tree from sisal, or rather, so far you have only made the base for it from paper. Another option is to make a soft blank from fabric or filler, for example, padding polyester. To do this you need to do the following:
- Cut the padding polyester or prepared thick fabric into strips. The width and length depend on the size of the material you have, as well as the size of the souvenir you plan to make.
- As a frame, take a strong wire of the required length.
- Start winding strips of padding polyester onto the rod from the place where the top of the tree will be, downwards, not reaching the end of the wire a few centimeters. To prevent the material from moving off the frame, be sure to fix it with glue.
- When the first strip is finished, continue with the second, etc.
- Pay special attention to the base of the workpiece. Uniform expansion should occur in this part.
The second method will require a more dense arrangement of sisal fibers so that the filler does not show through, however, when working with this method, you can give the tree a slightly rounded shape. It will look more natural rather than geometric.
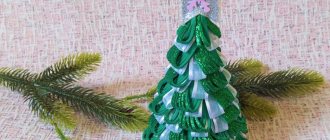
Master class on sisal Christmas trees
Apply a thick layer of PVA to the foam cone with a brush. The winding of sisal threads begins from the bottom up. They do this in a chaotic manner, the main thing is that the coating is of high quality and the foam is not visible anywhere. At the very top, the threads are wound tightly around some kind of rod, for example, take a thin knitting needle, which can later be easily removed. The upper part of the craft is made tight, and after removing the rod it is twisted a couple more times around its axis. To prevent the top from falling apart, add PVA glue.
The winding is secured with ribbons tied in a spiral around the Christmas tree. You can alternate a strip of golden ribbon and a garland with balls. The top requires reinforced winding to prevent it from unwinding. A small bright ball, secured with threads, is hung on the edge. The top thus tilts to one side. You can decorate the Christmas tree to your taste by attaching bright beads or pebbles along the ribbon. You can glue several balls, placing them evenly over the entire surface of the craft. Tie a red bow next to the top ball.
A sisal Christmas tree made according to our master class can be placed either on a shelf or in the center of a festive table. It takes up little space, but will serve as an excellent decoration for the New Year's holiday.
DIY Christmas tree - home decor
Decor for New Year's days with a Christmas tree is a great idea for a home or apartment.
Crafting a Christmas tree for home decor
1. Prepare a cut of the tree so that your cone is stable on it. Paint the cut surface with white acrylic paint. In principle, you don’t have to paint it.
2. Glue a cone out of thin cardboard or thick paper. Cut the base of the cone in a circle and bend the ends so as to glue the cone to the cut surface.
3. Starting at the top, glue twine or thin string to the surface of the cone. This way the cone will immediately become elegant. Then glue the base of the cone to the cut in the center.
4. Gradually begin to decorate the New Year's composition. Glue branches around the circumference of the cut.
5. Then glue cones, balls, beads and berries.
6. Glue bright red beads along the entire height of the cone. Add small silver beads to the surface of the cone. Glue a star at the top of the cone. New Year's decor with a Christmas tree is ready.
Christmas tree made from individual balls
Now we will present to the reader a master class on a Christmas tree made from sisal balls. You can use your imagination in making this craft in different ways. Both the colors of the threads and the size of the twisted elements themselves vary. Additionally, both natural and artificial components can be included in the work of decorating crafts.
Cones and twigs, Christmas balls and tinsel, foam fruits and berries are used. Dried fruits look beautiful, for example, orange or lemon slices, cinnamon sticks or star anise. Sisal balls alternate with yarn pom-poms. Here everything is decided by the master working on the craft.
Stage 1
Whatman paper is taken, which has been pre-selected according to the future size of the Christmas tree, and is painted to match the tone of the purchased sisal. It happens that the chosen sisal is quite thick or, on the contrary, thin. This feature of the material makes it necessary to glue sisal in pieces or wrap it over whatman paper, leaving areas that are translucent. Therefore, a separate piece of advice would be to paint whatman paper in the exact tone of sisal, which will allow you to get a less noticeable translucency. After the material is painted, it should be allowed to dry for about 10 minutes.
INTERESTING: New Year's crafts from scrap materials: TOP-20 ideas
How to make balls
Before starting the sisal Christmas tree master class, let's look at how to make balls correctly, because the threads have an unruly structure, they can stick out unattractively in different directions, they will definitely come apart after twisting. Before forming balls on a foam cone, craftsmen prepare them correctly.
First of all, a small part is torn off from the total pile of fibers and the shape of a ball of the required size is rolled in your hands. If it turns out small, don’t worry, you need to tear off a little more and roll the ball in your palms again. Then the element must be strengthened. The same PVA glue is used. Pour a little into the palm and roll the ball in the glue again. The finished part is left on a ceramic plate until completely dry.
When everything has dried, you can notice small imperfections, for example, threads sticking out here and there. This needs to be corrected before pasting the cone, cutting off all excess with scissors. Next begins assembling the components together.
Assembling a Christmas tree from balls
As a base, you can use either a purchased cone or one you make yourself from cardboard. Let's consider this version of a sisal Christmas tree (read the master class with a step-by-step explanation below). Thick green paper is selected and rolled into a cone around the top corner. The sides can be glued together, but it is more reliable to fasten them with paper clips using a stapler. The inner part for weighting is filled with crumpled newspapers.
The lower part of the cone is leveled with scissors and placed on a piece of foam or glued to a saucer from a flower pot. Only it must first be painted or covered with ribbons of green or contrasting color.
Then the prepared balls are pasted over the entire cone, decorative elements are added - bows, cones, Christmas tree decorations, artificial snowflakes and much more.
What you need
A DIY sisal Christmas tree can be made in different ways. You can use any materials to complete the base: both purchased and those that you already have in stock. All options will be discussed below, and the list of necessary tools, compositions and accessories is as follows:
- foam cone;
- cardboard or paper;
- pencil;
- compass;
- stapler or tape;
- glue or heat gun;
- wire;
- wire cutters;
- plaster or alabaster;
- mixing container;
- stirring stick;
- a glass or pot for fixing the base;
- rod, stick, skewers for creating a stem;
- sisal of the desired color;
- paint of the corresponding sisal shade;
- brush or sponge (sponge);
- decorative elements (satin ribbons, beads, sequins, bows, balls, tinsel, soft artificial snow, etc.)
Using this list, you can easily determine what you need or which way of working to choose, based on what you already have.
How to make a Christmas tree topiary from sisal
You have already read the master class on working with sisal fibers. Let's figure out how you can make a Christmas tree craft from sisal ropes, and even in the form of a topiary. It is best to use a foam cone as the base for the tree. A hole for the rod is pierced from below with a stick or branch. Also prepare a skein of natural thin sisal rope, a flower pot or any shaped container to hold our tree in an upright position. We will fix the base with a solution of gypsum and water, mixed in a separate bowl until it becomes thick sour cream.
To make the tops as curved as in the photo above, thick wire is used. The first step is to wrap the cone with rope or thick threads of sisal around the entire circumference. The wire is stuck deep into the cone (you can pour a little PVA into the hole), and also wrapped along the entire length.
The rod (stick, thick even branch, wire) is wrapped with brown satin ribbon, the ends of which are glued to the rod from below and above. A hole of the appropriate diameter is pierced in the cone and a rod is placed on the glue. Its lower part is inserted into a pot filled with gypsum solution.
Eco craft
An excellent natural material for creating a New Year's topiary with your own hands (the photos confirm this!) - pine cones! Cones of any coniferous trees will do.
- For the leg of a “cone” topiary, it is better to find a real tree branch. Choose a branch wide enough so that it can hold the base ball. Your stick may have no branches, or you can leave several branches.
- Clean the branch from bark and dirt, dry it and coat it with silver wood paint. You need to attach a round piece to it, preferably a foam or plastic ball. Make a suitable hole in it and put the workpiece on a stick.
- Also clean the cones from dirt, trim the legs to make it easier to glue them to the workpiece. Start forming the topiary from the top, carefully selecting the size of the cones.
- Now the structure needs to be stabilized. Dilute the plaster in a pot or plastic container and insert the craft into it. Mask the plaster with the same cones, for example.
- After the plaster has hardened, cover the entire craft with silver paint, and if you feel like something is missing, you can decorate the topiary with small Christmas tree decorations.
Don't want to fuss with paint or do you prefer the natural look of natural materials? Then add conifer branches to the cones (or even better, artificial branches, because then the composition will last longer) and do not treat the composition with paint.