There was a desire to diversify the menu on vacation, and instead of standard kebabs with sausages on the grill, try something new. And so, I recently found instructions on how to make saj with your own hands. That is, a special frying pan for the dish of the same name. Next, I’ll tell you in more detail what it is, and I’ll describe two options for how to make a saj from a harrow disk with your own hands.
Source ytimg.com
Device
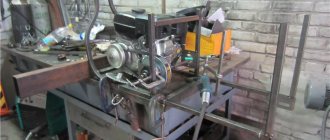
A potato planter for a walk-behind tractor can be easily made at home, using fairly traditional tools, as well as those components that almost every rural resident has on their farm (read about spare parts and parts for KSM 4 here).
The operating principle and purpose of a homemade potato planter for a walk-behind tractor is identical to factory analogues, such as a potato planter for a mini tractor, for a tractor, bomet, l 207, for MTZ.
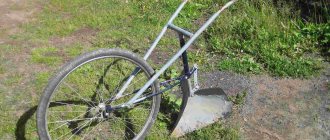
Homemade potato planter
In general, this device has the following structural elements, which we will need to manufacture:
- frame structure on which the remaining elements of the unit will be located;
- container in which the planting potatoes will be located;
- a mechanism that will operate the system for planting tubers in holes;
- rippers that dig holes;
- wheelbase;
- elements that bury holes after planting potato tubers in them.
In principle, this is the minimum that we need to make a fairly simple design of a potato planter at home.
The process of assembling such a device itself involves quite a lot of scope for action, because you can add an additional tank to the design, which will contain fertilizer, and also make not one, but two elements for planting tubers.
Of course, this will lead to the weight of the entire structure, slightly reducing its maneuverability and performance. Therefore, you need to think several times before adding additional elements to the potato planter.
For more information about a homemade potato planter for a walk-behind tractor, watch the video:
How to attach?
The next important parameter: how to secure the ballet barre? The most reliable is considered to be fixation both in the floor and in the wall. If the walls are unreliable, the equipment is attached only to the floor, but over time, the racks can become loose, making it uncomfortable to practice. If the apartment has strong (brick or concrete) walls and, for example, expensive flooring (the same parquet made of natural wood), you can fix the ballet barre only on the walls. However, if there is heavy load on it, there is a possibility that over time the screws or dowels will become loose, which can also lead to injury.
Necessary materials
In principle, to make a homemade potato planter, the materials that many summer residents have on their farms are sufficient. At worst, we can go to the nearest landfill, where we can find a lot of parts and related materials that may be useful to us during assembly.
Required material
Here is an approximate list of what we may need:
- sheet metal of various widths;
- bolts and nuts;
- welding machine;
- Bulgarian;
- wheels;
- channels, etc.
As we can see, we will need quite a lot of metal, which in itself implies the use of a welding machine. Therefore, if you do not have the skill to work with it, then assembling a homemade potato planter will not be available to you.
The list of required materials does not include various components that will be discussed in detail in the process of describing the technology for constructing this device.
Choreographic machine for dance hall
A choreographic machine for a dance hall is the same mandatory attribute of classes as mirrors on the walls. Using crossbars fixed at the desired height for a classic set of exercises, you can develop flexibility and elasticity of muscles, develop correct posture, correct the position of the body and arms, train ligaments, etc.
Design and principle of operation of potato planters for walk-behind tractors
Such devices consist of:
- frames;
- a bunker in which potatoes intended for planting are placed;
- wheel base;
- a mechanism that ensures loosening of the soil and planting tubers on the site.
Most models have a similar device
Attention! In addition to those listed, other elements may be present - for example, a container for fertilizer.
The operating principle of such a device is very simple. The sprocket mounted on a wheel base is part of a chain lift. When the wheels rotate, the tubers from the hopper rise through a vertical pipe and then are dropped down into the prepared furrow.
Plywood machines for cutting, joining, drilling and finishing
It has long been noticed that many structural parts of machines for various purposes can be successfully replaced with plywood, while the performance of such a machine will not change at all, but the price component can go down sharply. Homemade plywood machines have frames and tables for cutting material, which can easily be made from plywood.
Housings and movable supports are also quite suitable products for plywood, so today we’ll talk about machines and the capabilities of plywood.
The machine can be anything.
Planting process
Potato tubers are planted in a furrow made in advance using a walk-behind tractor. Thus, first you need to use it to plow the garden, then you need to attach a trailed potato planter to the back of the walk-behind tractor, place the tubers in its hopper and plant the potatoes.
It is impossible to simultaneously cut a furrow and plant tubers with a potato planter using a conventional household walk-behind tractor. Only a powerful diesel walk-behind tractor or mini-tractor can perform such operations.
The main types of potato planters for walk-behind tractors
Such devices can be single- or double-row. The first type is suitable for a small area. It has small dimensions and low productivity.
Two-row models are more productive
Some potato planters for walk-behind tractors allow you to plant sprouted potato tubers. Others focus exclusively on unsprouted ones. Also, a number of models allow connection to a certain line of walk-behind tractors. Others, if they have a universal hitch, can be aggregated with various units. The loading hopper can be rectangular or cone-shaped.
Depending on the type of tuber feeding, such attachments are usually divided into units with:
- flat belt system. Tubers are planted using horizontal belts;
- spoon system. To serve potatoes, a design consisting of spoons attached to a belt is used;
- shaped belts that have a special recess that resembles a spoon. An operator must be present when planting, but there is no fear of damaging the tubers;
- piercing mechanism. Such devices are relevant when planting cut potatoes;
- multi-belt design. Such attachments allow you to simultaneously plant two rows of potatoes.
Feeding mechanism may vary
What devices are needed?
To plant potato tubers, it is clear that one single walk-behind tractor will not be enough; additional devices will be required, in particular a potato planter. This equipment will allow you to carry out the procedure efficiently and quickly, without the use of heavy physical labor.
The effectiveness of this approach also lies in the fact that the potato planter may well be homemade. That is, anyone can make the device with their own hands: it is not necessary to buy a finished product. This allows you to optimally select the dimensions of the potato planter for the walk-behind tractor that will meet your needs.
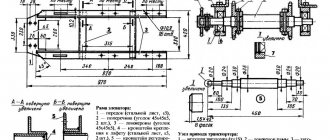
Therefore, we present a diagram and drawing of such a device in order to understand what kind of unit you can get in the end if you make it yourself.
Ballet barre for home training
It is traditionally popular to enroll children (especially girls) “in ballet.” This is quite justified: if you do not turn them into professional dancers, then such activities have a very beneficial effect on the child. He develops simply perfect posture, he never suffers from the scourge of our time - excess weight, and besides, his discipline soars to unprecedented heights. However, for high learning efficiency, sooner or later everyone has to think about installing a home ballet barre in their apartment. Without it, even daily training will not give the desired result. And here many questions arise.
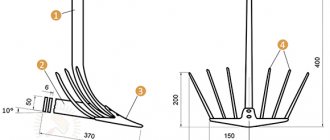
Drawings of a potato planter for a walk-behind tractor.
Calculation of gears of the chain rotation mechanism with potato planter bowls.
The frame of the potato planter is welded from a profile pipe; a tank from a Soviet Riga washing machine or a similar cone-shaped container can be used as a hopper.
Bearings with a lower axle and a drive sprocket for the chain and vertical posts for the upper axle with a sprocket are attached to the frame.
Bucket rings made of 6 mm wire are welded to the sides of the chain; the buckets must be welded in such a way as not to weld the connections between the chain links.
To prevent the tubers from falling out of the buckets prematurely, you need to install a guide pipe; alternatively, you can use a plastic drain pipe with a diameter of 100 mm.
To fill the furrow, two rotary disks with the ability to adjust the angles are installed.
Installation diagram of the planter on a walk-behind tractor.
I recommend watching a video of making a homemade potato planter.
Video: homemade potato planter in action.
Selection options
Many parents, faced with the need to purchase appropriate equipment, make standard mistakes. This is natural, since choosing a ballet barre is quite difficult. A person who is not professionally involved in dancing simply does not know how to do it “correctly.” And wherever you get the ballet barre intended for your child - you made it yourself, ordered it from a special workshop, or bought a ready-made one - you need to take into account the following recommendations.
First of all, the height of the beam. In order not to correct defects in posture and memorized movements later, remember: it should be at the level of the dancer’s lowest rib. The next requirement: no cheap stuff! Neither in the selection of materials, nor in the choice of a ready-made choreographic machine. Chinese versions usually contain easily evaporating inclusions that will simply poison your child in a confined space and under severe stress. “Environmental cleanliness” is the motto of caring parents!
Equally important: the ballet barre must include only wooden handrails. And at the same time not covered with varnish. A sweaty hand will slip on metal or varnished ones, which very often leads to injury.
DIY making
You can choose a potato planter and other necessary attachments in a specialized store, or you can make such a device at home. You just need to have some plumbing skills and purchase the necessary materials to make a mounting device for a walk-behind tractor.
Tools and materials
To make a potato planter with your own hands, you will need to purchase:
- Axles, bicycle chain (or chain from a car engine), bearings for wheel movement, making a chain elevator.
- Metal sheet for making a bunker.
- Square or round metal profile for mounting a frame holder and other purposes.
- Welding machine for firmly connecting potato planter elements to each other.
- Several electrodes for welding.
- Grinder and discs for cutting metal sheets into the required parts.
- An electric drill and drill bits for it for drilling work.
- Fastening elements to add strength to the device.
- Nuts and screws for mounting the structure.
- Wire (several meters) for fastening some elements of the device.
- Sandpaper or file for sanding and cleaning parts.
Before you start assembling the potato planter, you need to carefully study the drawing, think about the dimensions of the future device, its appearance, and the method of attachment to the walk-behind tractor. The dimensions of the planter should not be very large so that the design does not become too bulky.
The volume of the bunker for filling tubers is determined based on the calculation of the double length of the bed. The volume of the container should be enough for a walk-behind tractor with a bunker filled with potatoes to pass two furrows and return to the place of re-loading.
How to make a dance machine at home
Many parents send their children to dance classes. And they spend “tidy sums” on shoes, suits, etc. And the training itself doesn’t cost a penny either. But there is no elementary dance (or choreographic - whichever you prefer) machine at home.
Of course, someone gives away a room for a dance studio and there are all imaginable and inconceivable attributes, but let’s be realistic, most of us do not have such an opportunity. Therefore, make a simple dance machine at home with your own hands, from scrap materials.
Select a free wall.
In the “Everything for Furniture” store, buy a piece of chrome pipe, three stands for it (take aluminum ones to make it stronger), two plugs. All this cost less than $12. Very inexpensive.
What you purchased.
Drill the holes themselves with a 5 mm drill, since the selected screws simply did not fit through.
You will also need 12 powerful screws and the same number of dowels. In this case, the walls are concrete, so you don’t have to worry about the strength of the structure.
At a height of 110 cm from the floor (distance to the shoulder of a 10-year-old boy), make a mark
and drill four holes. We drive in the dowels.
Repeat the same procedure twice more, leveling everything.
Then insert the pipe
Countersunk hexagon screws
we tighten the pipe tightly in the racks, thereby slightly changing its “roundness”
and the plugs, which were previously inserted freely, became clogged very tightly
That's all the wisdom, the do-it-yourself dance machine is ready. Now all that remains is to conquer the dance peaks.
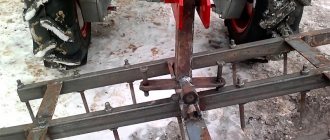
Specific points of using a potato planter for a walk-behind tractor
If you decide to use a potato planter for a walk-behind tractor, familiarize yourself with the features of its use in order to understand how to set up the device and the planting process itself.
The potato planter must be set up correctly
Setting up a walk-behind tractor and potato planter
Before planting, the soil is plowed, harrowed and moistened. The unit and device are configured to ensure the following points:
- forming a furrow of suitable depth;
- ensuring sufficient distance between furrows;
- stable operation of the planting material supply mechanism.
Recommendations for planting potatoes
To ensure that the walk-behind tractor does not change its position and is stable due to the large weight of the potato planter, you should immediately take care of the ballast, which is attached to the front of the unit. The speed of the unit should be about 1 km/h. Forming a furrow and covering the planted potatoes with soil is carried out using special sealing discs. Special cultivation paws should prevent the formation of marks after the walk-behind tractor passes.
If possible, planting potatoes should be uniform in size. It should be carefully prepared for the growing process.
Frame facades in exclusive furniture
What does everyone see when entering a room or kitchen where cabinet furniture is installed? The eye first stops at the doors and drawers. Furniture makers call these elements furniture facades.
They are made using different technologies. They use solid wood, MDF boards, as well as special MDF profiles coated with laminating films. When making exclusive furniture, developers like to combine it with façade design.
Using MDF profiles, you can select different wood textures. They are modeled by a film that is hot-glued. Internal filling is performed using different types of fillers:
- Plates made of laminated chipboard with a thickness of 8-10 mm - they are cut to the size formed by the internal contour of the grooves obtained after connecting the frame elements.
- MDF boards covered with films of various types - they also fill the grooves milled inside the profiles.
- Glass – usually reinforced with various types of glass films are used. In addition to transparent films, they are used in different shades and with patterns. Glazed fronts look great in bookcases, wardrobes and kitchen cabinets.
- Mirrors are used to create the effect of expanding space, as well as for practical use to look at yourself.
- Rattan panels decorate any facade; such material gives any furniture a solid look.
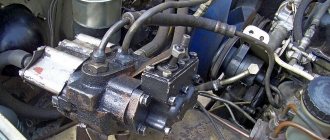
Design and principle of operation
All such units have almost the same design. This is necessarily a strong frame onto which the remaining components are attached, consisting of an axle with lugs, two gears, a conveyor with cells for root crops and a supply pipe. A small plow is also attached to the frame to create a furrow into which the tubers are placed at the same distance. And behind the frame, a disk hiller is installed to fill the potatoes with soil. The entire landing process occurs automatically.
The principle of operation is simple and is as follows. When the walk-behind tractor moves, the planter's lugs, on the axis of which the sprocket is located, begin to rotate. It is connected to the top gear via a chain. It is precisely the conveyor for feeding tubers into the furrow. Cells welded to the chain capture the potatoes and feed them into the guide pipe. At the very bottom there is a small plow. He makes a furrow in which the potatoes fall. A hiller is installed behind the frame, which backfills root crops.
The distance between tubers in a row is from 35 to 40 cm. All adjustments are made during the manufacture of the unit. Then tests are carried out and deficiencies are eliminated.
Testing a planter in the garden
After production, the potato planter must be tested and adjusted for normal planting. The unit must meet the following parameters:
- the depth of the tuber is 12-15 cm. This is regulated by the height of the furrow plow;
- the distance between potatoes in a row is 30-40 cm. This depends on the diameter of the lugs and the number of conveyor cells. This calculation is made at the stage of manufacturing the unit;
- the distance between potato rows is 60-70 cm.
In addition, it is necessary to carefully select seed material. The tubers should be the same size, fit freely into the planter cell and not have long shoots.
These are optimal conditions for good germination and, therefore, a large harvest.
Machine configurations for classical dance
The choreographic machine is one of the important elements in the interior of dance halls.
- The choreography machine is stationary.
It is securely fixed to the wall, to the floor, or has a combined mount.
Wall
fixation is the least preferred, since in this case the reliability of the fastening depends entirely on the quality of the material from which the wall is made. If plaster or drywall is used for finishing, strong anchors are used to hang the crossbar. Often, to strengthen it, it is necessary to resort to additional strengthening of the wall surface.
What is required for production
To make a walk-behind potato planter, you do not need any rare or expensive tool.
The simplest version of this device consists of six main elements:
- wheels;
- tuning mechanism;
- loosening mechanism;
- gear systems;
- bunkers for root crops;
- frames
The device can be improved by adding new parts to its design, for example, a container for fertilizers or a pair of landing modules. However, as the number of parts increases, the walk-behind tractor becomes heavier, and therefore becomes more difficult to control during operation.
To make your own potato planter for a walk-behind tractor, you usually use a tank from an old washing machine. It acts as a bunker for potatoes. Self-taught craftsmen also use a metal corner, steel wire, chain, gear, fittings, a pair of wheels from old vehicles, and a channel.
The tools you will need are the simplest:
- hammer;
- drill;
- spanners;
- welding machine;
- screwdriver;
- wire cutters;
- Bulgarian.
This is the required minimum for making a homemade unit. Essentially, a self-made potato planter is a cart attached to a walk-behind tractor.
But only at first glance the design seems simple: if you look closely, you can find many features in it.
Instructions
Do-it-yourself homemade potato planters for walk-behind tractors are a regular cart on wheels, which is attached to a walk-behind tractor. The apparent simplicity is a little deceptive, because the design of this unit has its own nuances and features that are worth paying attention to.
Frame design
You need to start assembly by making the frame structure. It will consist of channels welded together, as well as longitudinally located spars, which are connected by three transverse elements.
Thanks to a lawn mower, you can trim the grass and remove weeds - this is a suitable device for mowing unnecessary plants near the fence, at home, between the rows in the garden in a flower bed, and so on. Learn how to spool a line onto your lawnmower here.
The MAZ-500 can rightfully be considered one of the iconic cars of the Soviet period, which became the first cabover truck produced in the Soviet Union. MAZ-500 is a Minsk legend from the 60s.
Cultivation is on the list of priority tasks for any tiller, as it helps prevent the appearance of weeds, at least in large quantities, and helps saturate the soil with oxygen, thanks to loosening. Here's how to make a cultivator yourself.
There will be an arch and a fork in front, and on the sides of the structure there will be racks of elements for planting and digging holes. The wheels of the potato planter must be equipped with lugs. Between them there is a wooden disk 6 cm thick with four semicircular grooves located on it.
This disk will capture potato tubers, moving them into the dug holes.
Next you need to make a container for potatoes - a bunker. It can also be made from plywood, but for structural strength it is best to use sheet metal 3 mm thick.
The four sides of the hopper are measured and then cut out. They are connected by welding. The bottom can be covered with rubber so that the potato tubers are not damaged. It is necessary to strengthen the frame with steel strips, placing them from the middle transverse part to the arch in front.
There you need to weld linings and corners with a thickness of 4 mm. DIY drawings of a potato planter for a walk-behind tractor, which can be found on the Internet, describe this process in sufficient detail. Next, you need to attach a support and a footrest, consisting of a sheet of metal 5 mm thick, to the side members.
Making a seat
We make a seat. To do this, we need a metal corner with dimensions of 4.5 × 4.5 × 0.4 cm. To this support we need to attach boards covered with foam rubber for greater comfort. For the wheel axle, you can use a steel pipe that is sized to fit the frame.
At the ends there should be spikes secured with steel pins. As wheels, you can use any wheels from old equipment that has served its purpose. To hold the rippers, a metal rod measuring 5x5x0.5 cm is used.
On the sides of this rod there are elements holding the blade struts. They are made from metal plates 0.5 cm thick. As a seeder, you can use a regular 10 cm pipe, the wall thickness of which will be about 0.3 cm.
A furrow cutter will be located at the bottom of this structure. Digging elements, for which discs from a seeder can be used, must have two bearings. In principle, this description is quite schematic, with an approximate indication of dimensions and parameters.
On the Internet you can find quite a lot of detailed drawings, where other markings are indicated, so there are no strict recommendations in this process.
Plywood machines: materials and tools, selection and main points of creating structures
All photos from the article
Experienced craftsmen know that many parts in small machines can be successfully made from plywood.
If this unit does not provide for water cooling and excessive vibrations, then a laminated plywood sheet is quite suitable for its manufacture.
At the same time, the quality of the design will not suffer, and the price will be significantly reduced. Today we will talk about the main points of manufacturing components and assembling machines.
Photo of a home milling machine.
Important: keep in mind that all such designs are designed exclusively for amateur use. This material is not capable of withstanding everyday industrial load.
A few words about the material and tools
We will not deceive you, making such structures with your own hands is only possible for a person who is well acquainted with the basics of carpentry and confidently owns all household power tools.
Tabletop version of the machine.
What kind of plywood is needed
Although laminated wood sheet is deservedly considered a fairly durable material, not every profile is suitable for the manufacture of such structures.
- Let us immediately note that sheets with a thickness of less than 6 mm cannot be used for the manufacture of supporting and load-bearing structures. In this case, we can only talk about the design of casings or lightweight protective panels;
- As for sheets with a thickness of 10 - 12 mm, expert opinions differ. Some believe that this thickness is not enough for reliable operation of the units. The latter, on the contrary, argue that everything depends on the purpose of the machine; a ten-millimeter sheet, for example, is quite suitable for a cutting table in CNC machines made of plywood;
Characteristics of the material.
- Some claim that medium-thick sheets are well suited for gluing three-dimensional parts that are subject to periodic vibration; supposedly, the multilayer structure of the monolith dampens vibrations better. And in principle we agree with them;
- Sheets with a thickness of 19 mm and above are the strongest. They are most often used to make dimensional load-bearing and supporting structures. And although the price of this material is far from affordable, this is the profile that most craftsmen prefer to use.
Assortment of sheets.
But besides thickness, there are a number of important characteristics of a laminated wooden sheet, and since all such structures experience significant mechanical loads, it is undesirable to neglect these recommendations.
- Basically, all plywood is divided into coniferous and hardwood. Coniferous wood itself is lighter and softer, and accordingly the leaf inherited its qualities. Material glued together from hardwood veneer, although more expensive, is better suited in this case;
- Gradations in the chemical composition of the adhesive and the level of moisture resistance are not so important for such products. As a rule, machines are installed in a home workshop and are operated at room temperature and normal humidity. Therefore, you can safely take a thick sheet marked “FC”; in terms of cost, this is the best option;
Veneer grade.
- For such structures, the quality of the veneer matters. The more knots, the higher the likelihood of cracking and delamination of the sheet. There is no need to save money here; the sheet should be taken no lower than second grade;
- Sheets with unsanded jackets (NS), sanded only on the front side (Sh1), as well as completely sanded plywood sheets (Sh2) are produced. Theoretically, you can take unpolished material and polish it yourself, but in artisanal conditions this is difficult to do. Therefore, experts recommend using completely polished material. It is easier to process, and most importantly it adheres better.
Tool selection
The construction of such units requires a good power tool; a hand hacksaw or drill attachments will not work here. There is an opinion among professionals that sheets up to 10 mm thick can be cut with an electric jigsaw. Anything outside of these parameters requires the use of a circular hand saw or a stationary circular saw.
Standard jigsaw.
Important: modern high-frequency jigsaws from reputable and well-known manufacturers, as the attached instructions say, can easily cope with furniture boards up to 20 mm thick. And we have no reason not to believe in this.
To select various types of grooves and holes of non-standard configuration, you will definitely need a hand cutter. It is better to have this tool for personal use, since you can make a plywood bed for it and then you will have a personal milling machine. It is these units that are common among home craftsmen.
Manual frezer.
Naturally, in any such work you cannot do without an electric drill and a set of high-quality carpentry tools. Various kinds of clamps, screwdrivers, hammers, files, sandpaper and other little things are a must have for any self-respecting craftsman by default.
Set of carpentry tools.
The main points of creating machines
Important: it is better not to make drawings of plywood machines with your own hands, especially if you do not have strong engineering and technical knowledge. As a rule, professional factory-made drawings are taken as a basis.
Only instead of metal, a wooden plywood sheet is used.
As for strength, it is often achieved by increasing the thickness of supporting and load-bearing structures by at least 3 times.
Grinder machine.
When starting to cut a sheet, you should remember that the more revolutions the tool can produce, the smoother the corners and the better the quality of the cut. Both jigsaw blades and replaceable circular saw blades are taken with fine teeth.
The tool on the sheet or the sheet towards the tool should move as slowly as possible, otherwise there will be a lot of chips on the top layer of veneer.
Tip: to avoid chipping during cutting, experienced craftsmen use regular tape. It is glued to the surface and a cut is made along it.
Copy-milling unit.
It’s not for nothing that we mentioned that you need to be fluent in basic carpentry skills. In such structures it is not customary to use nails or self-tapping screws; all connections are made only according to the tongue-and-groove principle. Moreover, the joining must be precise; no gaps or backlash are allowed.
Such requirements are due to the fact that a machine of any type and purpose necessarily, to one degree or another, experiences vibration. And nails and screws in wood can become loose quite quickly during vibration. As a result, your machine will fall apart during operation, which can lead to extremely undesirable consequences, including injury.
Bench jigsaw.
Both the sheets themselves, when joining between planes, and the tongue-and-groove corner joints are often only glued. There are now a lot of adhesives for wood on the market, but most often good old PVA is used, not just the stationery kind, but the construction kind.
Tip: when drilling or milling, there is a high probability of chipping on the bottom jacket of the sheet. In order to avoid such consequences, you need to place unnecessary plywood scraps under the sheet, of which there are enough in any production.
Plywood circular.
Not least important is the final grinding of the assembled unit. This is caused not only by concern for the appearance of the car. Poorly polished corners can lead to splinters. Plus, sharp edges will constantly catch and the veneer will chip.
As for painting and varnishing, this is left to the discretion of the master. But in any case, the machine should at least be covered with primer. In the most budget option, it is a mixture of water and the same PVA, a 1:1 ratio is enough. This protection will keep the veneer from drying out and cracking.
Mini turning unit.
Conclusion
If the unit is needed for periodic use, then plywood machines are an excellent alternative to expensive factory models. The video in this article contains additional material on the topic of home machines. If you can share your own experience, write in the comments, we and our readers are interested.
CNC machine with plywood body.
Types and descriptions of seeders for walk-behind tractors
Planting garlic and other crops with a walk-behind tractor can be done with different seeders. Below we will consider the design features of each type of seeders for walk-behind tractors in more detail.
Row seeders
Devices of this kind are used for row sowing and simultaneous placement of seeds into the soil. Depending on the purpose, on sale there is a row seeder for a walk-behind tractor for garlic, a corn seeder for a walk-behind tractor, and a universal row seeder, which is suitable for sowing seeds of any crops.
The main elements of row seeders on a walk-behind tractor are coulters and sowing devices. The coulters are equipped with special “legs” or chains, which are necessary for embedding seeds into the ground. For operation in areas with heavy soils, row seeders with disc coulters are used, and for use on loose soil, devices with anchor coulters are used. The main advantages of row seeders include the uniformity of sowing and the optimal depth of placement of planting material.
Nest seeders
Devices of this kind are optimally suited in cases where the farmer needs to sow crops precisely into holes or nests prepared in advance. Nest seeders for walk-behind tractors can be successfully used for sowing seeds of garlic, onions and other small planting material.
The advantages of nest seeders for walk-behind tractors include ease of use. Such equipment is characterized by small dimensions and weight. However, this type of seeders is very slow, which is why it takes a lot of time to work with them.
Square nest seeders
These grain seeders for walk-behind tractors make nests at pre-marked points in conventional squares or rectangles. Such structures consist of a frame, support wheels, a mechanism for unwinding measuring wire from a reel and sowing sections.
The advantages of these devices for a walk-behind tractor include the ability to cover a large area of territory when working. Among the disadvantages of such seeders is their large mass due to the presence of a large number of metal elements in their design. These seeders are not capable of developing high speed, which leads to loss of time when working with it.
Broadcast seeders
Devices of this type have a simple and reliable design, do not require special care and rarely require repairs. The principle of operation of broadcast seeders on a walk-behind tractor is very simple: during operation, seeds taken by a special disk are subject to pressure, as a result of which they are thrown out of the seeder onto the site.
The advantages of such devices include high productivity. Among the disadvantages, it is worth highlighting the difficulties when using seeders at the edge of the plot, in which most of the seeds are thrown outside the garden.
Dotted seeders
These devices are used for sowing seeds of garlic, onions, corn and legumes in pre-prepared nests, which are located at a certain distance from each other. Despite the complex design and large dimensions, dotted seeders for walk-behind tractors are quite easy to operate.
The advantages of such devices include high precision during sowing and good productivity. Among the disadvantages, we should highlight the inability to use such seeders in areas with heavy clay soil.
Selection options
Many parents, faced with the need to purchase appropriate equipment, make standard mistakes. This is natural, since choosing a ballet barre is quite difficult. A person who is not professionally involved in dancing simply does not know how to do it “correctly.” And wherever you get the ballet barre intended for your child - you made it yourself, ordered it from a special workshop, or bought a ready-made one - you need to take into account the following recommendations.
First of all, the height of the beam. In order not to correct defects in posture and memorized movements later, remember: it should be at the level of the dancer’s lowest rib. The next requirement: no cheap stuff! Neither in the selection of materials, nor in the choice of a ready-made choreographic machine. Chinese versions usually contain easily evaporating inclusions that will simply poison your child in a confined space and under severe stress. “Environmental cleanliness” is the motto of caring parents!
Equally important: the ballet barre must include only wooden handrails. And at the same time not covered with varnish. A sweaty hand will slip on metal or varnished ones, which very often leads to injury.
Homemade seeder for walk-behind tractor: manufacturing features
In order to obtain a truly practical device after completing all the necessary procedures, you must:
- Two running wheels;
- Seed box;
- Screws and nails;
- Steel sheets;
- Rubber plates;
- Seeding roller;
- Self-tapping screws, tenons, steel angles;
- Two bearings and bracket.
The process itself is simple, but requires maximum concentration, so you need to pay attention to the following features:
- The seed box can be created from boards (wood) (thickness no more than 15 mm);
- To close them from the bottom, you can use steel overhead bottoms (1 mm thick);
- The walls themselves are connected using self-tapping screws, iron corners and spikes;
- Using nails, wooden linings (15 mm thick) are mounted on the bottom of the box walls;
- The process of placing the seeding roller in the walls and linings is accompanied by the creation of cutouts (semicircle shape). The fastening brackets are carefully screwed to the linings using screws;
- Special rubber plates, which are placed in inclined bottoms, help seeds fall out of the cells;
- The wheels of the created grain seeder for a walk-behind tractor (or corn) have 60 mm hubs;
- Special holes are created in the hubs (the diameter is similar to the seeding roller);
- The opener can be made from a sheet of iron and then attached to the brackets;
- You can adjust the depth at which the seeds will be placed by re-fastening the opener in special holes;
- A bracket is attached to the back wall of the seed box, serving as a “connecting link” between the device and the walk-behind tractor.
Sources
- https://MachinSpec.com/selskoxozyajstvennaya/kartofelesazhalka/samodelnaya-dlya-motobloka.html
- https://kalibrtractor.ru/spetstehnika/kartofelesazhalka-dlya-motobloka-svoimi-rukami.html
- https://tokar.guru/stanki-i-oborudovanie/motobloki/kartofelesazhalka-dlya-motobloka-izgotovlenie-svoimi-rukami.html
- https://dacktil.ru/motoblok/samodelnaya-kartofelesazhalka-dlya-motobloka.html
- https://www.samodelkindrug.ru/9007-2/
- https://pochini.guru/tehnika/izgotovlenie-kartofelesazhalki
- https://sotka.guru/dachnye-prisposobleniya/motobloki/izgotovlenie-kartofelesazhalki-dlya-motobloka-svoimi-rukami.html
[collapse]