How to make a tin scoop with your own hands
How to make a tin dustpan with your own hands, the necessary equipment for cleaning premises. An inexpensive homemade item will bring a lot of positive emotions while using it.
Consider a design consisting of only two parts:
• scoop bucket • handle
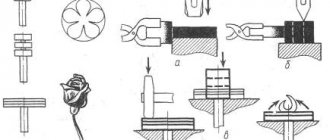
Let's cut out the figure shown in the figure from galvanized sheet steel GOST 14918-80
The dotted line shows the places of bends, their radii, directions and angles. Punch holes in the teeth or drill them with a drill. We bend the metal along the bend lines on the beam and beat it with a mallet (a flat wooden hammer) and get a scoop bucket.
If you make a false seam on the top edge of the scoop, from the side where the handle is attached (this will give the structure additional rigidity),
then on the development it is necessary to add an additional sector with a length of 200 (mm) and a width equal to the length of the seaming line.
In the figure, the additional sector is indicated in blue.
Let's make it from a wooden block measuring 25x25x200 (mm). Secure the block with its sharp edge facing up. We plan the sharp edge of a wooden block. Install the block with the next sharp edge facing up. In this way we process four edges and get a regular hexagon. Use sandpaper to smooth out the sharp edges where the hand is located. We will cover it with a protective decorative coating for wood.
Alternatively, you can use the handle from a blueberry harvester as a base.
1.
We use steel rivets to connect the edges obtained after bending.
2.
We screw the handle with self-tapping screws and a press washer to the curved triangles of the hexagon.
3.
Use sandpaper to smooth out the sharp edges on the metal.
Having an idea of how to make a tin scoop with your own hands, you can improvise and make a product of various shapes and sizes and for various purposes.
For large-sized products, it is necessary to replace the false seaming with a wire one. Seaming should be done on three sides of the bucket (on top of the ribs).
It is better to punch holes for rivets on a bent part.
DIY scoop – Home workshop
A useful household item made from something that has already served its useful life. The gardening season is approaching. Sowing seeds for pepper seedlings has already begun, and soon tomatoes will need to be sown. Soil in bags was purchased specially for this purpose, and containers were prepared in which this soil should be distributed.
Just pouring it straight from the bag is inconvenient, you can spill a lot, and it doesn’t hurt to mix the soil first, so I specially made a simple scoop from what I had on hand.
The dishwashing liquid (AOS) had just run out and the container was about to be thrown away, but the shape of the bottle seemed suitable for a scoop, and the color was so bright that the scoop wouldn’t get lost in the garden in the summer. The bottle has fairly thick walls, so the scoop will be rigid and strong enough to use for scooping up and pouring loose soil.
I trimmed it with a knife, trimmed it with scissors and the scoop is almost ready. All that remains is to attach the handle. First I wanted to make a wooden one - to cut some kind of stick from scraps from my carved crafts, but then I accidentally came across a thin metal tube in my workshop - the handle from an old mop.
It turned out that it was exactly the same diameter as the neck of the plastic bottle. I sawed off a piece of the required size with a metal hacksaw, inserted a wooden boss into one end for strength and so that the scoop could be secured to the handle with a couple of small nails.
I slightly bent the handle of the dustpan to make it easier to use, and put a plastic tip on the end of it, still from the same old mop. The whole job took no more than 5 minutes, and the result was a scoop quite suitable for working with seedlings.
If you don’t have just such an empty container on your household, it doesn’t matter: for this purpose you can use any other plastic shampoo bottles with flat shapes on both sides (not round), which can certainly be found in any home. They are, as a rule, also made of durable and thick plastic; their strength and rigidity will be sufficient to make a similar scoop. But their color is usually not so bright, which is why I chose the AOS bottle. www.instrument-mastera.ru
How to make a homemade scoop with your own hands
1. Select a canister suitable for the required purposes. For example, canisters with a flat side are more suitable for collecting waste. Moreover, you can choose canisters of different hardness, which will affect the ease of use of the scoop and its lifespan.
2. The only tool you need is a sharp knife.
3. We outline the cutting lines for the canister; this can be done with a permanent felt-tip pen or “mentally”.
4. We cut off the excess part of the canister with our own hands using a knife. The homemade scoop is ready. See photo. The price of a life hack product is zero :).
Canisters for liquid Canister cut Scoop - cement dispenser
In the same way, you can urgently make a water scoop with your own hands, for example, when you need to quickly remove water in the event of a water supply failure and save the neighbors below from leaks. The same scoop is useful for removing water from your watercraft (boat, cutter, yacht).
By recycling plastic containers in this way, we save nature and energy resources.
And a little about DIY inventions. It is not clear why container manufacturers still do not immediately make a notch on the canister for quick cutting and obtain a scoop at the output? This is a worthy competitive advantage.
How to make a tin dustpan with your own hands, the necessary equipment for cleaning premises.
What types of barbecues are there?
Simplified DIY metal barbecues have the shape of a rectangular body. Dimensions and photos of the devices are presented in this review. Coals are placed inside the container, which creates the necessary heat. There are a significant number of products that differ from standard models.
The following types of barbecues exist:
- stationary are massive structures that are placed on a rigid base. Metal devices can become a beautiful and stylish element. Such models are distinguished by their durability and variety;
- portable ones are characterized by compactness. They have less weight and are easy to transport by car. Portable products are made of thin metal, which quickly deforms;
Grillkoff Standard
- collapsible models are popular due to their quick conversion into a compact form. The collapsible design is characterized by the possibility of quick disassembly and assembly;
Brazier TONAR collapsible
- mobile options are large-sized structures, non-dismountable, equipped with wheels for more convenient movement around the territory. Do-it-yourself metal barbecues are decorated with stylish decorative details. The sizes and photos of these structures vary.
An electric unit equipped with a function for automatically moving skewers has certain properties. In such a device, food is fried evenly. All-electric models use hot coils instead of coals.
spit for barbecue
Metal structures have the following advantages:
- they can be easily transported, cleaned and disassembled;
- you can make the iron device yourself;
- The metal retains heat perfectly, which allows you to fry the meat evenly and quickly.
Other sizes are selected based on individual preferences:
- the width should correspond to the size of the skewers and be 8-10 cm smaller;
- the length depends on the amount of kebab that will be fried at the same time. The distance between the skewers should be 7-9 cm. Special recesses are made for the skewers along the long side;
- When choosing the size of a metal barbecue grill, you need to consider the height of the legs, which depends on individual preferences. For portable devices they are small. Welded structures have high legs;
- The thickness of the material depends on the type of structure. For a stationary device it can be 3 mm or more. And for a portable product, it is better to choose a material with a thickness of about 2 mm.
In some models, a second plate with longitudinal holes in the form of grates is placed on the bottom. This protects the metal at the bottom from burning out.
Step-by-step instructions and features of drawings of metal barbecues with dimensions
We build original barbecue devices with our own hands from metal. To do this, you will need dimensions with a roof and detailed photos of certain models. The collapsible model includes four legs, perforated walls and a bottom. Before installation, you should prepare a steel sheet, grinder, drill, fasteners and corners.
Standard assembly of the structure consists of separate stages:
DIY tin scoop drawings. How to make a tin scoop with your own hands
““Modeling an apron” 5th grade” - Artistic modeling. Applying the names of parts. Modeling the bib. Types of finishing. The process of creating clothes. Studying the material. Drawing of the base of the apron. Strap.
Familiarize yourself with artistic design techniques. Repetition of covered material. Pocket modeling. Modeling the bottom of the apron. Fixing the material. Safety rules when working with scissors.
Main stages of work
First of all, cut two square rods of the required length. After this, we make handles on a bending machine.
At the next stage, we clamp each workpiece in a vice in turn and twist the square into a torsion bar. You can also use a special machine for making torsion bars.
Next, we cut out a plate from sheet metal. According to the markings, we make cuts with a grinder. Then we bend the sides and weld the joints. As a result, we got an ash scoop.
With a poker everything is much simpler: we cut off a piece of metal strip, bend it and then weld it to the handle. Finished products need to be sanded and painted.
For details on how to make an ash scoop and a poker for servicing the stove, you can watch the video below. The review was created based on a video from the YouTube channel “Alexey Ayur”.
Source
How to make an iron scoop?
In every home and office, despite the presence of a vacuum cleaner, there is such a simple and practical thing - a dustpan. They use it every day, rarely thinking about how easy to use this particular type of product they once purchased is. But there are a lot of types of scoops, each with advantages, features or disadvantages.
Inventory for different purposes
Scoops are mainly considered as floor cleaning tools. But the range of their applications is much wider than the kitchen. Such an item is necessary for putting things in order on the street, in the yard, when sweeping away garbage from paths and very different surfaces in rooms.
Cleaning tools have their own special classification. The choice depends on what the cleaning location is (office, home, sidewalk, construction site, factory, dance floor). Pieces of construction waste, bottles, and bread crumbs require different devices for collecting them.
Currently, waste sweeping equipment is produced in a wide range, not only for floors. It is used for cleaning different surfaces: tables, sinks, cat litter.
The category of scoops includes shovels for collecting ash - fireplace and stove. They usually have expressive designs and high prices. A new scoop can not only be bought in a store, but also made to order.
Metal or plastic is used to make products. Blades made of galvanized iron and polypropylene differ in shape, weight, and strength.
Studying numerous products of this kind, you will notice that the prices for metal and plastic products are not too different from each other. Both categories have a fairly large price range: from several tens of rubles to several thousand.
The price is influenced not so much by the material as by the size of the product, its ergonomic characteristics, and design.
The main advantage of a metal dustpan is its durability. The cheapest one will cost about 40 rubles. Expensive ones can be bought for 1500 or more. The difference is as follows:
- quality of metal and painting;
- handle length;
- size;
- presence of a cover;
- completeness.
Scoops with a long handle are a professional tool. Galvanized durable metal does not deform upon impact. The thin edge on the collection side allows even road dust to be removed. The large volume for carrying waste makes cleaning easier and saves workers' effort when cleaning the premises in production.
Recommended: The Problem of the Great Pacific Garbage Patch
Large litter traps look like a box with a lid or a litter box. They are needed for cleaning large areas or clearing the area of leaves, cans, paper and other large debris.
The box itself can be placed on legs, wheels, or simply on the floor. Scoop containers resemble a cleaning machine; they have a special handle, like a stroller.
The price for such professional cleaning equipment varies - from 400 to 2000 rubles.
Very small metal scoops are recommended for removing construction waste; their strength is important. They will help with repairs and cleaning not only at a construction site, but also at home.
One of the important points when choosing is the length and material of the handle . It can be from 40 to 90 cm. Some people find it difficult to bend over when cleaning.
A more ergonomic option in this case is with a long handle. As a rule, some metal scoops are also made of metal. But if a person does not work with gloves, a wooden handle is more convenient.
Touching cold metal is unpleasant.
Design matters too. One option: a white metal scoop with a wooden handle and a rubberized insert at the end. It is very cute in shape.
It is also convenient to store - there is a special strap at the end of the handle, which means the scoop will fit neatly and compactly on the hook. True, its price is 1500 rubles.
High-quality metal, wood, paint, comfort, design - everything is included in the price.
You can buy about the same thing, but simpler and without tires, much cheaper - for 200 rubles. But it also has a guarantee of long service life even when removing construction waste.
There are many offers on the market in all price categories. Metal dustpans are produced by domestic and foreign enterprises.
At the same time, a set of a metal spatula and a brush is not as common as the same set made of plastic.
We recommend: Characteristics, structure and types of natural ecosystems
High quality plastic
When buying a plastic garbage scoop, you should choose an option that is not too fragile . It’s quite easy to drop such an object, get caught in something, or step on it when cleaning. A cracked handle or spatula will lead to the fact that this specimen itself will quickly end up in the trash.
Devices with a long soft plastic handle are very inconvenient. It does not allow you to maintain a static position necessary for sweeping crumbs from the floor. Much better is a plastic one, but with a long metal handle, protected on top by a plastic cover.
When purchasing, you must look at the edge adjacent to the floor. It must be smooth, without bends or defects, otherwise the debris will “run away” during cleaning.
The main advantage of plastic items is their lightness: they are easy to use and easy to wash. Simple plastic scoops with and without a rubber edge cost an average of 50 rubles. Now they are produced with a short and slightly elongated handle, which allows you to avoid bending too low.
Sets with a brush and long handles are much more expensive - from 200 to 1000 rubles. Some are even more expensive due to their improved design: they may have a special box, a closing lid, etc. The standard version (a brush with a long handle and a dustpan) will cost 250-900 rubles. The design of such a set is usually successful. The set is convenient to place on the floor due to the rigidity of the scoop.
New items for cleaning
There are interesting solutions that help remove debris not only from the floor. Indeed, dirt accumulates in different places in the house. A device in the form of a scoop can help in any situation and serve for the following actions:
- “savvy” for the table;
- for removing debris from the sink;
- for collecting small parts from the carpet;
- for collecting bulk products;
- for cat litter;
- to search for an object in small debris.
“Sweeps” from the table and kitchen surfaces, which are a set of a dustpan and a small brush, have already become commonplace. But a spatula for cleaning from the sink is an interesting know-how. This is a product with holes, reminiscent of a small colander. A very cheap and cute version of it (blue with wavy slits) can easily be found on sale.
We recommend: Features of outdoor plastic trash cans with a lid
There are dustpans with a brush for cleaning the car. An interesting device has also been invented for collecting small objects, for example, Lego pieces from the carpet. This is a real cleaning tool. There are also toy dustpans, they help teach young children the need to clean up the house.
A scoop for collecting bulk materials (coffee, flour, sugar) resembles a box with a handle. They collect various waste that cannot simply be swept away. It can be used not only by housewives, but also by professionals.
New design solutions help make cleaning easier. The Collapsible Household Dustpan prevents waste from spilling out as its scoop lifts up. Another new option with a long handle and a plastic bag holder is made specifically for collecting wet waste. A very useful, although not cheap, product.
A unique item is a scoop for sifting soil. It can be found in sand or other small waste, such as lost jewelry.
Home accessories design
In a well-designed kitchen, there are no small details. Details help create harmonious solutions.
For a room with elements of luxury in the decor, a golden-colored scoop with a relief ornament and a twisted handle . This item looks more like a cake spatula than a garbage disposal tool.
Nevertheless, there is also such a flirty copy on sale. Transparent scoops with ornaments will also fit into a classic kitchen.
Painted metal scoops with wooden handles are also made in a classic design. They are more formal, but their lines, quality paint and well-finished wood are aesthetically pleasing.
Plastic products delight the eye in a variety of shades. They can fit into the color scheme of any kitchen. There are transparent and decorated with a pattern, with a pattern and with a tile image. If you like ladybug, “Morocco”, “Palm”, “Baroque”, “Paisley” decor, then there is a product for every taste.
The type of scoop you have to work with every day is no small thing. But, of course, the functional qualities of cleaning items are in the foreground when choosing them.
DIY tin scoop drawings
› With your own hands
03.12.2019
How to make a tin dustpan with your own hands, the necessary equipment for cleaning premises. An inexpensive homemade item will bring a lot of positive emotions while using it.
Consider a design consisting of only two parts:
• scoop bucket • handle
Let's cut out the figure shown in the figure from galvanized sheet steel GOST 14918-80
The dotted line shows the places of bends, their radii, directions and angles. Punch holes in the teeth or drill them with a drill. We bend the metal along the bend lines on the beam and beat it with a mallet (a flat wooden hammer) and get a scoop bucket.
If you make a false seam on the top edge of the scoop, from the side where the handle is attached (this will give the structure additional rigidity),
then on the development it is necessary to add an additional sector with a length of 200 (mm) and a width equal to the length of the seaming line.
In the figure, the additional sector is indicated in blue.
Let's make it from a wooden block measuring 25x25x200 (mm). Secure the block with its sharp edge facing up. We plan the sharp edge of a wooden block. Install the block with the next sharp edge facing up. In this way we process four edges and get a regular hexagon. Use sandpaper to smooth out the sharp edges where the hand is located. We will cover it with a protective decorative coating for wood.
Alternatively, you can use the handle from a blueberry harvester as a base.
1.
We use steel rivets to connect the edges obtained after bending.
2.
We screw the handle with self-tapping screws and a press washer to the curved triangles of the hexagon.
3.
Use sandpaper to smooth out the sharp edges on the metal.
Having an idea of how to make a tin scoop with your own hands, you can improvise and make a product of various shapes and sizes and for various purposes.
For large-sized products, it is necessary to replace the false seaming with a wire one. Seaming should be done on three sides of the bucket (on top of the ribs).
It is better to punch holes for rivets on a bent part.
How to make a scoop with your own hands from tin or metal
An indispensable attribute for home use, in everyday life, even in the workplace is a scoop. The necessary item, a scoop, helps you get rid of trash in your home, work, streets, and just everywhere.
How to make a tin scoop?
Manufacturing stages:
- Take a steel rectangle measuring approximately 300x50 mm.
- Cut corners at approximately 45 degrees. Where the working part will be, the cut should be somewhat deeper.
- Having retreated about 10 mm from the pointed end, drill a hole with a diameter of 3 mm, after 25 mm - another one.
- At a distance of 150 mm from the end of the plate, a mark is made and the plate is bent at a right angle.
- Cut a steel circle about 400 mm long or any other convenient one. An M10 type thread is applied to one end to a depth of 10-15 mm, and two holes with a diameter of 3 mm are drilled at the other end: one at a distance of 12.5 mm from the edge, the second after another 25 mm.
- The metal plate is fixed with rivets on the circle.
- The handle is turned hollow, and a thread is applied inside to a depth of 10-15 mm. The handle is then screwed onto the threads on the circle.
Scoop capacity calculation
Since the shape of the scoop is an open half-cylinder, we will calculate the capacity of the scoop using the formula V = PRRL/2, where V is the volume of the scoop, P = 3.14, R is the radius of the back of the scoop, L is the length of the tray. Based on the fact that the workshop has a sheet metal blank measuring 21x22 cm, we will calculate the back radius. The length of the semicircle will be equal to C=2PR/2 or C=PR. Then R=С/П R=20/3.14=6.36 cm.
Round down and take R=6cm. With a radius of 6 cm, the width of the workpiece will be 3.14 × 6 = 18.84 cm. We round and accept a width of 19 cm. According to the requirements for the product, the volume of the scoop should be 800-1000 cubic cm.
We take the maximum value and find the length of the tray. L=2V/PRR. L=2×1000/3.14x6x6=17.69 cm. Since the thickness of the back is 1.6 cm, the total length will be 17.69+1.6=19.29 cm. Round to the nearest whole number and take the length equal to 19 cm.
Then the length of the tray will be 19-1.6=17.4 cm. We check the volume of the scoop:
V = 3.14 x 6 x 6 x 17.4/ 2 = 983.44 cc, which meets the product requirements.
Knowing the design and determining the materials of the product, we will present the data in the specification. (Table 1)
Table 1
| № | the name of detail | Col. | Material | Dimensions |
| 1 | Tray | 1 | Galvanized sheet | 190×190 |
| 2 | Back | 1 | Wood | R60 S16 |
| 3 | Pen | 1 | Wood | 0 32×110 |
| 4 | Nail | 5 | Steel | 1,5×25 |
| 5 | Nail | 1 | Steel | 1,5×35 |
Technology 5th grade
summary of other presentations
““Modeling an apron” 5th grade” - Artistic modeling. Applying the names of parts. Modeling the bib. Types of finishing. The process of creating clothes. Studying the material. Drawing of the base of the apron. Strap.
Familiarize yourself with artistic design techniques. Repetition of covered material. Pocket modeling. Modeling the bottom of the apron. Fixing the material.
Safety rules when working with scissors.
"Embroidery" 5th grade - Types of embroidery. Smooth surface. Five. Routing. History of embroidery. Embroidery. Physical education break. Your mood. Image. Magic chest. Get acquainted with the history of embroidery. Safety precautions. The young girl is not big, but she dresses the whole world. Counted embroidery. Safety precautions when working with an iron. Hand tools and materials.
“Natural fibers” - The finished fabric is dyed or printed with a design. Packaging in bales (pressing). The basis. Sewing materials science. In the spinning shop, threads are drawn and twisted from the roving. Carding shop.
Pre-cleaning. Classification of natural fibers. How is the fabric obtained? Tape shop. Get yarn. Edge. A thin thread obtained by twisting fibers. Dividing the fiber into narrow strips (roving).
Shuttle.
“Product manufacturing” - Selecting an option. Basics of design. Product.
Ash scoop and poker for stove maintenance
If you have a wood-burning stove in your house or dacha, then it must include accompanying accessories, namely an ash scoop and a poker.
These furnace maintenance items can be purchased. True, in some places they are unreasonably expensive. And the quality sometimes leaves much to be desired.
Therefore, if you have the necessary tools and materials, you can make an ash scoop and poker with your own hands.
We also recommend reading a review article on the topic: how to make a brick barbecue oven for a private home.
We will make a set for servicing the furnace from a square steel bar using the cold forging method.
To do this you will need a bending machine. If you don’t have a bending machine, you can make it yourself - read more here.
Grill scoop dimensions. How to make a tin scoop with your own hands
Manufacturing stages:
- Take a steel rectangle measuring approximately 300x50 mm.
- Cut corners at approximately 45 degrees. Where the working part will be, the cut should be somewhat deeper.
- Having retreated about 10 mm from the pointed end, drill a hole with a diameter of 3 mm, after 25 mm - another one.
- At a distance of 150 mm from the end of the plate, a mark is made and the plate is bent at a right angle.
- Cut a steel circle about 400 mm long or any other convenient one. An M10 type thread is applied to one end to a depth of 10-15 mm, and two holes with a diameter of 3 mm are drilled at the other end: one at a distance of 12.5 mm from the edge, the second after another 25 mm.
- The metal plate is fixed with rivets on the circle.
- The handle is turned hollow, and a thread is applied inside to a depth of 10-15 mm. The handle is then screwed onto the threads on the circle.