by Alexey | Crafts For Friends Gifts For Loved Ones Decor For Men For Women Workshop Cheap Accessories | Sunday, January 07, 2018
| Follow Make-Self.net on Facebook and be the first to read our articles. |
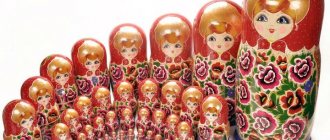
Coasters for cups are not only decorative, but also protect the table surface from scratches and stains left by the mugs. These coasters are usually made of wood, cork, marble or fabric . Although stores offer a huge selection of coasters for cups, you can also create your own unique options that will fit specifically into your interior. Take a look at 15 examples to inspire you.
Wooden stand with floral pattern
- Cut the wood into round pieces. We sand on both sides, giving the wood a smooth, flawless texture.
- Select a suitable photo and apply decoupage glue with a brush. The layer should be dense and even.
- Carefully coat the wooden base and level it with a paint roller.
- We carefully place the photograph on the tree. Leave the workpiece in this form until completely dry for 12 hours.
- After this time, remove the paper base of the photograph. To do this, cover the surface with a dampened (unnecessary) towel. After 3 minutes, remove it and begin to remove the paper. We do this with our hands, very carefully. Remove the remains with a sponge.
- Apply acrylic matte varnish to the developed image.
There is a second way, simpler and faster.
- We print the image on an inkjet printer. Apply to a moistened wooden piece.
- To better imprint the ink into the wood, press the image with a plastic spatula or card, creating light pressure.
- We remove the wax paper and see that the design remains on the wooden base.
- We smooth out part of the background by sanding it with sandpaper.
Stand made of wool balls
To make it you will need wooden blanks of any shape. We used round ones. Felt multi-colored balls of any color and glue. All this is sold in stores.
Place a ball on the glue in the middle of the wooden base. Around it we glue the rest of the felt products in the same way until we have completed the entire stand.
Note! This craft can be made without a wooden blank. Simply string the felt pieces onto a thread and fasten them together.
Stand made of tiles with photographs
We print out the photos and adjust them to fit the size of the 4x4 tile. In this case, the pictures should be slightly smaller so that when gluing, there will be a white border around the entire perimeter. Lubricate the tile with glue. We attach the image to the surface. We apply colorless varnish on top. After complete drying, apply a second layer of acrylic varnish. We attach felt legs to the underside of the stand with glue.
Stand with marble print
For production you will need:
- polymer clay;
- disposable plastic container;
- nail polish (gray);
- wooden skewers.
Procedure:
- We form a ball from polymer clay. Roll out into a layer. Place a cup on it and cut out a circle.
- Bake the preparations in the oven according to the recommendations on the package. We wait for it to cool completely.
- Fill a plastic container with water at room temperature. Add a couple of drops of nail polish. Stir with a wooden skewer.
- We put the polymer clay blank inside and immediately take it out, put it on the board and wait until it dries completely.
Advice! We recommend working with gloves to avoid getting your hands dirty with varnish.
Coasters made of twigs
We take coniferous branches and cut them 10 cm in length. Place tightly in a row. We intertwine the top and bottom with a strong rope to secure the stand.
Fabric coasters on wooden rings
- We tie the end of a knitted rope to a large wooden ring using a double knot. The short tail coming out of it does not need to be trimmed.
- We wrap a large ring in a circle in 3-4 layers.
- Then we feel for a smaller ring and wrap the yarn around it, holding it firmly in the center so that the figure does not move.
- We make sure that the thread has passed over the small ring, stretch it down to the large one, circle it and return up. We make 3-4 turns around the large ring and repeat the entire path in the same way.
- The last turn should coincide with the knot.
- We string a wooden bead onto the loop and secure it with a double knot.
Rope stand
To work you will need:
- rope rope;
- cardboard or foam base;
- glue gun
Procedure:
- Cut out a circle (10 cm in diameter) from cardboard or foam plastic.
- Hot glue a rope into the center and twist it in a circle until the end of the base of the stand.
- Glue the tip. We cut off all excess with a sharp knife.
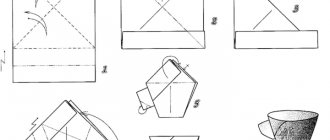
Photo stand
- We select photos, format them to the desired size, and print them on glossy paper.
- We put a lid with a wide neck on the photo. Draw a circle with a pencil. Cut it out.
- We glue pictures inside the lids.
- Mix the epoxy resin according to the instructions. Fill the lids halfway. Leave it for 3-5 hours to dry, remembering to cover it with a clean cloth to prevent dust from getting in.
Note! Bubbles that appear on the resin can be easily removed by heating, for example, using a flame from a lighter.
Cake tin stand
Don't rush to throw away your old baking pans. Even if they are rusty. These can make creative coasters for cups. Carefully apply spray paint on them. We are waiting for it to dry completely. Meanwhile, cut out a circle from thick cardboard; it should fit inside the mold. To make it even more interesting, we apply any design to it and cover it with varnish.
Pallet stand
We adjust the wooden planks to the required size. We lay them out at a distance from each other. We glue one strip along the edges. This way we make the required number of coasters for cups.
Advice! For greater reliability, the material can be coated with a protective varnish.