Small children experience the world by touch. Application helps to embody the images and objects seen on paper or using other materials. For small children, paper dishes using the appliqué technique will be a good opportunity to learn the names of objects. And adult children hone their skills of believability in crafts.
It can be made from paper, fabric and plasticine. Tableware applique is most often simple and almost all of its types are suitable for preschoolers and kindergarteners. And having supplemented the basic craft with his own elements, the child will take the craft to school.
One Sheet Model
An origami mug made of waterproof paper is suitable as a disposable tableware. This is a rather rare model; traditional cups are usually used, very simple and convenient. But if you want to show off your creativity, a mug is just what you need.
Finding waterproof paper is easy. For example, sheets for laser printing with special impregnation are suitable. You can apply a design on them that matches the theme of the party, not only with a printer, but also with an indelible marker. It is recommended to use the most inexpensive brand of paper - TerraSlate, which is durable with a small thickness and holds its shape well. There is also waterproof Kraft packaging.
Step-by-step instruction:
- We use an A4 sheet without cutting it. Fold the paper diagonally and open it. We bend the remaining part of the sheet in half like a mountain.
- Fold the right side of the square diagonally back.
- Rotate the workpiece 90° clockwise.
- We make folds in a “mountain” along the dotted lines.
- We bring the resulting side valves inward. Fold the left side in a zigzag pattern to form a handle. We bend its lower corner. We place the upper triangular valves inward, holding the cup together so that it does not fall apart.
- At the end, pressing on the bottom edge with your finger, we press it in, forming the bottom.
Three models with separate handle
It is more convenient to make an origami mug from two parts. If the handle is made separately, the container is more durable due to the closed contour. The most popular model of this type is based on a hexagon. For it you will need two squares of paper of the same color: 15x15 and 6x6 cm. The first is used to make a cup directly, and the second, a smaller size, is used to make a pen.
You can “revive” the cups by drawing funny faces on them. Let them create a good mood with their appearance.
A square-shaped mug is an unusual phenomenon, but in origami anything is possible. In addition, this model is best for storing office supplies; it is spacious and stable.
Step-by-step instruction:
- Divide a 6x6 cm square into 5 on one side and into 3 on the other. We cut out a blank for the handle for the mug. We divide the second square, measuring 15x15 cm, into 9 parts.
- Apply diagonal folds as shown in the diagram.
- We assemble the mug along the marked fold lines.
- We distribute the folds along the inner walls.
- We fix them with glue so that the product does not fall apart.
- We fold the blank for the handle in three.
- Glue both parts together.
For the third model of a mug, or rather, a cup, you will also need a sheet of 15x15 cm. The model is folded on the basis of a “Double Square”. The handle is made from a rectangle measuring 15x7.5 cm.
Floating money mug
A floating mug made of coins and coffee beans looks very stylish. The design technique of using an unfastening zipper will also add originality to your mug. Keys, bells, old small toys - everything can be used as decorative elements for your mug.
With coins you can also use imitation bills in which we pack candies.
The money tap is created using the same principle as the flying mug. Instead of a mug, we use a plastic tap, and a small chest or casket can replace the saucer. Coins will look more impressive if they are coated with gold spray paint or varnish.
Cash flows can be depicted using paper bills.
You can see how to create a money tap in the DIY gifts master class:
How is a ceramic mug made? Do you want to know the whole process?
First, the raw material is fed into a grinder and ground into a finer, more manageable clay powder. The clay powder is mixed with quartz feldspar and water in a mixer for 15 hours.
The refining process continues as the clay slurry is fed into molding tubes and cast into clay logs, which are cut into specific portions. Portioned game discs are placed in a disposable mold and molded to the shape of your mug.
Once dry, the cup is removed from the mold by hand and is ready for the next step. We work with applications, the handles for the manure are designed similar to the body of the mug.
Once they have dried and been removed from their molds, the handles are dipped into a mixture of clay and water, which acts as a glue. It's time to work on the details.
The technician carefully removes any excess clay or roughness, rinses off any dust or debris, and gives the mug a perfectly smooth finish.
It's time for the mugs to get their own color and signature ceramic glaze. Some mugs are dipped in a single color glaze with the edges lined and ready for the next step. Other mugs require a little more flair. For example, a specially painted rim or a different color inside and outside.
All mugs are hand dipped and stained to ensure a quality finish every time. Set the mugs aside for at least 12 hours to dry completely before moving to the oven. It's time to bake them to harden them forever.
Rows of mugs are placed on a conveyor belt that carries them through the oven and out the other side. Oven temperature is about 2200 degrees Fahrenheit.
Great news, your mugs are ready and they look great. Shipping equipment packs them in plastic boxes and ships them to happy customers around the world.
Some mugs will remain empty, while others will have a logo or text printed on them, turning them into a branded superstart. So the next time you enjoy a cup of coffee, tea or cocoa, take a moment to look down and appreciate all the hard work and craftsmanship that went into your favorite mug.
Below is the entire process of making a glass mug. If you want to know more about it, such as quality and price. Feel free to contact me.
Source
Three ways to make a cup
First
Roll a ball with a diameter of 13-15 cm from a piece of clay. Make a depression in the center with your finger. Then, pressing the center with your thumbs, use the rest to rotate the clay, giving it the shape of a hemisphere. Such a cup is sculpted from the bottom, gradually moving towards the top. Fingers and the surface of the product must be wet at all times. Level the surface of the almost finished cup with a spatula or small spatula.
Form a handle, attach it to the side surface of the cup and smooth out the joint. To decorate your almost finished masterpiece, use multi-colored polymer clay. Fashioned flowers, butterflies, beetles, cute animals will add personality and charm to the product. The cup dries within a day. If you decide to leave its surface flat, you can paint it after drying.
Second
A circle is cut out of thick cardboard. Its diameter is 20-23 cm. Inside the large circle, draw and cut out a small one. This is the future bottom of our cup. You will also need a strip 4 cm high and about 40 cm long.
We roll out the clay on the cloth, turning it over like dough from one side to the other. A round template is applied to a layer 3-4 mm thick and both circles are cut out. A larger circle is attached to the small bottom, the sides of which, during the attachment process, are slightly raised upward, forming a bowl. A layer cut out using a rectangular template is attached to the top of the hemisphere. Smooth out any unevenness with your fingers, lightly moistening the product with water. To smooth out some of the bumps, we stroke the future cup with a wooden spatula, rotating it in our hands. The handle for the cup is made and attached in the same way as for the mug.
Last
The third method is the easiest and children will really like it. Show them how to make a clay cup by snail-rolling strips. Roll out a long rope about 1 cm thick and roll it up on the table like a snail as tightly as possible. This will be the bottom of the cup, its size is 5-7 cm. With wet hands, smooth the snail so that there are no stripes left, to a smooth surface.
Next, we roll out a few more sausages of the same thickness and, placing it on the bottom, wind it in a spiral, forming the walls of the cup. Having laid the tourniquet tightly, we level the walls from the inside and outside with wet fingers. The same wooden spatula will help give the surface an ideal shape. We attach the handle, and - oops! The cup is ready!
If you don't attach a handle, you'll end up with a bowl. Its sides will be more open than in a cup.
Tea cup for postcard
When you want to invite someone for a “cup of tea,” the best way to say so is with a postcard. This creative solution is suitable for both a party and an anniversary celebration. Of course, a cup or mug must be two-dimensional, and such a model is also in the arsenal of origamists.
Step-by-step instruction:
- You will need a square sheet of paper 15x15 cm. We start from the inside out. Fold the square along the vertical axis.
- Let's reveal.
- We bend the right and left edges towards the center.
- We get the basic shape of the “Door”.
- Fold the bottom corners towards the middle.
- A triangle is formed.
- We bend the lower part “mountain” along the dotted line.
- Like this.
- Bend the bottom corners again.
- Turn the workpiece over.
- A small rhombus is visible at the bottom of the product.
- Let's open it from the inside.
- Stretch the edges to the sides.
- And flatten it. A bottom is formed.
- You can leave the cup in this form, stick it on the base, and then finish drawing the handle.
- But using the appliqué technique it will be more effective.
It's time to issue an invitation and send it to the recipient:
How to make an origami paper cup
Any paper is suitable for assembly, preferably thick paper. Colored cups with patterns look good. Take the one that happens to be at hand.
Fold the square sheet diagonally, with the colored side facing out.
Bend one end of the resulting triangle down so that the top side reaches the bottom border. Return the sheet to its original position.
Fold the right end of the triangle to the left so that its edge touches the beginning of the fold made in the previous step. It looks like this.
Turn the workpiece over. Repeat the last fold.
Two corners have formed in the upper part. Point one down, securing it on the outside.
Turn the glass over. Fold the second corner down. Open up the inside of the cup. Ready! Now it can be used for its intended purpose. As you can see, everything is simple and clear.
Accordion postcard (diagrams and templates)
Another type of voluminous postcard is the accordion postcard.
To create such a postcard you will need: thick scrap paper for the base frame, a die-cut scrap knife or stationery knife, transparent plastic for the internal parts, stamens, semi-pearls and other materials for decoration.
We take the template and make blanks for the postcard. We cut out 8 blanks for the base frame from thick scrap paper and 4 from transparent plastic.
Thick paper blank...
...and transparent plastic
We glue the plastic blanks to a paper base. To make the card fold, we make a double crease of about 2 mm on the outer folds. We connect the resulting 4 parts - glue them with glue or use 2-sided tape. Glue the remaining 4 frames on the opposite side.
Now you can begin the most creative part of creating a card - decorating it! Glue fluttering butterflies and twisted greenery to the plastic. The postcard is ready!
Original master class
See below for various templates for making the bases of such postcards:
Using your imagination, you can create all sorts of variants of such folding postcards. For example, with a predominance of children's themes. The number of components may vary.
Birds, flowers, butterflies always look very light and airy on postcards!
Preparation of the future fountain
The first step is to cut the bottle into a couple of long fragments.
Next, each person in turn is brought to the gas burner and kept close to it so that the plastic part begins to deform.
The result should be a smooth and sinuous shape. The top and bottom of these plastic elements should be made flat so that they can fit tightly to the dishes (saucer and cup).
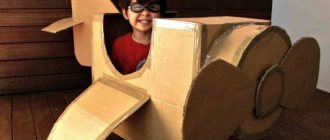
DIY cardboard cup
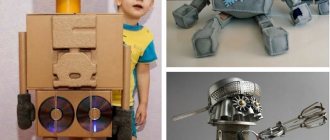
I continue to introduce you to techniques with which you can make interesting three-dimensional crafts from paper and cardboard.
In the old days, doll sets were made from different materials - even porcelain. Of course, they were a single copy, incredibly expensive and not accessible to everyone. The daughters of kings and emperors played with them. But all the girls, at all times, played with dolls and gave them tea. Any more or less suitable utensil could serve as a cup.
Modern industry produces a wide variety of doll tea and coffee sets. But standard plastic cannot satisfy the craving of little ladies for tea with their dolls or girlfriends. Children love variety. No matter how wonderful the factory set is, cups - DIY cardboard crafts will be beyond competition. In addition, such a wonderful children's craft made from paper or cardboard will be a wonderful gift for mothers and grandmothers for any occasion. Cups can be small or large, they can be made from paper, cardboard and papier-mâché and decorated in any way possible.
Volumetric postcards using scrapbooking technique
Scrapbooking is the art of decorating photo albums, but its techniques are also very popular when creating cards.
Using Kirigami elements, using the Scrapbooking technique, you can also make a three-dimensional postcard with your own hands. We cut out and fold “steps” from scrap paper for the “pop-up” candles on the second half of the card. Glue the candles and glue the resulting blank onto the base of the card.
You can make a simple but original greeting card from scrap or colored paper. We cut out the candle flame and decorate it with sparkles, then glue it to 2-sided tape. We glue the second part of the candle with glue. The congratulation itself can be tied or glued to an elegant satin ribbon. Simple and original!
A postcard made from paper of a different texture will look completely different)
By placing each element of the card on top of each other, again using double-sided tape, you can create such a voluminous, bright cake!
Let's take a look at Tatyana Sadomskaya's master class on how to easily make a voluminous, delicate postcard using the Scrapbooking technique using ready-made pictures.
To create such a postcard, Tatyana used:
- scrap set ScrapBerry's “Favorite Pet”
- scissors
- thick cardboard
It is better to use scrap paper with a large number of miniatures that can be cut from a single sheet, as well as colored stamp prints and chipboards.
Before creating a postcard, you need to decide on its plot in order to choose the color of the base of the postcard and its “characters”. In this case, the basis is paper with a calm beige print, and the components of the plot are cut out of it: kittens, a puppy, flowers, a crown on a pillow.
In our case, we put the larger kitten in the foreground, this will enhance the feeling that it is closer than kittens with a dog.
We make the necessary cuts. The result is a design with “steps”. We glue leaves of arbitrary size onto the resulting “steps”. These leaves imitate a wooden fence.
Next, we gradually glue our elements, starting from near to far. We start from the foreground and glue the kitten. We glue it onto beer cardboard, because it gives additional volume and casts a shadow. Using the same principle, you can glue several other elements, for example, balls and flowers. When the inside is ready, glue it to the base of the card.
We also decorate the outside of the card with an elegant floral print.
For greater elegance, decorate the elements of the card with sparkles (use glitter).
Original master class.
For inspiration, check out this masterpiece 3D cake card:
Unusual grains
This option will fit perfectly into the interior of the kitchen room. You can use grains, nuts, etc. as decoration. It would be ideal to use coffee beans, which will inspire you to take a break for a cup of this aromatic drink.
Those who love this drink should make a cup in an original design - in the form of a Turk.
Variety of crafts
Please note that the mug can be made in absolutely any color, size and, moreover, from different base materials.
With younger children, it is best to use paper, but if the craft is being done by schoolchildren, then a plastic bottle is quite suitable as the main material.
How to make a decorative paper mug?
At all times, gifts that were made by hand were considered the best. Even if everything doesn’t always turn out smoothly and beautifully the first time, you shouldn’t despair, because you can always redo it, the main thing is to have the desire for this.
Gifts made with your own hands are filled with love and the desire to make a pleasant surprise; naturally, it will be appreciated.
If you show your imagination and make an effort, then a rather banal gift in the shape of a mug can be given an interesting and original look.
Before you start making a decorative paper mug, you need to first prepare the necessary materials and tools:
- a thick sheet of cardboard in a pre-selected color scheme, preferably plain;
- a sheet of decorative paper of the corresponding color;
- 3 brads;
- a ribbon for decoration with a satin base, or any other decorative element;
- ruler;
- ball pen;
- paper scissors;
- curly scissors;
- glue stick.
Let's look at the process of making a decorative mug:
- First, you need to draw a rectangle on colored cardboard, which has the appropriate dimensions: length - 27 cm, width - 13 cm. After this, it should be cut out.
- On the wrong side of the cut-out figure, every 3 cm, use a ballpoint pen to draw transverse lines that indicate fold lines.
- Step back 9 cm from the top edge of the finished piece and draw a longitudinal line.
- After this, you should bend the colored cardboard along the marked lines.
- In the lower part of the rectangle, on the smaller side, you need to make cuts that should reach the horizontal line.
- Now on decorative paper you need to draw eight identical rectangles that correspond to the following dimensions: length - 8.5 cm, width - 2.5 cm. Cut them out.
- Cover each edge of the future mug with these rectangles.
- Glue the extreme ribs of the product being manufactured together so that you form a cylinder.
- To decorate the bottom of the mug, you need to fold and glue the protruding “tails” opposite each other.
- Now let's move on to making the handle. To do this, you can use the remains of cardboard, from which you should cut a strip of 14 by 2.5 cm. You can trim the edge of the handle with curly scissors - this way it will be designed in a wavy version.
- Using brads, you can attach a handle to our product. It is best to attach to the densest segment. When gluing the cup together, the double edge serves as such a place.
- You need to tie a bow from a satin ribbon, which should also be attached to the mug using brads. If desired, you can add other decorative elements.
The decorative paper mug is ready!
flying cup
A flying cup or mug with different designs can be a wonderful gift for family, friends and acquaintances who are already difficult to surprise with something.
The original idea and implementation will definitely make you think about how the cup floats in the air? The finished flying cup (a master class of various manufacturing and design options is presented in the article) will bring only positive emotions to both the giver and the recipient.
Flower topiary
Topiary is a small decorative item created from scrap materials: flowers, pebbles, shells, etc. A floating decorative cup would look appropriate in the dining room or kitchen. In this lesson we will learn how to make a topiary with a flying cup with our own hands. We will need the following materials and tools:
- cup and saucer;
- wire;
- hot glue;
- small artificial flowers;
- masking tape;
- pliers;
- scissors.
1. Prepare the cup and saucer: degrease them and wipe them dry.
2. Bend the thick wire with pliers, creating a Z-shape.
3. Align the bottom and top of the wire so that it fits snugly against the saucer and the wall of the cup.
4. Using a glue gun, first glue the wire to the saucer. We don’t skimp on consumables: the glue must completely cover the wire. Hold the wire in the desired position until the glue hardens.
5. Glue the wire to the walls of the cup in the same way. Be sure to wait until the glue has completely hardened: the wire should not lag behind the walls.
7. Glue artificial leaves to the bottom in random order.
8. Glue the largest flowers to the bottom of the cup and to the saucer.
9. We create a “stream” from smaller flowers and leaves, gluing both in random order.
It turns out this decorative cup with flowers.
We use kanzashi
To decorate a floating cup, you can also use flowers made using the kanzashi technique. It turns out very original.
- thin floral felt;
- sponge;
- aluminum fork;
- coffee or tea pair;
- lighter or soldering iron;
- tweezers for kanzashi;
- stamens and small beads;
- beads, decorative butterfly;
- multi-colored ribbons 5 cm wide;
- glue gun
1. From thin felt or, if there is none, then from ribbon, cut out leaves.
2. Cut the ribbon for the flower. One will need 5 pieces. We collect the sharp petal, but do not rush to solder it. We draw along the line with a soldering iron or lighter.
3. The result is a petal like this. We make the required amount from multi-colored ribbons.
4. We collect the centers of flowers from beads with stamens.
5. Glue the fork with hot glue, connecting it to the coffee cup and saucer.
6. After 10 minutes, apply glue again.
7. We use any heavy object as a load. We knitted old door hinges.
9. We collect flowers by gluing petal by petal to the stamen.
10. Decorate the cup. To begin with, we cover the cup and saucer with leaves, and then gradually cover the entire surface of the saucer, cup and fork with fabric flowers.
It turns out to be such a flying cup.
Money cup in feng shui style
The traditional money tree will compete with a flying cup of money made according to Feng Shui.
To create it you will need:
- coffee pair;
- glue gun;
- coins;
- wire;
- imitation banknotes;
- napkins;
- scotch;
- aluminum wire;
- clear nail polish.
1. Bend the wire and glue it in exactly the same way as in the previous microns.
2. To give the wire the appearance of a waterfall jet, wrap it in napkins.
3. Secure with transparent tape.
4. We begin pasting with coins, moving from bottom to top, as in the photo.
5. To make the craft look neat, first glue the side coins on top.
6. The result is a durable, rather weighty structure.
7. Roll the imitation real banknotes into a tube, fix them with glue and add them to the composition.
8. To prevent coins from darkening over time in the open air, we cover the money stream with transparent varnish.
Try making your first flying cup using our lessons: we are sure that soon all your friends will have different versions of such gifts made by your own hands in their home!
103583
How to make a cup out of cardboard?
By using cardboard, you can create a more durable cup. To make such a product we will need the following materials and tools:
- Paper or cardboard. As a starting material, you can use packaging boxes for products for which cardboard of various densities and qualities is used.
- Paper cutting scissors and matching knife.
- Glue gun or regular glue.
- Paper tape.
- Newspapers for papier-mâché.
- Napkins for decoupage.
- Brushes and paints.
- A cup template that needs to be downloaded and then printed on a printer.
Let's look at the step-by-step process of how to make a cardboard cup with your own hands:
- First, transfer the contours of the cup from the prepared template to the appropriate cardboard, and use a knife to cut out the blank.
- After this, you need to glue the edges of the sections of the cup together, then glue the bottom and glue the lower part of the base, the so-called rim, to it.
Important! To prevent gaps that may form in the cup at the gluing points, it is necessary to use paper tape on both sides of the product.
They need to glue the base and press it well.
In principle, our product is ready. But if you want to create a beautiful thing, then you need extra time to design the decorative cup in an original way:
- It is necessary to prepare a certain mass of papier-mâché from newspapers and glue. Step by step you need to paste over our product both outside and inside. We choose the thickness of the cup - this plays a role in applying the number of layers to our original thing.
- When the papier-mâché is completely dry, you can begin decorating our product. It all depends on your creativity and creative ideas. There are many interesting design techniques: you can paste the cup with unusual pictures from glossy magazines, apply the decoupage technique using a creative napkin, apply images made with paints in the form of still lifes and landscapes, or you can simply decorate it with rhinestones or an unusually beautiful tinted fabric.
- The handle of the cup should also be decorated accordingly, only after that it can be glued to our product.
At the end of the process, the product should be varnished.
If desired, you can make several of these cups.
Moreover, each personal gift should be decorated in a special way and not be repeated.
Important points in creating crafts
When decorating the cup, try to use a minimal amount of water. Otherwise, pay attention to the photo of the mug craft and you will see that it can simply get wet.
If you are in the mood, then decoration can take on the most unexpected scale. After the mug is decorated, you need to wait for it to dry completely and then attach the handle to the side.
If you don’t want to waste time on decorating with paints, then you can buy cardboard in the color you like and use decorative tape for gluing.
A homemade mug will no longer need any additional decor, and the process of creating it will take much less time.
Draw flowers
It is customary for ladies to give flowers, and if they are also painted on a cup, then such a gift is doubly valuable! We draw several vertical lines of different heights - draw them from bottom to top.
We paint the entire mug with lines. Draw flowers on the resulting stems. Easy, simple, but most importantly – strong!
DIY soft sock toy
We drink coffee or tea and have fun!
Thank you for watching our work - we are sure that your results will be even more interesting. You can write your name on the cup, draw a sun or a kitten. You can draw one letter on each of the mugs from a large set and lay out words from them. You can decorate the dishes with aphorisms and slogans, or write a mood or motto on each device from the set, and then those around you will immediately know whether they should bother you today. The space of imagination is limitless!
Drawing on a cup is the most fun creativity ever!