Not only girls, but also boys love to do handicrafts and creativity. For the latter, it is much more difficult to choose a craft option that will really captivate them. In addition to the “classic” boys’ cars, you can suggest making an original robot with your own hands from scrap materials – paper, cardboard, plastic bottles or bottles. And girls who are passionate about technology can make an “iron man” from felt.
Lighter options
For very busy parents, you need a craft that does not require a lot of time and material to create. With a minimum of material costs, but which will not be ashamed to show. It is desirable that a simple robot craft for kindergarten look like serious work created with dedication.
You can take regular packaging cardboard, any box will do for this, and make a large craft out of it.
The arms and legs are attached separately, by interlocking the puzzles, this is necessary so that the product has volume and not a flat shape. After that, all that remains is to paint the model with gouache and you will get a very original robot.
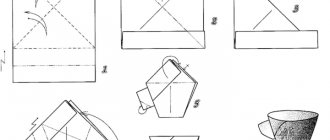
Origami transforming cube
To make a transforming cube with your own hands in origami style
, you need to remember how modules are made. It is thanks to the modules that the cube can be held together without the help of glue, and the toy itself will turn out to be very interesting and unusual. Let's move on in more detail to the question of how to make an origami transforming cube out of paper.
Thus, a module was created. For a cube of such modules you will need six pieces. All six modules must be done in the same way
Please note that each of them has pockets into which you will need to place other modules. Now all that remains is to connect all the origami parts to create a figure
Do it according to the scheme so as not to make mistakes:
The transforming origami cube is ready. To make your craft more beautiful, you can make each edge a different color or texture.
In addition to square paper crafts, you can also make such a magical plant as a rose
. Many people wonder how to make a cube rose out of paper if the flower has round delicate petals. Everything is very simple if you know the diagram or see the template in front of you. So, to make a rose you only need colored paper. You can choose the color of the rose yourself; the example shows a pink rose. First you need to prepare pink and green paper. You need three pink and three green squares measuring 15x15 cm.
We work with green paper in the same way as we did with pink sheets
It is important not to make a mistake in the last step, otherwise the cube will turn out incorrect
It's time to put our beautiful plant together. And we will start with green modules, in which one corner is sharper and larger than the other. It is with a sharp and large corner that you need to connect one module to another, putting the triangle into the pocket. The end result should be a small cube.
Now let's move on to the flower bud
and as you noticed, all the modules are symmetrical to each other, so we can insert them with either side into the module pocket
It is important to remember that you need to insert the corners into the pocket so that the bends of the sheet are directed towards the middle. We put the long corners of the pink one into the pockets of the green module
Now we straighten the green module and carefully lower the corners of the bud.
Thus, we got a beautiful origami-style rose. If you suddenly want to fold it back into a cube, then do everything exactly the opposite and you will get a green-pink cube.
In addition to such crafts, you can make many other interesting figures that came to us from Japan, where our ancestors came up with ways to create cubes and transformers. By the way, a mask for a transformer
You can not only draw, but also do them separately, attaching them to a toy.
Attention, TODAY only!
Due to their dress code, costume parties (Halloween, etc.) require first-class costumes. In addition, at such holidays there are usually competitions for the best, most detailed superhero costume. Who wouldn’t be pleased to take part in such a competition dressed as their favorite hero?
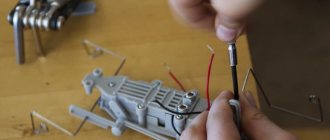
I present to your attention an article on how to do
DIY Optimus Prime costume
.
Necessary materials:
- Hot glue gun + rods for it;
- Adhesive tape (red, gray);
- Masking tape;
- Rulers of different sizes;
- Stationery knife;
- Scissors;
- Aerosol paints (primer, red, blue, white and silver);
- 4 mini flashlights;
- Helmet;
- Velcro;
- Cardboard or foam board;
- 2 empty tin cans;
- 2 plastic “visors” (for windshields);
- Hockey gloves;
- PVC pipes.
Another interesting option
An egg carton can be turned into a real masterpiece. To create a composition, it is better to take two, of different sizes. One will be the base of the body, and the second will be the head of the robot.
We recommend reading:
Craft bullfinch: detailed description of how to make a bird with your own hands (115 photos)- Crafts from vegetables: 100 photos of the best crafts for children and a review of recipes for adults
- Craft ship: 120 photos, templates, drawings and step-by-step instructions on how to make a boat
To paint the craft evenly, use a foam sponge and dilute the gouache with water, the paint will lie evenly and there will be no smudges. Blot the egg cassette thoroughly so that there are no unpainted cracks left.
Unforgettable R2-D2
Another wonderful robot is equally popular. Meet R2-D2 from the fantastic Star Wars saga. This model is more difficult to manufacture.
The diagram is attached:
We do it beautifully
- Wrap the boxes in white paper to hide anything unnecessary. However, you can choose the background yourself: gray, green, blue will look even more impressive.
- Cut out eyes and other small elements from colored paper of a different shade.
- Use toilet paper rolls to create arms and legs. To prevent them from breaking, we fill them with newspaper. With its help, it will be very easy to attach individual elements to each other.
- The head is attached with glue.
Application
Preschoolers enjoy working with paper. This children's craft robot will decorate the wall in your child's room. For the applique you will need colored paper, scissors, a simple pencil, and glue.
The child must prepare geometric shapes and then glue them to a sheet of cardboard. Then you can fill in the missing elements with a marker.
Another option
Making typical modifications is not always preferable.
You can diversify the work, create a robot using additional materials. Make the eyes from a foam ball, cutting it in half, everything else is paper, cardboard and paints. It is not necessary to make it full-length; the arms and legs can be soft, so the robot will be presented in a sitting position.
Cubic rose
In addition to square paper crafts, you can also make such a magical plant as a rose. Many people wonder how to make a cube rose out of paper if the flower has round delicate petals. Everything is very simple if you know the diagram or see the template in front of you. So, to make a rose you only need colored paper. You can choose the color of the rose yourself; the example shows a pink rose. First you need to prepare pink and green paper. You need three pink and three green squares measuring 15x15 cm.
- First, take the first pink sheet and fold it in half.
- Now we unfold the sheet and do the same with both resulting halves.
- Unfold the pink sheet again, turn it over to the other side and fold the corners towards the middle.
- Fold the paper along the curves.
- Then we put both sides into the pockets. We got an oblong diamond with corners.
- Now these corners need to be combined. We do the same with two pink sheets.
We work with green paper in the same way as we did with pink sheets
It is important not to make a mistake in the last step, otherwise the cube will turn out incorrect
It's time to put our beautiful plant together. And we will start with green modules, in which one corner is sharper and larger than the other. It is with a sharp and large corner that you need to connect one module to another, putting the triangle into the pocket. The end result should be a small cube.
Now let's move on to the flower bud and, as you noticed, all the modules are symmetrical to each other, so we can insert them with either side into the module pocket
It is important to remember that you need to insert the corners into the pocket so that the bends of the sheet are directed towards the middle. We put the long corners of the pink one into the pockets of the green module
Now we straighten the green module and carefully lower the corners of the bud.
Thus, we got a beautiful origami-style rose. If you suddenly want to fold it back into a cube, then do everything exactly the opposite and you will get a green-pink cube.
In addition to such crafts, you can make many other interesting figures that came to us from Japan, where our ancestors came up with ways to create cubes and transformers. By the way, you can not only draw a mask for a transformer, but also make it separately, attaching them to a toy.
Soft copy
An equally interesting model can be constructed from felt:
- Body base – 5 cm;
- Robot head – 4 cm;
- Legs – 2.5 cm;
- Handles – 2 cm.
To create each square, you need to prepare six layouts.
- Stitched in any shape. Large stitches will add drama.
- The finished parts are stuffed with filler, after which they are glued or sewn.
- By choosing the color of the material, you can indicate the floor; additional elements are also possible. For a robot boy, you can attach a tie or bow tie, and for a girl, an elegant bow is suitable.
- The eyes are buttons.
Origami transforming cube
To make a transforming cube with your own hands in origami style, you need to remember how modules are made. It is thanks to the modules that the cube can be held together without the help of glue, and the toy itself will turn out to be very interesting and unusual. Let's move on in more detail to the question of how to make an origami transforming cube out of paper.
- First you need to fold a square sheet in half, then bend the edges towards the middle.
- Then bend the lower left and upper right corners inside the sheet.
- Now fold the sheet in half and put the corners that remain unbent into the pockets of the right and left corners.
- Next, turn the sheet over and bend the resulting corners to the vertical corners.
Thus, a module was created. For a cube of such modules you will need six pieces. All six modules must be done in the same way
Please note that each of them has pockets into which you will need to place other modules. Now all that remains is to connect all the origami parts to create a figure
Do it according to the scheme so as not to make mistakes:
Popular articles Heartfelt congratulations on the Victory Day on May 9
The transforming origami cube is ready. To make your craft more beautiful, you can make each edge a different color or texture.
From matchboxes
The originality of the idea is that the robot can be a transformer. The number of boxes is not limited, everything is up to your imagination.
- Boxes, according to preference, are covered with colored paper
- The parts are connected to each other with paper clips or, for reliability, with glue.
DIY robot craft is an entertaining and creative activity for children of all ages.
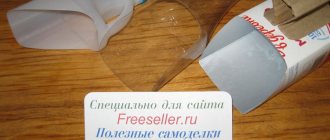
Robot made from plastic caps
If you have plastic bottle caps on hand, then you don’t need to look for another material. They will make a wonderful “iron” transforming man for a competition, exhibition in kindergarten or primary school.
The number of blanks depends on the size of the craft. As a rule, 22-30 pieces are enough. They can be the same color or multi-colored. The main thing is the same size.
You need to prepare them first - make holes in them with your own hands using an awl heated over an open fire. This should be done by adults.
We pierce 17 pieces in the center, 5 pieces on the sides and in the center. We do this so that the side holes are exactly opposite each other.
You can start assembling individual parts using a regular tailor's elastic band, threading it through the holes in the lids and pulling the figurine elements tightly together.
This can be done conveniently using a crochet hook or wire. A knot at the end of the elastic will help secure each detail. When the parts are ready, we put them together.
Photo diy robot
0
2
Paper transformer
Transformer Optimus Prime will not leave a child of any age indifferent. Diagram below:
How to assemble the parts:
- Glue the torso to the chest.
- Connect your shoulders, chest and neck with elastic bands.
- Glue the head to the neck.
- Connect the tops of your legs, calves, and feet with elastic bands.
- Glue the wheels to the calves.
- Connect the upper legs and torso.
- Glue the wheels to the hips and the thighs to the tops of the legs.
- Connect the hand pieces with an elastic band.
- Connect the shoulders, shoulder pads and forearms with an elastic band.
- Glue the exhaust pipes to the shoulder pads.
We make various robots with our own hands in step-by-step master classes
Crochet robot Bibi.
One of the cutest and funniest characters is the robot Bibi from everyone’s favorite “Smeshariki”.
It’s easy to crochet a round figure using leftover multi-colored yarn. Necessary materials:
- acrylic or cotton yarn in yellow and turquoise, as well as some black, brown, green and red threads;
- a hook of a suitable size;
- padding polyester;
- cardboard;
- wire;
- needle;
- scissors.
Operating procedure.
Using yellow threads, we cast on two loops and close them into a ring, tying it with 6 single crochets. In the second row we knit 12 single crochets, then in each row we evenly add 6 stitches. From rows 9 to 16 we knit without increases; each row should have 48 stitches. From the 17th row we decrease the loops in the reverse order until we get a round piece. As you knit, fill the part with padding polyester.
Let's start knitting the body. For one part, we cast on two air loops with turquoise threads, close them into a ring and tie it with 6 single crochets. In the second row we knit 12 single crochets. In the third and subsequent rows we make uniform increases of 6 columns, alternating classic and embossed columns. In the 9th row we knit the last increase, you should get 54 single crochets. We knit the next row without increasing, then we tie the workpiece with half-columns, inserting the hook behind the back wall of the loops. In the 12th row we alternate 2 single crochets, a bump of 4 unfinished double crochets and 8 single crochets. Then, in the 13th row, we tie the resulting hemisphere with single crochets and break the thread. We knit the second part in the same way. You can use other body knitting patterns.
We assemble the yellow base and body parts, leaving space for the eyes.
We knit randomly shaped handles from turquoise threads and attach them to the body. Then we knit wheels, an antenna, decorative keys and light bulbs, and eyes from scraps of thread. We sew the details to the figure, embroider the pupils and highlights on the eyes. First insert the wire into the antenna and twist it into a spiral. We cut the threads and carefully thread them. Robot Bibi is ready! Soft toy made of felt.
Who said that a robot must be made of metal and plastic or, at worst, cardboard? A funny robot girl made of felt can easily replace a soft toy or a miniature amigurumi figurine.
To make a small amigurumi-style toy from soft felt or fleece, cut out square pieces of the following sizes:
- 4.5 cm for the torso;
- 3.5 cm for the head;
- 2.0 cm for legs;
- 1.5 cm for hands.
For each part of the body you will need 6 squares. If desired, the dimensions of the blanks can be significantly increased so that you can sew a large soft toy.
We cut out blanks without allowances or with minimal allowances of 1-2 mm. Sew the pieces together on each side using a running stitch until you get a cube. Before sewing the last side, we fill the workpiece with synthetic fluff or other filler. We make sure that the filler fibers do not stick out along the edges of the cube; if necessary, trim off the excess.
In a similar way, we sew together all parts of the body of the future robot and connect them together with a needle and thread or a glue gun.
We sew on eyes from half beads, embroider eyelashes, and, if desired, sew on a bow and other decorations. The miniature figurine can be decorated as a refrigerator magnet, keychain or brooch. Robot made from boxes.
A funny and very cute robot is made from unnecessary boxes. You can use whole boxes to make a large product, or scraps of corrugated cardboard boxes to make a miniature figurine.
To make a small robot out of boxes, you can use the following template.
We transfer the pattern of the required size to the cardboard and carefully fold the parts along the fold lines. To avoid the formation of torn creases and folds, you should use a stationery knife. In the part for the head, we carefully make slits in the form of eyes and a nose; if desired, the shape of the holes can be modified. We glue all the allowances together using PVA or Moment glue and assemble the figure, starting with the body. The arms and legs can be made to be hinged so they can move.
If you have ready-made neat and clean boxes of the appropriate size, you can use them.
This method is perfect for beginners. In a similar way, you can make a robot from other, more durable materials - wood or plywood. In this case, it is necessary to cut blanks of the required size from plywood, sand the edges and glue them into cubes using adhesive tape. Further assembly is carried out by analogy with a figure made of cardboard or ready-made boxes. Matchbox robot.
A simple and cute robot can be made from matchboxes.
To make this craft you will need 9 matchboxes, colored paper and glue.
Cover five boxes for arms, legs and head with colored paper, and on the blank for the head draw an image of a face with a black marker. Glue the four remaining boxes together and cover the resulting blank with colored paper. Assemble the robot and, if desired, decorate it: make antennas from matches or sticks, stick or draw additional elements. Robot made from cigarette packs.
A classic craft from our childhood is a robot made from a pack of cigarettes. To make it you will need several empty packs and glue.
We assemble a body from 8 packs, glue the head on top, placing the cigarette packs perpendicular to the body.
We use the lids to make ears and a mouth. We assemble the legs from three packs each and place the body with the head glued on them. From two packs we make an arm bent at the elbow. We glue the handles to the body in the places where the lids are. We decorate the robot's face and make eyes and antennae from pieces of cardboard. Application of geometric shapes.
Even kids can easily cope with making a robot image - a fun applique of geometric shapes.
It is necessary to draw and cut out geometric shapes of different shapes and sizes in advance: circles, rectangles, squares, triangles.
Using PVA glue or a glue stick, together with the child, glue the figures onto a sheet of paper so that you get an image of a robot. Use a marker to add small details or decorate the background. This work will teach kids to navigate colors, sizes and shapes, and develop fine motor skills. “Robot” earrings made of wire.
In the shape of a robot, you can make an unusual decoration - original earrings made of wire and large beads.
We cut the wire into pieces of the same size and make tight spirals out of them, winding them onto a rod or thin tube.
We make a head out of wire, four spirals and two white or silver beads, thread the ends of the wire into a large colored bead and bend it to the sides to form arms. For each hand you will need two spirals and four small beads. Having folded the hands of the robot, we begin to form the torso and legs. To do this, we again pass the ends of the wire through a large colored bead and make legs consisting of two spirals and a small bead each. Fasten and cut the wire. We make the second earring in the same way and attach the earrings. Robot made from plastic bottles.
You can make a wide variety of crafts from waste materials. A very unusual and original robot figurine is made from plastic bottles.
In order to make such a robot, you need to use a stationery knife to cut off the neck and bottom of the bottle for the body, and also cut out shaped parts for the arms and legs.
We will use lids and other parts from plastic containers as decorative elements and fastenings. Using an awl, we make holes in the right places and connect all the pieces with wire. We fasten the wire and hide it inside the figure. Robot made from mastic.
An edible robot can be made from fondant and used to decorate a cake for a children's party.
To make such a figurine, you will need food mastic in red, blue and white. We sculpt each part separately and connect it with toothpicks or glue it together. Lastly, we design the face and make additional details. Cake candles can be used as antennas.
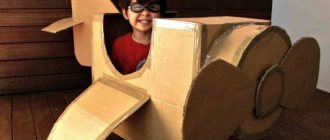
Man-made fairy-tale heroes
The first thought that comes to consciousness is a snowman. A life-size figure is created from cups quite quickly. The following components will be important: about 300 pieces of glasses, a hot glue gun (stapler), cotton discs, colored cardboard, paints, satin ribbon, a scarf. By attaching LEDs inside the finished sculpture, you will get a more elegant final result.
The main point is that two hemispheres are made, in one of them a round hole should be left - the future place for attaching the parts to each other. The second, smaller ball is glued together using the same principle. To connect the head and body of the sculpture, it is necessary to construct a connecting element from two glasses. After which it remains to work out the resulting workpiece in detail.
It seems possible to invite your favorite holiday tree character to the preschool group much earlier than the matinee, making it with your own hands. One has only to find out-of-print nylon tights of the flesh spectrum, padding polyester, alternatively cotton wool, a five-liter plastic bottle, a worn-out wardrobe item made of red fabric, thin tinsel (shiny braid), sand - this will ensure the stability of the structure.
Beard and hair - made of synthetic padding polyester, knitting yarn, yarn - to choose from. In non-complicated areas of the process, give the baby the opportunity to learn basic stitches. A large needle with a blunt tip will help initiate such an experiment. The daughter will definitely be proud of the mittens and cap she sewed herself.