Useful tips
Sometimes it can be difficult to part with your favorite things, which sometimes include pieces of furniture that were very useful, but are outdated and are usually replaced.
But even if you bought a new piece of furniture to replace the old one, you can turn the latter into something different, but no less useful.
Old chairs can be found in almost every home, and if you really want to replace them, you still shouldn’t throw them away, since old chairs can be used to make other useful things for your home, garden and cottage.
For example, you can use an old chair to make a towel rack, a garden bench, a convenient pet feeder and much more.
Here are the most interesting crafts that you can make using old chairs:
Remaking an old chair with your own hands: a street bench.
For such a bench you will need two or three chairs. These chairs can be spray painted or left with an antique look.
1.1. If the chairs are too high, you can file down their legs a little.
1.2. You can purchase special cushions for chairs. Some are sold separately (in which case they should be joined with a stitch), but you can also find 4 pads joined together and cut off the excess part.
1.3. To make three chairs look more like one bench, you can purchase or find two or three boards that need to be cut to the required length (the length of three chairs) and joined.
*If desired, you can round the ends.
1.4. Prepare a piece of fabric whose length and width exceeds the length and width of the pads. Lay the fabric pattern down on the floor and place pillows on it.
Decoupage technique
The method involves gluing drawings, pictures, or a cut-out pattern to the surface. The resulting collage is treated with varnish to secure and extend its service life. The work is performed in one of the styles: Victorian, Provence, ethno, military, country, simple city, shabby chic.
Step by step execution:
If the coating is porous, it is puttied to make it smooth. For grinding, first use mesh nos. 240, 320, and finally finish with mesh nos. 600 and 800. Be sure to prime the surface.- The base is usually painted in a light shade, for example, beige, baked milk, dull blue, but it all depends on the chosen style; most often they choose a white color.
- On the flat surface of the stool, the napkin is glued whole; if there are uneven spots, this will not work; you need to cut or tear the edges of the pattern.
- For gluing, use varnish, PVA glue, pencil glue or egg white; it is more convenient to work with a polyvinyl acetate composition.
- The glue is diluted 1:1 with water or the pattern is placed on the undiluted composition; in the first case, the napkin will get wet and tear faster.
- The picture is pasted on, carefully smoothed with a soft brush for drawing and fingers; after straightening all the folds, the collage is dried and varnished.
Ivan Bokorezov
Furniture columnist and designer
Ask a Question
For work, acrylic paints and similar varnish are often used. Inspired natures additionally tint the drawing after drying with paints and add bright details. A primer before gluing is needed to reduce absorption - in this case, the napkin will slide and align more easily.
New life for old wooden chairs: feeders for large dogs.
Tall dogs will find it easier if the feeders are a little higher, especially for older dogs who find it difficult to keep their heads down all the time.
You just need a file tool, a bowl and a pencil.
2.1. Before you start cutting a hole in the chair, you need to sand it first.
2.2. Place the bowl upside down on a chair and trace with a pencil. After this, inside the resulting circle, draw a circle of smaller diameter. This can be done with a compass or a plate of smaller diameter than the bowl.
2.3. Make a hole inside the circle with a drill, from which you can then begin to cut the circle. You can first cut a circle of smaller diameter and check the stability of the bowl in the formed circle. Make the circle even larger if necessary.
2.4. Sand the inside of the hole with sandpaper.
*You can paint the chair and then insert the bowl.
Methods and types of restoration
Restoration in the literal sense of the word means returning an object to its original appearance without making any unauthorized changes. Such work is carried out by restoration specialists who have years of training behind them. They are trusted to restore rare art objects. In our case, “home” restoration allows for changes to be made to the design of chairs that were not previously included in the design.
The goal of this process is to create an original interior element, and not to restore authentic furniture. A variety of techniques are used during restoration. For some stylistic decisions, only a certain method is suitable, while others use a competent combination of techniques. One of the striking examples is furniture for the Provence style. To update an old chair, they combine painting (mostly in light colors), decoupage techniques and craquelure. The most popular restoration methods include the following techniques:
- Painting. The fastest and least labor-intensive way to restore chairs. Depending on the type of paint, the surface can be given a glossy or matte shine.
- Craquelure. This is a technique for artificially aging the surface, imitating “worn-out” wood.
- Decoupage. A popular technique for transferring images from paper (postcards, napkins) to the surface of a chair and then fixing the image with varnish.
- Artistic painting. Applying original drawings and patterns to the prepared surface of the chair. You can be guided only by a flight of fancy or use ready-made stencils.
- Adhesive films, tapes. Stick directly onto the chair. Their surface imitates the texture of natural materials: stone, wood, leather.
- Veneering. The chair is covered with thin sheets of veneer (cut wood) with an original texture. Additionally, the decor is secured with varnish.
- Lamination. The technique is similar to decorating using adhesive films or veneer, but the sheets are fixed not with glue, but with synthetic resins, which are pre-coated with the back side of the decorative paper.
- Inlay. Decorating a surface by attaching parts from other materials to it. For wooden chairs, pieces of marble, ornamental stones, mother of pearl, metals, and ceramics are used.
- Painting with a “scuffed” effect. It is carried out in two stages. First, the surface of the chair is partially covered with a layer of dark paint. She is allowed to dry. After this, they are additionally coated with wax. Now the entire product is painted in a light tone. After the composition has dried, the “darkened” areas are thoroughly sanded, exposing the lower layers of wax and paint.
Of course, the list is not limited to these methods. Chairs can be decorated using pieces of old leather, fabric, small fittings, and carved elements made specifically for this furniture.
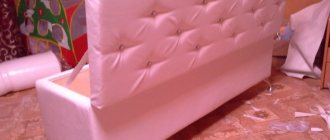
Wall organizer from an old chair with a backrest.
By dividing the chair into parts, you can create a wall hanger or organizer, as well as a comfortable stool.
The back and seat will not be easy to separate, but then everything will be easy.
If necessary, sand all parts and paint.
To make a comfortable stool you will need:
- tools for separating chair parts
- chair seat
- durable fabric and pillow filling or regular small pillow
- stapler
- hot glue (if necessary) to hold the fabric with filling.
1. Attach the fabric to the seat using a stapler, but leave one side untouched to fill the resulting pocket with pillow filling.
*You can also use a small pillow instead of filling.
Transfiguration
.
.
fw
bw
Paint the chair with bright paint, change the upholstery to a more suitable one (the choice of fabrics for furniture is now huge, there is an option for every taste) and, voila, the furniture looks modern again and fits perfectly into the interior. An updated chair can become a bright accent in the living room, or vice versa; due to the right selection of color and fabric, it can support the overall style. And most importantly, you won’t find anything like this anywhere else.
"This is a chair. They sit on it,” a phrase from a famous cartoon tells us. Not at all necessary. There are more interesting ways to use this item. To do this, it is enough to have a small set of tools (a jigsaw/hacksaw to cut something, a drill, a screwdriver, some nails and brackets to hang the resulting decorative item on the wall.)
Repurposing an old chair into a menu board
An old folding chair can be used to make a beautiful menu board.
To do this you will need:
- MDF sheets
- tools for separating the seat
- chalkboard paint
- sandpaper (if necessary)
— paint or spray paint (if necessary).
1. From MDF, cut out squares of the required size for each chair (if there is only one chair, then accordingly there will be one square from MDF).
2. Paint the MDF square with chalkboard paint.
3. Remove the seat from the chair and bolt on a painted MDF square in its place.
"Frankenstein"
Even from several different broken chairs you can make something interesting. For example, such an unusual stool. Just take legs from different chairs, paint them different colors and add a seat. This piece of furniture looks very stylish, and most importantly, it cannot be repeated.
What is the main advantage of decorating old things? You can safely experiment without fear of ruining anything. After all, in this case you have nothing to lose. But you can get much more. When thinking about whether you need that old chair or not, take a closer look at it. Perhaps he just needs to add a little color so that he “plays” in a new way and becomes a highlight in your interior, or he can “reborn” into something else. Choose the most interesting detail and use it. Old pieces of furniture are unique and carry a special atmosphere. Don't rush to write them off.
Bathroom hanger made from an old chair
You will need a chair back. It can be carefully cut down, sanded and painted if desired.
The seat can be cut in half and one half can be used as a hanging shelf.
This shelf can be attached with bolts and special glue. You can use corners to secure the shelf in place. This stage is optional, it is suitable for those who like to work with wood.
Such a hanger can be attached to the door in the bathroom, kitchen, cottage or other room where it may be needed.
Various little things
If you use your imagination, an old chair can become anything you want. Cut a hole of the required diameter in the seat, insert a bucket there, pour ice into it - and enjoy cool drinks in nature on hot summer days. Attach a drawer and a few hooks to the back and you have a convenient place to store your sewing supplies. Take the carved legs, attach bases to them and the unusual candlestick is ready.
Second life of an old chair: flowerbed
For your garden, you can create a beautiful flower bed using an old chair.
To do this you will need:
- a flower pot
- jigsaw
- drill
- sandpaper (for wood processing)
- paint (if desired)
— sealant paste for smoothing out unevenness in the opening of the chair (if necessary).
*If you want to attach more pots of flowers to the chair, you can use a pipe clamp to hold the pots or jars.
DIY photo of flower beds made from old chairs
Why is this necessary?
It seems that the very first question that every person who is going to restore an old chair will hear is: “Why is this necessary?” Indeed, isn’t it easier to buy new furniture and just throw the old one in the trash?
It couldn't be easier! In fact, the chairs that were made some 60-70 years ago are much stronger and more reliable than those that you now see in stores. At that time, all goods were produced conscientiously, and what was more important for the manufacturer was not crazy revenues, but the high quality and durability of the products. So it’s not surprising that Soviet chairs, even after so many years, are still found in garages and dachas, albeit a little rickety and shabby. They will outlive us all!
Modern interior with Soviet furniture
In addition, vintage is coming back into fashion, and interiors in the spirit of the USSR have become very popular. Even the “stylish, fashionable, youth” now use either a “grandmother’s” secretary or an old “grandfather’s” radio to decorate their homes. What's worse than the old Soviet chair? Trick him and everything will be as good as new.
You can also note one more reason: do you want something reliable and durable? Do it yourself! Everything is always done efficiently for yourself, isn’t it?
Well, restoring old chairs is an opportunity to create unique designer items that no one else has. Do you agree that standing out from the crowd is fashionable now?
Originally restored old chairs
So, let's see how you can restore an old chair without much effort. In fact, of course, you will have to work hard, but believe me, the result will definitely be worth all the time and effort.
Necessary materials
To work, we first need fabric.
The best option is thick upholstery.
What materials should you not buy? There are few exceptions.
- Faux leather.
The canvas will quickly become scuffed and lose its original appearance due to constant friction.
- Thin, lightweight fabric.
Such material is susceptible to damage from sharp objects, including pointed elements on clothing.
If the seat has lost its former softness, and the foam lining is very wrinkled, then you need to buy foam rubber, it will make the chair more pleasant and comfortable.
It is easy to find in sewing stores.
The reupholstering process: step-by-step instructions
The process itself is not complicated, it is easy to cope with alone.
- The first step is to disassemble the chair. To remove the backrest, you need to turn the screw at the back (with a large head); you can remove the back panel by opening the latches (by carefully pulling each corner).
A chair with a detachable backrest.
To disassemble the seat yourself, you need to turn the chair upside down. Unscrew the screws and detach the armrests.
Seat mounting points.
It is better to put all the screws in one place, so that by the end of the chair repair you simply do not lose them. Now you can start re-upholstering.
- The old upholstery must be separated by removing the staples.
Staples that need to be removed.Next, you need to apply foam rubber and cut it along the contour of the chair, then nail it with staples.
We cut out the foam for the seat of the chair.Handle the stapler carefully; this tool is quite powerful.
Stretch the new upholstery, securing it to the back of the seat base and backrest.The outlines of the chairs are rounded, and this should be taken into account when reupholstering an office chair so that there are no folds in the fabric. Excess “tails” must be cut off.
Garden bench made of chairs: master class
It is impossible to imagine a cozy garden without a bench, because this particular object can become the center of a recreation area. Let's write it together!
Let's start by choosing a suitable corner for our garden “sofa”. The ideal option is a green lawn, surrounded by bright flower beds and ornamental shrubs, or a secluded place in the shade of a spreading tree.
Important: the bench should not only be beautiful, comfort and durability are equally important characteristics. Such man-made objects will turn out to be very unusual, and they can be made in just an hour, especially if you have suitable “spare parts” on hand . The main thing is to show imagination and ingenuity. In our case, old, but very durable wooden chairs, which had been collecting dust in the barn for years, were useful. Now their finest hour has come! The bench made from them will turn out to be very elegant, and the fashionable “aged” decor will give the garden “sofa” a certain charm.