Every home still has furniture from the last century: everyone’s favorite wardrobes, which can hold quite a lot of things, and sideboards. The furniture looks boring, and has also lost its appearance. The houses or apartments of modern people should have stylish furniture. After all, what was fashionable 10-20 or even 30 years ago is now considered relics of the past.
We are not forcing you to get rid of your interior items, but we are presenting some tips that will help you transform your old furniture.
Ceiling repair
The ceiling is made of suspended plasterboard. You can hide electrical wiring behind it. Drywall allows you to beautifully play up the differences in protruding structures on the ceiling and highlight individual functional areas.
- Pool finishing: description of all types and features of modern finishing
- How an independent examination of construction work is carried out: an overview of all stages
Fasteners for the construction of frame houses: features of the right choice
A stretch ceiling will look beautiful in a large hallway. A glossy monochromatic surface visually increases the height of the room. A suitable pattern on the canvas will help complete the stylistic design of the interior.
The hallways of small apartments have a small height. The surface of a low ceiling is leveled with putty, cleaned and painted with water-based paint or finished with ceiling tiles.
DIY wardrobe: instructions, diagrams and drawings
Making a wardrobe is much easier than it might seem. But first you need to decide on the exact meaning of this term. “Sliding wardrobe” involves a special design of doors that move on runners along the cabinet body. It can be either built-in or free-standing.
If you wish, you can make the cabinet body from plasterboard and thus hide it in the false wall. But we will look at the classic design of a sliding wardrobe with side walls.
This model with dimensions 2020x625x2320 consists of several main parts.
- The side racks should be 2288x625 mm high (in these calculations, the thickness of the sheets of the upper and lower strips is taken into account - 32mm).
- Also large parts are the lower and upper strips: 2020x625 mm.
- The middle vertical posts are inextricably linked to the clothes rail. As a rule, it is mounted at a height of 1900 mm, so the standard size for them is height 1900 mm, width 525 mm. The remaining 100 mm is a margin for the normal functioning of sliding doors.
The filling of the cabinet can be anything. It all depends on your desires and preferences, but remember that there should be room inside to accommodate mounting systems.
It is best to order all parts from a carpentry workshop. Even an experienced craftsman will not always be able to cut out elements of the desired shape at home.
After this, you can begin assembling the cabinet . For installation, we recommend using not only screws and dowels, but also furniture corners. The rails are installed inside the cabinet in a specially designated area (those 100mm that we left when preparing the parts). After this, you can put the door back in place and use the cabinet.
Self-adhesive film
This method of restoring a kitchen set has become truly popular, and all thanks to its many advantages:
vinyl film is inexpensive, so updating facades will not break your pocket; The range of self-adhesive films is huge, you can find options with imitation wood of any species, stone or leather
There are films depicting landscapes, with interesting designs, etc., with a smooth and embossed surface; Almost everyone can handle installing the film - just be careful during the measurement process and directly during gluing; vinyl film is not afraid of temperature changes and moisture, which is very important for the kitchen. It will be easy to care for such a surface; if any part is damaged, or you again want to change the situation, the film can be easily removed.
The downside is the low durability of the film, only 3-4 years, but the low cost and ease of replacement smooth out this drawback.
The procedure for gluing kitchen facades is quite simple. The main thing is to follow the following recommendations:
- choose a film of a suitable color, taking into account your preferences for the new kitchen interior. It is not necessary to take a material with imitation wood - you can take a plain, light-colored film, and then you will be able to make a small kitchen larger and make your dreams of creating a minimalist interior come true;
- It is best to remove the kitchen facades - this will make the work easier. The fittings must be dismantled in any case;
- measure the parameters of each removed facade;
- the film must be glued to a clean, dry surface, i.e. facades must be thoroughly cleaned of stains of grease and dirt. This can be done with a soap solution or using dishwashing detergent. After this, you need to remove the remaining detergents and wipe the facades dry;
- If the facades are seriously damaged, you will have to spend some time on repairs. The peeling edges at the ends must be glued. The holes must be sanded, then filled with acrylic putty, sanded again and primed. If there are large potholes, then it is better to glue a patch of plywood or veneer in their place;
- In accordance with the measurements taken, the film must be cut. Experienced craftsmen recommend adding 4-5 cm of allowance in places where the film will bend. If there is a large design on the film, then when cutting it is necessary to control that it is positioned correctly. It is better to cut with a stationery knife - this way the edge will be as smooth and neat as possible;
- Take the first piece of film, start removing the protective layer of paper and apply the film with the adhesive side to the facade. Controlling the evenness, gradually peel off the protective layer and stick the film;
- You can roll the film with a rubber roller or a plastic scraper. This removes any remaining air. It is necessary to smooth out from the center to the edges. If there are any air bubbles left, you can pierce them with a needle and roll the surface again with a roller;
- If suddenly you notice that somewhere the film is glued crookedly, then within 5-6 hours the situation can be corrected. The film can be re-glued, but not more than 1-2 times, since then the glue will simply lose its properties;
- when all the facades are pasted over, you can screw them back on;
- You can use old fittings, or you can replace them with new ones, which fit better into the updated style.
If the shelves are dirty to such an extent that no detergent can remove them, then they can also be covered with film. The operating principle is still the same. The film can be chosen to be close to the original color of the shelves.
Design
It is advisable to design the hallway in the same style as the rest of the rooms. At the same time, the design can be diversified with artifacts that express the individuality of family members.
Posters or paintings placed in frames on a free wall will tell about your passion for art. An original banquette with ethnic motifs and exotic little things will communicate your love of travel.
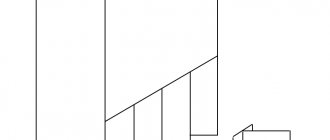
DIY corner hallway: instructions, diagrams and drawings
The problem that arises when creating a corner hallway is that careful calculations are required; the slightest mistake can cost a whole sheet of material . First you need to take measurements and check the walls. If the surface of the walls is curved, then you cannot do without a common frame.
Otherwise, the walls themselves can serve as a base to which you can screw shelves. The second option is more economical and simpler, but we will consider a separate cabinet, since perfectly smooth walls are very rare.
Choose the appropriate drawing based on the size of the room, the length of the walls and the proximity of the doorways. Consider the interior of the cabinet. According to the selected dimensions, make six main body elements :
- lower and upper bars,
- back walls (2 pcs),
- side walls (you can do without them, but the functionality of the cabinet will decrease).
Once you have the frame assembled, you can begin installing interior shelves, baskets and drawers, as well as hooks and rods.
The corner hallway can be equipped with doors on rollers, turning the structure into a corner wardrobe. But budget swing doors will also look good.
A few more schemes for the hallway
Facade finishing
In order for the wardrobe to be not only functional, but also pleasing to the eye, it is necessary to take care of its decorative finishing in advance. To do this, you can use several techniques and their combinations.
- A combination of panels of different colors - choose a material whose shades match the interior scheme. The combination of light and dark contrasting inserts looks especially impressive. They can be vertical, horizontal, or staggered. Matte panels give the room a cozy feel and are suitable for spacious rooms. Mirrors with or without a pattern - reflective surfaces visually expand the space and raise the ceiling. Additionally, you get space for conveniently trying on clothes and shoes. Mirrors with matte rough patterns, which are applied by sandblasting or using special abrasive pastes, look especially impressive. The choice of patterns is not limited, but it is advisable to order their execution from specialists, for example, when cutting a sash. Photo printing is a method of applying full-color images to cabinet doors. You can choose any shades and motifs: from “cartoon” scenes to abstract graphics. Such cabinets will become the highlight and main decoration of a minimalist interior. Vinyl stickers and posters are an easy way to decorate your built-in closet doors yourself. Over time, it will not be difficult to remove the boring ornament and apply a new one in its place. You can buy ready-made interior stickers or order a poster from a printing house. Stained glass film is a translucent material with an adhesive composition applied to one side. It is applied directly on top of the mirror, creating a subtle glow effect. By cutting the film, you can create fancy patterns and spectacular images.
Article on the topic: Do-it-yourself fermentation cabinet
Let's sum it up
You can assemble a built-in wardrobe with your own hands using the video or our step-by-step instructions. It's easy enough for an experienced DIYer. Making all the calculations and using professional sawing will cost much less than ordering an individual production of a storage system or buying ready-made cabinet furniture. You can additionally save on the choice of materials - chipboard or MDF will be a good solution. But it’s worth buying the best fittings, because they are responsible for the durability and convenience of the cabinet.
It is easy to decorate the doors even at the stage of ordering the panels, using spectacular combinations of different shades, mirrors and patterns on them. You can also decorate the cabinet after assembly if you use interior stickers or vinyl posters. Build the most convenient storage system that perfectly suits your needs!
Required materials and tools
Prepare in advance:
- saw or jigsaw,
- screwdriver,
- sandpaper,
- construction knife,
- furniture screws,
- roulette,
- corners,
- loops.
You will also need material for making a hallway . We recommend that you give preference to furniture board , since it is made from natural components without the use of synthetic resins. Such a shield is completely safe for the health of people living in the house. However, this material has a high cost.
common laminated chipboard is popular . It contains bonding resins, which can negatively affect the occupants of the house if the edges of the laminated board are not covered with edging. But at the same time, the material has a relatively low price and excellent characteristics (it is easy to work with).
Floor repair
To repair the floor, the old covering is removed and unevenness is corrected with a thin layer of screed. Then a soundproofing or other underlying layer is laid, depending on the type of flooring.
Quite often, large-sized ceramic tiles or porcelain stoneware are used in the hallway. The solid material is resistant to mechanical stress and has various textures similar to natural stone and wood.
Another popular material is laminate, usually at least 32 washability class. These materials can be combined: the entrance area near the door is covered with porcelain stoneware, and the rest of the hallway is covered with laminate
A common covering option in the hallway is semi-commercial linoleum. It is also resistant to heavy loads and comes in a variety of colors and textures.
Do-it-yourself standard hallway: instructions, diagrams and drawings
To make such a simple hallway, you will need the following materials :
- loops - 12 pcs.
- furniture panels - 7 pcs (dimensions 1600x400x18 mm),
- piece of plywood 6 mm,
- tongue and groove boards - 2 pcs (dimensions 2000x240x18 mm),
- furniture handles - 6 pcs.,
- three-dimensional rail - 1 piece (dimensions 3000x40x12).
We recommend that you start with a pencil case . Its dimensions are 2000x400x400 mm. The corresponding strips are cut out from the furniture sheet, as well as the top cover in an “overlapping” manner. also need two shelves . Assembly is quite simple.
The slats are arranged parallel and fastened into the lid using self-tapping screws; shelves are also installed. For strength in the corners, the frame is fixed with corners cut from plywood.
Since two doors located one below the other are much lighter than one, this option is preferable. From the shield you need to cut two identical doors and several internal shelves (optional). Secure the doors on their hinges.
You can get by with two for each door, but for reliability and proper weight distribution, we recommend using three.
The dimensions of one cabinet are 400x400x820, and the other - 820x400x490 mm. You can refuse any of them without damaging the design as a whole.
To assemble the first cabinet you will need 2 identical sidewalls and an internal shelf that will hold the structure together from below. The upper part of the future cabinet narrows greatly, so the lid should be noticeably smaller than the main part. All elements are fastened with self-tapping screws.
If desired, you can use furniture dowels. Don't forget to pre-drill the holes and use glue.
A door for the bedside table is cut out of the shield; it needs to be secured on two hinges. But for the drawer you need runners. We recommend that you purchase the necessary items from a specialized store.
You can make them yourself from plywood, but in this case the box will be pulled out rather than rolled out, which will make it much more difficult to use.
Making a second cabinet is very simple . You only need two sides and 2 internal shelves that form the frame. The internal filling of this cabinet can be absolutely anything. All parts are attached with self-tapping screws or dowels.
After this, the hallway needs to be assembled. Fasten all the elements together, and then prepare the boards. They should be beautifully located from the edge of the pencil case to the edge of the cabinet, creating the basis for the hanger. Maintain the same spacing when attaching the boards to the underside of the nightstands.
To ensure that the upper part of the structure is also strong, fasten the boards with a lath. Place it at such a height that you can later attach coat hooks to the rail. If you wish, you can complement the design with a shelf for hats.
Don't forget to varnish the hallway and attach handles and hooks.
What furniture is needed for the hallway
The main rule for furniture in the hallway is that it should be roomy, compact, and have a neat appearance. There is no need to decorate it excessively.
In addition to decoration, it has the function of storing things. You should carefully consider the size, the presence of drawers and cabinets.
It’s better if there are more of them, but you need to start from the area of the corridor; there’s no need to overload.
The unusually shaped hooks on the wall, plus the shoe rack, look beautiful.
In the presence of a large hallway, a wooden bench looks original; it will add zest to the interior. A win-win wardrobe option, it will fit into any interior. And a wardrobe, if space permits, is an ideal solution; it is comfortable and roomy.
For small sizes, it is worth using:
- built-in wardrobes - take up minimal space,
- mirrors and light finishes will visually expand the space.
Getting started: procedure
The quality of the finished structure is determined by two things: the drawing and the fittings. If the first one can still introduce its own “surprises,” then you should take care of the fittings in advance, choosing only reliable and proven samples.
If the product is installed on support legs, when drawing up the drawing, a place should be provided for them adjacent to the nearest partition.
In general, when assembling a hallway cabinet with your own hands, the procedure may look like this:
- Installation of the supporting structure. If it is a frame, you first need to assemble a power frame, and then strengthen it with auxiliary longitudinal or vertical jumpers. Sometimes the frame is mounted directly to the floor. For a frameless design, you should start by installing the sidewalls.
- Installation of jumpers and auxiliary elements. Here special fasteners are used, such as confirmations or minifixes.
- Installation of shelves and dividing partitions.
- Installation of hinges or guides.
- Hanging or installing a door. In the case of a wardrobe, the door is installed first with the upper part, with pressure, after which the lower rollers are inserted into the grooves of the corresponding guides.
- If the structure will be separated from the wall, the back of the cabinet is sealed with fiberboard.
- Adjustment, fitting, checking the operation of mechanisms.
The minimum width of the cabinet is 90 cm, the door is 45 cm. The maximum length is equal to the size of the chipboard sheet - 2.75 m.
Apparently, it turns out that furnishing an apartment on your own is not such an impossible task. With the proper perseverance and the ability to use the tool more or less, it is quite possible to make a cabinet in the hallway with your own hands. It may not be a super-original design solution or the pinnacle of inventive thought, but it will bring a piece of comfort to the house and long-awaited order.
A thoughtful design of a hallway with a wardrobe is a guarantee of convenience and functionality.
What can the hallway be made of?
Today the most popular material for furniture production is MDF. This is due to its performance characteristics, wide variety of textures and affordable cost. Also, hallways can be made of chipboard and have plastic or metal parts.
Small entrance hall in a modern style corridor
However, wood has been and remains the most attractive material in terms of aesthetics, environmental friendliness and durability. But the price of solid wood structures is significantly higher than models offered by manufacturers made of slab materials, which also contain wood.
A hallway made of solid wood is a chic and practical interior design solution.
Furniture finishing can also be different. You can decorate interior items using decorative and mechanical processing of wood, using inserts made of material or leather, using interesting fittings.
It is quite possible to make the elements of the hallway with your own hands. Let's look at a few examples.
Furniture in the hallway