Burning is an ancient craft, which began from the moment when artisans began to process wood, stain it, and make various carvings on it.
Today, this type of work refers to the amateur type of decorative decoration of wooden products. However, due to the fact that this technique has been constantly improved, it has now become available to children.
Features of pyrography technique
In essence, pyrography is the application of diagrams and drawings to the surface of wood using a heated object - a burner, an electrical appliance. With the help of this craft, children improve their imagination. Also, by doing this you can get relaxation and take your mind off difficulties.
In the process of creative activity, drawings turn out flat or three-dimensional. In general, pyrography is divided into:
- using a pyrograph;
- with the use of alternative tools.
When making a planar drawing, both the background and the drawing itself are made on the same plane, and for a three-dimensional image, the background is deepened using special knives like pins.
You can work with any type of wood - treated boards, cup holders, wood cuts.
The most important thing is that the material is completely dry.
Among the alternative combustion sources are the following:
- Acid. In this case, wax is applied to the wood, a design is applied on top of it, and then acid is poured.
- Pyrotopia. In this case, the image is applied using a stamp. The clarity and brightness of the drawing will depend on how much pressure is applied.
- Electric discharge. As with acid, the surface of the product is treated with electrolytes, after which a current discharge is sent across the board.
- Laser. With its help you can create drawings of different levels of complexity. The required pattern is installed on the machine, after which the laser does all the necessary work.
- A ray of sunshine. You can work with such a source only in non-cloudy, warm weather. You just have to stock up on another magnifying glass. This type is quite lengthy and tedious; not everyone can work like this. However, for those who can show patience and willpower, they will gain significant creative experience.
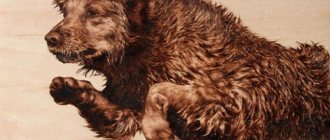
Tiger
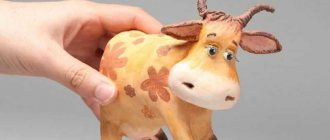
Unlike a complex picture, even a small child can burn out animals if you choose the simplest sketch for him. For adult craftsmen with experience, you can find a more complex stencil, with many small strokes. But the image of a tiger on the board is ideal for beginning pyrographers.
To further train a small child, it is better to choose a picture for children with additional elements - trees or other animals. Such designs are often used to decorate cutting boards or act as independent compositions. Gradually, the child will master complex techniques in pyrography, and over time will learn to burn portraits.
Materials and tools
For burning, you can use the following tools:
- Electric burner with nichrome or brass tip. Working with such a tool is not only convenient, but also quite fast. However, the attachments on such a tool have to be changed frequently due to the fact that they fail. During the work, the strokes are applied pointwise, so it is almost impossible to draw a non-broken line; it still turns out dotted.
- Soldering iron burner. Such an instrument heats up rather slowly, but it takes a long time to cool down. Replaceable nozzles are very reliable and have a long service life. Changing them is very convenient and possible at any time during operation. Using this tool, you can create scenes with a solid fill, with shadows, transitions, and it is also possible to draw a solid line of any required thickness. However, despite all its advantages, this model has one significant disadvantage - if it breaks, you will have to purchase a new tool.
Among the materials that may be needed during creative work, you can choose the following:
- plywood;
- MDF;
- array;
- fine-grain sandpaper;
- black copy;
- a simple pencil;
- pliers;
- paper tape;
- paints/varnish;
- tassels;
- clean rags.
The most important thing is that only completely dry wood, without knots or eyes, is used in the work.
You should not take boards that are already coated with paint and varnish. After all, during operation, when heated, toxic fumes will be released, which can easily cause poisoning or simply cause a fire.
Types of burners
Before you begin, you should purchase the most suitable burner. The quality of the resulting product largely depends on the main characteristics. Beginners and professionals use 2 types of soldering irons:
- With wire stings.
- With hard tip.
Many people compare a burning device with a hard pen to a soldering iron. The working part is represented by a tip of a complex shape, which is heated by nichrome wire when voltage is applied. A distinctive feature is that the delivery set includes a set of attachments. Their geometric shape can differ significantly; it is selected depending on what kind of pattern you need to get. The main advantages of this proposal:
- Relatively low cost.
- Long service life.
- Easy to use.
The only significant drawback is that it takes about 5 minutes or more to warm up. To ensure safety at the time of burning the design, the design is equipped with a large handle, so difficulties may arise when performing delicate work.
A tool with a wire pen is often used to burn small images on wood. In this case, the heating wire comes into contact with the wood. The advantages can be considered:
- The device is ready for use almost immediately after switching on.
- Models from the middle and high price categories have a regulator that allows you to select the most suitable thermal mode.
- The design is optimally suited for a wide variety of work.
- The thin thickness of the heating wire ensures little contact with the material, so there are no problems with fine work.
The disadvantage is the high cost and low maintainability. The heating wire can become deformed even with a slight impact.
Ready-made set for pyrography
Beginners should learn this skill using factory sets. These include:
- wood blank;
- template with a picture;
- sandpaper;
- copying;
- wax;
- pyrograph;
- paints;
- pencil;
- eraser;
- tassels;
- a piece of clean rag.
As soon as the essence of the creative process becomes clear and simple, you can begin to create and show your imagination.
Safety regulations
When working with a burning tool, you should be very careful and careful, and most importantly, adhere to several important rules:
- You can only take the switched-on device by the handle, as it is very hot;
- you cannot play with the pyrograph;
- the working tool is placed only on a special stand;
- after turning off the pyrograph, do not touch the tip, as it cools down for a long time;
- nozzles can be changed only with pliers;
- The device should be periodically disconnected from the network and given time to rest;
- Under no circumstances should the pyrograph be left on unattended;
- If damage occurs, use of such a tool is strictly prohibited.
When a child is working with a pyrograph, supervise him and remind him to follow safety rules with the tool.
Final processing
After receiving the image, the surface is treated with sandpaper. You can protect wood from the negative effects of the environment as follows:
- The wood is varnished. This substance significantly extends the life of the product. At the same time, the drawing does not lose its contours, remains bright and rich.
- If necessary, partial or complete coloring of the space that is formed between the drawn lines is carried out.
Final processing of the product can be carried out using a variety of protective substances. The choice is made depending on what result needs to be achieved.
Burning techniques and methods
There are several types of equipment that can be used when working with a burning tool. Let's look at them in more detail:
- Contour. This type of technique is perfect for those who are just learning the basics. Work here is carried out only on the designation of the contour line. Among other things, work is also carried out on shading and inscriptions.
- Silhouette. To obtain a drawing, the surrounding background is burned out here, the drawing itself will remain untouched, but the background will be completely shaded.
- Artistic. In this case, the above techniques are mixed. In this case, the drawing itself turns out to be quite complex. The perspective is perfectly drawn here, every detail is worked out. In order to get a picture, you need at least some skills in creating pictures using pencil techniques. At the very beginning, you should think about starting with simpler shapes - geometric ones. In this case, it is necessary to carefully work both with chiaroscuro and with the volume and depth of the picture.
Here are the basic techniques that are used when working with a burner.
Where to begin?
Using a burner is simple, but to get beautiful drawings you need to have talent and skills. The main recommendations are the following:
- Before directly applying the design, you should choose the right tree. There are a large number of different breeds, all of which react differently to temperature. It is recommended to give preference to soft hardwood: aspen, poplar, linden.
- Some wood can withstand a single point temperature of +250°C, while others ignite at 120°C. The softness of the surface layer simplifies the movement of the sting.
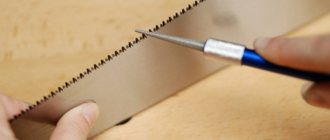
- The surface on which the design is burned must be pre-treated. Even minor defects can cause the tip to accidentally wobble.
- Contour lines are drawn using a stencil and pencil. Artists can apply the sketch by hand. Complex designs are applied using carbon paper.
To place the tool, a stand is made of non-flammable material. A ceramic plate or glass is often used. Ceramics can withstand high temperatures for long periods.
Wood burning for beginners
For those who are the first to learn the basics of this technique, it is worth starting with elementary images. To begin with, take simple pictures, sketches, diagrams, on which you can hone your skills in working with a pyrograph, and then proceed to more serious and original plots. But first, let's look at how to work at the very beginning.
Images
Since not everyone can draw a finished drawing, you can find ready-made pictures on the Internet and transfer them to a wooden blank. After the drawing has been transferred, you can begin the work itself - burning.
To do this, you should take a heated device and burn in small lines along the contour of the design. In this case, the pressure should be the same. After all the lines have been worked out, you can turn off the device and put it aside to cool. And start the finishing work yourself - painting and varnishing.
Sketches
A huge number of sketches can be found for different ages. They are quite easily transferred to a wooden surface; if necessary, you can use carbon paper.
For children seven to nine years old there are many contour sketches that can also be transferred using copying. The burning work will be carried out at the initial stages in the same way as in the first case.
Scheme
To apply any patterns or stencils on the board, it is best to use soft wood, as it will be more convenient to work on such a product.
In this case, it is worth printing out the diagram, then attaching it to the workpiece and transferring it to a wooden surface. Once this stage is completed, you can begin burning. At the end of the work, the product must be given a finished look - varnished.
As you can see, learning how to burn is not that difficult; the most important thing is to have the desire and desire to create something new, beautiful and unusual with your own hands, and then everything will definitely work out.
Getting Started
You need to work in a ventilated area using a respirator. The workplace and workpiece must be well lit. To prevent your working arm from getting tired, you can place a soft cushion under the elbow joint.
A hard pencil is suitable for drawing a sketch. In case of an error, excess lines are removed with an eraser. You can use carbon paper to make drawing easier.
During burning, the following rules must be observed:
- First, the main lines and contours of the image are burned out, after which detailing and shading are performed.
- It is better to move towards the body, so the arm will get less tired.
- If your drawing has a fill or gradient, the first step is to draw the outlines.
After completing the process, the surface of the image is cleaned with sandpaper (it is better to use fine-grained paper), and the charred areas are removed. The project can be colored with paints. After all the manipulations, the finished painting is varnished and left to dry.