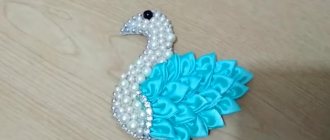
One of the most famous types of Japanese art is kanzashi . It consists of creating beautiful decorations in the form of flowers from pieces of silk ribbons. Here are master classes on how to make kanzashi from ribbon with step-by-step photographs. Roses, butterflies, hearts, bows and satin flowers using the kanzashi technique look elegant and delicate, and making them with your own hands is not at all difficult.
Satin flowers were especially popular among geishas; they used them to decorate all possible hair accessories: combs, hairpins, sticks. Kanzashi decorations made it possible to determine the character, and in some cases, the social status of the women who wore them, since the cost of the ribbons from which they were created could exceed the cost of the kimono itself.
Currently, this technique is popular all over the world and not only as a type of hair decoration. Kanzashi are used to create unique jewelry, and some decorate clothes with them. This technique is most often used by brides, since wedding paraphernalia looks very beautiful when decorated with snow-white kanzashi flowers. Young mothers also like this technique and create bright headbands and hair ties for their little princesses.
It is very easy to learn this technique, you just need to be patient, diligent and persistent, because such work is quite painstaking.
The materials for the classical kanzashi technique are natural silk and rice glue. But nowadays all possible fabrics and any glue are used, especially if you are just learning, then it is not at all necessary to take expensive materials.
Specifics of making flowers from satin ribbons
Making flowers from satin ribbons with your own hands is a painstaking but fascinating task.
The main tools for making jewelry are:
- Satin ribbons of suitable width. The color and texture are to the taste of the craftswoman.
- Sewing kit. It must contain threads, needles, and scissors.
- Glue gun. For fixing petals to the base or for decoration. If you don't have it, you can use superglue.
- Additional decorative elements. Beads, bead buttons, sequins, rhinestones.
- Fire (matches, lighter, candle). Necessary for melting and securing the petals. Also, cuts of tapes are treated with fire so that they do not “crumble.”
With proper use of available materials, the flowers come out strong and of good quality. They can be attached to elastic bands, hairpins, headbands, or arranged into bouquets.
Where and how to use kanzashi style flowers
Often women dream of making original flowers using the kanzashi technique for their hair. This is the ideal solution - make a hair clip and a small beautiful kanzashi flower to pin to your hair.
You can also make a flower on an elastic band. The hairstyle will have some zest and a completely unusual look. A hair flower can be made specifically to match the hair color or, on the contrary, the complete opposite.
Products with several different flowers of different types will look original.
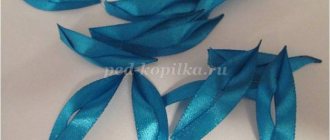
Types of petals
Satin ribbon flowers are collected from petals of different shapes. The main ones are sharp and round. Any type of petal can be made with your own hands. The sharp shapes of the petals are suitable for making flowers such as aster, chamomile, dandelion, sunflower, bluebell and others.
The varieties of sharp petals are:
- spicy double (triple);
- sharp with a curl in the center;
- sharp convex (convex).
Round-shaped petals are used to create flowers such as roses, lilacs, ranunculus, peony and others.
The varieties of round petals are as follows:
- two-color round (double);
- round for rose;
- round inverted;
- round flat;
- round narrow;
- round with a heart.
Master class for beginners: a simple flower in 5 minutes
A satin ribbon can turn into a flower in just 5 minutes. From this you can calculate that, for example, a hairpin with your own hands will be done within 7-10 minutes. It is necessary to strictly follow the instructions.
Step 1. Preparation of necessary materials:
- scissors;
- tweezers;
- needle and thread;
- candle;
- bead;
- pieces of satin ribbon 5x5 cm.
Step 2. Preparing petals . To do this you will need:
- fold a square of satin ribbon diagonally, marking the sharp ends with the numbers 1 and 2;
- combine ends 1 and 2. In the resulting triangle, mark the new acute angles with numbers 3 and 4;
- fold ends 3 and 4, resulting in a sharp petal;
- cut off excess material (cut a right angle parallel to the folded side and an acute angle parallel to the fold);
- solder the cut edges with a candle or lighter, fixing the petal with tweezers for convenience.
Step 3. Flower formation. The bases of the petals need to be connected with a thread like beads, tightened and decorated with a flower. Then you should glue the petals together for a more reliable fixation.
Step 4. Decoration. The middle of the flower must be decorated with a bead or button (optional). It is possible to add rhinestones or small stones to the center of the petals.
Kanzashi ribbons: how to choose materials
At first glance, choosing a ribbon for decoration is easy. Take any one you like and work. But no, when choosing a tape for kanzashi, you need to pay attention to the density of the material. After all, the thicker the tape, the easier it is to work with.
If it is not possible to purchase a thick ribbon, take a soft one; at the end of the work, be sure to treat the product with hairspray so that the decoration holds its shape better. You should also pay attention to the fact that rhinestones lose their shine when exposed to varnish.
Look through the tape carefully: sometimes you come across a skewed tape or a tape with uneven thread tension. Such ribbons should be discarded, since the end result will not be an even and beautiful decoration.
Most often, a satin ribbon is chosen for kanzashi; rep ribbons are used less often. Beginning needlewomen should start with classic satin ribbons, while self-confident craftsmen can try ribbons of bolder materials and colors. Pay attention to the colors:
- strict stripes and frivolous polka dots are suitable for classic hairpins;
- ribbons with funny inscriptions can be used to create children's accessories;
- Floral prints on ribbons will make the decoration solemnly romantic.
Flower made of satin ribbons 2.5 cm - step by step instructions
A 2.5 cm wide satin ribbon is perfect for creating lush flowers with your own hands. When finished, they resemble a bush rose. The technique is simple.
Step 1. Preparation of necessary materials:
- pieces of tape 2.5 cm wide and 7 cm long;
- needle and thread;
- fire;
- scissors.
Step 2. Preparation of petals. You need to melt the cut edges of the tape, bend the tape on each side so that you get a trapezoid, and additionally melt it to secure it. Then you need to do the same with all the tapes.
Step 3. Flower formation. It is necessary to sweep each petal blank along the bottom edge, pull the thread and fasten it, then sew the bases of the petals so that you get a flower.
To add volume, you can attach 3 more petals on top or leave the flower in a single layer.
Step 4. Decoration. Beads glued in the center, imitating the core of a flower, will look harmonious.
For the rim
Any flowers are suitable for decorating the headband, such as large and lush roses, peonies, chrysanthemums, zinnias, as well as small roses, jasmine, and bells.
To make a headband with a jasmine branch, you will need:
- a headband wrapped in a satin ribbon the color of the first green;
- a strip of rounded felt 2x16 cm of the same color;
- yellow plastic stamens - 1 bunch;
- pieces of white satin ribbon 5×5 – 25 pcs.;
- pieces of green satin ribbon 2.5x3 cm - 25-30 pcs.;
- thread, needle, scissors, glue.
Jasmine flowers form very simply. It is necessary to sweep a diamond shape on a white piece with white thread, then tighten the thread, insert a plastic stamen inside and sew it up. It takes 3 to 5 minutes to make 1 jasmine flower.
Important! When basting, the thread should not be interrupted, otherwise it will be impossible to form a flower.
To make a sheet from a green piece of satin ribbon, you need to fold it in half and round it off on one side with scissors. Then you should melt the edges and, while they are soft, slightly deform them in the manner of a jasmine leaf, gather the lower edges and melt them.
The finished elements are glued evenly onto a strip of felt to create a jasmine branch. You need to let it set and glue the finished composition directly to the rim.
For hairpins
To decorate hairpins, small flowers of light weight are often chosen, otherwise the hairpin will not hold the hair well and will slip off. Ideal options are small roses, one small chamomile, and aster. A very fast and beautiful flower is obtained from only 3 petals. A satin ribbon 5 cm wide is cut into 5 cm pieces. You need to make circles from the resulting squares.
You need to fold them in half and sweep them in an arc, tighten them, forming a petal with your fingers. Then you need to sew 3 petals together and glue a bead in the center. The resulting flower is glued to the hairpin. Note. If the flower is not large enough, you can increase the number of petals to 5-7. However, it is necessary to select a larger core size.
Teddy bear using kanzashi technique
In this lesson we will make a bear from satin ribbons using the kanzashi technique.
We will need:
- a piece of yellow felt;
- yellow satin ribbon 1 cm wide;
- brown half beads;
- a piece of red ribbon 1 cm wide;
- rhinestone;
- grosgrain white ribbon;
- two 5x5 squares of yellow tape;
- needle with thread;
- glue gun;
- scissors;
- lighter.
From a piece of yellow felt you need to cut a small circle with a diameter of 4.2 mm. It will be the basis for the craft.
Now you will need a piece of narrow tape. Its length should be 60 cm. Both cuts should be singed so that the fabric does not fray during wear. Then use a needle and thread to make a simple hand stitch, departing 1 mm from the edge of the tape. Stitches should be made small and evenly spaced.
Having stitched the entire segment, the thread must be pulled tightly, forming a voluminous ruffle from the tape.
The thread will no longer be needed, so you can cut it off with a couple of securing stitches. The resulting ruffle made of yellow ribbon must be attached to the finished felt base. Dropping glue onto the edge of the tape, you need to attach it to the circle, making sure to point the front side up, and the tightening seam to the center of the base.
Now you need to gradually glue the ruffle onto the felt base, making sure that the tape does not twist and is always wrong side down. By evenly attaching the tape in a spiral, you should completely fill the circle.
Then you need a piece of grosgrain ribbon, approximately 2.5x2.5 cm in size.
From it you need to cut out a muzzle for a bear. Its shape is similar to a heart, only without the pointed bottom edge. The cut piece should be immediately treated with fire so that it does not crumble and retains its shape.
The finished muzzle remains to be glued to the base of the hairpin, positioned approximately in the center of the circle.
Next you will need pre-prepared squares of yellow tape.
They are needed to create ears for the bear. To do this, each workpiece must be bent into a triangle.
The two sides of the part consist of slices; they must be folded in small folds, leaving the fold untouched.
Next, the sections should be aligned by cutting off all excess with scissors, and with a lighter you should carefully scorch them so that each layer is soldered, fastened with the rest.
The result is a rounded part, similar to a bear's ear.
Two squares make neat ears.
The ears remain to be attached to the prepared head. They should be attached to the edge of the circle, slightly hidden under the yellow ruffle.
Now you will need a piece of red tape.
The edges must be singed and folded towards the wrong side, approximately towards the middle.
Holding the folded ribbon with your fingers, you need to lay several stitches in its center with a regular needle and thread. Then you need to tighten the thread, forming a bow from the ribbon.
This bow should be attached to the left ear of the bear, at the intersection of the ruffle and the ear.
Turning the bear's head with the bottom side, you need to glue the hair clip in a horizontal position.
All that remains is to straighten the ruffle and add three brown half-beads to the head. The first half bead, located on the edge of the rep muzzle, will be the nose. The remaining two half-beads will become the eyes of the bear, located just above the nose, on top of the folds of the ruffle.
Our craft using the kanzashi technique is ready!
DIY kanzashi satin bows
The doll pink color makes these bows adorable accessories for little girls. And the magical effect is enhanced by an insert of grosgrain ribbon with the image of your favorite cartoon Hello Kitty, a sparkling cabochon and lace details. Every girl should have a lot of bows, which she can change to match the color of her dress or admire her wealth, which lies in the box.
To make the same unique decorations for young sweeties, prepare the appropriate accessories. It costs literally pennies, but the finished product looks very rich. Handmade accessories are an indicator of good taste and aristocratic nature, so mothers should pamper girls with them from childhood.
For one doll pink bow, prepare:
- 4 pieces of soft pink satin ribbon, 9 cm each;
- 4 pieces of textured white ribbon in the form of lace (2 cm wide) 9 cm each;
- 4 pieces of pink cartoon grosgrain ribbon with the image of Hello Kitty, 7 cm each;
- a small piece of pink lace 2 cm wide to fasten the bow (you can use a 1.2 cm satin ribbon) about 12 cm long;
- bead hugger 2 cm and cabochon to it 1.4 cm;
- felt circle 4 cm;
- clamp 7.5 cm.
To make the same charming bows, you need to form two portions of loops from the pieces of ribbon indicated in the list. Pink satin, combined with white lace, will become the bottom layer of the decoration, and rep details with a child's drawing will look beautiful on top, crowning the entire composition. And of course, you can’t do without sparkling stones - it will be a cabochon - girls love them so much.
If the need arises, the same bows can be made in blue, lilac, yellow or coral tones. Are there any strict rules when it comes to DIY jewelry?
Take wide soft pink satin ribbons 5 cm. Combine them with white mesh lace - clearly in the center. You can immediately burn the aligned edges to hold them together.
In total, for one bow you will need 4 such double parts. Fold each strip in half (the white lace must remain on top). Use your fingers to grasp both sides and press the combined ends towards the center to create a double fold. Scorch it again.
Glue the loops. Two loops will become right, the other two will become left. Connecting them all together, as if superimposing them on each other.
Cut out 4 grosgrain soft pink pieces with a matching design. The width of this tape can be 2.5 cm or 4 cm. The edge of the rep does not need to be singed, since it is denser.
Make loops using the same method. Only they will be single and smaller in size.
Glue these loops in pairs: make two right, the other two left, also overlapping each other.
Take pink lace for the center part.
On the back of the bow, glue the strip with the wrong side facing away from you.
Turn the bow to face. Glue the top layer of reps on top.
Place thin lace around the center. Trim and glue the end.
The second bow is done the same way.
Glue the cabochon into the hug and prepare the clamp.
Glue the jewel on top. As a centerpiece, you can choose another plastic cabochon that you find on sale, for example, a funny bee, some kind of face, or the same Hello Kitty, to complement the themed accessory.
Press the clip down with felt.
Imagine how happy a little fashionista will be if she has the opportunity to decorate her braids or ponytails with such cute bows. Of course, we recommend making a couple of decorations at once so that you can model different hairstyles.
From the presented master class it is clear that during the work you will not have to model any complex details or petals of a special shape - everything is simple and clear. The main thing is to handle the lighter skillfully, do not overexpose the parts over the flame so that the fabric does not melt.
Kanzashi elastic band “Girl in lace”
Delicate lace and satin ribbon are in perfect harmony with each other, and if you also choose an interesting combination of colors, then half the success is already guaranteed. This tutorial shows how to make a beautiful elastic hair clip with a kanzashi flower and lace.
You will learn how to model sharp petals by simply folding strips of ribbon, create a lace base for a flower, and also see how beautiful the cute center looks in a delicate frame. Prepare a similar masterpiece for a little girl who will definitely be delighted with such a wonderful gift.
For an elastic band with a flower and lace we will need:
- 26 pieces of pink ribbon - 1.2*5.5 cm;
- 11 pieces of pink ribbon - 1.2*4.5 cm;
- two felt circles with a diameter of 3 and 4 cm;
- felt rectangle - 1*4 cm;
- the middle is the smiling face of a girl;
- pink elastic band - 4 cm;
- turquoise or mint “Path” lace, cut in half - 29 cm.
The proposed decoration will be delicate, consisting of two layers. The first layer is a cloud of mint lace, the second is a pink three-tiered flower modeled from sharp flat petals. The whole composition is crowned by a beautiful and funny center that matches the ribbon used.
To work, you will also need glue, turquoise thread with a needle, scissors with a ruler, and a lighter. When the required accessories have been purchased, get down to exciting work without putting it off, because the girl is so looking forward to a fresh new thing.
How to decorate kanzashi with your own hands
Cut off the planned fittings indicated in the list. You need pink stripes in two sizes, lace, a plastic center and felt circles. By looking at an example of a hairpin in the form of this unique combination, you will get an idea of whether such a decoration is suitable for you, because the colors of the ribbon can be changed. All little girls are fashionistas, they probably have a whole wardrobe of bright dresses, so you can make an elastic band to match any of them.
Use the tape singed on both sides to create petals. First, you need to fold them in a special way, then singe the folded ends so that they stick, and glue them into a beautiful flower. Fold the strips in half at an angle. See how to do this in the photo provided.
Fold the resulting corners in half again at an angle to get double combined blanks, and house triangles will be visible in the place of the folds. Turn the petals to face you. Sear at the base, squeezing the sides with your fingers. Folds will appear at the bottom, and dents will appear in the center of the petals, which will add volume. Now all that remains is to glue everything together to get a lush result.
Make two sizes of pink pieces and cut out a small felt circle.
First, start gluing the larger petals. Place the first layer closer to the edge of the circle. Use half of the prepared fragments for it.
Make the second layer the same, but glue it overlapping on top, moving the parts relative to the bottom ones.
Glue the third small layer. There will be a hole inside, which will subsequently be disguised by the girl’s face. That's why we took the felt size with a margin.
Cut the lace to the desired length.
Start assembling onto the thread on one side. Move the needle along the part that was cut with scissors - it will be straight, not wavy. The list of accessories indicates that we will use “Track” lace, cut lengthwise.
Gather a lush lace cloud by pulling the thread tightly and tying a knot. Glue the turquoise component underneath.
Now start preparing the base of a beautiful hairpin. This can be any option, an elastic band is shown here. Cut out a second (larger) circle of pink felt, a rectangle and prepare an elastic band.
Glue the elastic band to the circle using a rectangle.
Next, glue the resulting base to the bottom of the flower. Glue the face at the top.
That's all - the beautiful kanzashi decoration is ready. Finally, the baby has received this wonderful gift, now she has something to brag about to her peers.
Start creating in a good mood, because the master conveys a piece of his soul along with the fruit of his work.
Do-it-yourself rowan kanzashi from ribbons
Beautiful flowers made from 2.5 cm wide ribbons
Master class - grapes made from ribbons using the kanzashi technique
Thanks to the master classes presented on our website, you can easily master the kanzashi technique and be able to create interesting and unique hair jewelry, bracelets, unusual pendants, brooches and many other creative products. Create unique floral items for yourself or as a wonderful gift for friends and family. Create at least one flower, and this new hobby will completely capture your attention.
The author of the master classes is Svetlana Sorokina.
Ribbon roses
There are at least 5 techniques for making roses from satin ribbons.
For beginners, the following option is suitable:
- A ribbon 6 cm wide and about a meter long is folded in half lengthwise.
- The folded tape is swept along its entire length. It is necessary to start and end at an angle of 40-50° to give more volume to the flower.
- Assemble the resulting workpiece.
- A bud is formed, securing it with threads.
- Wrap the ribbon around the bud, forming a flower. Periodically secure the layers at the base so that the rose does not fall apart.
- The final stitches should go through the entire flower, while being invisible. The thread should be the same color as the ribbon.
Kanzashi chamomile
To make chamomile you will need:
- white satin squares with a side of 5 cm;
- glue gun;
- fire (candle, lighter);
- tweezers;
- scissors;
- decor
First you need to prepare the petals. To do this, the atlas square is folded diagonally, then the sharp corners are folded towards the center. The resulting petal is folded in half. The tip is cut off and scorched with fire. Then fix it with tweezers on the other side and cut off the base parallel to the fold. They are scorched with fire so that the ends are soldered together. 15 such petals are prepared.
Carefully glue the petals at the base, forming a daisy. Glue a yellow button or a circle of yellow felt in the center. Kanzashi chamomile can be used to decorate a hairpin, a child’s handbag or a headband.
How to form a complex petal with a fold
In order to form an oblong petal with a fold in the center , prepare a square of the required size (most often the side of the square is 5 cm) (photo 23).
Make a diagonal fold (photo 24) and bend the corners to get a square half the size, cut the bottom half exactly diagonally (photo 25).
Next, squeeze the side parts and glue them together to get an oblong complex petal with a fold (photo 26).
Lush flower made of satin ribbon
A lush flower is formed from round petals singed along the entire perimeter. They are carefully glued layer by layer to the base. There should be at least 10-12 petals. They can be either the same color or different.
The set of tools is similar:
- satin squares with a side of at least 5 cm;
- scissors;
- fire;
- stamens – 3-5 pcs.;
- glue gun
Aster
To make an aster you will need the following supplies:
- pieces of satin ribbon 2.5×5 cm;
- tweezers;
- scissors,
- fire;
- glue gun;
- several circles of felt.
For a medium-sized flower, 30-40 petals are needed. It all depends on the desired number of layers and the diameter of the aster. The petal is made in two stages.
- Stage 1 . A strip of satin is folded in half lengthwise and clamped with tweezers. The edge is cut at an acute angle and sealed with fire.
- Stage 2 . From the opposite edge, the strip is folded like an envelope, clamped with tweezers and fixed with fire.
Petals are glued onto the felt circle along the very edge. The next layer is glued closer to the center. The petals are placed visually between the petals of the first layer. The same is done with all layers. The number of petals in each subsequent level decreases. The finished flower is decorated with a bead core. You can also combine the colors of the petals.
Multi-layered sharp lush petal
We use 4 pieces of tape. Place a pink triangle on the blue triangle and move it to the right, put a blue triangle on top and move it to the left, add a pink triangle in the center, fold all the ribbons into a petal.
Cut and trim the edges with a lighter.
Round pleated kanzashi petals, master class on simple and two-layer petals.
Bell
When making a bell, the following materials are needed:
- pieces of satin ribbon 5x5 cm - 5 pieces;
- fire;
- tweezers;
- scissors;
- stamens – 1 bunch;
- glue gun
Bell petals are ordinary sharp petals, with the seam turned inward. One stamen is glued to each petal at the base. Then you need to glue their sides together, forming the flower itself.
The leaves of the bell are made in the same way as the petals, only the ribbon must be smaller in width. They should be secured with a glue gun under the flower so that they stick out slightly.
Peony
Materials and accessories
We will need:
- satin ribbons – width 50 mm;
- a small piece of felt;
- threads to match the color of the ribbons;
- ready-made stamens or beads;
- glue gun;
- needle, scissors;
- hair elastic or brooch pin.
Step-by-step master class
Let's draw a petal pattern, taking into account that we are limited to a ribbon width of 5 cm. At the widest point, the petal has the maximum possible length of 5 cm, at the narrowest - 2.5 cm.
Fold a sheet of paper in half and cut out a full petal with symmetrical sides. We trace the contours of the part on the tape and cut it out. We cut out the required number of petals - 6 pcs. To speed up the process, you can fold the tape in four layers (no longer recommended, otherwise we will get uneven edges of the parts). Please note that we cut off the top edge of the tape and leave the bottom edge for ease of assembly.
Tip: when cutting out, you should not connect the layers of ribbon with pins - they damage the surface of the satin. For fixation, it is better to use office clips.
We reduce the pattern around the perimeter by 5 mm and repeat the procedure. Then we reduce the pattern again and cut out the petals. In total we will have three tiers of petals. Melt the edges of the petals. If you have never done such an operation before, practice on an unnecessary flap. By assessing how quickly the fabric melts and how close to the flame you need to bring the edge of the fabric, you can carefully process the edges of the petals.
Holding the edge of the fabric tightly, melt the opposite side and pull the satin in different directions.
As a result, the satin will become wavy. Please note that everything needs to be done quickly, otherwise the cooled satin will become brittle. To give the petal a beautiful shape, hold it over the fire. It is convenient to do this with tweezers. When exposed to temperature, the fabric will bend, creating natural curves. The final stage of creating a peony will be assembly. It can be performed in two ways: sequentially in a circle or alternately in a checkerboard pattern.
In both options, we sew the petals together with the seam forward with the needle. Having finished forming the first row, we insert the stamens into the center and secure the base of the flower by sewing the petals and tails of the stamens with several stitches.
We place the remaining petals in a circle, securing them at the base. For leaves, cut 10 cm of green ribbon. Fold the corners to the center and stitch along the bottom edge. We tighten the thread. We sew the edges of the leaf from the wrong side with a hidden seam. We cut out the base of our composition from felt. Glue leaves on it.
Then glue the flower. When the glue dries, glue a pin or elastic band onto the felt base.
Hibiscus
To make hibiscus you will need:
- satin ribbon cut into squares 5 cm wide;
- fire;
- scissors;
- tweezers;
- stamens;
- decorative wire;
- glue gun
You need to cut teardrop-shaped petals from the squares. Before assembling the flower, you need to corrugate them. To do this, the petal is folded like an accordion into 4 rows, then twisted into a rope and carried over the fire for several seconds. The cooled petal is unrolled.
A wire is glued to half of the petal on the wrong side. There should be at least 7 such petals. It all depends on the desired volume of hibiscus. Several stamens are twisted together and a bud of petals is formed around them. Then the petals are slightly leveled and arched.
Dahlia
Materials and accessories
To make this delicate flower you will need:
- satin ribbon – width 25 mm or 50 mm;
- a little filler for the core;
- lighter or candle;
- thread, needle, scissors.
Description
Cut out petals in three sizes:
- 2.5 by 7 cm (40 pcs.);
- 2.5 by 5.5 cm (20 pcs.);
- 2.5 by 4 cm (30 pcs.).
For the core, cut out a circle with a diameter of about 4 cm.
Melt the edges of the petals. Then we make veins on them.
To do this, place the petal in a linen towel folded in several layers. We heat the knife on a gas stove to a temperature so that it does not burn through the fabric, but leaves a clear mark on it. We draw veins in this way. On the round core we sew a seam along the edge.
Fill the core with filler and tighten the thread. We fold the lower group of petals inward and solder them with fire. Let's start assembling. We sew the smallest petals around the core, gathering them at the bottom. In this case, the front side of the petals should be turned outward. The core should be voluminous. Leave 8 small petals.
Now we will sew these remaining petals to the core, but with the front side inward. With the same arrangement (right side inward) we sew the middle petals. For greater naturalism, we sew small bunches from large petals. Then we distribute them at equal intervals around the circumference of the entire flower and sew them on.
Narcissus
To make one daffodil you need:
- scissors;
- fire;
- tweezers;
- glue;
- 5 squares of white satin ribbon 5x5 cm;
- 3 yellow squares 4x4 cm.
The petal is made like this:
- A square of white satin is folded diagonally twice. Sharp corners must be folded like an accordion into 1 row on each side, then clamped with tweezers, cut off the excess and soldered with fire. You should get a petal with two folds inside.
- The upper edge of the petal is clamped in the middle with tweezers and melted with fire. It has a slightly pointed shape.
The stamen is made in a similar way, only the upper edge is not pointed.
Assembling a flower involves sequential gluing of all elements. The resulting daffodil is practically indistinguishable from the real thing.
Spiral petals
Spiral petals can be made in different ways, I will show 3 of them. We use 2 pieces of 5x5 cm, put them on top of each other. We clamp 3 ribbons with thin tweezers, leave the very first one, and twist them into a spiral. You can fix it with glue or pierce it with a needle so that the spiral holds well and does not lose its shape, we bring the edges of the tape into a sharp petal. We cut off the excess and melt all the cuts.
The second version of the petal with a spiral. We use the same tapes. Glue tape to the right edge to hold the spiral securely. We grab this edge with thin tweezers and twist it before reaching the middle.
Apply glue again. We bend the left edge of the tape back and wrap it around the spiral.
We cut and melt the “tail” and cut off the excess tape from below, but do not melt it with fire yet. Let's make a two-color sharp petal and glue a part with a spiral into it.
We wrap the folded triangles around the twisted petal, and for reliability we glue it with Moment glue.
Cut off the lower part of the petal along with the twisted part and process it with a lighter.
The third new kanzashi petal with a spiral also consists of two pieces of 5x5 cm. We fold two pieces diagonally, wrap the right side of the blue one in pink. We twist the right edge into a tube with thin tweezers, making just a couple of turns.
Fix with glue, let the glue set. We bend the right part with the tube back and turn the part towards us.
All that remains is to fold the sharp petal and process it, cutting off the excess tape and melting it.
Poinsettia
Even beginners can make a poinsettia flower from satin ribbons with their own hands.
The required materials are:
- pieces of tape 5 cm wide and of different lengths;
- scissors;
- fire;
- glue;
- large stamens;
- wire.
The petals need to be cut out. To do this, pieces of tape are folded diagonally and cut out to form a petal. On top of the edges, 2 cuts are made on each side. The blanks are melted over a fire and the edges are slightly deformed. In total, you need 3 petals 5 cm long, 5 petals 6 cm long and 5 petals 7 cm long. Leaves are made in the same way - from pieces of 5x7 cm.
Assembling a flower begins with sequentially gluing together petals of equal length. The first layer of small petals is glued to the stamen, then the next layer is of larger petals, and the largest ones are glued last. The petals must be arranged in a checkerboard pattern.
You need to glue the wire to the leaves on the back side. They are attached to the flower by wrapping the stamen with wire.
Round shape of kanzashi petal
Round kanzashi petals are considered the most popular in traditional needlework of this direction. Their rounded appearance allows you to make hairpins and headbands with flowers of peonies, poppies and other beautiful flowers. When creating a multi-tiered composition, a round kanzashi petal is best suited.
The master class (mk) begins with cutting satin ribbons and folding them into an equilateral triangle. In the middle of the workpiece, the sides are assembled, directed towards the corner, which is located below. When you get the folds, you need to pull the corners back. The edges should be equal and fit tightly to each other. The ends are trimmed with scissors. Burn the edges and glue them together with your own hands. On the wrong side, place a small drop of transparent glue. Some new types of rounded petals can be seen in the presented photos.
The square is bent diagonally in half. The edges must be folded inward, as the photo shows. Turn the petal over and on the reverse side, fold the edges towards the middle. Then, we wrap it in half along the line. We trim the edges and process with fire. If you try to bend the petal to the other side, you will get a completely different round element.
We make a two-color petal in a similar way. Fold two squares of different colors diagonally and connect them together. Use a pin to secure. The smaller square remains unchanged, and the edge of the other piece is folded inward. Fold it in half lengthwise. Trim the edges and burn with a lighter.
Petals consisting of different colors look more interesting. They are used to form large brooches with one flower. You can allow yourself to play with the color scheme as you please. This is the beauty of such products. The video demonstrates how to make common types of petals from ribbons step by step.
Read
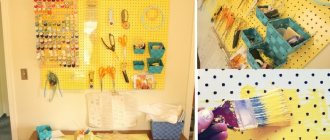
Kanzashi style in the interior - making paintings from ribbons
Dandelion Kanzashi
To make a dandelion you need:
- ribbon 0.6 cm wide in yellow and green colors;
- scissors;
- fire;
- glue gun;
- felt circle with a diameter of 4-5 cm;
- tweezers.
The technique is as follows:
- The tape must be cut into strips 7 cm long. Fold each in half and solder the ends. These will be dandelion petals. Green ones need at least 25 pcs., yellow ones at least 27 pcs.
- Green petals are glued around the perimeter of the felt circle using a glue gun. The second layer is also glued in a checkerboard pattern from green petals.
- All subsequent layers are glued with yellow petals. This way you get a voluminous chamomile, which is perfect for decorating headbands and hairpins.
apple blossom
Materials and accessories
To work you will need:
- ribbon in two colors – width 25 mm;
- ready-made stamens and core;
- glue, needle, thread;
- headband (if flowers are made for it).
Description
Cut the ribbon into pieces 7 cm long.
Fold, matching ends A and B.
We sew each petal. In this case, insert the needle so that a depression is formed in the center. We string all the petals sequentially and tighten the thread slightly. We straighten all the elements so that they are pulled together evenly.
We decorate the flower by gluing the stamens and core. You can make a second tier of petals of a different color.
Sunflower
Any type of sharp petal, such as an aster's, is suitable for making a sunflower. A two-layer flower will require at least 26 petals. The petals are glued to a felt circle with a diameter of 5 cm along the very edge. A little closer to the center you need to glue the second layer in a checkerboard pattern.
The middle can be made of a circle of even felt or dermantine with a diameter of 4–4.5 cm. Beads or large black beads are glued onto it. The middle is glued to the flower, and the sunflower can be considered ready. If desired, you can add decor in the form of a butterfly or bug.
Base for kanzashi to hair
As a rule, women want to hide large hairpins and leave only a flower on their hair, so they attach them to hairpins. If there is only one flower, it can be glued into hairpins, for example, for bangs.
When the composition includes one or more flowers, it is better to attach the flowers to the comb. Since the comb is more stable, it will withstand many flowers on the hair and maintain a natural look.
Note!
- Kinusaiga technique - TOP-140 photos of the best ways to create crafts using the Kinusaiga technique with your own hands + instructions for beginners
Do-it-yourself passe-partout - a master class with step-by-step do-it-yourself schemes. Making tips + photos of the best examples
- Decoupage with napkins: TOP-150 photos of ways to decorate with napkins. Simple instructions for beginners at home
Kanzashi flowers also look great on a hair hoop, especially if they are located along the entire hoop from small to large.
Lilac
To make a lilac branch you need:
- lilac ribbon 1 cm wide;
- beads;
- beading wire;
- fire;
- scissors;
- needle with thread;
- green floral ribbon.
The tape must be cut into strips 1.5 cm long. At least 60 pieces will be required. Flowers are made from them in the same way as jasmine flowers. Just before tightening the thread, you need to stick a wire with a bead strung on it into the center of a piece of ribbon. The result is a lilac flower on a stalk.
When all the flowers are ready, you need to form mini-branches of 3 each from them. and secure with one of the wire legs. A lilac branch is formed from these twigs and wrapped with floral tape.
Ranunculus
To make a ranunculus you will need a standard kit:
- scissors;
- candles;
- tweezers;
- satin ribbon of different widths;
- glue gun;
- beads.
To make the petals, you need pieces of satin:
- 2×2 cm – 18 pcs.;
- 2.5×2.5 cm – 18 pcs.;
- 3×3 cm – 14 pcs.;
- 3.5×3.5 cm – 24 pcs.
You need to cut out round petals from them, like a peony, trim the base, melt it over the fire, fold the base like an accordion, hold it with tweezers and secure it with fire. The core of the ranunculus is made from a 5x5 cm piece of satin, into which a wad of cotton wool is sewn. It turns out to be a ball on which the petals will be attached.
Assembling the flower must begin with the smallest petals, pasting them over the stamen ball. Thus, you get a very beautiful flower that will suit any decoration as a decoration.
floating cup
You will need: thin floral felt, cup, saucer, fork, foam sponges, glue gun, titanium glue, soldering iron, ruler, satin ribbons of different colors 5 cm wide, tweezers, weight (metal square or something else), decorative ornaments - stamens, microbeads, beads, butterfly...
Master Class
- Cut out felt leaves in the required quantity. There are 30 of them in this master class. Image 4.
- Cut the ribbons into squares; for one flower you will need 5 squares of the same color. Image 5.
- Form a petal by folding the square twice diagonally, then pinch with tweezers. Image 6.
- Guide the soldering iron along the marked line. Image 7 and 8. You should get a petal like in image 9.
- Turn out the petal. Image 10 and 11.
- Make 50-70 petals this way. Image 12.
- Fold 5 stamens and thread them through a bead. Image 13 and 14.
- Shape the fork into a curved shape and glue the fork handle to the inside wall of the cup with a glue gun. Then glue the fork to the center of the saucer, leave it for 10 minutes, and then apply hot glue on top. Image 15 and 16.
- Place a metal square on the fork and saucer as a weight. Image 17.
- Cut the sponge into pieces and glue them on, masking the fork, weight and making a platform for the flowers. Image 19.
- Cover the foam rubber with felt. Image 20.
- Take a bead with stamens and glue 5 petals. Make all the flowers this way. Image 21,22 and 23.
- Apply titanium glue to the core of each flower and sprinkle with microbeads. Image 24.
- Cover the saucer and the inner wall of the cup with petals. Image 25 and 26.
- Glue the flowers as shown in images 27 and 28.
The soaring flying cup with kanzashi flowers is ready!
Wedding bouquet of ribbons
Over the past few years, wedding bouquets made from satin ribbons have become very popular. It's unusual and beautiful. Such a bouquet will please the eye for a long time, because it will not wither.
Handmade flowers made from satin ribbons for a wedding bouquet will become a unique symbol of family happiness.
By combining various flowers from satin ribbons, you can create decorations for hairpins or headbands, as well as themed bouquets with your own hands.
To complete it, you need to make a suitable number of flowers from ribbons (roses are most often chosen) and stick them on a foam ball with a handle. For greater strength and beauty, you can stick a needle with a stone at the end into the middle of each flower. The handle must be wrapped with a strong satin ribbon. As additional decor, you can use rhinestones and pearl beads.
Flowers made from satin ribbons are an effective way to decorate accessories, household items, children's items, and even make a wedding bouquet.
Exclusive options for kanzashi hairpins
To ensure that a woman’s hairstyle is impeccable and maintains volume for a long time, a kanzashi flower is attached to a hairpin. Hairpins are less noticeable on the hair and are better able to maintain the volume of the hair on the head.
In order to simply secure bangs or a few strands of hair, use hairpins. And on a hairpin, a bright butterfly with several beads, or a pointed dragonfly with an elongated shape looks perfect.
You can also attach beads or small sparkles to the product. You can attach several flowers of different shapes to the reverse side of the comb. On the hair, the comb will look from the front side, and the flowers from the back. You get a two-in-one effect.
Many female representatives prefer to create a decoration for themselves using the kanzashi technique for their necks, attaching small flowers to chains or beads and adding a couple of butterflies. This makes a beautiful DIY necklace.
You can also glue flowers onto the braid, so that the side that lies on the body is soft. For example, add a small piece of fabric from the back. If a woman likes pearl beads, then it is better to add a kanzashi flower in light shades, for example, soft pink or bluish.
Another piece of jewelry for women is earrings. The flowers are very small, and the earrings, on the contrary, are long. You can also add some flowers with round petals to the earrings.