- June 19, 2019
- Needlework
- Natalia Penchkovskaya
The Japanese art of folding petals and leaves from pieces of fabric is called kanzashi. Every year it gains an increasing number of fans all over the world. Our craftsmen most often use satin or crepe ribbons for such crafts. In the article we will consider the procedure for making a beautiful bird, a symbol of marital fidelity and devoted love - a swan from satin ribbons. Knowing the basics of kanzashi, you can easily create both a flat figurine of a bird and a three-dimensional version for decorating a room for a wedding celebration.
How to make swans using the kanzashi technique: a master class with a description of the stages
You can make swans from satin ribbons for yourself or as a gift, for example, for a wedding. Elegant symbolic items will become an original decoration for a wedding ceremony, and then turn into a talisman that will preserve the love of a married couple for many years.
To make a kanzashi style swan you will need:
- white satin ribbons 1.2 and 2.5 cm wide;
- satin ribbons of black and red colors 1.2 cm wide;
- wire;
- yarn;
- scissors;
- glue gun;
- wire cutters;
- candle.
There are good tutorials on the Internet with photos and videos that tell you how to make a swan from ribbons step by step. It is necessary to act in the following sequence:
- First of all, you need to make the frame of the bird. To do this, bend the wire into a hook and form a loop from the bottom edge. This will be the base of the figure. From separate pieces of wire of the same length, bend two loops for the wings and attach them to the base.
- The frame is wrapped with yarn so that it is convenient to glue feather petals to it.
- The free edge of the hook is wrapped with red ribbon, indicating the bird's beak. A piece of black tape is glued a little higher; these will be the eyes.
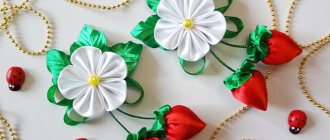
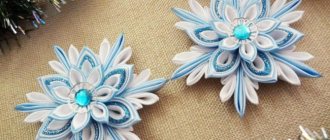
- Using the kanzashi technique, sharp white petals are prepared. Petals are made from a 2.5 cm ribbon and pasted over the chest, back and wings of the swan. From a 1.2 cm ribbon - head and neck. Make several elongated wide petals and attach them to the tail.
- The graceful snow-white bird is ready! It can be decorated with pearls and rhinestones, sprinkled with sparkles. And if swans are planned for a wedding, you can make them a top hat and veil.
Royal birds also have a feng shui significance. Swans looking at each other using the kanzashi technique is a talisman of love and tenderness towards each other.
Kanzashi lesson: how to make a kanzashi swan
How to make a kanzashi swan
This kanzashi lesson is dedicated to the creative process of making my next product from satin ribbons - a kanzashi (bride) swan.
I did all the stages of creation, as promised. took a picture.
First, I created an image of my future swan on a piece of paper. I found some wire and shaped it into a neck according to the drawing. Then I cut out the outlines of the swan shapes, a centimeter smaller than in the drawing. This is so that when gluing feathers onto a workpiece, the volume of the product does not exceed the design itself.
I transferred the outlines of the shapes from paper onto polystyrene foam, and cut out blanks for the wings and body of a swan from it with a knife.
I wove two baubles from a 0.5 cm wide ribbon. I folded them in half and sewed them together. I ended up with a long square bag. Then, using a bandage and cotton pads on a wire blank, I created a model of the swan’s neck and head of the required diameter. I left the beak thin. I added volume to my head using cotton wool. Then I pulled a sewn stocking from baubles onto the finished model.
I made the beak from red and black ribbon, gluing them alternately to the base, and decorated it with rhinestones. Then I glued on the eyes and eyelashes.
For the kanzashi swan (bride), I made feathers using a 2.5 cm wide satin ribbon, cutting it into 5 cm pieces. Having studied kanzashi lessons on the Internet, I made them according to the principle of making the most common sharp kanzashi petal.
I pasted the finished feathers onto the wings and body of the swan. The free edge of the neck mock-up wire was stuck into the foam and glued at the junction of the neck and body for reliable fastening. I also glued wings to the body.
The junction of the swan's neck and body was sealed with feathers.
I made a crown for the bride from foam plastic, decorating it with stones and lace. The veil and veil were made from tulle.
This is how my kanzashi (bride) swan turned out.
My kanzashi swan is the bride
Next, I plan to continue working on my exhibition “Tenderness”. I will reflect the process of making all the products for her on my blog in the next kanzashi lessons. If you are interested in how my creative process will be carried out, be sure to subscribe to my blog updates.
- Ready-made elements of the future exhibition “Tenderness”
- Also, I will not be indifferent to your comments and reviews about my kanzashi lesson: how to make a swan from satin ribbons.
- I wish everyone Health, Love and Happiness!
- See you on the pages of my blog!
- Subscribe to the RSS newsletter and receive announcements about new articles to your email:
How is everything done?
You need to understand that the work is very painstaking. It can take up to a month for two birds. It needs to be decorated with high quality. To make it easier for you to understand everything, just use the master class below.
As you can see, you really need to try. But the result is worth it. Good luck!
Kanzashi made from satin ribbons for beginners: master class on hairpins and swan
What can lovely ladies come up with to look bright, beautiful and unique? With a huge selection of ready-made jewelry and accessories, many fashionistas prefer to create incredible creations themselves and proudly display them. Kanzashi made from satin ribbons for beginners is just such a creation.
One of the first to decorate themselves with their own hands were Japanese women. They also became the progenitors of the art of kanzashi - the technique of creating flowers from silk. Residents of the Land of the Rising Sun decorated their hairstyles with flowers, which they made themselves from natural silk.
Methods of working using the kanzashi technique have become very popular all over the world. Needlewomen use the basics of kanzashi not only to make hairpins with flowers and leaves, as originally intended, but also to create paintings and canvases, figurines of animals and birds, voluminous topiaries and trees.
The materials and tools that craftswomen worked with in past centuries in Japan have also undergone changes. Previously, only noble and rich houses could use natural silk as the basis for kanzashi flowers, and all the parts were glued to each other using rice glue.
Now fashionistas have access to various types of fabrics, tapes, as well as all sorts of methods for fixing and gluing workpieces - using ordinary glue, a soldering iron, a lighter, threads and needles, liquid nails, etc.
One of the simplest, lightest and most inexpensive materials for creating kanzashi products is satin ribbon. This is the most successful fabric for beginning needlewomen. It is easier to cut it into even squares, and the edges are easier to singe over the fire.
In this article we will look at several master classes on working with the kanzashi technique from satin ribbons for beginners. Let's make a hairpin and learn how to make a swan.
DIY ribbon hairpins with photo tutorials
Content
Recently, it has become popular to make hairpins from ribbons with your own hands, as well as elastic bands and braid braids with ribbons. In such needlework, the tsumami kanzashi technique made from satin ribbons helps.
Our master class, as well as video lessons, will be devoted to creating hair jewelry in the Tsumami Kanzashi style.
Making a hairpin from ribbons
We will start our master class with creating kanzashi hairpins for beginners. To do this, we need the following accessories, namely:
- pieces of satin ribbons, or grosgrain ribbons, orange and white;
- decorative material in the form of a rosette and black beads;
- scissors;
- textile glue;
- fire from a candle or lighter;
- simple hairpin.
The pattern for creating a hairpin is simple. Take the tapes and mark them with a simple pencil, measuring 5 by 5, in the amount of 16 pieces. We do the same procedure with white tape. Cut everything into squares and pour fire over candles or lighters so that the threads do not unravel, and you can make tsumami kanzashi.
Look at the photo, this is what you should get.
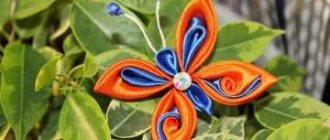
For such a hairpin, we will make pointed petals. This technique is very common and you can easily find it in videos on the Internet. Let's make the pointed double petal orange, inside it will be white. Take the orange square and bend it diagonally, then once more and pour fire on the corner. Fold the white blank also diagonally, only three times. Look at the photo to see what happens.
Attach the white blank to the orange one and make a petal. Remove the end and excess material and scorch with flame. We should have 16 such elements. To decorate the hairpin, we need a few more simple single-layer blanks. From a piece of tape, do exactly the same actions that we did above in the text. Simple pointed petals are made in the same way as two-layer ones. Let's not repeat ourselves so as not to waste time. This process can be seen in the video or photo in the text. We need twelve pieces of such blanks. Our master class continues, and we begin to make the main part of the hair clip with our own hands. Cut out a circle with a diameter of 3.5 cm from thick cardboard and stick tape on it. In the end, such an element should be formed. Now we move on to connecting all the elements together. Take the double pointed petals, and after smearing them with glue, attach them to the round base. We do this in a circle. Do this technology, clearly along the edge, attaching all the petals tightly. This should be the first tier of the flower, as shown in the photo.
Next, you need to cut out another circle with a diameter of 2.5 cm and also cover it with satin. Then, in a circle, glue simple petals. In the end, you should end up with a do-it-yourself piece using the tsumami kanzashi technique.
This small flower must be coated with glue on the reverse side and carefully glued to a large bud.
Our master class is coming to an end, all that remains is to decorate the flower. For this, we need a socket with a black bead.
Place a drop of glue on the rosette and then on the bead, glue this decor into the center of the flower and press with your finger. Look what a tsumami kanzashi we got. Now take a simple hairpin, crab or elastic bands, onto which we will attach a flower. Apply glue to the hairpin or crab, and press the flower against it, holding it a little with your fingers until it hardens completely.
Spray a little hairspray onto the finished accessory. This master class is for beginners, completely completed. In the same way, you can decorate hairpins or elastic bands. We hope that our video tutorials will be useful to you, and you will be able to create new hair decorations with your own hands.
Ribbon hairpin
For work, you will first need satin ribbons of any color, 5 and 2.5 cm wide; glue, or better yet, a glue gun; source of fire - lighter, matches, candle; cardboard; hairpins; beads or rhinestones for decoration.
1) The first step is to cut even squares from the ribbons.
2) We start working with large squares - fold a piece of fabric diagonally so that the wrong side is on the inside.
3) Fold it in half again.
4) And fold it again, and in the end you should get a sharp petal.
5) Now you need to fix it, for which, holding the part with your hands, we cut off the folded corners by a few millimeters.
6) Solder the cut area above the fire, the petal should be fixed.
7) In order for the petal to look smooth and neat, you need to cut off the corner at the base and also scorch it with fire.
 The petal is ready, you need to saddle 5 more pieces according to the indicated pattern.
9) Now let's start working on the small petals. It is necessary to repeat the first two previous stages and fold the square in half twice.
10) After this, you need to bend the corners to the sides and also fix and scorch the base using fire.
White swan made of ribbons
To conduct this master class, you will need not only patience, but also some materials:
- satin ribbon in colors such as red, white and black;
- scissors and lighter;
- glue gun;
- wire with pliers;
- knitting yarn.
First of all, you need to build a wire frame, as shown in the photo. Then wrap it in several layers of knitting yarn. You should get it as shown in the picture.
Use red thread to highlight the swan's beak. Take a narrow black satin ribbon, singe it with a lighter and connect it together, and then glue it over the beak.
These will be the eye sockets of the Kanzashi swan.
Next, you should make a large number of round and pointed petals from a white satin ribbon. You can see a description of the process in previous articles that are on our website, as well as video material on this topic. Using a glue gun, start gluing the kanzashi petals from the head to the very end of the neck length.
The master class continues, now you need to make wings for the swan. Take a thin wire and twist it into loop-like shapes. Wrap such frames with knitting threads in several layers. Such wings must be attached to the swan's body. You can glue them with glue or carefully screw them with wire.
In order for the wings to look harmonious against the background of the overall picture of the product, cover them with inverted pointed petals using the kanzashi technique. From the reverse side, the swan's wing will look as shown in the photo.
To give the back a lush effect, you need to glue the kanzashi petals one on one. This is not at all difficult to do. Glue the larger pointed petals first, and then insert smaller elements into them. The ponytail is made by layering several tiers of white blanks.
After all the manipulations carried out, we can say that the master class is over. Such a swan made using the kanzashi technique will not only decorate a festive interior, but will also become an unusual hand-made gift.
As you have already seen, this technique is not in itself very complicated. Creating a swan using the kanzashi technique will not take you much time - only 2.5 hours. It is not necessary to make a product exactly similar to the photo of the presented master class.
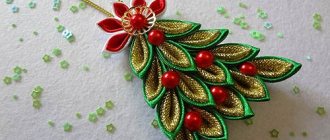
Show your imagination. Make it, for example, black or a pair of swans swimming with their chicks. You can make a decoration of two birds in the shape of a heart. There are a lot of possibilities.
As an example, watch the video material with the step-by-step process of working on a swan.
Video: Swans using the kanzashi technique
Swan Kanzashi
Having examined the method of making petals step by step, you can make a wonderful home decor - a swan from satin ribbons. Creating this creation will require perseverance and patience, but the result will exceed all possible expectations.
1) For work you will need: satin ribbons in white, red and black; scissors, fire source, glue gun and wire, white knitting yarn.
2) Firstly, it is necessary to create a basis for the future swan, for which we will make a frame from wire and wrap it with yarn.
3) Use red yarn to highlight the beak, and use black thread or a piece of black satin ribbon to decorate the eyes.
4) Then the most painstaking and lengthy work begins - you need to make a large number of white petals according to the pattern described earlier, and then, starting from the head, stick them from top to bottom to the base of the neck.
5) We will make wings from wire and yarn and glue or connect them with wire to the swan’s body.
6) Next, we glue the petals again; it is best to approach the process of decorating the swan individually, that is, select the details so that the swan looks natural, and the petals look like smooth and even feathers.
7) If large petals look scanty, then you can put smaller pieces in them - as discussed above.
Surprisingly, in this master class there is no specific final stage - the figure can be considered finished when your imagination dictates. If the swan has a bushy tail, then it is necessary to glue more petals; if the wings are small, then it is enough to glue several petals in one layer - it all depends on the desire and imagination of the needlewoman.
Base for the figure
If a flat figure of a swan can be made on thick cardboard, then for a three-dimensional version of the bird you will need a base. It is made from various available materials. Some craftsmen sew it from fabric according to a pattern and fill the inside of the craft with padding polyester or stuff it with cotton wool, and then cover the figure with satin details.
Our sample uses wire folded in half. Using pliers, it is easy to give it the desired shape with a curved neck and leave a wide loop at the bottom for the body so that the swan made of satin ribbons maintains a vertical position. Be sure to wrap the wire figure with several layers of yarn.
Kanzashi for beginners: master class on how to make elastic bands, headbands and hair clips
Kanzashi is a very popular type of craftsmanship that can be used to create various decorative elements such as roses on hairpins, bows, headbands decorated with flowers, and much more. Also, this art is so beautiful that after getting acquainted with the craftsmanship of kanzashi, you will immediately have new ideas for making all kinds of products under your authorship. Kanzashi petals are perfect for decorating children's clothes, cocktail dresses, and just everyday clothes. The “Kanzashi for Beginners” master class will teach you the basics of making kanzashi products, and here you will also find videos on making and decorating various jewelry. The art of kanzashi is so diverse that it allows you to create literally any product, from jewelry - a lush bow, to crafts - a butterfly, a swan, a ladybug.
Making a crown headband using the kanzashi technique for beginners
To make a kanzashi headband you will need:
- Prepared squares from white tape 5*5 and silver 4*4
- White and silver ribbon 0.6 cm
- Glue
- Candle with lighter
- Beads
Collect 2 sharp petals. Let's connect them together.
These are the blanks you get.
Next we trim them.
Next, take the glue and start gluing the flowers together.
We create a hairpin from satin ribbons using the kanzashi technique
For work, you will first need satin ribbons of any color, 5 and 2.5 cm wide; glue, or better yet, a glue gun; source of fire - lighter, matches, candle; cardboard; hairpins; beads or rhinestones for decoration.
1) The first step is to cut even squares from the ribbons.
2) We start working with large squares - fold a piece of fabric diagonally so that the wrong side is on the inside.
3) Fold it in half again.
4) And fold it again, and in the end you should get a sharp petal.
5) Now you need to fix it, for which, holding the part with your hands, we cut off the folded corners by a few millimeters.
6) Solder the cut area above the fire, the petal should be fixed.
7) In order for the petal to look smooth and neat, you need to cut off the corner at the base and also scorch it with fire.
The petal is ready, you need to saddle 5 more pieces according to the indicated pattern.
9) Now let's start working on the small petals. It is necessary to repeat the first two previous stages and fold the square in half twice.
10) After this, you need to bend the corners to the sides and also fix and scorch the base using fire.
11) Prepare the base for the hairpin - cut out two even small circles from cardboard.
12) The cut out circles should be wrapped in a piece of satin ribbon and the fabric should be secured on the back side.
13) Carefully glue the petals to the base using a glue gun.
First, large sharp petals are glued.
14) Small petals are carefully placed inside the large petals and glued.
15) It is better to decorate the center of the flower with rhinestones or beads, also gluing them with glue.
16) The hairpin is ready, all that remains is to glue the created creation to a metal pin or clip.
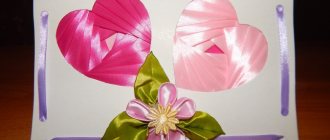
We create a “Winter's Tale” set from an elastic band and a hairpin
To complete this we will need 2.5 cm tape, glue, and hairpins.
We cut strips of 5 cm from the tape. Need 5 stripes.
Take the cut rectangle. We hold it with the wrong side facing us.
We bend it, hiding the front side.
Next, fold it in half.
We turn it towards the middle and scorch the corner.
This turns out to be a petal like this.
Create 4 more petals.
Next, we pull apart the centers of the petals, in other words, fluff them up.
Sew 5 petals. The petals hold their shape well, there is no need to glue them.
The finished flower can be decorated with granza. To do this, take 2 silver strips, fold them in half and singe them. The size of the strips should be such that they can fit into the middle of the petal.
For each flower we need 2 organza petals.
We insert them into the recess of the petal. Next, we either stitch or glue, whichever is more convenient.
When assembling brooches, it is best to take 6 strips of ribbon, 6 cm each, for the first tier, and 5 strips, 5 cm each, for the second tier. Decoration is at your discretion, we made it from organza.
In addition to kanzashi jewelry, crafts made from satin ribbons have become very popular. These crafts are so beautiful that they can be created for gifts, and so easy that a child will happily perform them under the supervision of an adult. A ladybug, a swan and a butterfly look very beautiful when performed using the kanzashi technique.
Making a kanzashi swan from satin ribbons with your own hands
To make such a swan we will need:
- White satin
- Wire for frame
- White threads
- A little red thread
- Glue
- Sharp scissors,
- Lighter
- Wire pliers
First, we form a swan frame from wire and wrap it with white thread.
It should look like this. Do not spare the thread when winding; the wire should not be visible.
Next we'll work on the beak. We wrap it with a narrow red ribbon.
We make two small leaves, solder them together and glue the eyes of the swan.
Then it's a matter of technique. Prepare small round or oval leaves, as you wish, and begin to paste them over the swan. First the head.
Then move to the neck.
Next, we make two loops from the wire for the swan’s wings.
We wrap the wings with thread, just as we wrapped the body, and attach them to the swan.
We cover the wings with a sharp inverted petal.
From the inside out the wing looks like this.
We cover the back of the swan with the same leaves as the neck. Only the size of the leaves should be larger.
As you can see from the master class, you can make almost anything you want using the kanzashi technique. Having made one part, you will certainly want to continue and make more and more products.