The bow tie has long been used by men all over the world to create a formal look. However, now this accessory is acquiring more and more original forms and is worn by both boys and girls of all ages, regardless of the importance of the event. And you don’t need to purchase this decoration at all in the store. After all, making a bow tie quickly and easily with your own hands from the most ordinary satin ribbon is quite simple. This is where the master classes presented in this article will help.
How to make a simple kanzashi butterfly? :
Nowadays it is very fashionable to create various accessories for clothes, hair, and interiors with your own hands. One of the simplest and at the same time beautiful elements for decorating a hairstyle is the kanzashi butterfly. Even a novice needlewoman can do it.
Materials and tools
The kanzashi butterfly is made from satin ribbons or fabric, which can be carefully cut into squares and the edges melted under the influence of temperature. Silk and organza are suitable. It's easier to use tape. Usually they take a width of 4 to 6 cm. It is difficult to fold elements from a smaller strip. You will definitely need tweezers.
So, in order for you to get a beautiful kanzashi butterfly, you will need the following:
- Satin ribbon (one or several different shades) or fabric.
- Sharp scissors.
- Candle, lighter or soldering iron.
- Tweezers.
- Thread with a needle or glue.
- Decor for making the body (beads, seed beads, wire or fishing line).
There is nothing unusual. In principle, you can do without a soldering iron or tweezers, and melt the edges carefully over a gas stove.
One-color kanzashi butterfly: master class
During the manufacturing process, the two simplest methods of folding elements will be used: with a sharp edge and a rounded one. If you show your imagination, you can even create many butterfly options based on this:
- Both pairs of wings are made of sharp single-layer “petals”.
- Same with rounded elements.
- The upper wings are sharp, the lower ones are rounded (all single).
- Any combinations with double, triple “petals”.
You see how different the Kanzashi butterfly can be. The master class will help you create these amazing decorations with your own hands. The work steps will be as follows:
- Take a satin ribbon, for example 5x5 cm, and cut 4 squares from it (one for each wing). For doubles, two respectively.
- Carefully melt the raw, frayed edges with a soldering iron or over a flame.
- Make two sharp petals for the top wings of the butterfly. To do this, fold the original square in half, then the resulting triangle in half again, and again again. Connect the layers of the part together with a soldering iron or melt the contact point over a flame. You can sew it with thread or use glue. Choose a convenient method. To work with flames, you should use tweezers. Make the second sharp part in the same way.
- Make two rounded petals. To do this, fold the remaining pair of squares (separately) as follows: first in half, then press the corners located at the base of the resulting isosceles triangle to the top, then bend the corners back at the created square. Secure the element layers over a flame or other method.
- Connect the sharp and rounded wings together. Do the same with the second pair of parts.
- Make a body, head and antennae using fishing line or wire, beads, beads.
- Glue the parts together. For strength, you can use a small cardboard backing covered with the same tape on the reverse side.
The simplest butterfly is ready. You can make each wing double, then the original number of squares will increase.
Multicolor butterfly made of kanzashi satin ribbons
Use a combination of shades at your discretion. The manufacturing technology will remain the same. Minor differences are as follows:
- For example, for spicy wings, cut two red and two pink squares. For round ones, you can take a similar combination.
- Before the last folding operation, in both cases you place two differently colored prepared elements on top of each other. You are already working with a two-layer part. Solder all layers of tape together.
Otherwise there is no difference. You can even create three-color elements (from three layers of blanks). In this case, for the internal ones it is better to use a smaller tape or move the parts relative to each other, and then trim the resulting wing.
Where to use the created decor
So, you have got very beautiful butterflies in the kanzashi style. Where to apply them? From the made jewelry you can make the following:
- Magnets.
- Decor for curtains.
- Accessories for hair, clothes, bags.
- Glue on artificial flowers, jewelry box, photo album, photo frame or mirror.
In a word, use it as your imagination tells you.
How to make hair jewelry
A butterfly made from kanzashi ribbons is perfect for an elastic band, hairpin, hairpin or headband. Initially, this technique was used specifically to create hairstyle decor.
To make such an accessory, you will need a base, such as a hairpin. Glue the completed butterfly onto a cardboard base covered with satin ribbon, if this was not done during the assembly process.
Materials
Designers and fashion designers select fabric for sewing ties very carefully:
- Made from satin ribbon. These butterflies look elegant and look good at various events.
- Knitted. These ties are quite original and unusual. Many men prefer manual work.
- Made from felt. A good option for a child.
- Velvet butterfly. Exciting velvet looks good at evening meetings.
- Butterflies made from denim fit perfectly into a hooligan street style.
- Made from grosgrain ribbon - a rather attractive and practical option.
- From foamiran. Such soft-touch material is more often found in bowties for children.
- Leather butterfly. As a rule, it is decorated with metal fittings and looks quite brutal.
- Quite interesting bright products are made from felt.
Among other things, when making butterflies, materials such as soft, light brocade and taffeta, tweed, cashmere, wool, cotton, linen, and viscose are used.
In the classic version, butterflies are made from linen, silk, cashmere, wool and polyester. Today you can find butterflies made of wood and metal. The latter are unlikely to be suitable for a business event, but they will make their owner stand out among the crowd at various walks and thematic meetings.
We select for clothes
Here are a few basic color schemes that will help you look stylish and appropriate in any situation:
- Black. The black butterfly is a timeless classic that goes with almost everything. It looks most advantageous against a white shirt, and textured as an addition to a black one.
- A white tie is a great way to play with contrast if you have a black shirt. It looks interesting against a white shirt, especially with silver splashes.
- Blue. Another popular option among men who prefer to look stylish and at the same time unusual. It will serve as an excellent addition to a blue suit and a pink shirt.
- A blue tie is suitable for summer looks and looks impressive in photographs. Suitable for a gray or dark blue suit, a snow-white or sky blue shirt.
- Red. Quite a catchy and aggressive color that attracts attention. This accessory is often used by media personalities and presenters whose activities are related to the show. Relevant for black, blue and gray suits and shirts.
- Burgundy. A more modest version of its predecessor. Pairs perfectly with black, light brown and dark blue outfits.
- The pink color, despite its softness, can perfectly harmonize with a brutal masculine image. See for yourself by trying on a pink bow tie with a purple suit and gray shirt.
- A brown bowtie complements retro looks well and goes well with brown and dark blue suits, as well as champagne splash shirts.
- Orange. Another extravagant option for lovers of everything unusual. Will complement the autumn and spring look, harmonizing favorably with the surrounding nature. Pairs with gray, striped suits and white or brown shirts.
- A yellow tie is a bold and eye-catching touch. A challenge to gray everyday life and officialdom. Try it on with a blue or beige suit and a blue or white shirt. You will be surprised how interestingly colors can harmonize that at first glance seem incompatible.
Knitted option
Knitted butterflies look very interesting, especially if they are made with your own hands. Such ties began to appear quite recently, and women wear them. After all, what a girl won’t do to look beautiful and stand out among others. Such decorations are crocheted, which allows you to make the accessory openwork and interesting.
Now we knit air loops. You will need as many of them as the length of the butterfly, but keep in mind that the chain should fold into a ring. Therefore, the length of the butterfly is half the chain of air loops.
Next, in single crochet columns, we knit as many rows as the width of the product. When the part is knitted, we begin to knit the strip on which our butterfly should be attached. We collect a chain of air loops - the length of the strip. We begin to knit the first row without crochets. Knit to the width of the ribbon. When the ribbon is ready, on the last stitch of the row we cast on 20 chain stitches or less, and knit single crochet rows, while attaching everything to the base of the ribbon. We do this for the middle part of our butterfly. And symmetrically from this ring we knit the second side of the ribbon. Next, look at the photo and work according to the described scheme of this product.
Related article: Crochet booties with piglets. Knitting patterns
On the second half of the ribbon we make loops - holes for the button. This is done by skipping buttonholes. Now we take our butterfly, select the middle and stretch the bow into a ring on a ribbon. This is how our bow tie turned out. Now we sew on the button, and you can glue some pebbles and beads onto the middle ring.
These knitted ties can be made for both children and adults. Of course, knitted butterflies are worn by women or crocheted for small children.
A blouse with a bow will highlight your femininity
Men love with their eyes. They choose women who are confident, slim and charming. The created feminine image is also important. Seeing a girl in tight dresses, beautiful skirts, airy shirts, blouses with bows, a young man can quickly lose his head. Therefore, a blouse with a bow should be in the wardrobe of every girl who wants to surprise, seduce and inspire her loved one and those around her!
How to make a butterfly from fabric
Bow ties are created in different ways and fall into two main categories:
- A traditional stylish model a la a tie that needs to be tied around the neck;
- A wonderful accessory that is attached using a special clasp.
According to the form, our product is divided into four types:
- Traditional products, the width of which is no more than 6 cm.
- Large bow ties with a width of only 8 cm.
- Butterflies-diamonds, made in the form of a rhombus;
- Ties with round ends.
Popular articles How to make a circular table for a jigsaw with your own hands?
If you want to sew a butterfly yourself and give it to your man, follow the step-by-step instructions. First you need to decide which material is best suited for the future product. If you use silk or corduroy, the bow tie will have a decent and business-like appearance.
A more inexpensive option is polyester, which is similar to satin models. Another economical option is paper. The first product should be sewn from inexpensive material, so as not to worry too much if everything turns out badly. If you want the product to keep its shape, take a thick fabric to work with.
Required Tools
The most important thing in any handicraft is to stock up in advance on the necessary materials that will be used to create the item. Therefore, before we begin to understand in detail how to make a bow out of fabric, let's find out what may be useful to us during our work.
- A sewing machine is necessary in order to sew an even stitch and sew the necessary details of the bow.
- An ordinary needle is needed to sew small bow elements.
- Sewing pins are needed to fasten the bow pattern to the fabric or those pieces of fabric that will then be sewn together with a needle or sewing machine.
- You may need a piece of cardboard if you want to make a voluminous, beautiful bow.
- Threads to match the fabric are essential so that the stitches do not stand out against the background of the bow and do not disfigure this decorative element.
- Sharp scissors are essential to cut the right amount of fabric.
Kanzashi bows with ribbon butterflies. Master class with photos
Hello everyone!
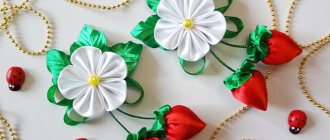
There are many ways to make hair bows using the kanzashi technique. I'll tell you how you can make cute bows with butterflies from ribbons with your own hands.
These bows were made for my daughter in her favorite color pink. For the bows I chose a grosgrain ribbon with a pattern 2.5 cm wide, for the butterflies I took a bright satin ribbon 2.5 cm wide.
Kanzashi bows made from ribbons
You will also need decorative elements, a glue gun, hair bands, thread and needle, ruler, scissors, a lighter and needles to fix the parts while working.
To make one butterfly you need to prepare: 2 pieces of 10 cm, 2 pieces of 5 cm, 2 pieces of 2.5 cm (35 cm in total).
bows with butterflies step by step master class photo
For the base of the bow you will need 3 pieces of grosgrain ribbon, 18 cm each (total 54 cm).
First, let's make a butterfly from a satin ribbon. We treat the edges of each segment with a lighter or candle so that they do not unravel.
Let's take a piece 10 cm long and make the upper left wing.
To do this, repeat the steps in the next photo. Fold in half and mark the middle. Then we bend the right side of the tape at a right angle, fold it again to the right and close it on top with the left side of the tape. We stab it with a needle.
butterfly from ribbons master class step by step photo
Now let's make the upper right wing, but in a mirror image.
master class bows butterflies kanzashi photo
We will make the lower wings from pieces 5 cm long.
First fold it at a right angle. Then we bend it again and fix it with a needle. The lower wings are the same.
Kanzashi bows, ribbon butterflies master class photo
From the smallest pieces we will make a sharp kanzashi petal. This will be the middle part of the butterfly. Fold the tape diagonally, then diagonally again. Then connect it in half using a lighter or candle. We cut off the lower part a little and also connect it using a lighter. You will need 2 of these parts.
butterflies made of ribbons, kanzashi hair bows, master class photo
Now we lay out the parts in the correct order and assemble them with a thread and a needle. We start with the upper left wing, then the lower, middle part, second lower, upper right wing and middle part.
butterfly from kanzashi ribbons master class step by step
Then we remove the needles and gradually tighten the thread to create a butterfly. We sew both parts together, fasten the thread and cut it. Glue any decorative elements. For example, stamens and a suitable center. The butterfly is ready.
butterfly made from ribbons, kanzashi bows master class photo step by step
You can use these butterflies to decorate various items. but I decided to decorate my hair bows with them.
To make the base of the bow, fold 3 pieces of grosgrain ribbon in half, mark the middle, then unfold and pin in the center with a needle. We sew all 3 parts, placing the second on the first, and the third on the second part. Remove the needles, tighten the thread and fasten.
Kanzashi bows step by step master class photo
Glue the hair elastic on the wrong side using hot glue. Then we glue a narrow ribbon around the center. You can fold the same ribbon in half or use a narrow ribbon of a suitable color.
Kanzashi bows butterflies from ribbons master class photo
A hair bow with a butterfly made of satin ribbons is ready.
kanzashi bows, photo master class, DIY ribbon butterflies
You can make a second one if the child likes to wear matching jewelry.
I hope the master class was useful and understandable.
If you are interested in creativity in general, as well as step-by-step master classes and original ideas, like it, share it with your friends on social networks and subscribe to my channel.
- You might be interested in reading:
- DIY chocolate bowl for a sweet gift with tea bags
- DIY kanzashi bows. Master Class
- Knitted crown for a girl
- DIY gift basket with wine and fruit
- How to make a rose from 2.5 cm ribbon. Master class
Tie for boys
Basically, such ties are sewn not only for girls, but also for boys. After all, this accessory is specifically for men, so the master class will tell you how you can make such a tie from satin ribbons with your own hands.
What you need to prepare to create such a tie:
- black ribbon 5 cm wide, length should be 30 cm;
- white polka dot ribbon 2.5 cm wide and 25 cm long;
- thread, needle and scissors;
- hair clip or elastic band for fastening.
We cut off a small part of 3 cm from the longest ribbon. Next, you need to hold the ends of the ribbons under fire to secure the threads. You need to make a bow from a wide ribbon, as shown in the photo. We do the same with a narrow ribbon. Fasten with a safety pin.
Now we place the narrower part on the wider one and fasten it with a pin. At this moment you can see what size the future bow will be. If they are too large, then the excess needs to be cut off. Next, we sew the two parts of the bow together in the middle. We make folds as shown in the photo.
Next we secure the seam of the bow and sew the jumper on the wrong side. Now we need to attach a hairpin or other fastening to our bow, which can also be adhesive fabric, which is very convenient.
Today, much attention is paid to the little things when creating an image. A fairly popular accessory nowadays is the bow tie, both among men and women. It is worn by both business women and young students. This accessory can decorate any blouse or shirt and, depending on its type, give the image new shades. You can create a bow tie with your own hands very easily and simply. We will bring to your attention a description of how to make such a tie for a child and for girls.
How to make a butterfly from satin ribbons using the kanzashi technique with your own hands
First, we present to your attention a master class on “how to make kanzashi petals.”
Kanzashi petals: sharp and round
So, see below how to make a butterfly from satin ribbons using the kanzashi technique.
We start with the top wings.
You will need: two types of ribbon 5 cm wide, 10 cm long (in two copies), a ribbon of a different color 5 cm long and wide (two squares) and a couple more squares measuring 2.5 cm.
- We take the two largest pieces of multi-colored ribbons, put them together and wrap them in an airplane (triangle).
- We carefully pierce it with a needle from below; in addition, you can glue a rhinestone above the needle at the seam junction (photo No. 2) or hold it with your finger so that the seam does not diverge.
- Next, fold our “triangle” in half and fix it with a clamp as shown in photo No. 3, cut off the excess (cut line No. 1). To make both wings the same, apply them to each other.
- Then we cut off the excess along line No. 2. We singe the edges of the cut from line No. 1 together, and on the second side, each side separately.
- Next, we make round “petals” with folds so that small sharp petals fit into them.
- We carefully first glue the small sharp petals between the folds of the round petals, then glue them into the large sharp petals. We make the lower wings simply round; you can glue rhinestones on them.
- We fold all the wings and stitch them with a large needle and long thread (try to capture all layers of ribbons). We tighten the threads well and tie them, trim off the excess threads. From below, at the junction of all the wings, we drip glue and align them so that they are all on the same level.
- We make a body from beads and seed beads. We glue the body of the butterfly and stitch it with thread.
- We assemble a circle from a piece of lace so that there is no hole left, straighten the folds evenly and glue a butterfly made of ribbons to the lace (the resulting beauty needs to be glued to a clip or simply to a round piece of cardboard covered with fabric, etc.).
Popular articles When there is only wallpaper left: creative ideas for the interior
Combine different ribbons with each other, as shown in the example below. Show your imagination!
Or this option:
- Cut out two squares for the wings from the ribbons.
- Lubricate the square with glue from the wrong side (you can use glue for ceiling tiles from a hardware store, for example “Dragon”) and carefully glue it into a triangle.
- Fold the resulting triangle in half and turn in the resulting corner (as shown in photo No. 3).
- We do the same with the second square of the tape. As a result, you should have two wings, as in photo No. 4.
- Next, if desired, you can give some shape to the wings. We cut out a recess at the fold. But that’s not all: with the help of a lighter you can melt the edges (To prevent the tape from burning, namely “melting”, you need to hold the tape at the bottom of the fire).
- You can make a beautiful body from beads and fishing line. As an option: we put one bead on the fishing line, combine the ends of the fishing line and string beads on them, secure with glue. Dip the ends of the fishing line into glue and glitter.
- For the base of the body, cut out a cardboard square and cover it with a piece of tape, and glue the body of beads on top.
- Glue the wings and decorate them with sequins.
You can diversify this idea. For example, take ribbons of different colors, cut out triangles, align them with the front side and fuse them with a lighter (you should get a square). Further progress is the same as with a regular square. Using this principle, you can combine ribbon with lace, etc.
No less beautiful butterflies are obtained exclusively from dense ribbons. You can decorate a postcard with these butterflies or use them in some other way - at your discretion.
Combine multi-colored ribbons with each other.
And by the way, don’t forget that you can sew butterflies from ribbons:
Knot batik technique
The knotted bow technique is used to effectively decorate a scarf on the head or neck. How to make a fabric bow using the knot weaving technique:
- You need to make loops from the ends of strips of fabric.
- Thread them together, fixing the lower and upper ends in the second loop.
- Tighten.
The elegant figure in the form of a bow is ready.
Scheme for creating a knotted bow
We sew from fabric
How to make a man's bow tie with your own hands?
In order to sew this accessory, you will need:
pattern: three pieces of any fabric of your choice, sizes 6x10 cm, 20x15 cm, 30.5x15 cm;
- doublerin or non-woven fabric, 2 pieces 30.5x15 cm and 20x15 cm;
- threads, needle;
- iron;
- scissors.
The composition of the base material can be anything, it doesn’t matter. If you decide to sew a man’s bow tie yourself, with your own hands, then you can give preference to synthetics or cotton.
In order for the product to keep its shape, doublerin or interlining is used - they allow the butterfly to maintain a presentable appearance.
So let's get started!
Place the interlining into two large pieces, moisten it a little and iron it through a thin cloth or gauze. The pieces must stick together well so that they do not move even a millimeter. It’s easy to check the strength: in a corner, try to separate the materials from each other. If you succeed, iron again, heating the entire surface for 2-3 seconds;
Fold the pieces in half with the non-woven layer facing up. Carefully sew the piece, retreating 3 mm from the edge. Do not forget to secure the seam so that the butterfly does not “crawl”. Repeat the same steps with other pieces; Turn the garment right side out and iron. If you want the product to have smooth lines, you can leave it without ironing. To try on the width and size, fold the butterfly into three parts. If you are happy with everything, sew with a zigzag stitch; To decorate a one-color butterfly, select a thread of a contrasting color and sew along the front side, for example, in the middle or slightly higher; Place the smaller piece with the wrong side to the front of the main layer and sew. To hide the seams, cover them with a small piece; A man's bow tie, sewn from fabric with his own hands, with thin lines, looks neat and elegant. But a tie with a thick “core” decorated with buttons will look no less advantageous. It is better to sew with a zigzag seam
Squeeze gently to give the product the desired shape. Secure with thread and needle.
The butterfly can be decorated with beads, buttons or left without decoration - it will still be stylish and original. To hold the tie securely, pin a small pin on the back side.
From satin ribbon
A purchased product will never be as exclusive as a men's bow tie made by hand.
To sew a tie, you will need two ribbons:
- wide (6 cm) and thin (1 cm);
- as well as thread, needle, scissors;
- clear varnish;
- special hooks.
- Cut the wide ribbon so that one part is slightly wider than four fingers - it can be used as a pattern for a man's bow tie. Take one ribbon and sew stitches in the middle with thread. Pull it so that you get a bow and wrap it with thread. Make the second bow in the same way. Glue them together and pass a thread through them;
- Glue glue stones to the edges of the smaller bow - two rows of different colors. Apply a layer of clear varnish on top and wait 15 minutes for it to dry thoroughly;
- Attach special hooks to a thin satin ribbon. Put on the slider and secure the end of the ribbon in it on the same side. This is necessary in order to easily change the size of the bow tie. The hook is attached on the other side;
- Connect the base to the butterflies using a ribbon of the same color and sew it at the back. You can make these ties in different colors to make them easier to combine with wardrobe items, or you can present them as a souvenir.
It's so easy to make a man's bow tie from satin ribbon or fabric with your own hands. Your man will wear such an accessory with pleasure, proud that you sewed it especially for him.
A bow tie is a stylish accessory that adds aristocratic chic to your look and looks appropriate at special occasions in combination with a tuxedo or tailcoat. Nowadays, not only men, but also women can wear a bow tie. Representatives of the fair sex can break the rules and wear a bow tie not only with a shirt and tuxedo, but also on the bare neck under a dress, which allows you to create an extravagant retro look. Women's bow ties are more democratic, while men prefer to choose a plain tie of a dark color, a self-knitted model rather than an elastic one.
Bow ties for children are also popular; they give young gentlemen and ladies a solemn and elegant look, attract attention and create a festive atmosphere during a matinee or school event.
Accessory for women
Recently, such ties are used not only for men, but also for girls. Such interesting accessories came to us from the eighties and are now used not only at special events or for the office, but also in everyday life. In addition, girls can wear such ties not only around their necks, but also decorate their hair with them, which is very important in our time.
What we need to create a women's bow tie:
- ribbons, different in width, length and colors;
- It’s worth choosing threads according to color;
- thin needle;
- universal glue, which should be colorless;
- scissors;
- measuring tape or ruler;
- elastic bands for decoration;
- regular elastic band.
Now you need to cut pieces of each ribbon of a certain length; for such a tie, the size of the ribbons does not matter.
For our bow tie you need to take white and black ribbons, which will be 2 cm in width. It is recommended to purchase a black tape a couple of millimeters wider.
We take a white ribbon and form a flat double bow from it, then sew the middle together using a needle and thread. Next, take the black ribbon and fold it as shown in the photo. The black part should consist of two pieces of connected ribbons. Cover the resulting seam with a thin black tape. In addition to the fact that this tape hides the seam, it also compresses the middle of our tie. On top of the thin black ribbon, place a piece of white ribbon, which should be double. Thin white ribbons must be threaded through this ribbon. An elastic band or fastener is attached to the reverse side to attach it to a shirt or other clothing. It is possible to glue a pebble or bead into the middle of our tie for decoration.
You can make various interesting decorative things from satin ribbons that will always look stylish. The colors of the ribbons are very large, and there are also beautiful designs that, if desired, you can make decorations for each family member.
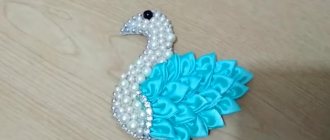
Delicate rubber bands with kanzashi butterflies made from satin ribbons
In this master class, kanzashi butterflies made from satin ribbons fly towards you, which you can use to decorate elastic bands or hairpins for girls. Detailed step-by-step photos are designed for the most inexperienced and novice needlewomen.
To make a beautiful decoration using fashionable Japanese technology with your own hands, all you need is desire and patience. Girlish ponytails or braids with butterflies will look beautiful and spring-like even in winter.
And you can make as many harbingers of spring as you like and to match any outfit.
- Craft materials
- Step-by-step manufacturing technique
Craft materials
To make beautiful butterflies with your own hands using the kanzashi technique you will need:
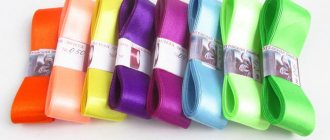
- two types of satin ribbon: wide and medium;
- tweezers for needlework;
- scissors;
- lighter;
- glue gun;
- half beads;
- felt;
- elastic bases.
The tape must first be prepared by cutting it into squares and singeing the sections so that the material does not crumble. You can cut and turn at the same time using a thermal cutting machine, a special tool.
Step-by-step manufacturing technique
Delicate butterflies for rubber bands consist of two types of petals: triangular and folded. To make a triangular one, you need to fold the square diagonally.
- And so on two more times until you get a figure like in the photo.
Trim the front to size. Hold the cut slightly over the lighter. When the material melts, glue the tape together by holding it with tweezers.
- Trim off the excess from the bottom and lightly melt it with a lighter so that the cut does not crumble.
- The first kanzashi petal for the butterfly is ready.
- For a petal in a fold, the first two steps must be repeated.
- Then fix the fold with tweezers, step back a millimeter and bend the sides.
Bend it back so that on both sides you get a fold parallel to the fixed fold. Using tweezers, squeeze all three folds.
- Bring the remaining sides forward, forming the outline of the petal.
- Cut the front and glue it with a lighter.
- Cut off the excess from the bottom and singe the cut.
- The folded petal for the wing is ready.
- Make triangular petals from small squares, as described in the first part.
- In total, for one kanzashi butterfly you will need: 2 folded petals, 2 large triangular ones and 8 small ones.
Popular articles 5 rules for an ideal bedroom [let's talk about decoration]
The small petals will make the middle for the large one. To do this, glue two petals from the bottom and glue another one between them.
- Cover the reverse side with hot glue and insert it into the large element.
- Glue two different large petals.
- Using small parts, connect the two halves together.
- Decorate the middle with half beads.
This is what a spring beauty looks like. Now you need to glue it to the elastic band. To do this, you will need two small pieces of felt that match the color of the elastic band.
- Glue one piece to the elastic band, and stick a butterfly on top.
- Use the second piece to secure the elastic band between the felt.
- Butterflies on elastic bands are ready for their duties.
Surely these will appeal not only to your daughter or granddaughter, but also to her friends. Not a bad gift for neighbor girls and relatives' children. The materials are cheap, but the products look luxurious! Check out other kanzashi lessons on our website, you'll have plenty to do in the coming months!
A master class on making a butterfly using the kanzashi technique to decorate a hairstyle was prepared by Yulia Zapara. We wish you nothing worse!
DIY leather butterfly: process features
When you want to do something unusual, practical and stylish, you should opt for extraordinary solutions, for example, leather as the main material for a bow tie for a boy or man.
To make an accessory you will need very little material, and it can be either genuine leather or a high-quality substitute. The tools remain unchanged.
For a butterfly, a child from 3 to 10 ribbons (finished product size 10×5 cm) will need:
- main part - length 20 cm, width 10 cm;
- jumper - length 7 cm, width 5 cm;
- elastic band for fixation (according to neck diameter).
Add 0.5-0.7 cm to each element for allowance.
The process begins with the manufacture of the main part. To do this, fold it with the front side inward and grind it down taking into account the allowance.
The part is turned inside out, folded into a bow and sewn up using a typewriter.
They work in the same way to make a jumper.
The parts are fastened by machine or by hand, and an elastic band is threaded through the jumper.
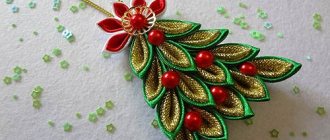
Another way to create a kanzashi butterfly from grosgrain ribbon
The technology for making such a butterfly is, in general, similar to that described above, but there are a couple of nuances (this is due to the difference in the materials used).
Therefore, we will still consider all the step-by-step actions of this master class. At the beginning, as usual, we prepare the following materials for work:
- grosgrain ribbon 4 cm wide;
- decorative ribbon with some pattern;
- a narrow ribbon (you will need it for the middle);
- tie or wire;
- double sided tape;
- an elastic band.
- We will make our elegant bow from a solid grosgrain ribbon, without cutting it like satin. To do this, we first wrap the ribbon in such a way that we end up with a blank for a bow, approximately 10 cm. Next, we put a ribbon under this bow and bend it a little further than the top one.
- We bend the tape on the other side in exactly the same manner. The result should be something like this:
- We bend the third layer at a slightly beveled angle and do the same on the other side. It turns out like this:
- Now we fix the center with wire or a tie, giving the workpiece the final shape of a bow.
- Cut off the rest of the tape and melt its edge. Now we make a bow from a satin ribbon with a pattern. Its edges will need to be secured with double-sided tape.
- Now we turn the ribbon over so that the bow ends up with beautiful sharp edges. Having finished the bow, we attach it to a bow made of grosgrain ribbon.
- In the same way as in the previous master class, we glue an elastic band to our bow. After this, wrap the ribbon twice, make a knot and place it right in the center. As a result, we get a beautiful butterfly made from grosgrain ribbon, which we made entirely with our own hands:
What is the further care of things using the kanzashi technique?
At first glance, it may seem that such bow ties are, how to put it correctly, disposable. But this is not true at all. Ties, bows, and hairpins made using the kanzashi technique can be washed. The only thing is that this should not be done in a washing machine.
Dissolve literally a few drops of detergent or regular shampoo in a bowl of warm water. Dip your product into this water and, in areas of heavy contamination, gently rub the fabric with cotton swabs. You can also use the soft side of the sponge. Once all stains are removed, simply rinse your tie under cool water.
As for drying, there are certain rules here too. You need to lay your product out on a flat, soft surface. If some of its details have lost their former shape, return the previous appearance of your bow/hairpin using pins. You can dry the item with a hairdryer at medium temperature.
After drying, we recommend spraying your product with strong hold hairspray. This will protect it from dust particles and other contaminants.
Blouse with bow-ribbon and lace
This style is more practical for each of us. Thin bows on the front or back of the blouse can be either part of the blouse or a separate element. A contrasting bow made from a narrow ribbon with long ends will create an elongated silhouette and add height.
A blouse with a bow at the back in this configuration looks even more unusual and attractive. When choosing a material, pay attention to rigidity. Be sure to tie a bow: it should not hang down, stick out or warp.
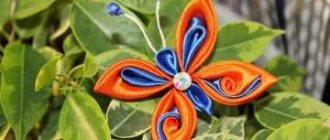
Turning ribbons into fluttering butterflies
Embroidering butterflies with a satin ribbon is a fairly quick and, most importantly, entertaining process. They look great in combination with embroidered bouquets of flowers, but they also do not lose if they are the main figure of the composition. Even a novice craftswoman can embroider wonderful butterflies. Therefore, let's get creative!
Preparatory stage
We will need:
- Ribbon for wings (colors: dark green, purple and two shades of yellow (bright yellow and yellow cream color - 25 mm)
- Floss thread for embroidering outlines (black color)
- Needle
- Lighter or matches (for burning the ends of the ribbon)
- Fabric (any)
Master class butterfly embroidery
In order to start embroidering with ribbons, we need a sketch of a butterfly. This is roughly the outline we draw on our fabric.
Let's start our embroidery with the antennae and head. We take a black thread with a needle and stitch it with regular satin stitch along the contour of the butterfly. We fill the body by stitching it with a dark green ribbon.
We embroider with ordinary stitches until the fabric is visible. With a double thread, in order to have a thicker seam, we sew the edges of the butterfly wings and the circles (patterns) inside them.
This is what it should look like:
We fill the edges of the wings and circles with purple ribbon. We do this using regular stitches
To fill in the remaining empty space in the wings, we use tape in two shades of yellow: a bright yellow and a slightly lighter one so they don't appear uniform. We roughly divide the wing in half and fill it with stitches of arbitrary length.
Important! Do not forget that those ends of the ribbon that are on the wrong side are not secured, therefore, they should definitely be burned with a lighter, otherwise the ribbon will begin to unravel
Today we learned how to embroider such a wonderful butterfly. Quick and easy, right?
Useful tips for beginning needlewomen:
As a rule, we want to see our product perfectly executed. But I’ll tell you a secret: only thanks to all sorts of irregularities, uneven stitches, etc.
, the embroidery composition becomes similar to a real one, for example, a bouquet of flowers. Therefore, my dears, do not worry. Your hands are golden.
And the embroideries you made are the most beautiful! But, nevertheless, there are some secrets in the process itself, which I will tell you about:
- Satin ribbon is a delicate material that quickly loses its shape when frequently threaded through the material, so each time you should take no more than 35-40 cm.
- To make the ribbon pass through the eye of the needle more easily, cut the edge of the ribbon at an angle. Stretch it so that the needle can pierce it a couple of millimeters from the edge. This way you will get a small neat knot on the eye of the needle.
- It is not worth being precise in counting stitches. Give a place to imagination in your creativity.
- If you want to wash the finished product, remember that this must be done by hand, only in cold water with powder intended for delicate fabrics.
- The ribbons cannot be ironed. Therefore, you can simply spray the embroidery with water from a spray bottle and leave to dry.
Good luck, my dears!
What is needed for production?
To make a butterfly we don’t need a lot of materials, just stationery and the ribbon itself.
So, the work will use scissors, glue, thread and a needle. A lighter or matches will also be useful for processing fabric. You will need to cut a strip 1 meter long from a wide ribbon, and 60 centimeters from a narrow ribbon. Of course, you can ask the store employee to immediately cut off the required length if you are sure that the satin will never be needed again. However, the experience of needlewomen suggests that you should always have supplies of various materials. It is possible that you may make a mistake and somehow spoil the material, so it is better to play it safe and take more at once.
Important! If for some reason you do not have a thin tape, you can work with a thick one, simply bending the edges inward.