creativecommons.org
The bright holiday of Easter is an excellent occasion to engage in handicrafts and creativity. A handmade craft will be an excellent decoration for the holiday table. It can be given as a souvenir to relatives or friends. There are many ways to create an exclusive souvenir yourself. The egg is a universally recognized Easter symbol. On the shelves on the eve of the holiday you can find eggs made of various materials - plastic, fabric, foam and wooden souvenirs are offered in a huge assortment by retail outlets. But a homemade Easter gift will be exclusive and more valuable.
Felt is a soft, easy-to-work material from which many crafts are created. A felt egg will be an excellent holiday decoration. It can be glued to glasses or dishes on the festive table. The ribbon allows you to hang cute decorations on walls, plants, and other corners of the apartment. If you have a special stick on which the craft is held, you can make a whole bouquet of felt products.
Felt Easter egg
Required tools and materials:
- foam blank in the shape of an egg,
- pencil,
- pen or marker,
- chalk,
- felt of different colors,
- paper and cardboard,
- scissors,
- pins,
- glue or double-sided tape.
Step-by-step manufacturing instructions:
- Using a pen or marker, draw several equal parts on the foam.
- Attach the paper to the workpiece and use a pencil to make a pattern. Then attach it to the felt and outline it with chalk. The result should be several multi-colored parts. It is recommended that they be slightly wider than the paper template - this will make it possible to align them when gluing them to the workpiece.
- Try on the parts to the workpiece, attaching them with pins. They should lie tightly to each other. If they are wider than necessary, they should be trimmed, and if there are empty spaces between them, larger parts are needed.
- Cover the workpiece with double-sided tape, paying special attention to the top and bottom, where all the parts will meet. You can also use glue.
- Glue the felt parts onto the workpiece.
- Make a stand by cutting out a small strip 1-1.5 cm wide from cardboard and felt. The length depends on the size of the egg itself.
- After gluing the cardboard and felt, make a circle out of the strip and place the product on it. The craft is ready.
Master class on creating a decorative egg for Easter using the kimekomi technique
We became acquainted with this type of creativity on the blog pages when we were making New Year's toys. Easter eggs also turn out amazingly beautiful, because you can use a variety of pieces of fabric and designs, thanks to which the result is bright, colorful, and most importantly - unusual.
Japanese craftsmen make crafts on wood, but it is very difficult, which is why they came up with the idea of using foam blanks.
By the way, this type of needlework is also called kinusaiga. In principle, this is the same thing, but the latter is used more on flat surfaces, this is the so-called patchwork without a needle. The technique in which work is performed on three-dimensional objects (balls, eggs, dolls) is more correctly called kimekomi.
Let's watch a master class from a needlewoman from Poland, Małgorzata Rawska.
First you need to draw the desired pattern on the foam egg; the simplest thing is to divide it into 4 parts. We draw the central points and connect them.
To make the lines even, use a thread, an elastic band, and secure it at the top with a pin. To be sure, draw along them with a pen.
Now use a sharp knife to make shallow cuts on the surface.
From scraps of fabric you need to cut blanks larger than one egg slice.
We apply the fabric, using a flat, non-sharp object (knife, nail file), press it into the cuts, pulling it tight. Then we cut off the excess and fill it to the end.
We do this with all the other pieces in turn.
We decorate the seams with braid and lace, simply gluing them on top. And to hide their ends, we make another bow.
You can also make a geometric pattern. First, divide the egg into 6 parts using vertical lines. Set aside pieces of 5 cm on top and 4 cm on the bottom along them, connect them in the form of rhombuses.
In general, any drawing is easy to apply.
Make a pattern out of paper, pin it and trace it on the surface of the egg.
And then do all the work described above.
Such beauty comes from just scraps!
Multi-colored egg
Necessary materials:
- felt;
- scissors;
- threads (including floss);
- needle;
- glue;
- lace;
- padding polyester or padding polyester;
- beads, buttons, decorative elements.
Progress:
- Carefully cut out two egg-shaped pieces from felt.
- From felt of a different color, cut out the middle, which will be decorative.
- Use pins to pin the base of the front part of the product with the middle insert and sew the seam at the top and bottom with small stitches in one thread, retreating 2 mm from the edge.
- Close the seams with beautiful lace, also sewing it with small stitches in one thread. Cut off the excess to the shape of an egg.
- Mark the letters “XB” on the middle insert and begin to embroider them with a back seam using a needle using three strands of floss.
- Add decorative elements to the product - beautiful buttons, beads, etc.
- Pin the two parts of the product together and begin sewing them together with a six-strand floss overlock stitch.
- Along the entire perimeter, try to lay stitches at the same distance from the edge and from each other.
- Leave a small hole for stuffing. The thread should not be cut.
- Fill the product evenly with padding polyester or synthetic padding.
- Sew the hole with an overcast stitch. The craft is ready.
During production, you can improvise using material of various colors, including with a pattern, as well as a variety of buttons and other decorative elements to give the product brightness and originality.
Tools and materials Time: 1 day Difficulty: 6/10
- a sheet of wool felt of the desired shade;
- floss;
- embroidery needles No. 5 or No. 8;
- pencil;
- scissors;
- self-adhesive non-woven lining (Fabry or another brand);
- template for embroidering an egg (see text below).
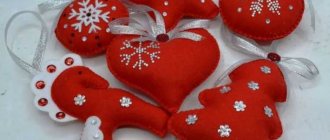
Felt Easter eggs are an original and stylish decoration for the Easter table that you can make with your own hands!
These eggs are also a wonderful gift for friends and relatives! Give your closest people one woolen egg each - and, undoubtedly, they will appreciate such a gift!
If you still doubt your capabilities, we hasten to reassure you. Anyone who is at least a little familiar with a sewing needle and thread can make such eggs! And our small recommendations on choosing materials and tools will help you.
So, what do you need to make beautiful felt Easter eggs?
First, you'll need felt. Wool felt is preferable. It sews well, looks cozy, and you can find great colors in their range. You will also need embroidery floss. Use any colors you like (like we used in the first egg, the photo of which you can see above). Or use just one color for a simple, classic egg.
You also need a needle. We used 3 strand floss, so we recommend size 5 or size 8 needles. Plus you will need some soft filler. A bunch of cotton balls will work great in this case. And finally, you will need a template, which you can download below. This template is full-size, so you don't have to do any expansion.
There are also a few extras to help you stitch the best stitches of your life! Fabry's self-adhesive non-woven fabric is great for transferring patterns onto felt (as you will see below), it's easy to use, and the stitches on it are even and beautiful! Such non-woven fabric can be easily purchased at a craft store.
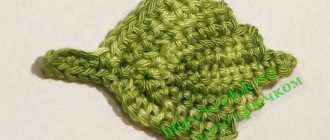
Egg case toy
To work you will need:
- paper pattern,
- felt of different colors,
- scissors,
- threads,
- needle,
- sewing pins,
- glue gun,
- markers.
Step-by-step instruction:
- Print the provided template.
- Cut out the pattern.
- Pin the pattern to the felt.
- Cut out two pieces from felt and remove the template.
- Using the pattern, also cut out the ear parts.
- Make a muzzle from white felt.
- Use markers to draw eyes, mouth, blush. If desired, you can use beads.
- Using a glue gun, attach the face and ears to the main part of the rabbit.
- Place the two parts of the product together.
- Having secured the parts with pins, sew them with thread to match the color using a simple seam using medium-sized stitches.
- The craft is ready.
Volumetric paper Easter egg
Make some Easter eggs from paper. What could be simpler - cut out the blanks and glue them together!
If the kids can already do this kind of work, it would be a wonderful family project.
The shape of an egg is not difficult to draw yourself. Use the template to transfer the drawing onto thick colored paper. There can be any number of details, and the more, the more interesting it will be. And play with colors, inserts of different tones give a wonderful, beautiful effect.
Fold each paper oval in half lengthwise. Glue one piece to another, and then add new ones one by one until you get a perfectly even piece.
Make a bow and attach it to the top, it will help hide the seams and decorate the product.
See what other cute and cool crafts in the form of eggs and not only for children you can make from paper
Easter bunny
Such rabbits are placed on the festive table as decoration. They will be stable, and you can hide a surprise under them - an Easter egg.
Necessary materials:
- thick felt of different colors;
- scissors;
- threads (including wool);
- needle;
- paper, pencil;
- glue gun or glue.
Manufacturing instructions:
- Draw a template on a piece of paper.
- Transfer the pattern to felt.
- Cut out 4 parts: 2 of one color and 2 of another. If the felt is dense, it will be difficult to sew the 4 parts together later. Therefore, in this case, only the ear can be left from the fourth “inner” blank.
- Connect all the parts together, making sure that they do not stick out from under one another.
- Glue the pieces together using a glue gun. It is important to apply glue only to the center of the head and ears, since there will be a seam along the edge, and it is difficult to sew through the glue. The rabbit’s “body” should also not be glued together.
- Use a regular stitch to sew the ear parts together, then sew the rest. Use threads of a contrasting color.
- Use a decorative stitch along the bottom contour without sewing the parts together.
- Make a tail according to the principle of a regular pompom.
- Sew the pompom to the main piece.
- Make the rabbit's eyes from a round piece of black felt, sewing it with light threads, or from a small button.
- Sew the nose with black floss threads, making several stitches. Or cut out a triangular piece of black felt and glue it to the product. The craft is ready.
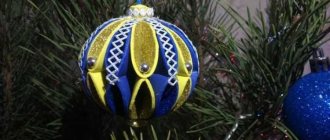
Easter egg decor using kanzashi technique
Well, now let’s try to decorate our egg with ribbons using the kanzashi technique. In this type of needlework, flowers are created from separate modules sewn together.
Initially, kanzashi were used in hair clips, and even now this direction is predominantly more common. But you can decorate anything with them. Therefore, this species has become popular in crafts and for Easter.
A master class from NataliDoma will help you understand how to make an elegant decoration.
By the way, such modules can not only be collected into flowers, but simply pasted over a blank egg with them, placing them one behind the other, will also be very original and beautiful.
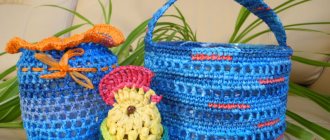
Egg basket
Materials for production:
- thick wool felt,
- scissors,
- linen threads and floss,
- thick sewing needle.
Step-by-step manufacturing instructions:
- Cut blanks from thick sheets of felt: circle (bottom of the basket) - 17.5 cm in diameter; two rectangles (walls) - 9 cm wide and 28 cm long; strip (handle) - 2.5 cm wide and 30 cm long.
- Connect the walls by sewing the rectangles together with linen threads using small stitches.
- Securely sew the bottom of the basket and the walls.
- The handle is also attached to the frame itself with threads on both sides.
- Finish the edges of the basket with colored floss threads. The product is ready.
To make the basket look elegant, its walls can be embroidered with floss threads, pieces of thin felt, decorative elements, bows and ribbons, or even bright colored eggs presented in the master class above can be glued.
Step-by-step instructions with photos
So let's start sewing felt Easter eggs.
Step 1: Download the pattern
Download the template below with patterns and embroidery for the egg.
Felt Easter eggs - pattern
Step 2: translate patterns
Trace the patterns carefully along all the lines with a pencil on self-adhesive non-woven material.
Cut each piece with a gap of approximately 3-4 mm. Glue the interlining onto the felt.
Step 3: Embroider the design
Next you need to embroider the design. You will sew directly through the stabilizer and felt. We used a combination of the following stitches: back igloo, running stitch, lazy daisy, and French knot. Below we will show you how to make them if you are new to embroidery and these stitches are not familiar to you.
Back stitch
To form this stitch, insert the needle into the fabric from the underside about 0.5 cm from where you want to start sewing. Then insert the needle from the front side to the starting point of sewing and move it from the bottom 1 cm forward. Bring the needle up from the bottom (see picture below).
Running stitch
This is the simplest stitch. Simply insert the needle and thread into the fabric from bottom to top and top to bottom at equal intervals.
Stitch “Lazy daisy”
To form this seam, bring the needle out from the bottom up and immediately insert the needle back into the same place from top to bottom. You should have a loop formed. At some distance, bring the needle up from the bottom, pick up this loop and bring the needle back to the same place.
French knot
Bring the needle up from the bottom. Wind 2 turns of thread onto the needle, then pass the needle to the same place from top to bottom.
For all seams we used 3 strand floss. For this egg we embroidered with white thread using Norwegian blue felt. For the sample above we used straw colored felt.
Repeat the embroidery for all four wedge shapes.
Step 4: Trim along the outline
Once you are done with the embroidery, trim all four pieces neatly along the lines.
Step 5: Remove the interlining
Now you need to soak the stabilizer. To do this, place all the pieces face down in a bowl of cold water and let them sit there for about an hour. The stabilizer will become viscous and soft. Rinse it under cold running water. If any pieces are difficult to separate, simply run them under a strong stream of water and they will come off. Don't rub the surface of the felt - just let the water do its job.
Set the pieces on a towel and let them dry. Do not wring or twist them, even slightly. Just place them wet on a towel and let them dry.
Step 6: Sew the Pieces
Place the two egg pieces together with the embroidery facing up and sew them together along one edge. We used a running stitch with small stitches, which leaves a nice ridge along the seams of the egg. If you want a smoother finish, you can use a finishing stitch to stitch the edges.
Attention: be careful not to mix up the ends of the parts! The front of each piece is longer and thinner, while the back end is shorter and not as sharp.
Repeat for the second pair of pieces.
Other ideas
It’s quite easy to create various cards and appliques from felt.
You can decorate your apartment with bright Easter garlands.
It's pretty easy to make cute felt bunnies in different shapes and colors. They are easy to make because they do not consist of a large number of parts, and the manufacturing process takes just a couple of steps. They are sewn together with hidden stitches, and a little synthetic padding or padding polyester is added inside. Easter eggs placed on a skewer are created in a similar way.
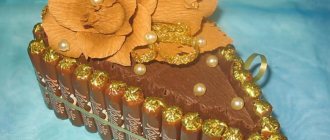
Another original solution is a felt cake filled with padding polyester and decorated with beads, bugles and beads on top.
Many of the crafts presented are quite simple to make, which allows you to create them together with your children. You can fully express your imagination by bringing in your original ideas, changing the colors of felt and using various decorative decorations at hand.
- Author: admin
Rate this article:
- 5
- 4
- 3
- 2
- 1
(1 vote, average: 5 out of 5)
Share with your friends!
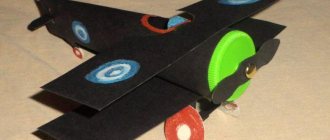
Pasta egg - craft for a school competition
This craft has already spread all over the Internet, but it is quite original, so I also want to post it in my post. Maybe someone is interested and wants to do something similar. And then, it’s just an idea, but you can execute it and design it in your own way, then it will be appreciated in the competition.
So, we take pasta of different shapes: for the base - small round ones, since they are flat and will stick and hold better. Seashells or bows are suitable for decoration; they even come in the form of leaves.
You will also need:
- balloon
- PVA glue
- spray paint
- nail polish.
Pour the pasta directly into the glue into some container. Mix with a stick.
Inflate a large balloon and use a felt-tip pen to draw an oval window on it.
Now, using tweezers, take one pasta at a time and place it first along the contour of the oval, and then one after another over the entire surface of the ball.
Leave it like this overnight until completely dry.
Then remove the ball. We poke holes in the pasta with a pencil to get rid of any remaining glue. Wipe the entire egg inside and out with a rag.
Next we cover it with spray paint in any color you like.
We paint blanks for decoration with nail polish. We hold them with one hand on tweezers, and with the other we go over them with a brush. Then we glue them along the rim of the window and in any other places.
We make a stand from tape, put sisal grass and painted Easter eggs inside.
You can make a rabbit from pompoms or make a chicken.
DIY Easter Bunny made from fabric
Cute bunnies have long become symbols of the bright holiday of Easter. Therefore, they can be found as decoration, or you can make a whole Easter bunny craft with your own hands. Fabric makes not just crafts, but real soft toys.
Patterns for Easter bunnies made of fabric can be different. You choose according to your desire or level of difficulty.
You can make such a cute bunny without any special sewing skills.
To do this, you need to print out the bunny template and cut it out, transfer it to the fabric. The brighter the material, the more fun the bunny will be.
You can cut the fabric according to the template by folding it in half at once. Be sure to allow seam allowances.
On one part we embroider eyes, a nose and a mouth; you can sew on beads instead of eyes.
Sew both pieces together, leaving a small hole for stuffing. The hole is then closed with a hidden stitch.
To make the bunny stable, we make a seam at the bottom with side folds.
You can decorate as desired - with ribbons or other decorative elements.
You can make wonderful Easter bunnies from a simple sock.
Materials:
- Needle
- Sock
- Threads
- Filler
- Decor
- Pomade
The place of the heel will be the front side, on which we will cross-stitch the eyes and nose with black threads.
To do this, first cut the socks in half to make ears. Turn it over and sew it up carefully.
You can also stitch on a machine.
Fill with cotton wool or padding polyester, helping yourself push it into the narrow parts with a stick.
Sew it up with thick thread.
We embroider the eyes and nose.
Another option is to make a bunny out of a sock.
Materials:
- Socks
- Scissors
- Felt pen
- Threads
- Sintepon
On one sock, cut out a rectangle in the middle about 2.5 cm.
We sew up the ears with white thread.
Fill with padding polyester and sew up the ears.
Using a felt-tip pen, draw a smile where the heel should be.
We embroider the nose with red threads in the form of a triangle.
Eyes can be drawn or embroidered with black thread.
Beautiful DIY Easter crafts for the competition
If your school is hosting an Easter craft show and you want to bring an original piece of work, it could be a beautiful thread egg.
Materials:
- Threads
- Glue
- Ball
- Decor
Inflate the balloon.
Prepare a paste by combining 1 liter of water and 4 tbsp. flour. Place on the fire and heat until you get a viscous and sticky mixture. Let the mixture cool slightly and check how well it sets.
Or use PVA glue, slightly diluted with water.
We wrap the ball with threads and lubricate it with glue or paste.
When the ball is completely dry, pierce and pull out the ball.
We cut out a window on one side of the blank and decorate the inside.
You can make Easter crafts for the competition with your own hands from pasta
Children often use colored paper in their work, as it is easy to work with and the crafts turn out bright.
DIY egg stand for Easter
Having learned how to paint and decorate eggs for Easter, a reasonable question arises - how to put them beautifully on the table. All kinds of stands will help you do this. The most affordable material for making a stand for Easter eggs is paper. It can be different - corrugated, colored, with different prints, or antique-looking craft paper.
You can make an origami Easter egg stand out of paper in just a couple of minutes.
This stand is made according to the principle of a regular paper boat.
We cut out two strips from colored paper, the length of which is equal to the circumference of the egg + 2 cm for gluing the seam.
If you want to make a stand for a dozen eggs at once, you can use the containers in which they are sold in the store.
To do this, you need to cut off the lid and side parts. For strength, we insert one part of the box into the other and glue them together with a hot gun. We paint the workpiece yellow. From green felt or colored cardboard of two shades, cut out strips in the shape of grass, with triangles cut out.
We glue this grass to the sides of the workpiece and lay a strip about 10-11 cm long inside each cell. We make strips of 15 cm from two colors of felt and roll them into rolls. Secure these holes with hot glue. We cut out flowers from colored felt.
Multi-colored eggs will look bright and colorful in this stand.