cherry blossoms made from crepe paper
In Japan, cherry blossoms are called sakura - they are a metaphor for the ephemeral nature of life, probably because they come and go so quickly. The wonderful thing about paper cherry blossoms is that they will last much longer than real flowers. You can enjoy them all year round.
Paper cherry blossoms are fun to make and look amazing as decor for your home or party. Try to capture the beautiful pale pinks and bright greens of spring in different versions - cherry blossoms made of crepe paper , origami, kirigami, napkins and various compositions with twigs. Just use the master classes presented here with step-by-step photos; for each example there is a link to the source. A little practice and you will be surprised how easy it is to make sakura flowers from paper with your own hands .
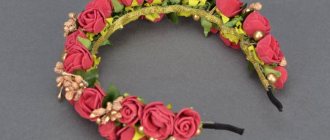
Leaves
You will need to cut a 70cm piece of wire to create a 15cm sakura.
Mix all three types of beads - white, pink and soft green, so that it is convenient for you to remove one bead after another, for example in a bowl.
Measure a couple of tens of centimeters of wire to make a loop. Place beads on the other end. Each time - five colors: first pink, then white, green in the middle, and again pink and white.
Hanam Public Holiday
Sakura represents the rose family, the plum subfamily. For the most part, trees are grown for decoration, but there are also fruit-bearing species. Although the fruits are small and not edible, they are rare and expensive. Sakura serves not only for decoration; for the Japanese it has a certain meaning.
Looking at her, they think about the eternity and frailty of earthly life. A blossoming flower on a branch pleases others for no more than a week. In windy and rainy weather, the flowers wither even earlier. For the nation, this time is a real holiday, which is celebrated by the whole country. "Hanam" literally means "contemplation of flowers." The entire population takes to the streets.
The main events take place in Shinjuku Park, where major political figures and the imperial family gather. To create a special effect, the trees are illuminated. They twinkle with delightful lights in the twilight and darkness. Many people believe that this time brings good luck, so they conclude profitable deals, arrange negotiations and make new business partners.
Branches
Keep making leaves like this. To make one branch, you will need about 15 of these, but in the whole tree there will be 60 of them.
Flowers from Thomas: where to find and how to print patterns
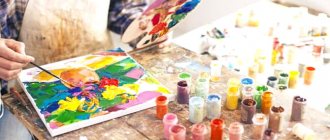
Foamiran is not a natural fabric whose structure resembles suede or rubber. It is this feature that allows products to be as natural and beautiful as possible. Making flowers from this material with your own hands is not so difficult; it will require standard tools, a diagram, a little time, desire and a good mood. Fantasy will make the craft exquisite and unique. The most beautiful and believable flowers are large ones, since they usually do not require long, painstaking work.
You can find patterns on the Internet, and then print them on a printer.
To make a rose, you need to print the pattern and prepare the following materials and tools:
- Foamiran white, pink, green;
- Scissors;
- Toothpicks;
- Iron;
- Pastel in crayons;
- Hot melt adhesive.
In principle, the number of petals is not limited, but it is important to clearly focus on the appearance of the future flower so that it is as natural and aesthetic as possible. The petals in the product should have different sizes. You need to start attaching small parts to the green base first and expand towards the edge.
Beautiful petals are created as follows:
- The first step is to draw or print petal templates;
- The template must be placed on the material and traced with a toothpick;
- Cut according to the pattern;
- The iron must be heated, made warm;
- Place the petal on the iron for a few minutes and give it a natural shape;
- You can draw veins on a leaf, or you can use a special form of textures;
- Pastel, which should be rubbed on the petals, will add volume and brightness.
After the petals are made, you can make a rosette and glue the flower. Life-size roses look beautiful and impressive.
Large branches
Collect 14 of the above branches into one large bunch. Tie the wire of these bundles in a spiral and secure with tape. Wrap a thread of a color suitable for the branches over the tape.
Connect the bundles into a whole tree. The resulting trunk must be covered with thread, preferably of a lighter color, so that the threads from the bunches themselves are visible.
DIY cherry blossom branch. Master class with step-by-step photos
Master Class.
Blooming cherry branch Author: Ivanenko Tatyana Dmitrievna, teacher. Place of work: MDOBU No. 7 “Lastochka”, Prochnookopskaya village, Novokubansky district, Krasnodar region. Description of the material: I offer you a master class on a spring theme.
The master class is designed for children aged 6 - 7 years. This material will be useful to kindergarten teachers, primary school teachers, additional education teachers, as well as parents of preschool children. The resulting product can be used as interior decoration - both home and office space. Master Class.
Blooming cherry branch Purpose: To introduce students to non-traditional methods of depiction. Objectives: Educational:
- introduce children to various non-traditional appliqué techniques.
- instill aesthetic taste. Developmental:
- develop fine motor skills, imagination, attention and perseverance.
— to develop creative abilities in preschoolers through non-traditional appliqué techniques. - develop artistic skills and cultivate artistic taste. Educational:
- cultivate accuracy in work, attention and patience.
Flower template:
Master class steps:
In order to make a sakura branch, you actually need the branch itself and available tools: silver acrylic spray paint, red gouache, brush, PVA glue, napkins (pink, yellow), scissors, light yellow threads, semolina, toothpick.
Step 1. Paint a twig found on the street with silver acrylic paint and give it time to dry.
Step 2. Pour semolina into a saucer and paint it red using a brush and gouache. Step 3. Take a napkin (preferably light pink), fold it in several layers and draw small flowers on it. Then we cut out these flowers with scissors.
Step 4. Cut a small hole in the middle of the flower for the stamen.
Step 5. Divide a napkin (preferably yellow) into three parts and cut into strips. Step 6. Make frequent cuts along the long side of the rectangle. Step 7. Lubricate the cut ends with PVA glue and sprinkle with colored semolina. Twist the strip using a toothpick. The stamens are ready. Step 8. Take the stamen and insert it into the hole cut in the flower.
Step 9. We wrap the stamen with light yellow threads on the back side of the flower for strength. We straighten the flower petals, giving it splendor. Using threads we attach the flowers to the branch. This is what we got.
Our branch is ready!
We recommend watching:
Daisies using quilling technique. Master class with step-by-step photos of DIY Chrysanthemums. Master class with step-by-step photos DIY postcard for mom Do-it-yourself voluminous paper flowers using the origami technique
Similar articles:
DIY flowers and floral arrangements
Spring crafts with children 6-7-8 years old
Volumetric applique for children master class. Summer water lilies
Paper daisies. Master Class
Chrysanthemums made of paper. Master Class
Main trunk
Cut off the bottom of the resulting trunk. Place what you get in a beautiful pot or any other vessel and fill it with a hardening substance, such as gypsum. You can sprinkle the resulting “ground” with beads of the same color as the leaves of the tree. So you have made a beautiful sakura!
As you can see, it’s really nothing complicated. You can come up with, add or change details yourself - this is a vast field for creativity.
Sakura medallion
The third sakura is different from the other two. It is suitable both if you are just starting to create, and if you have already gained experience.
You will need:
- Large beads of various colors, 10 g;
- 1 g pink beads;
- 4 g beige beads;
- Pink flower-shaped sequins, 3 g;
- Wire, 30 cm, monofilament, bead needle and scissors.
Easy way
There are two ways to create sakura flowers:
1. cut out each petal separately using a template;
2. Fold the square sheet several times and cut the top into a semicircle. We make several thin slits at the tip; when unfolded, they will look like stamens.
A sakura branch made from corrugated paper turns out incredibly beautiful and elegant.
- soft pink corrugation, or napkins;
- thin thread;
- branches (without leaves).
Master class on making:
1. cut a lot of blanks in the shape of a simple flower;
2. roll each piece into a cone and twist it from the bottom;
3. for greater naturalness, we make flowers in different shades;
4. Take a twig, for example from an apple tree, and attach the buds with thin threads. Distribute the flowers evenly.
Having prepared all the branches, place them in a small vase. In this way, Japanese cherry is made very quickly and simply.
The basis
Cut a piece of 30 cm from the wire, preferably thick. Fold the piece into a ring and string large beads on it, alternating colors as you like. This will be the base, the frame of the sakura, no less bright than the tree itself.
Twist the ends of the wire into a spiral and bend them into a loop. Cover what remains with beads, both for aesthetics and for safety (so as not to get scratched).
Sakura in bloom. How to make a flower. Photo selection
Photo panel “Cherry blossoms! The charm of spring has come!” ..."Is she sad that follows the rising sun and dreams tenderly under the sakura"... Sakura (a type of cherry) is beautiful, diverse and very revered in Japan. I made a small tutorial (for the first time) on making sakura flowers. I apologize if anything is wrong.
The panel is larger.
From a different perspective.
To make a panel you will need colored crepe paper, colored thick cardboard for the base (I took a photo and edited it a little in Corel, size A4), strips of thick paper for the frame, acrylic paints, a felt-tip pen, wire, glue and scissors. I pasted the photo onto thick cardboard using an adhesive pencil so as not to get wet. We make a frame around the edges.
I made the frame from strips of thick paper - I have photo paper, painted with silver acrylic paint using a sponge in two layers.
We bend the prepared strips in half and glue them with an adhesive pencil along the entire perimeter of the picture. The corners must be cut at an angle of 45 degrees.
For the flowers you will need petals, stamens and sepals. I cut the petals according to a stencil on a strip of white crepe paper folded like an accordion. Stamens made of pink rectangles. Sepals made of green squares.
I painted the finished petals around the edges pink: using a sponge (blotted the paper) colored with a felt-tip pen. Then we twist them, giving them a shape. One flower will need 6 petals, and a bud will need 3.
For the stamens, cut pink rectangles along the edge and twist them in one direction with your fingers. We take the wire, drop a drop of Moment glue onto the tip and wind the strip with the stamens into a tube. Glue the required number of petals to assemble the flower. I glued them in pairs opposite each other. Glue - Moment, you can also use PVA.
Give the flowers shape.
For the sepals, fold the prepared squares (twice as for snowflakes) and cut them out according to the design. The top one is for a blossoming flower, the bottom one is for a bud.
For a flower, the sepal is simply put on a wire. For the bud, cut off the extra leaves - leave only 5 pieces and glue the outer ones together to make a cone with 4 leaves. Next we wrap the wire with green crepe paper, gluing it with PVA here and there.
Birth of a flower!
There are about that many handsome guys.
Next comes the most interesting part. We form branches. We twist the wires with flowers together, gradually screwing new ones, for reliability we fasten them with glue (I have a glue gun) and wrap them on top with crepe paper. The branches are ready. All that remains is to attach them to the cardboard. They attach very well with a glue gun.
The branches can be bent in the desired angle and direction! I really hope that my MK will be clear and useful.
Creating this panel brought me a lot of good emotions. I finished it last night, and today is my youngest daughter’s birthday and memorial day for my grandmother. Cherry blossoms are like our lives - instant and beautiful!
A small photo selection
Branches in bloom - Fragrant girlish hands, - Whitening, gracefully greet the Beautiful Spring, the best time.
Akiko Esano
The sky and the earth are united in an unsteady plexus - The fog that has flown from the sea has penetrated the flowering crowns of the mountain Sakura.
Akiko Esano
With the arrival of spring I admire the flowers again... What more could you want? Truly life is good! (Motoori Norinaga)
Spring is a charming time of year!
And here are a few pictures-sketches with Japanese women. This is the original that I liked and was suitable for the job
And this is the hieroglyph - Sakura
stranamasterov.ru
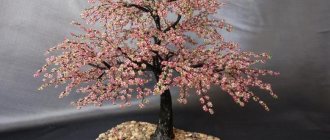
Tree
String 8 small beads onto a single long thread. Next, you need to re-thread the thread through the same beads in a checkerboard pattern and string new ones: thread the thread into the 5th - string the 9th, thread into the 3rd - string the 10th, thread into the 1st - string the 11th and immediately turn 12, and then turn back, continue in the same spirit.
You should get a dense mosaic in many rows. A tree trunk will come out of this. This may seem a bit complicated to you. When making a sakura tree from beads, a diagram can be useful. But believe me, this is not such a difficult principle.
Having made the trunk of sufficient width, begin to make thick branches. They are made in the same way, but you need an indent - one bead to the side from the base.
Attach the branch to the trunk and sew. Make hidden knots, because it won’t look good if they are visible.
Branches
Having created a thick base of the branch, move on to thin continuations. Lead them from the thick corners. For each you will need only one row of beads. Sew these branches with a ring base
Important: the thread must be passed twice not only through thick branches, but also through thin ones - this is necessary for strength.
Repeat the procedure, making symmetrically another thick branch on the side and a third in the middle, also continuing them with thin ones.
Flowers
This stage is the easiest. Including the joy of the approaching result and the fact that your tree becomes more beautiful before your eyes.
Sew flowers on both sides of the “coin”. Not only because the parties are equal, but also because then the sakura will look deeper and more natural. If there are areas of the tree that you are unhappy with, this is a good opportunity to hide them.
The beaded sakura tree is ready! Decorate your room with it, give it to someone or carry it with you, on your clothes or bag.
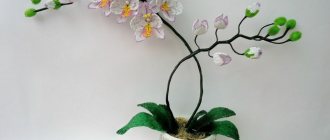
Realistic buds
With the arrival of spring, I want to add tenderness to the interior. A sakura flower made of corrugated paper on a white branch will look elegant and stylish.
- green, yellow and pink corrugation;
- branch;
- white acrylic paint;
- strings;
- scissors;
- PVA glue;
- semolina.
How to form a branch step by step:
1. paint a tree branch and leave it until completely dry;
2. cut out a yellow rectangle and cut it in the shape of a fringe. We twist each “tail” with our fingers. We make a tube from the blank;
3. mix semolina with PVA glue, dip the stamens and allow time to dry;
4. Cut the pink corrugation into rectangles, and then round each one into the shape of a petal. We twist the lower part with our fingers;
5. Cut out a piece from a green rectangle that looks like a “fence” with teeth on top;
6. Place the petals around the stamens, then wrap them in sepals and tie them with a thread;
7. Attach each bud to a branch. The number of flowers is optional.
For making, use different shades of pink.