Good afternoon – today I decided to make an article about jewelry. And since my piggy bank has already accumulated a sea of wonderful ideas for bracelets, brooches and necklaces made from zippers, I decided to systematize all this, all the decorations made from zippers, dividing them into themes ...
- Lightning bracelets
- And there will be separate articles on BROOCHES and NECKLACES
- And I’ll make a separate article on COLORS made of zipper and felt
article “Jewelry made from lightning. Part 3 - BROOCHES - 20 DIY models."
article “Jewelry made from lightning. Part 2 - NECKLACES AND EARRINGS - 25 DIY models.
article “Jewelry made from lightning. Part 4 - FLOWERS and ROSES made from zippers and felt.
I will also post here 10 master classes with step-by-step photographs of the process of creating jewelry from lightning with your own hands.
Well, let's start to slowly delve into this beauty. Now I'm going to make you fall head over heels in love with these lightning ornaments.
DIY LIGHTNING BRACELETS.
(variety of options + master classes)
The simplest option is
for which you don’t need to buy special clamps, fasteners, etc...
It is when…
we have a base bracelet (for example, a piece of leather - which is attached to ordinary buttons (buttons can be inserted in any workshop). And on this leather bracelet we attach an applique from the bends of a zipper . And in this version you don’t even need to cut it. Just unzip and wrap the halves with a roll (see photo below).Fix the zipper rolls with threads and attach them to the leather bracelet with glue.
Or divide the zippers into halves and intricately arrange them in curls on the base bracelet.
MASTER CLASS – bracelet made of lightning with a flower.
Make a longer zipper so that it is enough to twist a lush flower.
If you only have a short zipper, then you can lengthen it by gluing its unzipped halves together - the process of gluing two zippers into one long one is shown in the photo below. We press the tails of the first half towards the wrong side. We apply the tail of the other half to the same place and glue or sew with thread.
We twist the zipper into a flower roll - I fix the twist as we wind it with a thread and a needle. We attach a round piece of fabric to the reverse side. On the front side we attach a rhinestone droplet.
We sew a flower from a zipper to three bracelets covered with a strip of fabric.
And this manicure design would be perfect for these bracelets...
Or these homemade lightning earrings...
We will tell you more about different lightning earrings in a separate article.
...there will be handmade necklaces and earrings - a wide variety of models made from lightning.
You will see real beauty...
Good luck with your creativity.
Olga Klishevskaya, especially for the site
She was no exception. The site “KnowKak.ru” found for its readers several simple but original ideas for lightning bracelets.
For your convenience, the process of creating accessories is divided into stages, following which you can make them yourself.
Materials you will need:
- metal zippers;
- scissors, glue gun;
- pliers, colorless varnish;
- clasps for bracelets;
- tape measure;
- decor for jewelry.
Option No. 1 “Spike bracelet”
Step 1
. Measure your wrist and cut the zipper to size. Do this from the base of the clasp. If the material is loose, then burn the threads so that they do not unravel.
Step 2.
At the cut, install the clip for the lock on the bracelet. For greater fixation, glue it with.
Press the edges of the clip well so that they do not damage the skin of your hands when wearing the jewelry.
Step 3.
Prepare square spikes to decorate the front of the bracelet. Unzip and determine a place for each decor.
On the reverse side, spread the pins, thread them through the fabric and fold them over the back of the zipper.
Decorate the entire length of the zipper on both sides in this way.
Step 4.
Fasten the lock all the way and install the second part of the bracelet clasp. Press it down with pliers as well.
The studded bracelet is ready!
Option No. 2 “Woven bracelet”
Step 1.
Divide the zipper into parts. To do this, remove the slider and remove the limiter on the other side. In total, you will need three strips of lightning for this bracelet option.
If desired, treat the teeth with colorless varnish, so they will shine on the bracelet.
Step 2.
At one end, glue all the strips together. In this case, the teeth should be next to each other. Use hot glue for fixation, which hardens quickly and securely holds the parts together.
Step 3.
Install a clamp at this end of the parts. Additionally, glue it and press it.
Step 4.
At this stage, you need to twist all three parts into a braid.
Try not to tighten the braid too much, while creating semicircles from the zipper on each section of the braid.
Step 5.
Weave the zipper sections to the desired length. If necessary, trim off excess ends and seam the edges of the fabric. Assemble the loose parts of the decor together as in the second step.
Step 6.
Hold the ends with your hands, then glue them together. Place the fastener on top of the adhesive. If it comes out during work, remove the excess before it hardens. Otherwise, in a solid state, it will not be possible to cut it cleanly.
The zipper bracelet is ready!
In just an hour you can make your own original bracelets from a regular zipper. To do this, you need to clearly follow all the steps of this master class.
Fabric accessory
Since fabric is a universal material, you can create a wide variety of brooches from it, improvising and implementing the most interesting ideas.
Fabric flower brooch
Necessary materials:
- fabric of any color;
- scissors;
- threads;
- needle;
- brooch holder or pin.
Manufacturing instructions:
- Cut out the parts from the fabric: 1 - the largest, which will be the base of the flower, 4 - medium in size, 2 - the smallest.
- Fold 4 medium-sized pieces into quarters, right side up.
- Attach to the base with small stitches.
- Fold the smallest parts only in half and sew them on as well. It is necessary to straighten the details of the flower. Attach a pin or fastener to the back of the flower. The product is ready.
Rose brooch
Materials for work:
- synthetic fabric (organza);
- paper;
- candle or matches;
- scissors;
- threads;
- needle;
- glue gun;
- beads or other decorations;
- brooch holder.
Progress:
- Make 5–7 circle templates of various diameters from paper.
- Using the templates, cut 2-3 circles from the fabric.
- Sear the edges over the fire. To make the circles resemble the petals of a real rose, they should be melted along the inner circle. In this case, the fabric must be kept high above the flame so that it melts only from the temperature and does not burn.
- Place the circles from largest to smallest and sew them together.
- Glue or sew beads, a beautiful button or other decorative element into the center of the product.
- Sew the base for the brooch to the back of the product. The accessory is ready.
BRACELET WITH STORG APPLIQUE.
This bracelet has a scalloped appliqué
- you can make it wider (as in the photo below). Then we will need
- Take as a basis two strips
of a solid zipper. - Place them side by side - sew or glue them together -
- sew Velcro
to each end of the bracelet (see Master class below).
And then on this bracelet base you can glue or sew appliqués-curls of our jagged narrow ribbon cut from the zipper.
Here is such a simple lesson on jewelry made from lightning - anyone can do it, right?
OR... here's another bright variation of the same idea - where the BASE is made of a zipper ribbon... AND THE PATTERN is made of a jagged ribbon and stone... like in the photo below:
(Master Class)
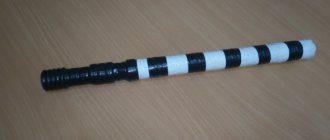
And also - you can make a simple bracelet from the cut off CLOSED toothed part of the zipper. This can be a SINGLE bracelet or a DOUBLE bracelet.
Let's start with a single zipper bracelet with metal charms.
You can also decorate this bracelet with curls from the jagged part of the zipper and a stone or a suitable button.
The length of the zipper can be such that it is enough for one turn around the wrist
... Or you can take longer zippers and wrap your hand around it 2-3 times
.
Below we see a master class on creating such a bracelet from the fastened jagged part of a zipper. There we took a zipper of two wrist girths.
Cut off the fastened toothed part of the zipper - towards the tail part
sew on a keychain with a ring - thread the ring onto the eye of the zipper dog.
You can make several of these zipper bracelets in different colors and wear them all together on your hand.
And here is the option WITH DOUBLE zipper.
The technique is the same. Only here we will have jagged parts from TWO lightning bolts
. And we connect them at the tail with an iron rivet
(they are sold at a jewelry fasteners and clasps store). Below is a clear step-by-step master class in photographs.
And you can do something similar on your leg.
Pencil case
A rainbow pencil case will lift anyone's spirits.
To make such a colorful and cheerful pencil case you will need several bright lightning bolts of different colors. It is not necessary to make it rainbow, you can simply alternate several colorful shades with each other, or make one half of the pencil case one color, and the other a contrasting one. Manufacturing is extremely simple: zippers are sequentially sewn to each other, forming a circle. The pencil case for the office is quite spacious.
A similar pencil case, only more spacious due to the round side inserts.
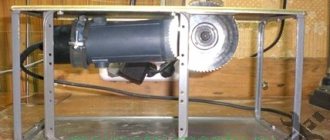
Jewelry made from lightning master class
Hand-made has firmly become fashionable, so today high-quality homemade exclusive items are valued much higher than factory-made products. Even the most ordinary zippers can be used to make original jewelry. Don't believe me? In this article you will learn how to make iron lightning jewelry.
Master class on how to make jewelry from lightning
1. We start working with the zipper closed. 2. Trim the fabric base so that only 2-4 mm of fabric remains. 3. It is necessary to cut off the fastener and retainer from the ends of the zipper. 4. Separate the zipper and you will have 2 pieces. 5. The zipper blank must be bent inward at one end by 3-5 mm and stitched with thread.
6. After this, we wrap the zipper in a circle in three rows and sew all rows of the zipper. To do this, insert a needle every two cloves.
7. To make the work more accurate, you can use fishing line for stitching.
9. The result is a blank in the form of a disk, which is sewn onto a hoop or onto a base for a bracelet (strap or wide elastic band). The result is a beautiful and original decoration. You can also make earrings from disks; for this you need to buy the appropriate fittings for the clasp.
Felt brooches
Felt has a fairly dense structure, which allows you to create a variety of products from it. This material is often used as a base for brooches, on which fabric, beads and other decorations can be sewn.
Flower
Necessary materials:
- felt in two colors (for flower and leaf);
- a beautiful button, stone or other decoration;
- scissors;
- threads;
- needle;
- brooch holder.
Step-by-step manufacturing instructions:
- Print the template below.
- Using a pattern template, cut out from felt one shape for the leaf (large) and three for the flower itself (each slightly smaller than the other).
- Use scissors to make an x-shaped hole in the center of the smallest one.
- Cut small round holes in the middle of the other two. Their diameter should be smaller than the button, which is subsequently attached to class=”aligncenter” width=”1600″ height=”1187″[/img]
- If desired, add the inner veins of the flower by embroidering the petals with threads.
- Sew a brooch mount to the back of the sheet. Place it just above the middle.
- On the front side of the product, lay out all three parts - from largest to smallest. Make a stitch through the center of the leaf and flowers, then back, thereby sewing on the button. It, located in the center of the flower, will give it the desired shape.
- Make a knot, secure the thread and cut. The product is ready.
During production, you can change the color of the details, embroider the flowers with different threads, sequins or beads, use different buttons for the middle, giving the brooch individuality.
From felt and zipper
Necessary materials:
- green felt (three mm thick);
- black felt (one mm thick);
- gold metallic zipper;
- beads, glass beads, decorative elements;
- scissors;
- a thread;
- needle;
- knitting pin;
- lighter or matches.
Progress:
- Prepare the border for the brooch by cutting off the zipper close to the teeth. Secure the cut by burning it over the flame of a match or lighter.
- Cut out a small heart from felt.
- Starting at the top center of the heart, sew a zipper along the entire edge of the base. Make stitches of the same length through each clove.
- Once completed, secure the end of the zipper with additional stitches. Make a circle from a small piece of zipper, secure with stitches and sew to felt. Use a thick needle or awl to make a hole for a pin in the center of the circle.
- Fill the remaining space on the brooch with beads, glass beads and decorative elements that can be sewn on or securely glued. However, there should be gaps between them.
- Cut a heart of the same size from black felt for the wrong side. Thin felt will hide the seams.
- Fold the front and back sides, sew the parts, also making even stitches between the teeth. In the upper left part of the brooch, leave a space unsewn for the point of the pin to come out.
- Attach a pin by bringing the point through the zipper circle and out through the side seam. The brooch is ready.
- as a trial option.
So that it’s not scary... - start with the simplest ideas... For example, like this...
You can make dragonflies with butterflies...
Then you can buy more zippers and make the thing bigger.
Jewelry made of lightning - with stone.
You can insert a beautiful stone or crystal into your necklace. You can buy them in a bead store - they sell such special large stones - they are called CABACHONS. They are designed to be woven with beads... but we will be wrapping them with zippers.
And then you can do something VERY AUTHORAL... in the spirit of Kate Kuzak...
You can connect creativity - and create ALL DIFFERENT ABRACADABRA out of lightning... the main thing is that you like it...
If you are far from impulses of wild creativity and love an orderly life... then there are options for you to decorate with lightning in a restrained style.
If you like STRICT STYLE in clothes...
You can make zipper jewelry in the form of regular zip ties using fabric threaded through a zipper ring... Or in the form of a neckerchief.
You can decorate the neckline area with a simple decoration made from straight sections of a zipper.
FRINGE NECKLACE – like a lightning bolt decoration with earrings.
You can make a fringed necklace from pieces of the zipper jagged part. As in the photo below. Or you can simply stick the same straight pieces of zipper on top of each other - the main thing is that there is symmetry - the same on the left and on the right - it also turns out very beautifully (second photo below).
Zipper DECORATION - with precious rhinestones.
And then... you can buy crystals... beautiful Czech beads, expensive Swarovski crystals... and simply embroider an ordinary zipper with them - and turn it into an exclusive DIY decoration made from a zipper.
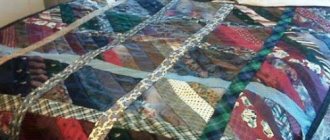
Jewelry made from lightning - twisted into roses...
Or wind simple rose flagella... and sew them onto a piece of thick fabric...
Next to the zipper roses, place roses made from ribbons or pieces of satin fabric... It also turns out very beautifully - and very quickly. In one evening you will become the owner of an original handmade jewelry - and then you can make such little things for sale. The costs for the material are small - the labor is also not sweatshop - and the pleasure from the process and the result are guaranteed.
Then, when your creative courage and desire for daring experiments awakens, you can buy felt and try to make something on this basis...
Then you will find out where zippers are sold wholesale - and then you will start making things with more material...
Decorations made from lightning - twisted into round discs...
If you buy zippers of the same color - but WITH DIFFERENT SIZES OF TEETH - you will get a necklace like this... The rings are twisted - fixed with threads - sewn onto a base of thick felt (so that the necklace holds its shape and does not warp or bend under the weight of the metal)
Necklace
This decoration looks extravagant and fascinating.
Despite the fact that the cost of such decoration is small, it looks quite attractive and stylish. Thanks to it, any casual or festive look will immediately become more memorable and catchy. To make the decoration you will need several zippers. It is performed sequentially: first, a central circle is created, and then subsequent circles of slightly smaller diameter diverge from it. A needle and thread will help you make circles. You need to think about the fastening on top so that the necklace is comfortable to put on. To make the decoration look more expressive, it is better to stack the zippers for each circle in several rows, for example, four.
Braid bracelet made of three halves of lightning.
You can take three halves of an unzipped zipper and weave them into a braid.
Clamp the edges of the braid between fasteners for jewelry (sold in bead stores and hand-made stores, and in sewing accessories departments).
Attach a jewelry fastening clasp to the clamped edges.
Or
you can make a more interesting weaving...
When the halves of the zipper (first sewn together) diverge, they go around the opposite halves of the zipper - they go over the sides of the bracelet and there they are sewn into a round loop. It turns out that the left loop is threaded into the right loop - an interesting model.
Lightning bracelet with crystal beads - master class.
And here is a master class on creating a bracelet with crystal beads.
- Here we take the unzipped zipper
and sew its flaps together -
and at each connecting stitch we insert a bead. - As a result, our halves of the lightning are connected, and the lenses sparkle between them.
- Now we just cut off the fabric part
. - clip
onto the tail of the zipper . And everything is ready.
This bracelet can be made wide by connecting SEVERAL of these crystal-toothed strips together.
MASTER CLASS – bracelet made of lightning with metal rivets…
Bracelet with rivets
- it's simple.
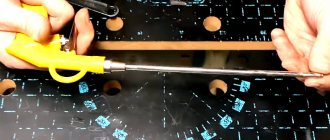
We take the zipper, stick rivets along it - we pierce the sharp legs of the rivets through the fabric part of the zipper - and bend them to the wrong side - hammering them in with a hammer or pressing them with pliers - whichever is more convenient for you.
We sew a piece of elastic to the tail part of the zipper so that our bracelet is stretchable and easily fits on your hand.
A bracelet with a chain
– it’s even easier to do.
Along the toothed part of the zipper we draw a strip of glue. We put a chain on it. We attach a fastener to the tail part of the zipper that will be fastened to the zipper dog.
Bracelet made from halves of lightning bolts rolled into handles.
But the idea of a bracelet is when the halves of an unzipped zipper are rolled into rolls (the rolls are fixed with thread or a drop of glue). And then we put these rolls in a mosaic - side by side
– fasten it with threads or the same glue. And now your DIY lightning bracelet is ready.
And here is another master class on a bracelet, where half a zipper is twisted into a flower and attached to three plastic bracelets covered with fabric.
Flat flower
Almost completely repeats the previous version of the flower, but with slightly different petals. That's why he's not so lush.
Step-by-step instructions in pictures
How to create a jewelry brand?
If you are the owner of a jewelry brand, are planning to expand your brand, or, on the contrary, are just excited to create your own jewelry collection, you will need:
- Systematize your knowledge about the market.
- Analyze the current market situation.
- Identify potentially interesting market niches.
- Develop a strategy for promoting your products to the market.
Let's look at each point in detail:
How to choose a niche to position your jewelry collection?
- Decide on your target audience, who will be your consumer?
- Analyze from what specific sources of information do they get ideas for purchase? try to be as specific as possible in the answer to this question, this will give you the opportunity to further build targeted marketing of your products and save money using the most effective advertising.
- Visual style, I think you have already noticed that all collections have a single visual style, which makes it possible not only to attract customers, but also to retain them, developing a kind of loyalty and magical attractiveness.
Of course, you should take into account not only trends in jewelry design, but also non-standard materials and technologies that you can use, this will allow your brand and your company to become competitive in the market.
In addition, if you are planning to introduce your jewelry collection to the international market, you should take into account the cross-cultural characteristics of the mentality, taking into account the use of modern information technologies, which will allow you to export with minimal financial costs. If you are interested in details on organizing the export of jewelry, please contact us for advice. Let's summarize and determine what needs to be done:
Let's summarize and determine what needs to be done:
- Determine the target audience.
- Position your collection according to potential clients.
- Build and calculate a financial and economic model, taking into account pricing and potential costs.
- Develop a brand design and conduct testing for the target audience.
- Understand what actually distinguishes you from many manufacturers.
- Organize photo and video shooting of a jewelry collection, taking into account the developed concept.
- Build relationships with bloggers and celebrities to promote your products.
Let's try to describe in more detail the roadmap for the development of your brand.
First, let's decide on the general concept of the brand and the target niche that you plan to enter:
What naming and corporate identity will you use?
It is very important to understand that any international market has its own specifics and should be taken into account, otherwise your sales will be very low
How will you build a sales funnel?
- How easily can you reach your clients, what prerequisites are created for word of mouth?
- How to properly build relationships with partners?
- Do you use a partner assessment system that will allow you to minimize many risks?
Embroidered brooches
Such products are made by embroidery using floss threads. The material needs to be put on a hoop and the outline of the brooch should be outlined. To do this, you can use a compass. Then, according to the planned sketch, you need to make embroidery. You can use various embroidery techniques.
In this case they use:
- satin stitch embroidery;
- knot technique;
- stem seam.
Braid bracelet made of three halves of lightning.
You can take three halves of an unzipped zipper and weave them into a braid.
Clamp the edges of the braid between fasteners for jewelry (sold in bead stores and hand-made stores, and in sewing accessories departments).
Attach a jewelry fastening clasp to the clamped edges.
Or
you can make a more interesting weaving...
When the halves of the zipper (first sewn together) diverge, they go around the opposite halves of the zipper - they go over the sides of the bracelet and there they are sewn into a round loop. It turns out that the left loop is threaded into the right loop - an interesting model.
Lightning bracelet with crystal beads - master class.
And here is a master class on creating a bracelet with crystal beads.
- Here we take the unzipped zipper
and sew its flaps together -
and at each connecting stitch we insert a bead. - As a result, our halves of the lightning are connected, and the lenses sparkle between them.
- Now we just cut off the fabric part
. - clip
onto the tail of the zipper . And everything is ready.
This bracelet can be made wide by connecting SEVERAL of these crystal-toothed strips together.
MASTER CLASS – bracelet made of lightning with metal rivets…
Bracelet with rivets
- it's simple.
We take the zipper, stick rivets along it - we pierce the sharp legs of the rivets through the fabric part of the zipper - and bend them to the wrong side - hammering them in with a hammer or pressing them with pliers - whichever is more convenient for you.
We sew a piece of elastic to the tail part of the zipper so that our bracelet is stretchable and easily fits on your hand.
A bracelet with a chain
– it’s even easier to do.
Along the toothed part of the zipper we draw a strip of glue. We put a chain on it. We attach a fastener to the tail part of the zipper that will be fastened to the zipper dog.
Bracelet made from halves of lightning bolts rolled into handles.
But the idea of a bracelet is when the halves of an unzipped zipper are rolled into rolls (the rolls are fixed with thread or a drop of glue). And then we put these rolls in a mosaic - side by side
– fasten it with threads or the same glue. And now your DIY lightning bracelet is ready.
And here is another master class on a bracelet, where half a zipper is twisted into a flower and attached to three plastic bracelets covered with fabric.
BRACELETS - with a zipper tape base.
Or you can make such an applique of curls from a thin strip of the jagged part
lightning. To do this, we cut off the entire fabric part of the zipper - and we get a narrow toothed strip.
And from this jagged rope we make an applique. The basis for the bracelet can be the zipper itself - where its solid halves are sewn on top of each other - with the jagged edge outward
– to the sides of the bracelet.
Or such bracelets can be decorated with textured iron buttons
or buckles
from thin straps
or punch holes in them with metal eyelets.
You can glue zipper lock pawls onto such a bracelet... Or cover it (directly cover it) with rhinestones or spikes...
You can decorate such a bracelet with a bright ribbon with a pattern... Or sew a chain of rhinestones onto it...
The clasp on such a bracelet can be a push-button clasp, or a short section of zipper can play the role of a clasp.
The base for the bracelet can be a zipper. Then you can simply stick pieces of zipper
– like tiles on a roof – overlapping each other (photo below).
Look at this cute bracelet WITH LIGHTNING RUCHLE
in our photo below. I know how to do it.
We need a base - it can be a wooden or plastic bracelet... Or a homemade base from something that is nearby - for example, saw off a ring from a narrow plastic bottle and wrap it with tape diagonally - here you have a base in the form of a bracelet... And now you can attach our zipper to it .
Half of the zipper simply spins like a snake - and is layered, spreads along the entire barlet - it can be fixed with threads or glue.
BRACELET made from a bunch of Jagged lightning bands.
You can prepare several pieces of such a jagged part of the zipper - fold them into a row-bundle - clamp the ends of the bunch with a fastener - and you will get a bracelet made from a zipper like this (photo below).
And if you also come up with an applique of a large bead and zipper dogs for this clamping model, you will get such an elegant bracelet (photo below).
And if each of the twigs is passed through a piece of leather
, decorated with rivets - you will get this model of the same version..
And also the jagged part of the zipper - you can arrange it in beautiful patterns
. We just make bends and fix them with threads – tightly.
You can provide a clasp (as in the left photo below)
Or you can make a bracelet without a clasp - wide enough for your hand to fit through, but narrow enough to wrap around your wrist and not fall off your hand (as in the right photo below).
Dragonfly
The example of a brooch in the shape of a dragonfly presented below looks very original. The manufacturing method is similar, only the “zipper” is not cut each time, but is laid in bends and loops. The wings can be made in different colors, then the craft will be more colorful.
As you can see, making brooches from such a pleasant material to work with as felt is not difficult. Knowing the principle of working with lightning, you can make any craft structural and original. Create with joy!
Braid bracelet made of three halves of lightning.
You can take three halves of an unzipped zipper and weave them into a braid.
Clamp the edges of the braid between fasteners for jewelry (sold in bead stores and hand-made stores, and in sewing accessories departments).
Attach a jewelry fastening clasp to the clamped edges.
Or
you can make a more interesting weaving...
When the halves of the zipper (first sewn together) diverge, they go around the opposite halves of the zipper - they go over the sides of the bracelet and there they are sewn into a round loop. It turns out that the left loop is threaded into the right loop - an interesting model.
Lightning bracelet with crystal beads - master class.
And here is a master class on creating a bracelet with crystal beads.
- Here we take the unzipped zipper
and sew its flaps together -
and at each connecting stitch we insert a bead. - As a result, our halves of the lightning are connected, and the lenses sparkle between them.
- Now we just cut off the fabric part
. - clip
onto the tail of the zipper . And everything is ready.
This bracelet can be made wide by connecting SEVERAL of these crystal-toothed strips together.
MASTER CLASS – bracelet made of lightning with metal rivets…
Bracelet with rivets
- it's simple.
We take the zipper, stick rivets along it - we pierce the sharp legs of the rivets through the fabric part of the zipper - and bend them to the wrong side - hammering them in with a hammer or pressing them with pliers - whichever is more convenient for you.
We sew a piece of elastic to the tail part of the zipper so that our bracelet is stretchable and easily fits on your hand.
A bracelet with a chain
– it’s even easier to do.
Along the toothed part of the zipper we draw a strip of glue. We put a chain on it. We attach a fastener to the tail part of the zipper that will be fastened to the zipper dog.
Bracelet made from halves of lightning bolts rolled into handles.
But the idea of a bracelet is when the halves of an unzipped zipper are rolled into rolls (the rolls are fixed with thread or a drop of glue). And then we put these rolls in a mosaic - side by side
– fasten it with threads or the same glue. And now your DIY lightning bracelet is ready.
And here is another master class on a bracelet, where half a zipper is twisted into a flower and attached to three plastic bracelets covered with fabric.
Animal figurine
Next we will offer an option for making felt brooches for beginners. This is a figurine of a wolf. If you wish, you can make any other character - a fairy tale hero, a cartoon, an insect or even a fish. First, the outlines of the character are drawn on a piece of paper. You can redraw it from a book or print out a wolf coloring page.
Two identical elements are cut out of gray felt. From white fabric you need to cut out the eyes and the tip of the tail. Sew on all the details with contrasting color threads. In our case we used black. After sewing on the main parts, two identical beads for the eyes and one larger one for the nose are reinforced. The figure is decorated with a bow made of satin ribbon.
Gift for February 14
A felt brooch in the shape of a heart is suitable as a gift for Valentine's Day. Cut out two identical parts from red fabric. Before stitching them together, padding polyester or artificial wool is inserted inside. Then the craft turns out voluminous. Sew the parts together with a seam over the edge using contrasting floss threads. Any color can be used.
The craft is decorated with three different buttons depicting flowers, and small leaves are embroidered with thread on opposite sides. They are located on three sides in several pieces. There are no decorations on the back as this is where the latch will be attached. You can use a regular safety pin; if desired, glue a metal clothespin with a glue gun.
DIY “Heart” accessory
This master class is not too complicated in the manufacturing process, but requires special care, painstakingness and perseverance. The work will require:
- thick red felt;
- zipper with synthetic base and iron teeth;
- dense threads;
- darning needle
Step-by-step work plan
- From squares of red felt with a side of 5-6 cm, cut out 2 similar pieces in the shape of a heart.
- Then, in a free-form spiral, make a continuous cut to the middle of one of the workpieces.
- Insert the prepared zipper (you can learn how to prepare a zipper for work in the previous master class) along the entire cut and sew over the edge.
- Sew a clasp (pin) to the second part of the heart on the reverse side.
- Apply glue to the heart with a sewn pin on top and attach the part with a sewn zipper.
- Sew the two pieces together using small, invisible stitches.
A beautiful bright heart-shaped brooch is ready!
As you can see, even an iron lightning bolt in the skillful hands of a master can become the basis of an original decoration. Thanks to well-chosen color combinations and appropriately sewn decorative elements, your brooch will be able to amaze even the most famous designer with its splendor.
Related Posts
leave a comment
New Year's gift
A felt brooch on a New Year's theme can be made as a gift to a loved one. Draw patterns for mittens (2 pieces) and headband (2 pieces). When stitching the elements together, insulation is also inserted inside to add volume. For stitching, you need to select threads to match the red and white felt.
A lot of work lies ahead in decorating a felt brooch with your own hands. First, small curls are embroidered with floss threads. Then beads or pebbles are attached randomly, from which stitches are made in different directions. These will be snowflakes. On a white rim there are three flowers with white centers and the same number of leaves. Such small details on a brooch can be strengthened with a glue gun. Lastly, a metal clothespin is placed on the back side.
ROUND lightning necklaces.
SOFT TWISTS - LIGHTNING NECKLACES.
We take two bundles of long lightning. There are five lightning bolts in one beam and only three in the other (this can be seen in the photo). And now we begin to weave from the center.
We intertwine these bundles with each other - we simply throw them over each other. But we throw it so that the bend is graceful and soft - so that in the bend the jagged lines of each zipper in the bundle move slightly apart - so that each line leads its own gentle, smooth pattern.
As soon as we manage to put the first “weave” into a soft wave of a beautiful shape, we immediately fix it with stitches of threads tone on tone with the zipper... maybe a drop of glue from a glue gun (but so that the glue drop is hidden in the depths of the zipper and then does not come out out).
When the first weave is fixed, we go in any direction from the center (to the right or left) and make another weave - also achieving a beautiful shape - and fix this shape with threads or glue. And so on in both directions from the center to the clasp itself.
NECKLACE - Braided from the jagged edges of a zipper.
You can buy an insane amount of zippers (in wholesale stores). Cut off the serrated part from each long zipper...(edge with teeth).
And weave a crazy braid - from these cut off jagged parts of the lightning.
Schemes for weaving such braids from lightning can be seen on sites dedicated to macrame techniques or hair braiding...
NECKLACE is figured - from the jagged edges of a zipper.
And here is another technique for creating a decoration from lightning... When the jagged part is laid on a plane in symmetrical curls.
Practical handbag
This small bag will fit all your essentials.
Making such a stylish and unusual handbag is not difficult. But you can put everything you need in the first place: keys, smartphone, napkins, lipstick, headphones and the like. The handbag is quite roomy and can be of any color. To make it, you just need to sew together the number of zippers required for the selected size of the accessory.
Helpful tip: If you wish, you can add a comfortable strap to the bag to hang it on your shoulder. To make it, zippers or a chain are suitable.