Headphones as a camera shutter button
Practical camera shutter button The in-ear headphones that come with most smartphones are rarely considered a breakthrough in audio reproduction.
Therefore, music lovers prefer higher quality alternatives. However, a second life is also available for the original headset, for example, as a camera shutter button. This can be useful both for selfies and when shooting with long exposures, that is, when the camera needs to be held as still as possible.
Already in iOS 5, Apple has adapted the software in such a way that pressing the “+” button on the headphone cord triggers the iPad or iPhone camera.
Smartphones running Windows Phone (manufactured by Nokia and Microsoft) also have this feature. In the case of Android, it all depends on the manufacturer and series of the device.
Labor intensity: low; costs: no
Mini CRT monitor
At night I couldn’t sleep because of the spring blues, and in order to distract myself from sad thoughts, I began to come up with various inventions. And so I figured out how to make a miniature CRT monitor. CRT - because in principle I love lamp technology, and even more so a device for displaying information. First, I'll show you the result.
Warm tube Debian lxde
Miniature CRT monitor measuring only 1 cm! And it’s very easy to do and anyone can do it! Go!
From an idea.
Actually, the essence of the idea is simple. In old VHS cassette camcorders, an ordinary small kinescope acts as a viewfinder display. And once upon a time in the magazine “Radio” I saw an article about how to make a TV out of this kinescope. And then at night I thought: if you can make a TV, then you can make a monitor!
Remember: if you come up with a cool idea, Google it! Surely it came to someone else!
Of course, I decided to Google it. The search for “Viewfinder Hack” contains a lot of interesting things, I’ll leave this query for you to puzzle over. But I found one site www.ccs.neu.edu/home/bchafy/tiny/tinyterminal.html, where a friend is trying different ways to display information, and one of the ideas is to use a kinescope from an old video camera.
Camera viewfinder
Warm tube DOS
These pictures are taken from this site. Apparently you are also intrigued by how to do this?
The idea is very simple and trivial.
In the old days, there was no such development of small LCD displays, especially color ones, and then the lamp ruled. In the viewfinder of old cameras there is a CRT (Cathode Ray Tube), and what is interesting is that it is powered (in the sense of the tube circuit) by a small and commercially available voltage of 5 V (you can take it, for example, from USB). The current consumption is also low. The best part is that this screen only needs a composite video signal as an input. A composite video signal is provided by our VCR, DVD player, cameras, almost every camera, Nokia N900, Nokia N9 phones (I can’t speak for others - I don’t know), some video cards. The most interesting thing is that a composite video signal can be obtained even from a VGA video card using a fairly simple circuit. VGA-to-video converter circuit
As you can see, enormous possibilities for creativity open up. Now we need to understand how to do all this.
What to do and who is to blame?
To make such a miniature display, we will need an old VHS video camera, straight arms, and one 75 Ohm resistor (optional). Plus a good mood, a soldering iron, a multimeter, free time and desire. Regarding the camera, I want to say that cameras with a color image in the viewfinder are not suitable for us right away. You can immediately dismiss cameras that have a side screen. The older the camera, the better. The most relish is cameras with an angular viewfinder or professional cameras. They usually have a fairly large display. The instructions given below are not universal! You may have to turn on your brain, look for documentation, poke devices at different nodes, but it may go the same way as for me. I would like to note that in the viewfinder itself there can only be a picture tube, and the “brains” can be in the main body, but I was lucky.
So, you managed to get a video camera. Failed? Blow on Avits, slandas, hammers, ebays, flea markets, there is a lot of this stuff for pennies! We'll assume that you got it. The camera was given to me by one of my good LJ friends, who immediately understood the trick and presented me with a Panasonic NV-S600EN
.
The camera before the experiments
The camera was without a battery, without a power supply, and it was generally not known whether it worked. First, I took it apart. I can’t give universal instructions: unscrew what can be unscrewed, open all the curtains, unscrew all the screws. It makes sense to start the analysis from the side opposite the cassette. In this way, my camera was divided into two halves, in the second there was a patch board with a viewfinder, and in the other there was a camera with steel guts. I removed the scarf from the other half, the viewfinder, and removed the piece of plastic altogether. The camera should not be completely disassembled yet, because... We still need its performance. I put the switching board back into its original slot.
The connection board
, the Viewfinder, after being disconnected, shocked me: ten(!) wires came out of it. Seven color and three gray, but after disassembly, it turned out that 7 color went to the buttons located on the viewfinder body (zoom). We safely remove these buttons. We get this parsley:
Viewfinder, with three gray wires, one black ground wire and a zoom button next to it.
The viewfinder is interesting to look at inside. I won’t describe its structure; I think you can find the description yourself if you wish.
With the lid open, top view
I removed the “eye” itself as unnecessary, although I use it occasionally. The screen itself reminds us of old black and white televisions, which the modern generation has never even seen.
Miniature screen
We will have three wires going to the display, as you probably guessed: a common wire, +5 volts and the composite video signal itself. It remains to determine who is who.
Hacking is an interest, plus the electrification of all devices
Having paraphrased the famous saying, we will move on. Our task now is to solve the puzzle of three gray wires: who, where, why and why. The simplest thing is to find the common wire. My battery was missing, but its contacts were sticking out. We take a multimeter in dialing mode, touch the minus of these contacts with one end (I had them signed), and with the other we look at the contacts of our three wires along the connector. One of them rang - this means the common wire. It should be noted that, hypothetically, the power from the battery can be decoupled; in this case, you need to look at the common wire according to the circuit inside the camera; usually all screens and wide polygons “ring” with it. Now let's put the camera back together! Those. We don’t quite assemble it, but so that all the electrical components work. For me it looked like this
Electrically assembled camera
To determine the other two signals, the camera had to be powered. Since the camera was orphaned, I powered it from an industrial power supply unit, which we connected directly to the battery contacts. The camera agreed to work normally, only with power parameters of 6V, 6A. Before that, at startup, it blinked the LED, the screen, jerked the engine and switched off. I assume that all the electrolytes have dried out there. After we brought the current to such astronomical proportions, it started up and did not hang.
Working camera
I couldn’t deny myself the pleasure of checking the functionality of the camera and the display itself, so they hooked up a TV to the camera and looked at all sorts of inscriptions on the screen.
My nickname
The image from the screen turned out poorly in the photo, but I can assure you that it is flawless! Okay, we had some fun, made sure everything was working, and then we were on our way. Now we need to find out where we get food. We switch the multimeter to the DC voltage measurement mode, connect one contact to the common wire, and poke the other into the remaining two wires. If the power on one wire is somewhere around 1.5-1.7 V, then this is most likely a video signal. On the other wire there will be approximately 5 V (you must understand that it can be 4.8 V, as in my case). As a result, we draw everything on a piece of paper and get the following connection diagram.
Connection diagram
After all this, we disassemble the entire structure and begin assembling a new one.
New life for an old display
Since the display power supply was 5V, it was decided to power it from USB. I want to disappoint some who hope that there will be 5V everywhere. After reading similar guides on making products from displays, I came to the conclusion that the display power supply does not need to be 5 V! It could be 6 or 12. So be careful! But in my case everything is fine. Solder the USB cable and power it from the charger.
Wool on the screen
You should see familiar fur on the screen. Please note that despite the scanty currents, there is a high-voltage transformer there! And you shouldn’t put your hands into the tube, otherwise it will be a mess. I prudently hide everything in the case before turning it on.
After a successful launch, it is worth checking the input resistance of the line. With the display turned off, we measure the resistance between the common wire and the input wire. If it is equal to 75 Ohms, we calm down and skip this operation. In my case it was 1 kOhm. To match the line, you need to solder a 75 Ohm resistor between the common wire and the signal wire. In principle, the operation is not critical, but my video card and some other video outputs refused to show without a matched resistance. Of course, it’s better to solder the resistor as close as possible, but I did everything on the switching board.
Resistor 75 Ohm, size 0805
I didn’t have a tulip-female connector on hand, so I found a SCART connector in my trash bin, took it apart and soldered it to the scarf inside. I used my Nokia N9 with Debian on board as a video source.
The design is assembled, everything is clear, I’m not deceiving you.
Everything works immediately after connection. I don’t have a native cable for Nokia, and I used a store-bought one for 200 rubles. Everything started right away.
Desktop on a micromonitor
I’ll be honest, taking this and the photo at the beginning of the post was very difficult, I spent an hour experimenting with light, shutter speed, aperture, etc. But the result is wonderful. It's even better live! It’s also a lot of fun to watch a video from such a screen.
What about the computer?
It's not so simple with a computer. There are several options to solve the problem. One of them is to buy a VGA to S-VIDEO adapter, it costs mere pennies, the other option is to solder it yourself, I gave the diagram above. The third option is to use video cards with S-VIDEO output, for example these:
I found video clips on the mezzanine.
The video card has a round connector, similar to ps/2. You also need a corresponding adapter, it comes with the video card. In the photo it hangs on the left. Since I didn't plan to replace my video card with this old one, I just tried out what it would look like.
My desktop on a big computer
It is also duplicated on the micromonitor.
An attentive reader will notice that some fields have appeared. Changing permissions (all) did not affect their availability in any way. There is neither sense nor desire to understand the reasons for their appearance. The fact that it works is established, we return the video card to its place.
Hello. My last name is “Total”
As a conclusion, I want to say that this craft has no practical meaning or I don’t see it. The display has sufficient resolution to even read texts on it, but it is so small that without an optical system it is impossible to make out anything on it. It is possible that if it were possible to connect it as a third monitor, it would be possible to display some useful information there, but again I don’t know why.
So, in essence, this is a fun entertainment that you can demonstrate to your children, friends and girlfriends. It looks impressive when you take your phone, insert the wire and the image appears on the screen :).
If you wish, you can make virtual reality glasses, but I have little idea how to separate the video signal without a lot of hemorrhoids. So all this is entertainment and nothing more.
Thanks comrade
freeman for the camera and my wife for her patience :).
Source
High quality audio playback via Bluetooth
Stream music
A high-quality hi-fi system with high-quality speakers and a powerful amplifier still provides excellent sound over the years. But the equipment of modern models is undoubtedly better.
However, you can provide at least Bluetooth music streaming quickly and inexpensively. For this, the market offers audio-Bluetooth adapters at prices starting from 1,400 rubles. The compact devices have their own power supply and can be connected to the analog input of any stereo system using a 3.5 mm Mini-Jack plug or RSA cable.
Pair in the Bluetooth menu of your devices (smartphone, tablet, PC), after which streaming can begin. A particularly large number of interfaces are offered, for example, by the Philips AEA2700/12 (about 5,000 rubles on eBay), which can be connected via MiniJack and a digital connection (optical and coaxial). In addition, it supports NFC technology.
Labor intensity: average, costs: 1400 rubles.
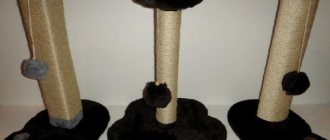
Profile 20x40 and a coil of textile sling
First of all, we weld the metal frame. In order to estimate the dimensions, you can use ordinary wire, which we first bend to the size of your carcass.
After this, we cook two identical sides according to the wire sketch.
We connect them together and weld them to the rectangular legs. Voila, the frame is ready!
We cut strips of textile sling and sew them on tape by tape. First of all, I pulled the short ribbons along the width, and only then those that go lengthwise. Don't be discouraged if you can't tighten the short ribbons properly. Insufficient tension will disappear when you tighten all the long bands.
We throw the mattress on top, and you can get stuck in your favorite Pikabushka =) And here is a video on how to make it, if anyone is interested.
About equipping with the “smart TV” function
Old TV becomes smart
Your old Full-HD TV could work for several more years - provided it is equipped with smart TV functions. Similar options can be easily implemented using media players. For example, the Amazon Fire TV Stick (about 7,000 rubles), connected to an HDMI port and supplied with power via an adapter, offers a smart TV interface with access to media libraries and streaming services. Control is carried out using the included remote control. Models such as Google Chromecast (about 2,500 rubles) serve as links between TV and mobile devices: with their help, you can broadcast any content from a tablet or smartphone to the big screen.
Labor intensity: average; costs: 2500 rub.
Where is the video peephole installed?
The device is one of the elements of the security system and is mounted on the front door. The video peephole allows residents to monitor the situation near their door. Recently, people are increasingly installing such a security system. Installation can be done in apartments, private and country houses, dachas and cottages.
Advantages
An electronic video eye has many advantages compared to a conventional optical device:
- The resident does not need to go to the door and peer through the peephole to see the situation in the corridor. The electronic model of the peephole transmits information through the camera according to the principle of a video surveillance system. You can now view what is happening behind the door on the monitor of a laptop or smartphone located in the room.
- Many manufacturers use cameras with maximum sensitivity. Thanks to this, you can see the picture even in poor lighting of the corridor. Video eyes with an infrared camera allow observation in the absence of any lighting.
- The main advantage of the video peephole is extended viewing. The viewing angle ranges from 90 to 180 degrees. Thus, the corridor and stairs are visible as much as possible.
- The autonomous power system is located indoors, so it cannot be turned off from outside. The video eye will work until the battery runs out.
- Most models of modern devices record video on a specific medium. This model is convenient to use during vacation or business trips. When you arrive home, you can see who came and what was happening near the door.
Nowadays, a video peephole is a reliable protection of property from burglary and theft. You can make the device yourself from materials found in every home. There are two ways to create a device with your own hands. The first method uses a camera from an unwanted mobile phone, and the second uses a webcam.
Return of the player
Turntable Amplifier
Do you have an old turntable and a dusty record collection that you haven't digitized but don't want to throw away? If so, put it back into service even if your stereo doesn't have a dedicated Phono input.
All you need is a Phono amplifier that converts the Phono signal into an acceptable line level signal and connects it to any input on your Hi-Fi system using a cinch cable. A good choice, for example, would be the Hama PA 506 model (about 5,000 rubles on eBay) in a solid metal case.
Labor intensity: average; costs: 5000 rub.
"Smena-2"
A small-format scale camera produced on the basis of Smena. Initially, the device was produced at GOMZ in Leningrad (1955-1962), then production partially moved to Minsk to BelOMO (1958-1961).
The model was mass produced, with a total of 1,579,326 copies produced.
The Bakelite-bodied camera used standard film cassettes, loaded through the back wall. It was impossible to rewind it; the captured frames were “moved” to an empty cassette. There was a self-timer.
The lens is quite mediocre - Triplet T-22. Smena-2 was also equipped with an optical parallax viewfinder and an “X” synchro contact. If desired, it was possible to additionally install a rangefinder or flash.
In general, this model is not particularly expensive now. There are many offers on the Internet for only 1000 rubles. But I found on Avito a rare copy with two lenses, the owner of which assures that there is no second one. Cost – 200,000 rubles.
Inexpensive solution for macro photography
Macro
Photography Macro lenses allow small objects to "become" large - this can help you realize great photography projects. But even without using macro optics, you can get close-up shots. All you need is a so-called macro ring for your DSLR or system camera.
This adapter is mounted on the camera mount, and any lens is mounted on the adapter. The shorter the focal length, the larger the image scale becomes. Rings with electronic contacts (from 4,500 rubles) are more comfortable to use and allow automatic exposure metering and autofocus. With cheaper rings, setting these parameters is only possible in manual mode.
Labor intensity: average; costs: 4500 rub.
"Zenit-7"
It was supposed to be a small format SLR camera for professional photographers, but mass production never began. “Experimental” copies (3024 in total) were produced at KMZ in 1967-1971. Camera dimensions – 15*11*10 cm, weight – 1.1 kg.
Over three years, the design has undergone repeated changes. But most of them were “cosmetic”. The color of the case, the location and design of the markings on it varied. Among the more important changes:
- the appearance of a self-timer and its abandonment;
- “removing” one of the two sync contacts;
- development of a shutter with curtain travel in a horizontal plane and stepless shutter speed adjustment;
- automatic frame counter reset;
- using a Fresnel lens as a focusing screen.
Now this camera can be purchased for 40,000-100,000 rubles.
If you find an old Soviet camera in a closet or at your dacha, do not rush to throw it away, especially if it is in good condition, with all its components and documents.
Try consulting with experts on the forums. It is quite possible that by putting it up at auction you can earn some good money.
Friends, if I forgot to include some expensive model in my list, write in the comments. Maybe you've seen higher prices?
Using third party lenses
Continued use of lenses
Even the most committed photographers sometimes change the platform and switch, for example, from Nikon to Canon. However, what to do with lenses in this case? Of course, use it, but in a new way!
Specialized stores today offer adapters that, for example, allow the operation of old Nikkor optics on a Canon-EF mount. This is a particularly practical and balanced solution when using expensive lenses.
Labor intensity: average, costs: 800 rubles.
Useful modification of Leatherman Squirt PS4 scissors
Most owners of this small but very useful multitool are faced with this extremely common problem:
Assembling a 3D camera from two cameras
3D camera at home
Even novice photographers can use 3D technology with a little work with their hands. If you already have a used camera that is still functional, you will need another identical copy to complete this project.
The eBay platform may be a good place to find it. Attach both cameras to one bar so that the distance between the lenses is about 6 cm. To fire the cameras simultaneously, use the IR remote control; when shooting stationary objects, press the shutter buttons one by one. For image processing, we recommend using the StereoPhoto Maker tool.
Labor intensity: high, costs: 4000 rubles.
Photo: manufacturing companies
Video peephole installation
Correct installation of the camera will provide a good overview and protect the device from falling out. Many people do not know how to install a video peephole themselves. First you need to pull out the old optical model. A modern device will be installed in this hole. If the door did not have an optical peephole, then you need to make a corresponding hole. It is best to use an electric drill here.
The most difficult stage of installation is the location of the peephole. The lens should not be obscured by door elements. In addition, the peephole should be fixed as much as possible. Most often, the size of a homemade structure is much smaller than the prepared hole in the door. After installing the homemade device, you need to move on to running the cable. It supplies electricity and broadcasts video. Proper cable routing is very important at this stage. It should not be damaged when opening and closing the door. It is also important that the cord does not interfere with the passage.
Conclusion
Making a video eye with your own hands is not difficult. The device will help residents control the situation on the landing and near the front door. Broadcasting from the device is available even at a remote distance. In order for a homemade device to function similarly to factory models, you need to perform the installation correctly. In addition, the creator will be able to repair the video peephole himself if necessary. The skills acquired while creating the device will help you carry out repair work with ease.
On video: Video peephole from an old DVR.