Cyclists are increasingly appearing on public roads. Today, riders can ride not only on pedestrian and bicycle paths, sidewalks and parks - cyclists can freely move along the roadway along with the general traffic flow.
Consequently, when appearing on the roadway, a cyclist must follow certain rules so as not to create emergency situations. One of the obligatory points in traffic rules is the timely and accurate giving of turn signals. The standard signal of the intended maneuver is an arm extended to the right or left. But recently, bikes equipped with special turn indicators have increasingly begun to appear on the roads.
Making turn signals for a bicycle
In this article you can learn how to assemble simple turn signals for a bicycle with your own hands. This will be especially useful for those who constantly ride a bike around the city. After all, showing the direction of turn with your hands may not always be convenient, and sometimes even unsafe, since you have to steer with one hand, and your attention is reduced.
The author assembled his homemade product from three flashlights that he found at home. In order not to come up with a separate circuit for flashing the lights, it is best to purchase ready-made, cheapest “flashers” for a bicycle. If you get by with the most budget option, you can assemble a simple circuit using a blinking LED.
Materials and tools for homemade work: - three bicycle flashers; — two toggle switches for turning on; — USB cable (the author’s is 1.83 meters long); - clamps, wires and other small items.
The process of creating a homemade product:
Step one. How to choose the right lights
You will need to buy the most common and cheap bicycle flashers. The simpler the design, the better. Two flashers with three LEDs and one button to turn off are perfect. You can choose any one to suit your taste as a central lantern.
Next, you can connect the flashlights, as you know, a USB cable has four wires, and each flashlight will have two wires. The connection points need to be wrapped with electrical tape, and it is best to use heat shrink. Finally, the wire must be securely attached to the base of the structure, that is, to plywood or board, depending on what was used. You can use a stapler; for maximum reliability, it would be a good idea to drip some hot glue on top.
Step four. The final stage of assembly
Next you need to install the turn signal switches. There should be two of them, one on each side. The switches should be convenient so that the turn can be turned on quickly and without much effort. They must also be waterproof, since if water gets in, the turn signals may turn on spontaneously. Of course, the right turn signal is connected to the right switch, and the left one to the left.
To connect, the author again uses a USB cable with a female connector, or vice versa. Subsequently, to connect the entire system together, you need to connect the USB cables. However, a regular four-wire wire is also suitable for these purposes. After this, the system can be tested.
If everything works correctly, now all that remains is to route the wire along the frame. The length and method of laying may vary, depending on the bike model. A cable 1.83 m long was enough for the author. It is important to understand that the wire in the steering wheel area should not be too tight, otherwise it will break when turning. The wire can also be secured to the frame using plastic clamps. Do not pull the clamps over the brake cables, otherwise they may become strained. The author secured the switches using clamps and electrical tape. The switches were borrowed from an old toy keyboard.
For those who decide to continue using classic cyclist signals, the picture below will be useful.
Source
Ready-made signaling systems
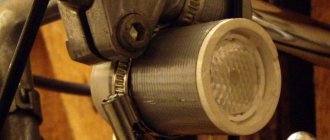
A standard bicycle-type unit consists of side indicators and a central section that visually separates the light output from the turn signals. Chinese manufacturers offer original vests with an integrated LED indicator. For control, a unit with wireless communication is used, which is mounted on the steering wheel. The stern light consists of a central position light and direction indicators equipped with orange lenses.
Features of choice
When selecting equipment, the following design features are taken into account:
- The indicators located on the vest provide for the installation of a control panel on the steering wheel. The indicator is only present on the back, so it is recommended to install a front headlight and a rear marker light on the bike.
- Turn signals of a classic design with a wired switching method are difficult to install. Manufacturers offer standard lampshades with LED or incandescent lamps. There are also rectangular panels on which the direction of rotation is indicated by a luminous arrow.
- Wireless control products require batteries to be installed in the transmitter and receivers. Due to low RFI immunity, installation does not require wiring harnesses to be attached to the bike frame.
Best articles: Online services and applications for creating cycling routes
Turn signal assembly
For assembly you need:
- Unpack the equipment and check the condition of the parts and the completeness of the kit.
- Install the brackets or mounting screws in their standard places (the number of parts and method of connection depend on the manufacturer of the set).
- Insert the batteries into the sockets located inside the housings or in the control unit (taking into account the polarity). Information about this is printed on covers or casings.
- Connect the patch cables, which are equipped with plastic sealed connectors (optional).
- Think over a diagram for installing components on a bicycle.
Step by step installation
Algorithm for installing turn signals:
- Install the housing with LED indicators on the vertical part of the frame. For fastening, use a plastic split clamp, which is tightened with a screw. It is not recommended to use excessive force when tightening the threaded connection, as there is a risk of breaking the bracket.
- Mount the control panel on the steering wheel and connect it to other units using electrical wiring harnesses. Cables are laid along the bicycle frame away from moving elements (for example, pedals or chain drive). When using wireless equipment, no electrical wiring is required.
- Check the functionality of the direction indicators.
What are bicycle turn signals?
The signaling system can be installed to complement the main lighting - front and rear lights. It is a three-section flashlight, which is controlled by a special unit mounted on the steering wheel. The block and lights are connected to each other by wires. All the cyclist needs to do is press a button on the remote control, and the light will blink on its own. Everything is the same as in the car!
The signaling system lamp consists of parts:
The active areas of the turn signal lamps can be made in the form of arrows in the corresponding direction, but this does not change the essence. When installing rear turn signals, a standard flashlight acts as a marker. It usually has several flashing and non-blinking modes. As soon as you start driving with turn signals, it is better to switch the “standard” light to non-blinking mode so as not to mislead drivers when the lights turn on.
Schematic diagram
The author used miniature instrument buttons fastened with a nut, low, with side contacts. To do this, I had to drill two holes in the pipe from which the steering wheel is made and install buttons in them.
The design is clear, now let's move on to the electrical circuit. The D1 chip of type K561LA7 (or foreign type 4011) contains a multivibrator, which produces pulses with a frequency of about 1.5 Hz as long as the power is connected.
Rice. 1. Schematic diagram of an LED turn signal for a bicycle.
The frequency depends on capacitor C1 and resistor R1, and can be changed in any direction by correspondingly changing the values of these elements. The multivibrator itself is made on elements D1.2 and D1.3, and the buffer cascade is made on elements D1.1 and D1.4. Through it, pulses are sent to the key field-effect transistor VT1. It controls the current through LEDs.
Resistor R2, connected in parallel to the transistor channel, serves to reduce the resistance of the closed transistor channel in order to eliminate the possibility of its breakdown by static electricity.
The left turn signal is made with HL1-HL4 LEDs, the right one with HL5-HL8 LEDs. The LEDs of each signal are connected in parallel, but through separate current-limiting resistors R3-R10. The use of one common resistor in each signal, although it looks logical, in practice, due to even small differences in the magnitude of the forward voltage on the LEDs, will lead to extremely uneven brightness of their glow.
Rice. 3. Diagram of adding LEDs to the turn signal.
The turn signals are switched using the S1 and S2 buttons. When you press the corresponding button, power is supplied to the corresponding signal and it flashes.
Advantages and disadvantages
What is better and more correct: to inform about maneuvers with an outstretched arm or to use light signals? At first glance, the answer is obvious - the second option is much safer. But let’s not rush, this method also has both light and dark sides. As they say, it's a double-edged sword.
| Type | Convenience | Visibility during daylight hours | Visibility in the dark | Weight |
| Hand feed | — | + | + | + |
| Turn signals | + | — | — | — |
When giving signals using an outstretched arm, it is not always possible to keep the steering wheel in a straight position, especially if the leading hand is released from it. Needless to say, road instability is a safety hazard?
With turn signals everything is simpler: just press the button. In addition, giving a hand signal is done only before a turn, and at this time not all drivers will be able to see it. The turning lights turn on throughout the entire turn.
The bulbs are almost invisible during the day, especially in the sun. Perhaps this can be attributed to their significant disadvantage. In the dark and twilight, light has an advantage over the standard method, unless, of course, the cyclist decides to put LED strips on his hands. But if dynamics and acceleration are of fundamental importance, then it is not recommended to install turn signals on a bicycle. Why? It's simple: any suspended device will increase the weight, which makes itself felt very well in motion.
Storage Shelf Options
A unique solution from an aesthetic point of view for hanging a bicycle in an apartment would be to use a shelf that can be decorated in various ways (flowers, books, etc.).
Bicycle racks come in two types:
Shelf for hanging a bicycle from the frame
Bicycle rack with saddle holder
Making and installing a shelf yourself is easy. The production of the shelf is carried out according to a scheme similar to the production of the cabinet.
The shelf is fastened to special corners fixed to the wall.
Thanks to the simplest devices presented in the article, storing a bicycle in a small apartment does not cause any problems.
Hanging a bike on the wall
Storing a bicycle is a headache that everyone knows. It’s good when you can put it on an insulated balcony for the winter, somewhere in a corner, where there are skis, boxes, grandma’s jam, and so on.
But is this what a real cycling enthusiast should do? It’s much more humane and convenient to hang the bike on the wall. It looks very beautiful and practical, why wouldn’t you like it as a decorative element?
Especially if your bike is beautiful. Now you can find a large number of devices to hang your two-wheeled friend like this (or make it yourself), so let's look at the most interesting of them.
Since there are a lot of fasteners, we select only those that will not only be a practical solution to the problem, but also look beautiful in your room and match the interior.
Best articles: Bicycle generator
Remote turn signals without wires
An advanced version of the light signal system is used on steep bikes riding on roads. The key features of wireless turn signals are, of course, the absence of wires from the control unit to the bulbs and good visibility even in very good natural light. Every car driver will take into account such a cyclist, and on equal terms. It goes without saying that the “coolness” of such a device does not free the cyclist from the need to give a signal in advance and control the traffic situation.
The kit of such devices includes special batteries and chargers. An additional function – “hazard warning light” – will allow you to indicate a stopped bicycle in the wrong place, as well as signal bike malfunctions to other cyclists if, for example, they are moving in a group.
This option is perfect for cyclists who often cross open spaces along busy city streets and highways. The disadvantage is, of course, the high cost.
Wheel mount on wall
A popular option that saves floor space. It is enough to install the holder by the front wheel on the wall. Fasteners require the use of force when hanging or removing a bicycle, especially if it is not an ultra-light equipment.
The device is suitable if you plan to place a two-wheeled horse in the corner of the room. Hanging can be done using hooks placed on the wall.
The second option is a combined mount for storing a bicycle on the wall, including:
If you need a solution that performs a fastening function and is attractive in appearance, you should look for colorful designer brackets that decorate your apartment. You can even hang your bike above your bed or sofa.
A more practical option is to hang it in the hallway, closer to the exit, protecting the wall, for example, with washable wallpaper.
How to make turn signals for a bicycle with your own hands
If you often ride your bike at night, then you will need more than just a front headlight and a rear red light. For greater traffic safety, the bicycle must be equipped with turn signals, because Hand signals may not always be visible to pedestrians in the dark.
Let's install a set of bicycle turn signals. The design of the signals is very simple and does not require any complex tools to make them. If possible, we will use ready-made factory-made parts that you can buy in a sports store, electronics store or online store.
This article discusses how to make turn signals for a bicycle with your own hands. You can install the same exact signals on the front of your bike.
Fastening assembly
This stage is the most critical. You need to accurately mark the holes for the anchors.
If the holes in the wall are slightly misaligned with the holes in the wall, the stones may not fall into place. We drill the wall, insert anchors, hang stones.
Between the stones, approximately at the height of the top pipe of the frame, we place a ceiling anchor with a hook.
That's all. The bike mount on the wall is ready. All that remains is to place the bicycle wheels on the stones and tie the frame with a cord to the top anchor.
When we remove the bike from the mount, we get a decorative element in the form of two stones on the wall. Maybe someone would like to repeat the homemade product. Cost a couple of kopecks, half an hour of work.
Well, now it's time to finish the article. All the material I wanted to share has been reviewed. I hope it will be useful to you, and you will use it if you need to make a bicycle mount on the wall. Improve your own practical skills and gain new knowledge, as they say: “It’s never too late to learn!” That's all, thank you for your attention, successful and easy repair!
General characteristics
Bicycle flashers consist of:
- Housing - it can be made of modern plastic or metal, the seals are usually made of rubber (protection from the penetration of moisture and dirt). Innovative aluminum cases with a special coating give the models additional protection from precipitation and durability;
- The main power source is disposable batteries or accumulators. A set of batteries is inserted into the body of the structure; as their energy is consumed, the batteries are replaced with new ones or recharged. Models of size with a battery are supplied with a USB cable for charging - can be charged from any power source with a standard USB port;
- Optics - it focuses the light flux, making it brighter;
- Light source - dimensions can be with different light: white, red, blue;
- Control systems - it is simple, with the ability to configure different flashing modes;
- Fastening kit.
Light reflectors on a bicycle flasher can be smooth (further visibility) or textured (more uniform light, but shorter viewing distance), they form the main light in the center and weak on the sides.
Front light - battery headlights have high power and provide the maximum illumination of the road (from 5 to 30 meters) for a long time. They are designed to be installed on the handlebars of a bicycle. The light scattering angle can be:
- narrowly focused - if you need to move along illuminated streets;
- wide – for driving on country, rural or forest roads.
Side, rear and front markers have much less power, since they are not intended to illuminate the path, but to indicate the presence of an object on the road.
Flashers are distinguished by the number of LEDs and the method of mounting.
Shelf mount
Of all the types of wall mounts available to the modern cyclist, the most popular is the shelf option. The cost of such a device may seem too high, but you can make it yourself, while reducing your costs to a minimum level.
Before you make a bicycle mount on the wall with your own hands, you need to prepare consumables and standard tools. We will need:
Wooden board or plywood measuring 1 square.
meter and a thickness of at least 1.5 cm. The choice of material must be taken seriously.
It is not recommended to use MDF and chipboard, since the holder in this case will not be particularly reliable and after a while it may break at the location of the fasteners.
Good glue, which is designed for working with wood. Products for wood processing (stain, paint, varnish). Fasteners in the form of bolts with washers.
Features of the device
A bicycle alarm is one of the types of anti-theft devices. The plastic housing is bolted to the seatpost. Moreover, it is designed in such a way that it is quite difficult for an outsider who does not have a control panel to neutralize the protection. The alarm operates primarily on regular batteries and can be controlled remotely using a remote control or a program on a smartphone. The coverage radius depends on the type of device and terrain features: it can range from 10–30 m to 0.5 km.
Control via the remote control is carried out using two buttons. One of them turns off the signal, the second one blocks the bike
When attempting to break into or steal a bicycle alarm, it makes a very high-pitched sound, which is very poorly perceived by the human ear and therefore immediately attracts the attention of others. Benefits include:
- ease of operation and installation;
- compact remote control;
- works in any weather;
- Suitable for all types of bicycles.
Ease of operation and convenience
Versatility - suitable for any bike
Works in any weather
Compact remote control included
Types of lanterns
For bicycles, you can choose from a wide range of flashing lights.
LED
These size models are designed for a long service life and are resistant to mechanical stress. Flashers are economical and have high brightness.
Halogen
Lanterns are designed to create directional light. Halogen models are not suitable for bicycle dimensions; they cannot operate in flashing mode. The downside is the rapid energy consumption.
Laser
The flashers provide additional safety by emitting two red stripes along the sides of the bike. The models have several glow modes; persistent rays are not lost when illuminated by car headlights.
Call required for mixed routes
A bike bell becomes a necessity when it comes to mixed trails. Suddenly, dogs or children may run out from around the corner. It may be useful if you live in a large city that does not have bike trails. When the traffic around you is chaotic, the bell gives you confidence that you won't cause a minor incident on the sidewalk. And although opponents of this attribute continue to insist on its ignoble origin, the world around us is filled with arguments in its defense. Agree that when people scream, you have to forget about civilized behavior. Think about the people who find it unpleasant to hear a cyclist screaming as he passes by at full speed. Why not replace the request to move aside with a more civilized signal?
Best articles: How to decorate your bike at home?
Found a violation? Report content
A little history
The first automobile and bicycle devices that made sounds and attracted the attention of road users were very simple. Structurally, they consisted of a rubber bulb attached to a curved or straight tube with a socket at the end
When the pear was pressed, the air created vibration, which was converted into sound. The extended end of the tube served to amplify the sound - simpler designs were simply inaudible in street noise.
Over time, in addition to pneumatic devices for the car, mechanical ones appeared. They consisted of a spring plate, which was fixed with a rivet. A gear was in contact with the plate, which, when rotated, created a specific sound. These devices were also equipped with a horn, which made the sound louder. In 1908, the company Klaxon Signals Ltd began serial production of car signals, which were called “klaxon”. This word was taken from the ancient Greek language, it is translated as “howl”.
Video about choosing a beep:
With the advent of electricity, the car signal underwent significant changes: now an electric current was used to create the sound, which caused the gear to rotate. The famous scientists Edison and Miller received a patent for this invention. The name “klaxon” stuck to this device and is used to this day, regardless of the type of device.
Today, the following types of horns are used on cars.
- Pneumatic. Sound is produced using air, which is supplied under pressure from a compressor into the pipe.
- Electronic. The design includes a sound generator and a speaker.
- Electromagnetic.
Pneumatic type of horn
The larger the vehicle, the more powerful the device that produces the signal must be. This is done in order to notify all road users in advance about the approach of a large vehicle. In such devices, sound strength and low frequencies play an important role.
To create sound signals that attract attention and create a feeling of slight anxiety, two tubes with different sounds are used. One tube produces sound at a high frequency, the other at a low frequency
Compressor-based horns may have several of these tubes, resulting in a more attractive and melodic sound.
The so-called VIP signals used on police cars deserve special attention. Car enthusiasts call them “quacks” because of the specific sharp sound, similar to the loud and abrupt quack of a duck. Many people dream of such horns, but the price of the device—about $500—is not affordable for everyone. We will tell you how to make such a signal for a car using improvised materials with your own hands.
Signal VIP installation
The working process
We saw the board or plywood according to the drawing. Do not rush to connect the parts together; first, you should make a trial mounting option. Initially, you need to cut out the top wall for the future shelf and two side parts.
Before connecting the parts together, you should make a trial mounting option.
We draw a cutout for the frame in the side walls.
To cut it, you need to use special equipment (a jigsaw), which will allow you to get an even cut that matches our sketch. The contours can have any shape, but its beginning should be located higher than the end. Subtleties also apply to thickness, which should be the same along the entire length.
Now you can assemble a wall mount for your bicycle with your own hands.
We glue all the parts together, having previously degreased them. Remaining glue must be removed immediately before it begins to dry. Because it will be extremely difficult to do this later.
The top cover can be secured with hinges or glued to the overall structure.
In the first case, you will get a drawer, and in the second, a shelf. Decide for yourself what will be preferable for you.
Next, you need to make holes for fasteners. The DIY bicycle wall mount in the form of a wooden shelf is ready. You can leave it like this, or you can work on the appearance and sand it, cover it with stain and varnish.