Light and delicate decorations for the New Year in the form of paper spirals.
There is very little time left before the arrival of the New Year and naturally you want to decorate your home as best as possible for this holiday. Moreover, to create a more festive and joyful atmosphere, you can not only put an elegant Christmas tree, decorated with beautiful toys and garlands in one room, but also decorate other rooms and premises (kitchen, hallway, etc.). Various paper decorations may be particularly suitable for this purpose, and it is precisely one of the options for such decorations that I want to present today. These are light and openwork spirals made of paper that can be hung, for example, from the ceiling, chandeliers, cornices, etc., and they look quite impressive and original.
In addition, with the slightest breeze or movement (for example, when one of the family members passes by), they begin to rotate around their axis, which gives them additional attractiveness.
How to make origami - Spiral
Stasya will teach you how to make a spiral. There is nothing complicated in the work and the result will please you)
For the spiral you will need 4 square sheets of colored (optional) paper of the same size.
Stasya took 16x16 squares.
Take the first sheet.
bend the 2 ends of the square to form a triangle.
We do the same with the other two ends.
we got a cross.
Turn the sheet over with the white side facing you. If the paper is two-color, it doesn't matter.
then bend along the line of the cross, as shown in the figure.
We do the same with the opposite side.
Now we bend the remaining open white triangles according to the picture.
We do the same on the opposite side.
Now we add 2 obtuse angles together.
and unfold.
bend the left end along the middle line
we're turning this whole thing around
and we do the same.
So, you need to do this “machination” with the remaining three squares.
Now we take any 2 blanks.
bend them and make a rhombus, as shown in the figure.
Next, add the 3rd blank and place the honey in the first two.
We also add the last 4 blanks, in accordance with the picture.
then look carefully. we begin to bend the ends along the lines of the central cross.
and so we bend all the corners one by one.
to bend the last one, bend the first corner. and bend the last one.
and bring it back
Continue collecting like this until you reach the very ends.
So, now we turn our creation over.
and on this side we do the same thing we did just now. twist in a circle.
To prevent our creation from falling apart, we twist the remaining ends together on both sides.
So we got such a spiral.
I hope you liked it))
Lesson prepared by: Stasya
This material was prepared for you by the team of the site https://bakemono.ru
DIY garland “Spiral”
You will need to cut out circles from colored or decorative paper. Then, using scissors, cut a strip of the same width in a circle, thereby obtaining a kind of spiral. To make the garland long, glue the resulting spirals together with glue.
Mini-MK spiral decoration for home | Country of Masters
I made a mini-MK on making these spiral decorations for the home. I’m not sure that someone hasn’t already posted something similar before me, but I really want to share.
We will need thick two-color cardboard. draw a spiral of a derivative size on it - if desired.
Then we cut out our spiral along the contour
Now we’re making the blanks to decorate our spiral. In this case, I made hearts using the quilling technique from wide strips of colored paper.
I strung the largest heart on a thread, which I secured at the very top of the spiral. I left the end of the thread - it will be needed to secure the spiral to the ceiling or window.
The hearts can be secured to the spiral with a stapler, PVA glue or double-sided tape - whichever is more convenient for you. I sewed some of the hearts with threads to the spiral, just like the first main one, so that they hung from the spiral.
This is the spiral I got. If a light breeze blows, it spins.
In addition to the first one, I also made this spiral with butterflies.
I also made this spiral with stars of happiness. I kept thinking about where to attach them and decided to try it.
My collection of spirals hangs above my bed. I apologize in advance for the not very successful and clear photos - I was in a hurry to share quickly.
DIY garland “Zig-zags”
A very interesting and effective garland that is very easy to make. Fold a standard sheet of colored paper in half and cut it into two parts. Then make cuts on each part, not reaching the edge of the sheet (see photo). To make the garland long, glue the fragments of the homemade paper garland together using glue.
Origami spiral - origami assembly diagram step by step
Home » Various origami » Origami spiral
I don’t know why it’s needed, but nevertheless it looks pretty decent on my shelves
I recommend everyone to assemble this wonderful origami spiral.
Similar origami:
Green crane
Today we will make one of the most popular origami figures - the Crane.
Magic Ball of Paper
A wonderful magic ball that changes shape when pressed.
Volumetric letter "A" origami
Robert Lang recently made a collection of 3D origami letters.
Boomerang
We invite you to assemble such an excellent origami boomerang from a square sheet of paper
Master class Postcard Valentine's Day Quilling Origami Spiral roses Paper
These flowers can be used to decorate a postcard or glue a panel together.
- Flower. Take red double-sided paper. Cut out a square with a side of 3-5 cm.
- Cut off the corners. There is no need to turn the square into a circle, just round the corners a little.
- Draw a spiral and cut it out with scissors. After some practice, you can cut it by eye, without drawing.
- Start twisting the spiral from the outer end. For convenience, the first turn can be wound onto a toothpick. Next, twist the strip with two fingers. The rolled strip should resemble a multi-layered cone. When you curl the spiral to the central circle, release it. Give the flower the desired shape: if the spiral is curled too tightly, loosen it a little; if it’s loose, twist it again.
- Apply glue to the central circle. It should be either thick PVA or a thick layer of adhesive stick. Press the center of the flower against the circle and hold it until the glue sets so that it sticks end-to-end.
- Leaves. Take squares of green paper with a side of 2-3 cm. Fold them diagonally.
- Fold the corners towards the middle.
- Fold along the indicated lines.
- Turn it over. Glue to the base, applying glue only to the wide end.
To make a Heart Full of Roses card, fold a paper heart-shaped vase. See how to do this here. Glue the heart to the base. Cut out thin strips of stems. Insert them into the heart with one end, and glue the other end to the base. Glue flowers and leaves.
Origami volumetric Spiral
The magnificent three-dimensional origami model “Spiral” is very popular due to its appearance. Anyone who has ever seen this fake will want one for themselves. Today we will tell you the secret of how to make it yourself!
Please note that the paper squares must be larger, as they will shrink during assembly!
To assemble you will need 4 square sheets of paper (22 cm) of different colors.
First we need to make blanks for the craft:
Step 1. Lay a square sheet of paper in front of you like a diamond.
Step 2. We bend the sheet so that the corners match, do not forget to look at the detailed step-by-step instructions.
Step 3. Then simply lay it out.
Step 4. Again, fold the sheet so that the other corners of the square match, as in the photo:
Step 5. Now you just need to expand the sheet. And now we see the intended bends.
Step 6. Bend the bottom corner of the diamond to the right. Let's smooth it out. Look like in the photo.
Step 7. And fold the top corner of the diamond down in the same way. We have a rectangle.
Step 8. Take the bottom corner (right) and bend it towards the center.
Step 9. Fold the upper left corner towards the center.
Step 10. And now we bend our resulting rhombus along the floors.
Step 11. Turn the craft over with the corner facing up as in the photo.
Step 12. Bend the left corner down.
Step 13. Redesign the craft.
Step 14. Fold the right corner down. Now we have the first preparation ready.
Step 15. We need 3 more.
When we have all 4 blanks made, then we can start assembling the spring itself:
Step 1. Take two blanks and place them in front of you, on the table, as shown in the photo - parallel to each other.
Step 2. Between these two blanks we insert a third blank, pay attention to the photo!
Step 3. Also, perpendicular to the third workpiece, we plant the fourth one.
Step 4. Next, we place the multi-colored parts along the intended bends in order. Place the pink part up.
Step 5. Take the yellow piece and point it to the right.
Step 6. And the blue one is angled down.
Step 7. Fold the light green part so that it is in the middle of the pink and blue parts.
Step 8. If you get a figure that looks like a pinwheel, then you are doing everything right!
Step 9. It's time to put all the pieces together. We do this as described above (the lower part on the right - up, the lower part on the left - to the right, the upper part on the left side - down, the upper part on the right side - to the left)
Step 10. We follow the assembly diagram and finish the assembly on this side of our craft.
Step 11. Turn the figure over and use the same principle to assemble all the parts of the workpiece, only from the reverse side. Now your origami Spiral is ready!
When assembling origami, be careful and don't take your eyes off the step-by-step instructions! Also, don’t forget: like the creation, like the creator! Give it your all and get satisfaction not only from the result, but also from the process of assembling origami!
And at the end, as always, we post a video lesson to consolidate your knowledge!
DIY garland “Triangles”
To make such a cheerful multi-colored paper garland you will have to work a little. After all, you will need to cut out a large number of triangles of different colors, but of the same size.
Glue the finished triangles with double-sided tape to a thick thread or sew the triangles on a sewing machine.
Spiral Diagram PowerPoint Templates Archives
Do you want to grab your audience's attention and make your presentation memorable? One of our spiral PPT templates will help you with this. This section contains unique, bright, eye-catching slides. Rest assured, a presentation with such slides will attract your audience and make your speech more memorable.
Here you will find different types of slides. They all have different styles, structures, shapes and color themes. There are slides resembling DNA chains, funnels, flowers, etc. Each shape is unique and designed by our developers. Most slides have one or more text blocks. All slides are multi-colored; so rest assured that they will add sparkle to your presentations.
A professional spiral template will help you clearly explain any topic and simplify even the most complex questions. Other benefits of the slides provided include:
- Excellent quality;
- A set of built-in tools for convenient user experience;
- Clear and improved functionality;
- Multi-purpose slides suitable for a wide range of business presentations;
Our free spiral chart template will become your employees' favorite work tool, as it will help you handle work tasks faster and easier.
.
Impossible
Only for those who are firmly confident in themselves: Kawasaki rose.
hand-made.by
Toshikazu Kawasaki is an origami theorist and mathematics teacher at Sasebo Technical College. To understand how to fold a Kawasaki rose out of paper, we recommend that you read the detailed (and cannot be reproduced in one article) instructions, as well as videos, which on average last from 10 to 40 minutes.
In short: a sheet of paper will need to be folded many times, unfolded many times, and then carefully folded along the fold lines. Sounds easy? Try it if you can.
Tadashi Mori/youtube.com
Making paper crafts is not only interesting, but also useful. Fine motor skills, patience and the ability to overcome difficulties develop. Plus, it’s a way to relax and enjoy the process of creating beauty.
How many levels did you manage to overcome? Share your successes in the comments.
How to Make a Spiral Chart in PowerPoint
Creating a spiral design in PowerPoint can help you create stunning spiral diagrams that can be used to represent different business concepts and consulting models or present your data.
PowerPoint does not have a SmartArt graphic on which we can get a spiral design, at least with PowerPoint 2007, 2010 and 2013. However, we can create a spiral chart from shapes, specifically using the Block Arc shape.
Here we'll show you how to create a simple spiral chart design and spiral shapes that you can use in your PowerPoint presentations.
Insert multiple block arc shapes onto one slide and adjust them to create concentric circles. You can add a horizontal line as a guide or landmark. Once the diagram is ready, we can remove the horizontal line.
Now you can duplicate all the inserted shapes and rotate them 180 degrees.
Then start reducing the size of each block arc shape above the horizontal line and adjust the end of the arc according to the following design.
As you can see, we have created a simple spiral chart. Now we can group or connect the shapes together. This will help us add special effects to the entire object. We recommend using the Unite tool as it will help you treat the shape as a single object.
If you don't have time to create this shape from scratch, you can download a free spiral diagram template for PowerPoint.
.
DIY garland “Circles”
A very cute and original garland in the shape of circles is very easy to make. Cut out identical circles from colored or decorative thick paper of the same color or different colors.
And then string them on a strong thread. Make some kind of paper beads.
Spiral Chart PNG Images | Vector and PSD files
- arc arrow vector diagram
1200 * 1200
- science and technology digital lines line curve spiral
1200 * 1200
- metal mesh fence with steel spiral barbed wire
1200 * 1200
- rose gold spiral element
1200 * 1200
- three dimensional spiral auxiliary element with red ribbon
1200 * 1200
- spiral with colorful handprints made by children
6250 * 6250
- spiral gradient 3d twisted brush element
1200 * 1200
- spiral notepad vector spiral notepad blank layout for your design vector illustration
5000 * 5000
- circle infographic design vector for workflow layout diagram presentation web design
1200 * 1200
- spiral ascending magic ray
1200 * 1200
- purple spiral 3d brush element
1200 * 1200
- golden flares spiral particle elements
1200 * 1200
- spiral notebook icon
1024 * 1024
- hand drawn family tree family tree loving family relationship diagram
1200 * 1200
- realistic note template empty spiral and blank paper layout for your design open notebook for and taking notes vector illustration
5000 * 5000
- business infographic design vector can be used for annual report workflow layout diagram
2000 * 2000
- stock chart logo currency trading chart success concept Forex free logo design template
5000 * 5000
- 901 22
spiral magic golden ray of light1200 * 1200
- hand drawn family tree family tree family tree family tree diagram
1200 * 1200
- business information schematic diagram
1200 * 2244
43
- infographic timeline template with icon options or steps infographics business infographics for presentations process diagrams workflow layout banner flowchart information graph
1200 * 1200
- golden spiral ascending magic ray
1200 * 1200
- spiral blank notepad blank mockup set template for advertising branding corporate identity 3d realistic laptop mockup blank notebook with blank cover
5000 * 5000
- infographics set of elements diagrams graphs diagrams 1 2 3 4 steps presentation idea cycle eps 10 vector
4000 * 4000
- 9017 1
spiral blank notepad blank layout template for corporate identity branding advertising realistic vector illustration5000 * 5000
- blue hazy dark purple spiral celestial galaxies
1200 * 1200
- spiral 3d glass trophy
1200 * 1200
- golden spiral magic light effect
1200 * 1200
- graph analytics business chart marketing statistics training
5556 * 5556
- circle infographics design vector for workflow layout diagram presentation web design
1200 * 1200
- spiral coffee liquid 3d element
1200 * 1200
- colorful blue spiral nebula
1200 * 1200
- creative technology lines circuit diagram
mother circuit
2000
- 9 0004 blue-green hazy diffuse spiral galaxy
1200 * 1200 - blue spiral nebula galaxy
1200 * 1200
- purple spiral galaxy universe galaxy
1200 * 1200
.Funnel diagram
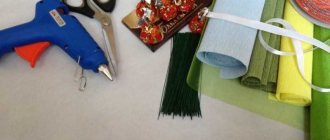
What materials will be needed?
Garlands are always beautiful and festive
In the process of making a garland, you may need the following types of paper:
- colored: thin and dense
- shiny cardboard
- corrugated
- napkins
- sheet music
- glossy press
- unnecessary newspapers
- kraft paper
New Year's garland
Also prepare:
- PVA glue
- spools of thread
- figured hole punch
- clothesline, twine
- ribbons
- stationery scissors
- awl or hole punch
- stapler
- various decorative elements: beads, sparkles, sequins, foil, cotton pompoms
- knife
- ruler
You can use single- or double-sided colored paper for the garland. Beautiful products will be obtained if you use scrapbooking paper, which is colorfully decorated, as opposed to standard colored paper.
for PowerPoint - download for free!
A funnel diagram allows you to visualize a linear process that has sequential, connected steps. The shape of the funnel clearly shows the state of the controlled process. The Funnel Chart Template section of PowerPoint includes a number of slides featuring these types of diagrams, which are widely used in marketing and business. Each stage of the funnel represents a proportion of the total. Thus, in most cases, the diagram is shaped like a funnel: the first stage is the largest, and each subsequent stage is smaller than the previous one. Funnel chart is most often used for the following purposes:
, when the data is agreed upon and goes through at least four stages; , when the number of “elements” in the first stage is expected to exceed the number in the last stage; to calculate and monitor performance and retention indicators; for step-by-step calculation of potential indicators (income, sales, transactions, etc.); to track the progress and success of advertising and marketing campaigns; to identify bottlenecks in a linear process;
The ready-made slides collected in this section will help you cope with these tasks, simplify your work, and make the presentation clearer and more accessible.
.
DIY garland “Snake”
To make a luxurious homemade “Snake” garland, you will need decorative paper ribbon (it is often used to decorate gifts). Thread a decorative paper ribbon onto a strong thread and pull it together to form an accordion (see photo).