A New Year's feast in our country is unthinkable without splashes of sparkling champagne! The New Year comes to the crystal clink of glasses filled with aromatic drink with bubbles. If you show your imagination and have a little time to spare, the bottle will turn into a fabulous, central element of holiday table decor. Today we’ll figure out how to decorate champagne for the New Year. An elegant bottle will serve as decoration or become an original gift for loved ones.
In this article:
- Adding a festive sparkle
- Dressing up a bottle of sparkling wine in different clothes
- We make decor from paper and Christmas tree decorations
- Champagne decorated with sweets
- Knitted New Year's outfits
- How to decorate sparkling wine with threads
- Bottle painting
- Decoupage on champagne
- Photo ideas on how to decorate champagne
- Video master classes
How to decorate champagne as a gift with your own hands
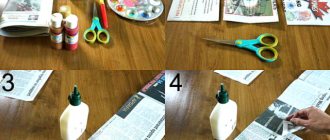
In this master class you can learn how to make a pink lady from a champagne bottle.
You will need:
- bias binding (10-11 m)
- glue (preferably construction glue)
- scissors
- fabric for bows
1.
To make the top of the dress you can use silver braid. You just need to glue it, covering the emblem on the bottle.
2.
After you have made two overlapping rows, prepare a pink ribbon. Use just a little glue to stick the tape to the bottle. Do it a little obliquely.
When you have reached the middle of the bottle, you should have something like this:
* Next, wrap the bottle completely with a whole cloth, while continuing to apply small drops of glue to the fabric.
3. After you have wound the fabric to the end, its end needs to be glued in the place where it will be approximately covered by the skirt. This way you will hide all the seams.
4.
It's time to make the skirt. To do this, prepare a ribbon for the bow and gather it onto a thread. In this example, the tape is 1.5 meters long, but you can choose it yourself, make it longer or shorter.
5.
The skirt can be attached to the bottle using glue or thread tied around the bottle.
Decoupage
You want to make your gift unique and unforgettable. Decoupage for beginners on a bottle is ideal for this. The process does not take too much time, and the set of necessary materials and tools is minimal.
For the first experiment, it is better to take a regular colored multi-layer napkin. Modern industry offers a huge selection of possible designs.
Not only banal floral motifs are suitable for decorating champagne bottles on March 8th. Images of jewelry and women's accessories or interesting ornaments look original.
How to decorate champagne. Hat for a lady.
In this example, you will be able to make a hat for the lady that you prepared earlier. The only difference is the color chosen to cover the bottle. In this example it's blue, but you can leave it pink, or choose a color that you like best.
* Prepare the bottle by decorating it as in the previous example.
Cooking the hat
1.
Cut a circle from a plastic bottle. The size of the hat will depend on the diameter of the circle.
2.
Inside the cut out circle, cut out another circle - you will have the part of the hat that is attached on top of the champagne. This means that you need to measure the diameter of the neck of the bottle, and make the inner circle a little larger so that the hat is a little larger.
3.
Next, cut out this shape from cardboard (the diameter of the paper circle is equal to the diameter of the hole in the plastic circle).
*Remove strips one at a time.
*Use a stapler to attach the cardboard to the plastic. Next, use your imagination to decorate the hat. In this example, satin ribbon and lace were used.
The photo on the left is a top view, the photo on the right is a bottom view.
Leg-split
This method of decorating a bottle for March 8th is suitable for bright personalities who cannot tolerate routine and banality.
This decor looks fresh and bold. The coarse thread contrasts sharply with the spring festival, making this decoration method unique.
Both thick and thin twine (almost a thread) look beautiful. Such a rope can cover the entire surface of the bottle, and only part of the container. In case of partial wrapping, you must first remove the label from the bottle.
To dilute the severity of the twine, the wrapped surface can be decorated with flowers or delicate lace.
Decorated containers can be stored after using the contents, using them as an element of interior decor.
How to decorate champagne with sweets
You will need:
— silent paper (2 orange sheets, 1 green sheet)
*Tissue paper is thin paper, also known as tissue paper. You can find it at gift wrapping racks, as well as in specialized art stores.
- candies (in this example there are 48 pieces)
- raffia
*Raffia are long fibers that can be found on the leaves of the raffia palm tree. They are popular among florists and are used in arts and crafts.
- hot glue
- hot glue gun
1.
Prepare some orange tissue paper and cut it into 7 x 7 cm squares.
2.
Apply glue to the flat side of each candy. Now you need to glue the candy into the middle of the paper square.
3.
Next, you need to fold the edges of the paper towards the top of the candy. Start gluing the candies to the bottle using glue.
* It is better to decorate the bottle with candies from the bottom up in a circle.
* Try to glue the candies tightly to each other.
4.
Making leaves. To do this, prepare green tissue paper and cut out long narrow leaves from it.
5.
The leaves need to be glued together in several layers. Next, you need to decorate the neck of the bottle with them.
6.
Your bottle will look even more like a pineapple if you wrap some raffia around the neck.
Photo frame
Crafts made from wine corks are convenient because their parameters are standardized; accordingly, even this material, which has been unconsciously accumulated, can always be used without additional processing for a product that requires identical components.
From several corks you can create a frame, the appearance of which can be either structured or chaotic. The blocks from which it will be composed can be processed and compiled into any desired form:
- cut circles;
- cut lengthwise;
- lay vertically;
- fold horizontally;
- glue diagonally;
- go beyond the main form.
Note!
DIY military crafts step by step: 150 photos of the best craft ideas for children for school or kindergarten
- DIY crafts for May 9 step by step: 150 photos of the best crafts for Victory Day
DIY crafts for February 23rd step by step: master class with photos and descriptions of how to make crafts for Defender of the Fatherland Day
And, of course, combine all of the above techniques in one work, at your discretion.
How to beautifully decorate a bottle of champagne
It is customary to decorate weddings with beautifully decorated bottles of champagne. In this master class you will learn about another original way to decorate a bottle. A satin ribbon and your imagination will help you.
It is worth noting that such a decoration is suitable not only for a wedding table, but also for any other holiday, such as March 8 or a birthday.
You'll need:
- silk fabric
— satin ribbons (2 colors, the width of each ribbon is at least 4 cm)
- golden braid
- bias tape
- lining
1.
Preparing a dress pattern. It consists of a bodice and a skirt.
First you need to do it on paper. Take the dimensions of a champagne bottle as a guide and then transfer it to the fabric.
* It is best to use thick satin and silk.
2. Sew along the edge of the satin ribbon, loosening the thread tension on the sewing machine in advance.
Next, pull one end of the thread to tighten the ribbon and create a ruffle.
* It is advisable to put fasteners at each end so that when working with ribbons, the tightened edges do not come apart.
3. Using tailor's pins, you need to attach the ribbon to the bottom edge of the skirt. Make a zigzag stitch using a machine.
4.
Decorate the entire skirt by alternating ribbons of two different colors (in this case, white and burgundy).
* Leave no more than 3 cm between rows.
5. When you sew the ribbons, you should make sure that the top row completely covers the joint seam of the bottom row.
*If you want to hide the stitching on the wrong side, you can use a lining. It is worth placing the skirt on the fabric, drawing the outline of the part and making a lining.
6. Fasten all the parts using pins. It is also worth securing the edge with machine stitching (see picture).
7.
Now you need to edge the edge of the product with bias tape.
8.
Decorate the bodice with ribbon. To do this, you need to put the tape on the bodice and then grind along the edge, i.e. fasten the two parts together and then twist them out.
9.
The seam must be hidden by sewing the bodice and skirt with ribbon.
10.
Start decorating the dress with a bow (brooches, sequins).
Furniture handles
Using the algorithm of actions described in this paragraph, you can diversify the appearance of home furniture or protect the handles in the children's room. As part of its implementation, only a screwdriver and the number of plugs required by the handles will be needed. Having unscrewed the existing handles or taking advantage of their absence, the plug is screwed in to the base.
If the woody motif fits organically into the interior and the result of its presence is satisfactory, then the work is completed. Otherwise, you can use the decorating principles from the first points.
It is worth noting that champagne corks are indispensable here, since it is the basic convenience of grasping them with your hand that allows them to be used in this work.
Note!
DIY airplane craft: the best options for creating an airplane from paper, cardboard and plastic. 120 photo ideas
- DIY crafts for March 8 step by step - a review of the most beautiful crafts for International Women's Day (120 photo ideas)
Diaper cake for a girl - 180 photos of ideas for original diaper cakes + DIY instructions with examples of finished products
Crafts made from plastic corks
The advantage of plastic materials lies in their wide range of colors, resistance to washing and versatility. Therefore, crafts made from plastic corks are very popular.
How to decorate a bottle of champagne with your own hands
You will need:
- satin ribbon (1 chocolate color, 1 white color; length 2m, width 3cm)
- white satin ribbon (length 60cm, width 6cm)
- fabric for base
1.
First you need to cut out a dress, focusing on the size of the bottle.
2.
You need to make shuttlecocks from satin ribbons. To do this, sew a stitch along the edge and pull it together to create ruffles.
3.
Sew ruffles onto the skirt.
4.
The first row should consist of the widest strip that needs to be stitched.
5.
From the center of the waist line you need to draw an isosceles triangle (see picture).
6.
Sew white ribbons, 3cm wide, around the perimeter of the triangle.
* In order for everything to work out neatly, you should secure the product with pins, and only then start grinding.
7. Cover the edges of the triangle with a frill made from chocolate-colored satin ribbon.
8.
Next, drape the skirt with chocolate ribbons as shown in the picture.
9.
Use wide white tape (6cm) to cover the gaps in the drapery. On top of this ribbon also apply a narrow chocolate ribbon (3cm) and stitch.
* If you pull the end of the thread, you will be able to tighten the ribbon and distribute the folds beautifully and neatly.
* With this detail you can hide undraped areas.
10. Prepare a satin ribbon (6cm) and sew it onto the bodice of the dress. You can add sequins for beauty and sew on ties.
11.
At the bottom you can decorate the dress with white ribbon bows.
Massage Mat
The multi-tiered massage mat is an interesting design. As is noticeable in comparison with the photo of other crafts made from corks, in it they are in an inverted state, for a better effect on the blood flow in the area of the feet.
To make such a useful and important thing you will need a lot of lids, glue and a flat base for the rug. The latter is covered with a multi-layered but asymmetrical appliqué of inverted lids.
It is important to start not from artistic expressiveness, but from orthopedic functionality.
How to decorate a bottle of champagne with ribbons
For a wedding or anniversary, the following champagne bottle decor will also suit you.
You will need:
- satin ribbon (3.5 m)
– gold brocade ribbon (1.5 m)
- glue (preferably instant)
- scissors
- a bottle of champagne with gold foil
1.
Prepare a bottle and tape and measure its approximate length for the first layer. To do this, attach the tape to the neck of the bottle.
2.
When you have measured the length, cut the desired piece of tape and mark several points on it with glue.
3.
Next, wrap this piece of tape around the bottle to cover the champagne wrapper. It is advisable to tighten the tape well, thereby preventing unevenness.
4.
Measure out the second piece of tape. It will be longer.
5.
Proceed with the second piece as with the first piece of tape, i.e. Mark the dots with glue and glue. It is advisable that the ends of the ribbons be positioned equally, this will ensure a beautiful and neat pattern.
6.
Continue gluing the next two layers (3rd and 4th) in a similar manner.
7.
Now prepare the gold ribbon. It also needs to be measured and glued. Make 2 rows (see picture).
8.
Another piece of gold tape needs to be glued to the bottom of the bottle.
9.
Prepare the blue ribbon again. Measure and glue to the bottom of the bottle so that the seam is at the back.
10.
Now we cut 7-8 blue ribbons of the same length and glue them in the same way - so that the seam is at the back.
11.
Here's the rear view. A not very neat seam has formed that can be easily closed. To do this, prepare a stationery knife and use it to make a slot for the end of the tape, which needs to be inserted there.
12.
Apply a little glue to the tip of the blue tape and push it through the gap.
13.
Next, you need to apply glue to the entire tape and press it tightly to the bottle.
14.
Pay attention to the middle of the bottle, there is an open space there. This is where we attach another piece of golden ribbon. The corners that stick out from the front need to be cut off.
15.
Now you can decorate the front of the bottle - add bows, lace, beads, etc.
We make decor from paper and Christmas tree decorations
Christmas tree decorations - balls, beads, tinsel - for the New Year can be seen not only on the festive tree. Collect all the toys on a thin, strong wire and wrap it around the neck of the champagne.
It is worth adding to the New Year's composition to the balls:
- cones;
- berries;
- bows;
- pine, fir branches (natural or artificial);
- gold ribbons;
- thematic pictures.
Corrugated (crumpled) paper is a soft, plastic material. You can literally wrap it around champagne, then smooth it out with your hands. The combination of red and gold is reminiscent of Santa Claus's rich fur coat. If you add gold buttons and a hat with a pompom, the similarity will be complete. Additional decor will be bows, tiny balls and bells.
How to decorate champagne for the New Year
You will need:
- thick aluminum foil
- medium thickness wire
- glue
- decorations (artificial or natural spruce branches, tinsel, small New Year's toys, ribbons, beads)
1.
First you need to wrap the bottle in foil. It is advisable to cover in several layers (from 2 to 4 depending on the thickness of the foil). Try to press the foil tightly against the bottle.
2.
Now you need to attach the wire. Wrap it around the bottle, but not tightly, so that you can then remove it when you want to open the champagne.
3.
Proceed to the most important thing - the actual decoration. In principle, there are many options and they depend on your imagination and available materials.
You can take a few Christmas tree branches and use glue to attach them to the foil. This can be done in a spiral (see picture), and it is advisable to start from the base of the bottle.
In those places where the foil is visible, you can attach ribbons, fabrics, wide braid or decorative paper. Places where glue may be visible can be hidden with tinsel.
4.
Add beads, pine cones, toys, candies, small Christmas tree decorations, etc.
Adding a festive sparkle
There can't be too much sparkle and shine for the New Year 2022! The first way to decorate New Year's champagne is to stick a large amount of sparkles. Doing this yourself is quite simple. You will need:
- a bottle of champagne, or better yet more than one. By the way, you can find mini bottles with a volume of 0.33 liters in the store. Several of these vessels, picturesquely displayed on the festive table, can surprise guests. For information on how to choose champagne, read the link;
- glue. The best option would be glue in a can - it’s most convenient to apply, but if you don’t have one, don’t worry, take any and apply it with a brush;
- actual sparkles. Glitter powder is available in craft stores. You can find any shade according to your design;
- additional decorative elements upon request: ribbons, cocktail tubes, Christmas tree decorations.
Step-by-step instruction:
- Cover the bottle with an even layer of glue. It’s convenient to do this over an unnecessary box so that splashes don’t fly in all directions.
- While the glue is still wet, you need to apply glitter. You can scatter them on a sheet of paper and roll the champagne. The remaining unused particles from the sheet can then be shaken back into the jar. Additionally, glitter can be applied pointwise with your fingers.
You can decorate New Year's champagne with sparkles. To do this, treat the bottle with glue and until it dries, roll it in glitter and sprinkle it with it. The colors of the “powder” can be very different.
You can decorate with ribbons, bows, or attach a small greeting card with a wish. If you add a paper or plastic straw, this bottle of champagne will turn into a charming gift.
Golden decor in the New Year looks very stylish and appropriate.
Champagne glitter can be any size and color.
Curtains
This development belongs to the category of crafts made from corks for the garden, since, most likely, such a product will not be applicable to the interior of a modern apartment.
For a beautiful appearance, you must first sketch out a sketch plan for the location of the plugs. The manufacture itself consists of measuring the doorway in such a way that the distance from the floor to the curtain is maintained at least 7-10 cm.
Now you will need an improvised cornice (a mop holder or any other oblong and strong base) the width of the opening, taking into account its reliable fixation.
When assembling the first tape, you need to cut off the wires with a margin for a knot in the lower part and fastening to the cornice. First, after wrapping the wire at the bottom, they begin to string corks of the desired colors and sizes.
In addition, there is a more painstaking, but quite interesting idea to maintain the distance between the strung corks by tying knots at the bottom and top. All other tapes are created according to the same principle, and their number varies depending on the required density of their placement.
Chandelier
From wine corks you can create a unique piece of interior equipment. It is created based on a sketch of the future model from wire, screws and, directly, plugs.
There are no strict guidelines here, because the implementation of any known chandelier design with a certain degree of stylized simplification is acceptable.
The main task during development is to create a strong and reliable fastening from screws and wire so that the use of this lighting device is safe.