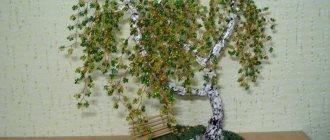
basket of pine cones master class
We present to your attention an original craft - a basket of pine cones . Of course, such a basket has little practical use, but if you want to emphasize the rustic style of your interior, create an autumn composition, or decorate for New Year’s, then this craft is ideal for these purposes.
In this article we will look at several options on how to make a basket of pine cones with your own hands . Even the process of working on a craft will bring a lot of pleasure. Firstly, collecting and preparing pine cones is good for walking in the fresh air, and it's also fun. Plus an interesting and useful activity for children.
How to prepare buds
The number of cones depends on the size of the product. It is necessary to collect only whole, clean, not damaged by pests. It is advisable to use not “fresh”, just collected cones, but those that have been lying in a dry place for a couple of months, have dried well, and have opened. Fresh pine fruits are sorted by size, dried in the shade under a canopy, laid out on newspaper so that they do not touch each other.
The structure assembled from such parts does not deform during operation. It is advisable to use elements of the same shape and type that are not damaged by pests - combining spruce with pine is problematic, and alder cones are suitable only for the external decor of the finished item.
Baskets look very interesting, where the side (top row) is made of the largest parts, and the remaining rows and handle are made of smaller ones.
DIY basket of fir cones for children: instructions
Fir cones differ from pine cones in size and quality. They are less durable, so they are ideal for children's crafts that are decorative.
DIY basket of fir cones for children, instructions:
- To create a children's basket you will need a cardboard base, you need to make a cylinder from it. Take a thick sheet of cardboard, cut out a long rectangle, connect the edges together, and glue the bottom.
- The result will be something similar to a small bowl or saucepan. Decorate it with tissue paper or felt. Glue fir cones on top of the base. You won't be able to use a glue stick during the process, as it is applied thinly. For these purposes, use glue in a gun, or moment.
- This basket is more of a decorative or play option for a child. It is not possible to use it as a flowerpot for fruits due to its low functionality and low strength.
Cones
Materials, tools for assembling the basket using glue
A small basket is easily created from about four dozen pine cones and “moment” glue or any other similar one. You will also need a strong fishing line to create a handle for the product, wire cutters or strong scissors, beads, ribbons, glitter to decorate the finished structure, some free time for making, and drying the basket. It is better to start making an object from the base, and make the handle at the very end.
If you want to make a basket from pine fruits that are as light as possible, but not colored, they are soaked in water with bleach for 8-10 hours, after which they are dried in the oven.
Assembling the Basket Base
The base of the basket is assembled from nine cones of the same size. It is advisable to take large, homogeneous ones, laying them “bottom” outward - this way the design will be more interesting. When the circle is closed, another row is glued to it, but the bottom is already turned inward, and eight parts are already taken. In the next similar row, only seven parts will be required, the very bottom is made of one, the largest cone, with the bottom turned towards the “floor”. Now start making the handle.
To create a beautiful basket in the shape of a half ball, use a large foam ball, “wrapped” in foil up to the middle. The glue is applied directly to the latter, the cones are attached as close to each other as possible. When the product dries, the ball is taken out, and the basket-vase is filled with flowers, moss, and other decor.
Handle assembly
To make a handle, take a little wire or fishing line of medium thickness. For this part you will need nine cones glued together, with all but the top, central one turned upside down. For strength, the handle made of cones must not only be glued, but also wrapped with fishing line, but so that it is not overly noticeable. The part is wound and glued to the main part of the basket. The sides and outer part are decorated with beads, ribbons, rhinestones, dried flowers, and coated with glitter varnish.
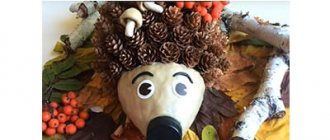
Cheerful bunny
You can make a lot of interesting animals from pine cones. , other materials will be additionally .
- Cone.
- Plasticine.
- Thin white wire.
Here the algorithm for doing the work is very simple. The cone will serve as the body. On top of it we attach a round head from white plasticine. We attach another small circle of white plasticine to it, it will serve as a muzzle. We already attach a pink nose and a red mouth elongated with a sausage to it. We place blue beady eyes a little higher.
We draw out the ears from white plasticine and apply them to the head. At the tips of the ears we make two drops of pink, so the ears will look more impressive. We insert two plasticine handles on the sides and attach them properly to the pine cone, and at the bottom we also make two legs. Don't forget to insert a wire mustache into the bunny's face. Complete the composition with a small ponytail at the back.
Master class on assembling a basket on a wire base
Larger structures are made from almost two hundred cones, fastened together with wire for strength. Here, all the elements are laid with the bottom outwards - this way the design looks more aesthetically pleasing, neater, and due to the fact that there is no glue here, it turns out to be completely environmentally friendly. To attach one cone to another, a wire loop is wrapped around it, and a “chain” of several objects is closed into a ring.
What to do step by step:
- a circle is assembled from about 30 elements, the parts of which are fastened together with wire; glue is usually not used;
- then three or four more similar rings are made, with the lowest one being made the smallest, since the basket should expand upward;
- the bottom here comes out relatively large, therefore, to create it, the parts are attached to a central large cone, all of them facing the bottom “towards the ground”;
- the bottom is made up of 7-11 cones, screwed with wire to the rest. Sometimes it is made of cardboard, but it is not so beautiful;
- now the handle is being made. It is “twisted” and contains two or three rows of small cones or is made of wicker and firmly attached to the base;
- Afterwards the product is decorated in any way you like.
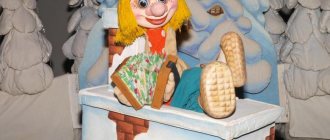
Snowman made of natural material
From such scrap materials you can create not only animals, but also other crafts. For this craft lesson you will need to prepare:
- Skewers.
- Vatu.
- Cones.
- Scissors.
- A piece of felt.
- Small sock.
- A thread.
- Glue.
- Eyes for dolls.
Work order
- Using a skewer, we thread pieces of cotton wool between the scales of the main parts. You need to do this in three lumps for the body.
- Fasten them together using plasticine.
- Put a sock on your head and cut it off to make a hat. At the tip you can make a pompom from threads.
- On a piece of felt we mark the mittens and the nose of the snowman.
- Using a glue gun, glue them into place and attach the eyes in the same way.
Following the recommendations of this needlework lesson, you can easily make a beautiful winter snowman.
Making basket-pots
A flowerpot is a decorative structure, inside of which a flowerpot with live, mainly climbing and hanging plants is placed. To begin with, select a plastic or ceramic pot, which will later be placed in a basket. The cones are fastened together or glued directly to the flowerpot itself. The handle of the basket is made higher than in a simple decorative one, so that nothing prevents the flower from growing in height. It is not at all necessary to make the bottom from natural materials - the side walls are enough. The edges of the structure are made one or two cm higher than the pot itself.
When it comes to a hanging product, it is done a little differently: the bottom is mandatory here, all elements are firmly fastened with wire matched to the color of the object. An inconspicuous wire frame of two loops clings to the flowerpot itself, a hanging hook, and neatly hides under the handle structure. If you decide to use pine cones to decorate a tub or barrel standing in the open air, then you cannot do without a special impregnation that prevents rotting, eating by beetles, and destruction under the influence of precipitation. Usually all kinds of compositions suitable for wood and various lumber are used.
P O P U L A R N O E:
- The magic wand turns on the lights on the Christmas tree
This scheme will allow you to wave a magic wand to turn on garlands of lights on the New Year tree. Once turned on, the garlands begin to switch in a certain sequence. The essence of the idea lies in a magnetic wand that looks like a real magic wand. Read more…
We make our own pencil holder.
DIY pencil holder
Things made with our own hands always contain a piece of our soul. Therefore, these objects acquire even greater benefit and meaning. When the child had accumulated so many pencils that they began to constantly roll off the table and were eventually scattered all over the room, I decided that the child should be taught to put them in one place, and so that the child would like to do this, we thought what would be best a bucket with the image of your favorite cartoon character is hard to find. This is how the idea of creating a pencil holder with your own hands arose. The child took an active part in this, so now we always have pencils in place, and there is plenty of space there. Read more…
Blinds - DIY Roman and Japanese blinds
Square basket-box
To create such a functional item, you will need a small box made of thin plywood, hot glue, a construction stapler, and a wooden handle. The box is placed on a flat surface, pasting is done from the bottom up, the parts are placed as desired, you can combine elements of any shape, color and size. The top “cone” row should slightly obscure the edges of the box, and its inside should be tinted to match the color of the cones. A thin handle, woven from wicker or carved from wood, is secured with a stapler, pasted over with seeds of vegetables and cereals, and sprinkled with sparkles. This product is suitable for storing small handicrafts, various kitchen items, and haberdashery.
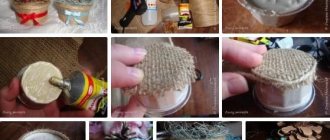
Beginning of work
It is recommended to prepare larger cones so that you can select them according to size. We wrap pieces of wire around each cone and fasten them together into a chain. We connect this chain into a circle. A total of three circles of different diameters are needed. We connect them together with wire so that the circle of smaller diameter is at the bottom, and the larger one is at the very top of the basket. We make the bottom from the cones and weave everything together with wire. The bottom can also be made of wood or thick paper. All that remains is to fasten the three rings together using thick wire. And the basket of pine cones is ready - you can fill the container with fruits or plant flowers in it.
Decorative design
You can decorate the finished basket with anything - it all depends on the imagination of the master and the size of the structure itself. Some options are so original that they do not require additional decoration. These are complex, in terms of self-production, baskets in the shape of chickens and turkeys, princess carriages and boats, amphora on a leg and some kind of casket with a lid.
Best suited:
- live, dry plants, moss;
- textile, paper flowers, including those made of corrugated paper;
- plastic, wooden, glass beads;
- ribbons of various widths, colors;
- varnish in a can with glitter;
- spray paint or can;
- twigs with rowan and hawthorn berries;
- grains of lupine, pumpkin, sunflower, coriander;
- patchwork crafts;
- toy mushrooms made of fabric or plastic;
- textile inserts;
- animals made from pine and fir cones;
- multi-colored sisal;
- buttons.
Some hobbyists decorate large floor baskets with LED lighting. It is hooked onto a handle, run along the sides or placed in the very center. The handle of the product itself is not always made round; heart-shaped, cone-shaped, and also U-shaped configurations are acceptable. From cones turned upside down, original flowers are created to fill the basket - the lower part is painted with bright acrylic paint, and the core is painted in a contrasting color. “Flowers” are placed on a bed of sisal and moss.
Differently decorated baskets are suitable for very different interiors and spaces. For high-tech, the product is completely painted with silver-gray paint; for ethnic, it is decorated with decorative grains; for boho, it is decorated with several strings of multi-colored beads.
Selection and pre-processing
Most often, pine and spruce cones are used for crafts, sometimes cedar, larch and alder. Natural materials brought from the forest should be carefully sorted. Having selected the most beautiful ones, they need to be prepared, first of all, washed. This process will also help get rid of small insects.
Dense buds can be dried in the oven over low heat, this will help them open up.
After washing, you can paint the material in any color (whichever is more suitable depends on the design) or cover it with artificial snow, according to the design. It is better to hang painted cones on threads until completely dry.
After drying, not only material for further work is obtained, but also practically finished products - Christmas tree decorations. You can decorate them with glitter as you wish.
Thuja and cypress also have beautiful cones that will perfectly complement any bouquet or composition.
Some experts advise bleaching the cones. To do this, they need to be treated with chlorine. But the result is far from always ideal: they bleach unevenly, even if you keep them in liquid for several days.
Many of those who have tried this claim that the pictures of perfectly bleached buds posted online are fake.
Christmas wreath
Today they are becoming very popular, and buying ready-made ones in a store turns out to be quite expensive. Why not make it yourself? This will require a little time and effort.
- Sheet of cardboard.
- Vine or flexible branches.
- Grass.
- Cones.
- Glue.
- Bunches of rowan berries, beads, bows, bells, spruce paws.
First of all, take some cardboard. Twist the branches and grass into a voluminous wreath and wrap it with thin wire. Using the same wire, secure it to the cardboard. For extra strength, go over with a glue gun. Actually, this is the answer to the question of how to glue pine cones to cardboard. The pistol is perfect for this.
Now it's time to decorate our wreath. To do this, we place fluffy spruce branches, pine cones, and beautiful ribbon bows on top in a free order. How to glue the cones to the base? You can use Moment glue. It will do the job just as well as a glue gun. All that remains is to cut out the cardboard in the center of the Christmas wreath and attach a loop to the wrong side.
Bottom formation
As the bottom, you can use thick cardboard or plywood cut to shape and size. But if you spend a little time, you can ensure that the basket consists entirely of pine cones, including the bottom. To do this, you need to take 6 elements of approximately the same size and connect them using thin wire and glue in a “flower”. If the basket of fir cones has a larger diameter, then one more element must be attached to the existing “flower” at the junction of each two “petals”. And so on until the diameter of the “flower” reaches the desired size.