Homemade pistol made of wood - how to make a wooden weapon that fires cartridges with your own hands
This toy gun fires spent 9mm pistol casings and is powered by rubber bands and springs. How to make a homemade shooting pistol from wood and scrap materials.
The pistol is automatic. It has a built-in magazine that is loaded with seven rounds that are automatically fed into the chamber during firing.
Any 9-10 mm copper or wooden blanks can be used as pistol bullets. Depending on the installed spring, bullets fly at a distance of 3 to 6 meters.
Warning: Do not point the gun at a person or pet. If a bullet hits the eye, it can damage it.
Step 1: Parts and Materials
Necessary materials for assembling a wooden gun with your own hands:
- Plywood 12 mm thick.
- Plywood 3 mm thick. Plexiglas, masonite or other material suitable for processing will also be suitable.
- Two Silly Bandz.
- Several very small thin wood screws, 1-1.5 mm thick. If you cannot find such screws, you can use glue for assembly.
- Two screws with M2 or M3 thread.
- Large spring with a diameter of 9 mm and a length of 50-75 mm. If you can't find such a spring, use an elastic band instead.
- A small spring or metal elastic bar. You can take a piece of rubber the size of a pencil eraser.
- One standard nail with a diameter of about 1.5 mm.
- Sleeves or other cylindrical blanks with a diameter of 9-10 mm and a length of 19 mm.
Step 2: Tools for the job
- Superglue or wood glue.
- Sandpaper of various grits.
- Any saw or jigsaw with a thin blade.
- Screwdriver.
- Wire cutters or pliers with wire cutters; You can take a hacksaw for metal: to cut the nail to the desired size.
- Drill with small drills.
Step 3: Cut out the wood pieces
First you need to cut out the wooden blanks. At the end of this chapter there is a link to a PDF file with plans for making the toy. Download it, print it and transfer the sketches onto plywood. The easiest way to transfer is to cut out templates from paper, attach them to plywood and carefully trace them with a pencil.
All dimensions are indicated on the drawings: they will be useful to those who have a CNC machine.
We make cuts. The small cut-outs on parts A, C, D and G are for the rubber bands to hook into.
We drill holes. Drill a hole in part F with a diameter of 3 mm. The hole in part E will have a diameter of 1.5 mm, in parts G - 1 mm. The groove on part G must allow the mounting screws to fit freely.
After cutting out all the parts, study the photos to understand how they are assembled. Files
- NCGODuncan_woodgunparts.pdf
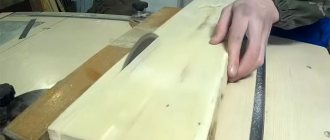
Step 4: Sanding friction surfaces
Take sandpaper and sand all the rubbing surfaces of the parts. These surfaces must be polished to the highest possible quality. Finish sanding with at least 400 grit sandpaper. All areas to be sanded are marked in green in the photo.
- The inner surfaces of both halves of part G are made from 3mm sheet (they are shown in dark green in the photo).
- Shutter on all sides (detail F).
- Internal surfaces of parts A, B and C.
- Both sides of the trigger (part E).
- All sides of the magazine follower (part D).
Step 5: Start assembly
Glue parts A, B and C to one of the sides (part G) as shown in the picture.
Attention! Try to avoid getting glue on the rubbing surfaces of parts.
Let the glue dry completely before moving on to the next step.
Step 6: Install and Adjust the Trigger
Install the trigger (part E) at the back of part G. Insert a nail into the holes of these parts from the bottom.
Make sure that the trigger rotates freely on the nail, otherwise you will have to slightly increase the diameter of the hole in the hook.
Now we mount the trigger spring. Look at the pictures: they show three different installation options:
- If you find a suitable spring, install it in the groove.
- If you have a flat elastic bar, install it as shown in the picture.
- If you do not find a spring, insert a cylindrical pencil eraser or other elastic rubber element into the groove.
Step 7: Install the Shutter
Insert the bolt (part F) into the groove above the trigger. Screw one screw into the bolt hole through the groove of part G from the back side. Do not screw in the screw all the way. Make sure that the screw will not rest against the edges of the groove, otherwise it will simply break off when shooting. Another such screw will be screwed into the other side of the gun.
Spring or rubber band? If you have a spring with a diameter of slightly less than 12 mm and a length of 50-75 mm, then install it behind the bolt (part F).
If there is no spring, use an elastic band.
Step 8: Install the Second Side
Glue the second side of the gun (part G). To make the gun dismountable, use screws instead of glue for assembly.
It is recommended to pre-drill holes for screws to avoid splitting the plywood.
The nail used as the trigger axis must pass through the hole of the second part G.
Step 9: Final Assembly
After installing the second side, cut off the protruding nail at the level of the body surface and screw the second screw into the bolt (part F).
If you don't have a mainspring (which is installed behind the F bolt), you will need to tighten the rubber band as shown in the photo. You can experiment with different elastic bands of different strengths.
Step 10: Learn to shoot
Insert 9mm rounds into the magazine. They must move freely inside the store. Can hold up to 7 rounds at a time.
Insert the pusher and put the rubber band on it as shown in the picture. The rubber band presses on the pusher, which in turn feeds the cartridge into the chamber when the bolt is cocked.
Cock the bolt by pulling the screws back. In this case, the pusher will feed the cartridge into the chamber.
Point the gun at the target and pull the trigger. For the next shot, cock the bolt again and fire. Shoot until your opponents are defeated.
Watch the video on how to use the gun.
I tell you how to make something with step-by-step photos and video instructions.
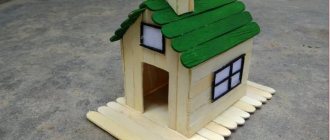
Making a rubber gun from plywood
I want to talk about making a simple plywood pistol for shooting with office rubber bands. The pistol is three-shot, automatic. All the children are very happy with these gifts, I have already given quite a lot of them. And office battles have not been canceled!
I am attaching the file for cutting, taken from the Internet. This gun was cut out by my friend’s ten-year-old son himself with a hand jigsaw; there’s nothing complicated about making it. Actually, we don’t need anything other than a hand jigsaw, 4mm plywood and office money rubber bands. It’s very good if you have an electric jigsaw, it will be faster.
First you need to print the file on A4 sheets and glue it to the plywood.
I will give for description the part numbers that are presented in the file. Open it to understand.
If you have a powerful jigsaw, then parts 1 and 4 can be made immediately in one cut by gluing the workpieces with double-sided tape. I used a bandsaw for cutting.
The entire assembly process is presented in a drawing file.
But I changed my pistol a little. To begin with, my internal part does not consist of two parts 2 and 3, but one made of 8mm plywood.
Next, the trigger part is also made of 8mm plywood according to template No. 5. By default, this part consists of 3 parts (No. 5, 6, 
I simply selected the required groove for the rubber bands with a chisel, it was faster than making three parts and gluing them.
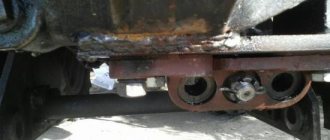
I also did not cut out parts 7 and 9; they were replaced with a nail, as in the picture below.
What is the result? If, in addition to 4mm, we also have 8mm plywood, then we cut out only parts 1 and 4 in one cut, parts 5 and 2. Instead of 9 parts!
But that's not all. Where to store spare rubber bands? There can never be too many cartridges! We need a store! In the central part I cut a hole for it.
The store itself was assembled from scraps of 4mm plywood.
Now all we have to do is gluing and sanding. You can clamp it with clamps, like I did, or you can simply assemble it with screws, as indicated in the drawing. There is no point in grinding before gluing; now all the parts are together and by grinding you create a single profile.
I pay attention to the processing of the teeth necessary for holding and discarding the elastic bands. You will need to carefully polish them, otherwise there may be misfires.
You can do everything according to the drawings, or you can move away from them and make your own version. No one bothers, for example, to make a five-shot pistol by filing more teeth. You can repeat my version with a reduction in the number of parts; if you do a lot at once, you will save a decent amount of time.
All that's left is coloring! But it’s better to entrust this to children; they will draw stars for us faster.
Ready to answer your questions. See also my other publications.
DIY wooden gun
How to make a gun from wood?
A gun is one of children's favorite toys, but the problem is that most purchased toys break after a very short time. Today, we want to show you how to make a gun with your own hands from wood, which will be very difficult to break. It can be used not only as a toy, but also in martial arts training, because they often teach how to behave with dangerous people who are holding a gun.
How to make a pistol at home?
To make a gun, we will have to work a lot on it, but we need very few materials. We only need a piece of wood, 20x12 centimeters in size, 2.5 centimeters thick, and don’t forget about the layout, which needs to be printed on a sheet of paper. Let's start making our gun!
1. First of all, the model of the pistol needs to be transferred to the tree so that we can then see what needs to be cut and where.
2. When the layout is drawn, we see that the excess parts can be trimmed. Using a jigsaw, cut them off.
3. In our case, we used a jigsaw machine, but you can even use a regular one.
4. Next we need to thoroughly sand the surface of the future pistol using a grinding machine. It is very important at this stage not only to sand the surface, but also to round off the sharp edges.
Important points
The length of the blade and handle are important, but not the only parameters. Before you start making a sword, you need to find out what the following parameters will be for the future weapon:
- Blade section shape. There are a huge number of options, but for a wooden sword the most suitable are a rectangle with pointed or rounded edges or a diamond.
- Handle shape. The best option is an oval handle, since in this case the weapon will be comfortable to hold in your hand. A round shape is not acceptable (the sword will rotate). You should also pay attention: the handle is usually made thinner than the blade.
- Point shape. It is arbitrary, but if you are making a sword for a child, then it is better to make its end rounded. For an adult, you can make a point, the two sides of which form an angle of 45 degrees.
- Garda. The widest part of the sword. Its width should be enough to protect the hand, and the sword should be comfortable to hold.
How to make a gun from wood: step-by-step master classes with photos
How to make a gun out of wood - this question interests quite a few fathers and grandfathers who have sons and grandchildren, despite the fact that today in children's store chains you can purchase any similar toy, based on the wishes of the child, as well as the financial capabilities of his parents.
That is why we decided to devote one of our publications to this topic and share with you interesting master classes that tell in detail how to make a gun out of wood with your own hands. We hope this information will not go unnoticed by you and will be adequately used for the right purposes. And your child will receive tremendous pleasure from the toy he receives, made by the skillful hands of his loved ones.
How to make a homemade gun from wood
If the question arises, how to make a homemade pistol from wood that shoots or not , you can try to show all your imagination and, if you have certain carpentry skills, try to plan it based on a previously selected suitable wooden blank. It is best to take soft tree species for this; linden or pine will work very well in this case, but if desired, your child’s coveted toy can be cut from other species.
As a basis, you should take a board of the required size and thickness, perhaps use materials that were previously used, but for some reason have lost their relevance and significance, for example, part of old furniture or leftovers that were not used in the manufacture of crafts made of wood with your own hands.
How to make a gun out of wood: drawing
Of course, any craftsman, when creating a wooden figurine, will rely on a pre-made auxiliary drawing. You can try to find such instructions for the manual in old books on carpentry, do-it-yourself magazines, or use advanced technologies, and look at everything that the resources of the World Wide Web - the Internet - offer us. You can also try to make a similar drawing yourself. To work in this case, you will need a sheet of paper, a simple pencil, an eraser (eraser), a ruler, and also, possibly, a compass.
It will be much easier if, as a basis for your future creation, you take a ready-made plastic model of a similar toy, which you will probably find in the house where boys grow up, and simply take the measurements you need from it, down to the millimeter, from all possible sides for constructing a drawing and further work. .
If you have nothing to take measurements from, you can try to draw something yourself. You should not bother with a design that is too complex; firstly, it will take you too much time to create the drawing itself, and secondly, if you do not have a certain amount of knowledge and your arsenal does not have a sufficient number of woodworking tools, your plan may simply not work out general disappointment for you and your boy. Therefore, it is enough to simply repeat the shape of the pistol, which, by the way, even your child can draw for you.
Once the drawing is ready, you can proceed to work. As in the case of sewing, where needlewomen, before cutting the fabric, transfer all the details of the pattern onto it, it is better to first schematically transfer the main shapes of the future wooden toy with a simple pencil onto the selected base material.
Next, armed with the appropriate tools, you should begin making the toy. This will require patience, perseverance and accuracy, as well as time. Gradually, layer by layer, a piece of wooden blank will begin to take on the desired shape in your hands and become more and more like a pistol for children's games.
Instructions from carpentry experts, as well as video tutorials, will help you perform all the manipulations correctly. Which you can probably find on the Internet without any problems. To do this, you just need to select one of the search engines and ask the phrase there: “ how to make a gun from wood video” , or something similar and the necessary information will immediately be provided to your attention.
When the product is ready, it is better to sand its entire surface so that the wooden base becomes smooth and does not lead to minor injuries such as punctures, splinters, etc. when playing with this toy. Sandpaper with zero abrasiveness is best suited for these purposes.
To make the finished pistol look even more attractive, it can be coated on top, like other wood crafts, with several layers of varnish. In this case, it is better to use acrylic-based varnish; it is safe and non-toxic, which is extremely important when making a children's toy. But if you don’t have such an environmentally friendly coating on hand, you can also use the traditional one, which is used specifically for wooden surfaces.
Please note that varnishing the figurine should be done exclusively in a well-ventilated area, or better yet, in the open air, so that harmful fumes from the chemical material do not have a negative impact on the health of you and your child. For the same reasons, you should leave the toy pistol to dry away from living quarters.
The pistol can also be decorated with paints. Here it is advisable to use natural-based dyes - acrylic, gouache or even watercolor. Give your child such pleasure and allow him to choose the color and design of the gun toy. In addition to the fact that such a process will greatly delight your baby, it will also have an extremely beneficial effect on his development. After all, this is how, in a playful form, children’s imagination awakens. Skills are developed in accuracy, perseverance, patience, and the desire to complete the work started. And when working with small details and drawing them, fine motor skills of the fingers are actively involved in the process, which in turn has a positive effect on the mental functioning of the brain.
How to make a gun from wood that shoots bullets
In order to make this version of the toy, you must have certain knowledge, tools and skills. One thing can be said for sure - creating such a toy is extremely difficult and beyond the power of amateur carpenters; here it is necessary to draw up a lot of drawings and do a lot of complex, sometimes even jewelry, work in order to achieve the intended goal. Therefore, it is better to abandon this idea and talk your dreaming child out of it. In addition, such a wooden toy gun can turn out to be very dangerous in the hands of a child, and lead to the most unpredictable consequences, ranging from minor injuries and injuries to serious threats to health.
But if you still want to try your hand, then a video will help you figure out how to make a shooting pistol out of wood, following which you can create your own model of a wooden weapon. However, it should not end up in the hands of a child; for the reasons described above, such toys for adults are made exclusively for souvenir purposes and are valued only as a delicate and professional work of a master.
dwell on how to make a combat pistol from wood . Since our article is primarily aimed at making interesting toys for children, and not for adults, read below how you can create interesting models quite easily and quickly based on cheap materials available to everyone - paper and cardboard. In one of our articles we told you about a paper sword, today we will share other equally interesting works.
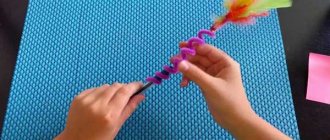
Answering the question of how to make a gun out of paper, we can say that this model of a popular paper toy among boys, however, like airplanes, boats, boats and frogs, is one of the elementary models of the ancient Chinese art of origami, so any older child can handle it 3 years old. At the same time, you should not be afraid that this work is dangerous and requires close adult supervision, because for creativity you will not need either scissors or glue.
To work we will need:
– two album sheets;
1. Take a sheet of A4 paper, it is better that it is thicker than regular photocopy paper; a landscape piece of paper will do just fine. We fold it lengthwise according to the accordion principle, and each new fold should be at least 2.5-3 cm wide. We carefully smooth out all fold lines so that our workpiece has an ideal shape and does not unfold during work.
2. Using exactly the same principle, we form, by folding it like an accordion, the second blank of the future paper weapon. Only each of its folds, unlike the first, should be slightly narrower, approximately 1.5-1.7 cm.
3. Next, we fold each manufactured part exactly in half widthwise, and we get blanks for the pistol handle from a narrower strip and the barrel - respectively, from a wider strip.
4. We temporarily put the barrel part aside, and the handle part, stepping back from the center line of its fold, 5-6 cm, bend it diagonally to one side, as it is shown in the diagram below.
5. Now we take the barrel part, turn its connector towards us, open it a little and insert the handle part inside until it stops. We fold both halves of the barrel, and overlap the previously bent part of the handle diagonally from above.
6. The paper pistol model is ready; in order for it to hold securely and not fall apart during the game, you can additionally fix it in several places with regular paper glue or PVA.
7. The most interesting moment remains: to make the toy resemble the real one as much as possible, invite the child to decorate it using colored markers, pencils or paints. Here, give free rein to your child’s imagination, and let him design his weapon the way he wants.
Using exactly the same principle, only from larger sheets of paper, you can make a paper hunting rifle; your child will surely enjoy this kind of fun, and both the process of creating toys and further playing with them will be interesting.
In addition to a gun, you can also make a paper revolver; it is not much more difficult to do than the previous model, although you will need an additional A4 sheet of paper and a little more time.
1. We take the first steps similarly to the previous master class.
2. Next, we assemble both main parts of the revolver a little differently, as shown in the diagram below.
3. Separately, we form the barrel of the revolver; to do this, we divide the A4 sheet in width into two unequal parts, so that we get one larger rectangle and the other smaller.
4. Then we twist each of the rectangular blanks into a tube with a diameter of less than 1 centimeter; for reliability, you can fix the end of each with drops of glue.
5. The final touch. We insert one and the second barrel into the base of the revolver, and finish working on its creation.
What other version of such paper weapons can be made with your own hands, you will find here.
As you can see, you can make toy weapons for little fidgets from a wide variety of materials, from wood to paper. The main thing is that such fun is safe, interesting and does not awaken hatred and aggression in the child. Therefore, it is better to play less with such models, giving preference to something calmer - toy vehicles, outdoor games with sports equipment, or educational logical toys.
How to make a gun from wood? Read below
Sometimes there comes a moment in the relationship between father and child when all the games and entertainment are practically running out. You have to rack your brains to find new forms of leisure in order to captivate your child as much as possible and not let him get bored. In such cases, the Internet or special printed publications come to the rescue, which contain a huge database of games for every taste and taking into account age characteristics.
How to make a gun from wood
One of the proven ways to engage a child can be military sports games, both in the fresh air and within the confines of a house or apartment. Moreover, the game will be most interesting if you make all the necessary equipment and ammunition yourself.
Necessary materials
To do this, you will need some tools and materials that can easily be found at home or in the country: a board made of non-solid wood, a ruler, a pencil or pen, a plane, a hacksaw, a file, a vice or clamps, a wood burning machine, sandpaper and varnish. This will be quite enough to make a homemade pistol made of wood.
Another important and desirable point in making homemade weapons is a drawing of a pistol made of wood. You can easily find it on the Internet or draw it yourself, taking into account all the wishes for the future product.
Making a pistol
At the initial stage, you should take an existing board and select an area on it without knots, holes or damage. The optimal thickness of the wood material should be 30-40 mm. It is desirable that the wood is sufficiently dried, which will make it easier to sand at the final stage. Using a hacksaw, you need to cut out the required workpiece and carefully process its surface using a plane and sandpaper. The thickness of the board should be the same throughout its entire thickness.
Drawing selection
Having decided on the model and parameters of the pistol, you need to make a drawing of it or modify the existing one, taking into account all the nuances and wishes. It is possible to use illustrations or photographs of the weapon you like to recreate the smallest details as much as possible. You can turn to specialized forums, where they can tell you how to make a wooden pistol as similar as possible to the original.
The next step will be this: you should transfer the image of the previously made drawing to the existing workpiece, preserving all the parameters and dimensions and taking into account all the smallest details and features of the future pistol. To make it convenient to cut a wooden workpiece, it can be secured in a table vice or using clamps. This will greatly facilitate the process of making a pistol. It is worth cutting out parts not strictly according to the applied contour, but with a little margin for finishing.
Workpiece processing
Using a file, sandpaper and a knife, it is necessary to give the product all the inherent features of a weapon, highlight all the necessary and distinctive design details, and identify the key elements of a real pistol: trigger, front sight, butt. At the final stage of processing the workpiece, a mock-up should be obtained that exactly resembles a real pistol and corresponds to the image in the drawing. The greater the similarity, the more pleasant it will be to hold such an object in your hands.
The final stage
Using sandpaper of varying degrees of coarseness, remove all unevenness and roughness and sand all sharp corners.
By doing this activity with your child, you will not only promote bonding, but also teach him how to make a gun out of wood. In the process of processing wood material, you can acquire some skills that the child did not possess before. And, without a doubt, it is very nice to have something made with your own hands.
Preparation and independent production
For production, any durable wood is used (the best option is hazel, birch, oak) without knots and rot. It is recommended to soak a piece of suitable size for several days and then dry it slowly so that the wood does not crack. With this method of wood processing, the product will be durable and light.
It is advisable to choose medium-density wood that is easy to process. Sawing the sword must be done strictly along the grain, otherwise it will instantly break.
When starting to make a wooden sword with your own hands, you need to stock up on a suitable block of wood with a cross-section of 5x10 cm.
The following tools and items will be required:
- a hand saw or other tool designed for working with wood;
- pencil;
- sharp knife;
- ruler and measuring tape;
- sandpaper.
The work of making a simple wooden sword with your own hands is divided into several stages:
- A drawing of the sword is created and transferred to the block.
- The workpiece is cut using a saw or jigsaw.
- Using a knife, a layer of wood is removed from the blade to make it a little thinner than the guard.
- The handle is processed so that it becomes oval in cross-section. If the sword seems too heavy, you need to grind off some more wood from the blade and handle. If necessary, perform balancing, then carefully sand the surface of the product with sandpaper.
- Wrap the handle of the knife with electrical tape or sealing tape. This is necessary for several reasons - the sword will not slip out of your hands, the handle will not get dirty, and the product will take on a stylish, attractive look.
- Select the guard using a file or knife, making a depression in the place where it meets the blade. You can go the other way and not cut out the guard at all, but make it separately in the form of a wooden, plastic or metal circle with a slot for the handle.
- The guard fits tightly onto the handle and is secured with wire for additional fixation.
- At the last stage, you can decorate the sword with drawings or decorative carvings and varnish it.
If you have more complex tools and experience working with wood, you can try to make a sword using a different technology. It will consist of a separately machined blade with a handle and a guard, and will look more like the real thing. To make the blade and handle, a block of the required length is used, having a cross-section of 2.5 x 4.5.
The stages of work on how to make a sword from wood are as follows:
- Using a circular saw, make 4 cuts and give the workpiece a diamond shape. The tip is given the desired shape, for which a belt or disk grinder is used.
- The opposite end, which will be used as a handle, can be made thinner by additionally removing a layer of wood, or left the same thickness as the blade if its shape is comfortable for the hand. In order to subsequently connect the handle with the pommel, a hole is drilled in the end for the connecting rod. The workpiece is processed with sandpaper. To make a guard, you will need two 15 cm long strips with cross-sectional dimensions of 2 x 2.5. You should put them together and draw a rhombus in the middle, the size and shape of which coincides with the size and shape of the blade.
- It is necessary to cut out each of the parts and connect them with glue or nails.
- Round off the edges of the guard and sand it.
- Place the guard on the workpiece, moving it to the desired place, and fix it with glue.
- The pommel can be made semicircular or triangular, decorated with embossing or a pattern, and connected to the handle with a metal pin.
- Coat the product with varnish.
To prevent slipping, the handle is sometimes wrapped with electrical tape, tape, cloth, or notches are made on it.
DIY wooden gun
To make your own multi-shot “rubber shooter” pistol for shooting rubber bands. We will need its drawing and assembly diagram, as well as material and tools for its subsequent processing.
* Delivery is carried out by Russian Post. The order will be shipped within 7 working days after receiving the funds.
The price of parts is 300 rubles. Material plywood 4 mm
The material you can use is wood (plywood), PVC plastic, acrylic or any other material you consider suitable and acceptable for cutting, 4 mm thick. Sandpaper for sanding parts, screws and glue appropriate for the material used.
Beautiful weapons here!
As a tool, you can use a manual or electric jigsaw, a band saw, as well as a CNC machine, on the latter we actually make blanks for assembling the gun according to the attached diagram. For those who want to buy ready-made parts for a “gun with elastic bands,” you can order them by sending a request to the specified e-mail in the upper left corner of the site under the logo, the choice of material is subject to agreement.
Well, whoever decided to go through all the stages of making a pistol on their own will need to download the drawings. After which you open them and print them on a printer, they will be used as a template for the office in which all parts of the toy weapon are cut out. You can print on regular or self-adhesive paper for an A4 printer; the latter is convenient because it can be glued to any sheet material and cut along a line without fear that the cut will shift. If you don’t have self-adhesive tape and have printed out the cutting template on plain paper, you can glue it using pencil glue. At the same time, don’t try too hard to rip it off.
Video on how to make a toy
Drawing of a pistol. To download the drawing, move the mouse cursor over the picture and right-click on it, selecting “Save picture as” in the context menu, save it in the location you need, and then print it on a standard A4 sheet.
We sand the cut parts with sandpaper until they are as smooth as possible. Then we begin assembling the gun according to the diagram, if the material is wood, then we glue it with PVA glue, plastic with second glue (superglue).
In Figure No. 7, a rubber band (banking) with a diameter of 40 mm is used for the return mechanism; an elastic band of this diameter is very difficult to find, so I recommend using the existing one, which can be cut and then tied in a knot by selecting the required diameter. Figure No. 8 The last lining must be secured with screws, since after some time the rubber on the trigger mechanism wears out and becomes unusable, and to replace it you will need access to the inside of the gun.
A multi-shot pistol that shoots with rubber bands is ready for shooting; a rubber band with a diameter of 50 mm is used as bullets with strict adherence to the loading sequence from bottom to top.
Cool homemade weapons
Shooting toys can be bought in a store without any problems, but you can successfully make them yourself. On the pages of the website Secret of the Master, various designs of cool toys are considered, from the simplest to the more complex, which, in addition to gaming and experimental purposes, can bring practical benefits, for example, in protecting crops from pests at the dacha.
How to make an office cannon with your own hands
A simple gun design invented to carry out “office wars”. A projectile is a sheet of paper or a light ball crumpled into a ball. The gun does not allow firing in a straight line, but it shoots well with a canopy, which allows you to bypass obstacles in the form of office partitions ;). The gun can be easily made with your own hands from a plastic bottle and rubber bands. See the video and website page for details.
How to make a rubber gun with your own hands
A simple wooden automatic three-shot pistol. The pistol fits comfortably in the hand. It is cut out of plywood with a hand jigsaw; you only need to cut out 4 parts. The gun fires rubber bands. With such a pistol it is easy to organize a small airsoft game in an apartment or on the street. See drawings of the gun stencil here (link at the end of the blog). Load your homemade pistol carefully according to the instructions. For safety reasons, wear safety glasses.
How to make a vortex cannon with your own hands
A wonderful weapon for children's games and experiments. The gun shoots... with air, an invisible toroidal vortex erupts from the barrel, which moves in the direction of the shot for some distance. A safe thing for children to play with weapons and remotely “destruct” toy buildings. Construction details are shown in the video and blog text.
How to make a pneumatic machine gun with your own hands
If you have an air compressor with a receiver on your household, then you have every opportunity to make a game console for the compressor. The weapon was adapted to the available ammunition - rowan and pea, and accordingly the machine guns were called rowan launcher and pea launcher. The design of a homemade machine gun is simple. It is based on manual blowing, which makes it easy to control the weapon. See manufacturing details here and in the video.
How to make a gas gun with your own hands
When repeating this design, strictly follow the safety rules. You build a gas gun at your own peril and risk and take ALL responsibility for the construction, use, consequences of using this device, as well as for any damage caused. The authors summarized the accumulated experience in building potato cannons and tried to use ready-made elements in the design. In total, three types of guns of different calibers were designed.
Mini gun 32 mm caliber
The gun is made by hand in the shape of a pistol and shoots small balls. A reliable piezo spark source will not create problems. The gun is used for target shooting competitions. Requires some experience when loading. See production details here.
Gas apple potato gun 50 mm caliber
This is a serious design in terms of sound and projectile. The main application is to imitate the sound of a hunting rifle shot to scare away birds. A reliable budget gun, but only if used correctly and sparingly. Strictly follow safety rules and assembly recommendations. See how to make an Apple Gun here.