- January 7, 2019
- Crafts
- Natalia Penchkovskaya
A popular craft for craftsmen is a house or hut. They are made from completely different materials. These are paper and cardboard, natural materials and plastic bottles, sections of wood and branches, ice cream sticks and newspaper tubes. It would take a long time to list the materials from which it is interesting to construct structures, as well as the types of buildings. It could be a rustic one-story house, a multi-tiered mansion, a log house made of thick branches, a hut on chicken legs for Baba Yaga.
You can fantasize about making a house in different directions. Our article is about a house made of sticks made of wood. These are either simple branches and twigs, or processed wooden pieces, which are easier to work with and make the houses more neat. Additionally, you can decorate crafts with any natural material, as well as make bases from durable cardboard.
You will learn how to make a house from wood sticks step by step, how to connect the elements together, the better and more reliable way to cover the roof, on what basis to start construction, so that you can move the craft from place to place, or take it to an exhibition in a school or kindergarten.
Popsicle stick craft
A child of primary school age can create a small house from wooden sticks, as in the photo below. To fasten the parts together, use a glue gun. Only hot glue will hold the structure together. If you don't have such equipment, don't worry. A craft house made from tree sticks can be placed on a cardboard base.
Popsicle sticks are flat plates with rounded ends. In shape they resemble logs from a log house, so most often a village house is assembled from such elements. In addition, they are easily cut into strips of the desired size with a stationery knife.
Decorative tree
To decorate the interior of your home, we suggest making a decorative tree with flowers.
You need:
- Twigs.
- Decorative flowers (can be made from paper).
- Sea pebbles.
- A piece of foam.
- Moss.
- Hot glue gun.
- An unusually shaped flowerpot (in our case, square).
Step-by-step production of decorative wood
- Take sea pebbles and add them to the bottom of the flowerpot.
- Then place the foam on the pebbles in the flowerpot and insert the prepared twig into this foam.
- Fill it with sea pebbles again to make the branch more stable. Place the moss on top.
- Now let's start decorating the branch. Take decorative flowers and glue them with a glue gun to the branch in a chaotic manner.
- When you glue all the flowers, then your decorative tree will be ready to decorate your apartment or house.
Decorative tree painted gold
Decorative tree white
Foundation for any house
To ensure that a house made of wooden sticks holds its shape well, you can first create a base from corrugated cardboard. They do it according to the drawn diagram, drawing one by one all the walls of the building in order. At the end you need to leave a small strip for gluing the parts together.
Then fold the cardboard along the lines and connect the first and last parts of the walls together. For the roof, a long rectangle is measured with a ruler and cut along the contours. All that remains is to fold the workpiece in half and install it using a glue gun on the wall supports from above. If holes are needed for additional parts - doors and windows, then cut them with scissors before assembling the cardboard base. All that remains is to cover the future house made of wooden sticks with natural material and place it on a reliable foundation.
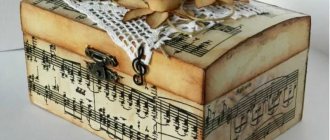
Original box
One of the most popular uses for sharpened wooden sticks is to create a jewelry box. This could be a container for storing threads and needles or a convenient place to hide jewelry.
To work you will need thick corrugated cardboard, a pack of toothpicks, beads, seed beads and knitting threads. The threads can be anything, but the best boxes are made from cotton threads of medium thickness. Corrugated cardboard is used as a base. But it can be replaced with salt dough. This option will be stronger and more stable.
You need to make a base of the desired shape from dough or cardboard. Next, you can use toothpicks. They should be inserted around the entire perimeter of the base. The distance between the wooden sticks should be such that the thread can be passed freely. The walls of the box are carefully wrapped with thread.
The final stage will be decorating the craft. Beads are placed on the sharp ends of the toothpicks and fixed with glue. You can also decorate the walls of the box with beads and sequins. It all depends on the imagination of the master.
If thick cardboard was chosen as the base, then you can immediately use the product for its intended purpose. The dough should dry.
You can make wonderful New Year's toys from toothpicks and threads.
For this, plasticine or salt dough is used. These materials are used to make a base into which toothpicks are then inserted. Next, everything is intertwined with threads and decorated with sparkles and beads. This way you can make not only beautiful snowflakes, but also voluminous toys.
Craft for preschoolers
Teachers often draw with children, make appliques and sculpt houses. This could be a kindergarten building, a small hut for a bunny or a house in the village. Children of senior preschool age will be quite capable of making such crafts as in the photo below. They begin to make a house from tree sticks for the kindergarten after preliminary work. First, children and their teacher go for a walk in the park or collect branches of the required size on the territory of the kindergarten.
You need to select material of the same thickness. To create bushes around the house, don’t forget to collect a few thuja leaves and a thin branched twig to represent a tree. Then the branches are cut and laid out first without glue. When you have the shape of the house, transfer all the details onto a sheet of thick cardboard and strengthen them with PVA glue.
Decorating the lampshade
Using your creative imagination, you can create an exclusive lampshade. For decoration, you can use bark-covered or sanded branches.
The compositional arrangement can be asymmetrical or uniform. Based on the general style of the interior, you can preserve the natural texture or paint over the rods.
To work you will need a transparent lampshade, polyurethane glue and branches.
Don't be afraid to try new directions in your creativity. Only those who do not learn anything make no mistakes.
House for a pig
Let's look at how to make a hut for a fairytale pig out of branches. To make it easier to hold the branches upright, make a base from a small box filled with plasticine. First, install pillars of thick branches along the edges of the walls and on both sides of the window. Then fill the voids with thin branches, inserting them deeper into the plasticine. Connect the material on top either with hot glue, or tie the elements together with thin wire or nylon thread, matched by color.
The door can be glued together from wooden ice cream sticks, making cross members from matches without sulfur. To create a roof, you need to tie long branches in the center and attach them to thick branches on the sides of the walls. To hold dry leaves, stretch threads or wire in several rows between the branches.
Safety precautions
First of all, you need to choose a suitable workplace.
It should be comfortable for the child, well lit, and there should be enough space to arrange all the tools and materials.
It is better to remove all foreign objects so as not to distract the child and not spoil them during work.
It’s good if mom or dad can sit nearby, help the baby, give him hints and just enjoy the joint activity.
A toothpick is a fairly sharp object, so you need to make sure that the child does not get hurt during the process. The same goes for scissors and other tools.
Before getting started, parents should talk to their child about how to properly handle these items. Particularly complex and traumatic operations are best performed by an adult.
It is better to cover the working surface with oilcloth or newspaper; this will prevent it from becoming dirty, and cleaning will take much less time.
Fairytale country house
A house made of natural material will look great in a garden flower bed. You can select a small plot of land for construction, cover the craft with round pebbles and moss, creating the atmosphere of a fairy tale.
The use of hot glue will add reliability to the structure. Choose branches of the same thickness so that the craft looks like a rustic log house. First you need to cut the material to size with a knife, reducing the length to create a triangular base for the roof gradually until you get a corner. You can assemble all the walls separately, matching the opposite ones with each other so that they are the same, and only then glue everything together. The roof is laid out in place, connecting the branches tightly to each other in the center of the ridge.
All that remains is to work on additional details - make doors, you can add a window, decorate the craft with a flower knitted from small pieces. It will be interesting to see the craft if you lay out a path of fine gravel on the ground to the door of the house and place a small gnome at the entrance.
Technology
When the base of the frame is ready, you can start decorating. Algorithm:
- Cut branches to the desired size.
- Apply glue to them and glue them to the base.
- Wait for the glue to dry and repeat.
- Glue as many branches as needed based on the initial idea.
Advice! You can use many thin branches, or you can use only 4, but thick ones. The result will be different, but in any case it will be interesting.
When the branches are glued, you can begin the most interesting part - the decoration. This stage can be entrusted even to preschoolers. Hot glue or super glue is also used for fastening.
Related article: 5 mistakes in choosing “warm” decor items for an apartment
Crafts for the autumn exhibition at school
You already understand how to make a house from tree sticks. Let's look at another interesting craft option, where an entire village courtyard is assembled. The house is assembled from branches of various thicknesses, so it looks more natural. The area of the triangle under the roof is decorated by gluing additional vertical branches.
On the roof, on top of the main covering of branches, scales of pine cones are laid, creating the impression of a tiled roof. The windows are made with applique of white and brown cardboard. The craft itself stands on a cardboard base covered with green corrugated paper, imitating a clearing with grass. The mistress of the house is made from a pine cone and a walnut shell, supposedly sweeping up scattered autumn leaves with a broom in her yard. The craft is complemented by a fence made of sticks and a real poplar branch with leaves.
Materials
When making a house, the following natural and available materials may be useful:
- eggplants, zucchini, pumpkins;
- chestnuts, acorns, pine cone scales;
- unnecessary boxes from shoes or household appliances;
- clothespins, wooden cuttings, tree branches;
- cardboard, paper, plasticine, etc.
Below are the most popular options for houses that are not difficult to make with your own hands.
House by the river
The next version of a small house made of branches is complemented by a padded polyester river, painted with blue gouache, a wooden bridge and a boat on the water made of walnut shells.
A cone gnome sits on logs near the house and catches a fish with a fishing rod. The courtyard is lined with autumn leaves and surrounded by a fence made from wooden skewers. In the craft, you can consider a whole fairy tale plot. The master has thought through everything to the smallest detail, so the work looks unique and interesting.
Flowerpot
In order for all the pots to be identical and original, you can make a flowerpot with your own hands. You will need a minimum of effort and a maximum of desire and good mood.
Flowerpot made from branches
To do this you need:
- Dry twigs.
- Saw on wood.
- A skein of twine thread.
- A piece of burlap.
Step 1:
To begin with, take dry twigs and use a wood saw to make them all approximately the same length.
cut the branches and tie them together
Step 2:
Then we wrap the flower pot or flowerpot with a piece of burlap. Secure it with any glue.
Step 3
Take the previously prepared branches, tie them together with twine so that the branches do not fall apart (see photo)
We wrap a piece of burlap around our old flowerpot
Step 4:
Then tie these branches around a pot or flowerpot and secure it with a bow.
Use a rope to secure the branches around the flowerpot
Baba Yaga's hut
The following talented house craft, assembled on a base of two chicken paws, looks very impressive. They are made from branchy cherry tree branches. The base for the house is assembled from thick branches with bark, cut into equal lengths. All fastenings are made with hot glue. For the hut itself, the author created real logs from a log house, making holes at the end of each branch. This is very painstaking work.
Pieces of moss are placed between all the logs, just as the builders of a real log house do. The roof is additionally covered with thin exfoliations of pine bark, which can be collected on the ground in a pine forest. The work was done professionally, so that novice craftsmen can only admire the author’s creation, trying to achieve the same quality in their handicrafts.
Try making simpler crafts first. Good luck with your work!
Modern designer artistic textiles
Since I specialized in hand weaving for several years, throughout my master’s research more attention was paid to it than to other textile areas. For modern artistic objects made using weaving techniques, the term tapiseria is used in world practice.
As noted in his study “The Author's Tapiseria in the Context of the World Art Process: 1960-1990.” researcher Uvarov V.D., this is due to the fact that in the 20th century, designer weaving was enriched with new varieties, including volumetric-spatial, experimental and miniature.
The term “tapiseria” is broader than the concepts of “tapestry” and “trellis”, and in Russian the term carpet weaving most closely corresponds to it. However, the term tapiseria is used not only for woven objects; they can also be made using the techniques of knitting, weaving, lace weaving, macrame weaving, and appliqué. That is, the concept of tapiseria covers a wide range of phenomena of artistic decorative textiles.
But tapiseria is not synonymous with the concept of textile art (fiber arts), since the latter includes costume design, artistic painting of fabric, design of industrial products - and is an even broader concept than tapiseria.
In modern textile art, it is problematic to identify the dominant trends: the production of traditional textiles and the conceptual, experimental movement coexist at the same time. They do not compete, but interact and interpenetrate. For example, traditional embroidery can be done with modern synthetic materials, or even on metal, as Latvian artist Severija Insirauskaite-Kriaunevisiene does.
From the mid-20th century to the present day, decorative and applied art has experienced unprecedented freedom and a unique flourishing.
The variety of materials, technical capabilities and information richness thanks to the World Wide Web allow artists to quickly grow professionally, develop flexible imagination and non-standard thinking.
It also allows you to find new sources of inspiration in the works of masters from the other side of the planet and share experiences with each other, quickly searching for suitable means of conveying an artistic image.
An example of searching for an image, texture and material for a future product, Nymphodisiac (V. A. Ivanets)
There are many unusual textile artists. We can talk about them endlessly, but I will give a few of the most interesting examples to me. The artist and textile researcher D. Draper is an iconic figure in the direction of stitched textiles. Using stitches, she forms relief and three-dimensional compositions from a variety of materials: rod, yarn, bast, leather, flap, and so on. The stitch in her work is both a formative and fixing structure and a decorative element. As an additional technique, D. Draper uses coloring of the object, which reveals and emphasizes the relief and beauty of the texture of the object created by her.
Examples of Jean Draper's works using stitched textiles technique
Studio RosiePink (mother and daughter Lyn and Annie) creates stunning felted panels with machine-stitched finishes. First, a felt blank is created, not felted too tightly. Then numerous machine stitches and hand stitches are laid, while the stitching crumples the layers of felt, forming a relief. Areas without a line become the highest point in the terrain.
RosiePink
The textures of artistic weaving are actively developed by frame weaving master M. Moody. The most expressive and relief textures in her work are the textures of pile weaving and weaving with wool for felting. These techniques are easy to perform and very expressive, especially if performed on an exaggerated scale.
Three samples in which felting wool was used in the weft. Maryanne Moodie
The list of textile artists who rely in their works on the artistic characteristics of the surface can go on and on, but the main thing here is that texture is becoming an increasingly actively used decorative means, textile artists are paying more and more attention to it.
It is proposed to consider in more detail what texture is, what its role is in artistic textiles, and by what means its expressiveness can be achieved.
Hedgehog with sunflower seeds
As you have seen from the previous instructions, sculpting a hedgehog is not that difficult. There is a slight problem with small parts, because children under five years old often cannot make them. But using seeds instead of thorns is an original solution.
As in previous master classes, we will need plasticine and a board. Sunflower seeds complement this list.
Let's look at how to make a hedgehog from plasticine and seeds:
- Knead the brown plasticine until it is completely pliable for modeling. Form a ball. We pull back the material to make the nose. The rest of the body can be left unchanged, because the hedgehog often rolls into a ball to protect itself from the enemy. Attach a small brown drop to the sharp end. Add eyes.
- Now you can do what little children love so much - attaching seeds. They need to be carefully inserted with the wide part into the body. You don't need to press hard. Start laying out the first row at the muzzle. The second row must be placed between the gaps of the first so that all the empty space is filled.
This simple plasticine modeling for children will interest your child. Offer to decorate the craft with additional elements, for example, gifts of autumn, which the child already knows how to sculpt.