Brick stove for cauldron
Therefore, you should prepare a place for the stove in advance and carefully consider its shape and finishing options, purchase beautiful accessories for cleaning the stove (scoop, poker), doors (firebox, blower) and a decorative plate with rings of different sizes, on which you can install different volume of cauldrons.
So that the cook does not have to bend over, it is raised to a height of 80 - 90 cm, which approximately corresponds to the height of the kitchen table. A steel plate about 20 mm thick with a hole for the cauldron is placed on top of the stove.
Since the unit will be in sight all the time, it is very important to provide it with an attractive appearance. In this regard, it is recommended to purchase the stove, doors and other external parts in the store: factory-made ones look much more interesting than homemade ones
In addition, a purchased plate is usually equipped with several rings, by installing which you can change the diameter of the hole. This will make it possible to use cauldrons of different sizes. In the store you can also find various accessories - a spatula for removing ash, a poker, etc.
Required tools and materials:
Although the construction of a small brick stove under a cauldron cannot be called a very difficult task, it has its own characteristics that must be taken into account when performing the work.
Stages of building a stove for a cauldron:
Let's consider the main stage - the construction of the furnace.
The final stage is the production of a sheet base.
It can be made from a metal sheet more than 1 cm thick. The sheet should be of such a size as to completely cover the brick base.
Using a grinder, cut out a circle right in the center with a diameter 2 cm smaller than the circumference of the cauldron. These dimensions will allow the boiler to be immersed exactly 2/3 into the firebox of a brick furnace.
At the same time, dressing with the casing is not done. The firebox has a cylindrical shape. The masonry is done in halves of bricks or the bricks are placed vertically. Possibility of undercutting to give the structure a cylindrical shape.
All seams in the masonry, especially on the front side, must be of equal width.
If you do not have the skills of a mason, this can be achieved using wooden slats of the same size installed between the bricks (removed after the mortar has set). The masonry is carried out with bandaging of the seams.
All metal parts are installed directly during the construction of the furnace.
To install the doors in the masonry, you need to install a wire, clamping its ends between the bricks and fixing them with mortar.
The grate is installed immediately after closing the ash pan door.
In the upper part of the firebox on the back side of the stove you need to leave an opening to which the chimney will be connected.
To install it you will need:
We connect the fittings and pipe by welding, having first laid them out on a flat surface. We make sure to use protective equipment – a mask, overalls and gloves.
We remove scale and other irregularities with an angle grinder (grinder) or a file.
We install the prefabricated metal chimney in the right place (in a hole specially left for this purpose in the furnace masonry), coat the cracks with oven clay or refractory mortar.
We check the chimney for cracks. To do this, light a small fire in the furnace firebox and watch the movement of the smoke.
At the final stage, you need to seal the corners into the masonry and lay a slab with a hole for the cauldron on them. After this, you can grout the outside of the stove or cover it with tiles.
There are several possible options for finishing the stove:
For this purpose, you can stretch a thick awning over the stove, or try harder and assemble a good-quality gazebo.
You can place a table in it on which you will cut food for cooking in a cauldron.
It’s great if you can supply water to such a gazebo yourself.
The stove itself can be covered, then it will become a decoration for your site.
Process of creation
A gas burner for a cauldron can also be purchased in stores, but a homemade modification is more convenient. She will become an excellent assistant on hikes and while relaxing in the country.
The main advantages of this burner:
- Ease of use.
- During operation, it does not produce smoke or unpleasant odor.
- There is less soot on the dishes.
To create a cauldron burner yourself you will need:
- Special regulator. Its functions are to supply fuel to the created burner.
- Set of nozzles.
- Heads.
- Unit for mounting a cylinder with fuel (gas).
The DIY working stages are as follows:
- A supply tube is created. A steel tube is used. Its maximum permissible diameter is 1 cm. Required wall density: 2 – 2.5 mm.
- Creating a case for your device. A strong steel rod is used. Its width is 2 cm. There are 2-4 holes in it. They will ensure oxygen gets in. Without them, the fire will not be stable or the device will not start at all. Each hole in diameter reaches 1 mm. Similar holes are required in the cutting rod. A couple of holes are also placed in the body. Their diameter is 5 mm.
- The divider is placed into the housing using pressure. It needs to be pressed very carefully.
- A flange is installed inside the device. The required gap here is at least 0.6 mm. Such a reserve will somewhat slow down the flow of fuel at the outlet section of the igniter.
- Creating an injector. Here you need to use a steel rod and a drill. There should be a blind hole. Drill number – 2. The required distance to the exit section is approximately 1.5 mm. Anything less is not acceptable.
- Creating a jumper. A number 4 drill is used. The created hole must be caulked and the end sharpened. Emery will help with this. You need to sharpen it so that the tip of the pipe sits quietly on the nozzle.
- A hose made from a mixture of rubber and fabric is threaded onto the end of the pipe. The other end is mounted to the cylinder. Fastening is done using a clamp. A screwdriver is used to tighten.
- The body, into which the divider is already embedded, is threaded onto the nozzle thread.
After these stages, the homemade burner can be considered ready. Signs of its correct assembly:
- In operation, it produces an even flame.
- No black smoke appears.
If soot has formed somewhere in the burner structure, slowly turn its body on the threaded section of the nozzle. Examine the connecting points. If the fastening here turns out to be weak, strengthen it: the FUM tape will be used. It perfectly compacts the desired areas. You can regulate the fire by using a valve to introduce gas.
Before using the burner, be sure to examine all its connecting areas for strength and tightness.
After all the indicated steps, the product can be mounted on the stand. The cauldron should easily fit on top. Such a stand can be created from good metal that is not subject to deformation under heavy weight and high temperatures.
It is also very important to protect the flame. This defense will not allow the wind to knock down the fire
And then all the heat will be directed under the cauldron. This type of protection consists of a funnel arranged around the nozzle. When hiking, you can use stones instead of a funnel. But this causes some inconvenience.
A portable gas burner for a cauldron is a device that allows you to quickly and efficiently prepare pilaf during tourist travels. The device has a fairly simple design, so it is not difficult to make it yourself. What burners are suitable for a cauldron and how to build them with your own hands?
Pipe cauldron stove
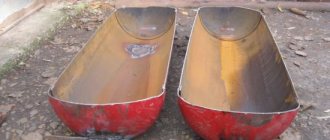
Initially, you will have to solve the problem - what to choose for what, a pipe for a cauldron or a cauldron for a pipe.
To ensure that the dishes do not fall through or stick out more than normal, you will have to work hard.
The cauldron should be lowered into the circumference of the stove either completely (with the exception of the upper rim and “ears”) or by 3/4 of its height.
A very “shallow fit” will prevent the dishes from warming up. As a result, it will take a lot of firewood and time for cooking.
Keep in mind that making a stove for a cauldron made from a pipe with your own hands is convenient for the owner. Based on this, select the height of the rack. If legs are not planned, the segment can be made longer.
A very high base is irrational; the heat will not reach the bottom of the dish very well. The optimal distance from the fire to the boiler is 20–30 cm.
The structure without legs will be placed directly on the ground. In this case, the fire is lit directly on the ground.
If you are going to mount the legs, then you will have to weld a bottom made of grating or sheet of metal to the bottom of the pipe. In this case, the fire will be raised above the ground.
Consider the design, shape and dimensions of the stove for a cauldron made from a pipe - the drawing should be detailed, with measurements and calculations.
When making calculations for clarity, use the cauldron that you will use in the future so as not to miscalculate.
Decide whether you will make a portable or stationary structure.
The portable option is convenient - you can have a picnic outside the site. With a stationary model there is less fuss, no need to fold and unfold, or take it to the utility room. Plus, you can use it to decorate the exterior of your dacha; it is more economical and easier to maintain.
The simplest, and therefore most common, option is a metal stove for a cauldron with a pipe, which is a cut cylinder on the ground.
Sometimes a stand (made of bricks or a tripod) is used. The ratio of the height to the length of the product is 3 to 4. The opening of the firebox is of the same proportions; there is no door on the firebox.
A more complex stove for a cauldron made from a pipe is a model cut crosswise along the edges. You can also cook only smoky dishes with this design.
Progress:
- The section is made with a grinder on both sides, the resulting petals are moved outward.
- Holes are drilled in the lower petals for L-shaped pins with sharp lower ends (they can be made from scrap materials). On them, the product will be attached to the soil or mini-foundation for stability.
- A window for the firebox is cut out at the bottom.
- Legs and handles are made from corners or scraps of reinforcement, then welded.
- The finished product is coated with heat-resistant paint to protect against corrosion.
Selection rules
Before choosing, you need to decide how often you cook in a cauldron. If the menu constantly includes pilaf, shurpa, muli, strudl and other Central Asian dishes, then a stationary brick stove is needed. This is especially true for the private housing sector. Moreover, building a stationary slab is quite simple. You need a regular flat area, which is additionally leveled with a small reinforced layer of cement.
If you have your own home, but there is no desire or space to install a permanent stove for a cauldron, then you can choose stationary options made of cast iron or thick metal. In addition, they can be combined with barbecue. In the slabs of capital design, it is necessary to provide removable rings for boilers of different volumes. This will make it more versatile.
For travel or rare use, thin-walled, collapsible fireplaces are better suited. They take up little space, last quite a long time with infrequent use, and are lightweight. But they are not suitable for frequent cooking. For metal or cast iron types, legs are desirable. The fireplace flame, being above ground level, will better heat the entire surface of the boiler. In addition, you won’t need to bend down low every time.
In cases where Central Asian dishes are prepared very rarely or when they are prepared outdoors, a Taganka cauldron is best suited. This stand is perfectly transportable, lightweight, and takes up minimal space. In addition, there are collapsible options.
Advantages of a stove for a cauldron made from an old gas cylinder with your own hands
- The oven allows you to achieve a tight fit and proper distribution of heat along the walls of the cauldron. Warming up occurs evenly.
- The product is extremely mobile and can be easily moved from place to place.
- The stove is very economical in terms of wood combustion - all the heat is used.
- Rain or wind will not interfere with the cooking process if there is a permanent canopy or temporary tent.
- Speed of production - you can make a stove with your own hands in half an hour using an ordinary grinder.
- The cost of the stove is equal to several grinder circles and one gas cylinder, which will not be difficult to find for free.
Tips for use
Before the first use, the stove must be well warmed up, and it does not matter whether it was purchased at a factory or made with your own hands. Manufacturers apply a special shipping coating to protect the product from damage; it must be burned off before cooking.
The brick hearth requires additional drying to improve the strength of the mortar and finally prepare the material for use.
When using the oven regularly you should:
- systematically remove ash from the grates and firebox;
- clean out layers of soot in the chimney;
- remove carbon deposits from the inside;
- get rid of all possible blockages.
It is unacceptable to burn leaves, grass or debris in the stove provided for the cauldron, otherwise it will quickly become clogged. You cannot extinguish burning wood or coals with water, as well as light them with kerosene or gasoline. To avoid any problems with ignition, you must use only dry logs.
Improper use of a homemade or industrial oven will inevitably lead to its rapid breakdown. In some cases, careless handling creates life-threatening conditions
In addition, it is important to remember that only adults can use such structures.
The stove must be regularly cleaned of ash and carbon deposits.
Brick stove for cauldron
Brick and stone are durable building materials. Their use in masonry is practical. A stove for a brick cauldron can be built by an ordinary worker who has a technical mind and can read the order drawings. And if you know a stove maker, then the issue is easily resolved.
You can find many detailed instructions on the Internet. The design of the system is simple. No heavy, dirty work on foundations is required. Simple masonry is used.
There are several types of brick stoves. The main task is to promote strong, uniform heating of the boiler walls. What stove layers don’t do to ensure uniformity of heat supply to the boiler.
Classic versions of combustion boilers, a vase-like shape, and an inverted pyramid are the main tricks that craftsmen go to in order to obtain even heat.
Required burner power
The thermal power of the kitchen stove burner is 2-2.5 kW.
It is not enough.
Even a thick-walled cast iron cauldron cools the meat, stops frying and produces juice.
This is not at all what is needed.
Kazan
To select a burner, we suggest focusing on the following:
- Cauldrons with a volume of <12 liters – 5-8.5 kW;
- For a 40-liter you will need a 20 kW burner;
- A 60 liter cauldron will require 25 kW.
We recommend choosing burners with adjustable flames. It is not always convenient to regulate with a gas reducer, and some reducers do not have this option.
You can watch the video how such a burner works (here a cheap wood-burning stove under the cauldron acts as a cauldron holder and wind protection):
https://youtube.com/watch?v=fg2N60jmZeM%3F
Furnace assembly algorithm
Usually the height of the furnace does not exceed eighty centimeters, so the foundation need not be made. The site should be leveled and metal formwork made. For these purposes, ten-centimeter reinforcement can be used. When the formwork is prepared, everything needs to be filled with concrete.
It is important that the base is level, it should be checked using a building level, there should be no distortions
Brickwork can be done in some variations. Here you will need to study the features of its implementation, you can consult with a specialist.
If you are not confident in your abilities, it is better to enlist the help of a stove laying specialist. After all, the materials used are not cheap, and it will not be possible to re-arrange the structure without financial losses in case of incorrect actions.
It is also worth making a support, it can be a stand for a cauldron with your own hands, thanks to which the preparation of culinary masterpieces will be much more convenient.
Design with useful additions
Stove with ashlar.
If desired, you can improve the oven during the manufacturing process. If you are confident in your abilities, you can make a “tuned” installation. The basic principle is similar to that described above.
And this is what will give the oven more convenience.
- A metal ring is welded onto the upper rim of the pipe. Its outer diameter should match the diameter of the pipe, and the inner diameter should be 5–15 cm smaller. Next, you can install a series of rings on the circumference for a standard wood-burning stove-stove. Now you can adjust the size of any cauldron by removing or adding rings.
- It is quite possible to make a stove with a grate and a blower. The grate is mounted inside, between the upper and lower fireboxes. Now the crumbled ash is removed from below, and a fire is lit on the grate. In this case, legs are not needed; you will get a solid cylinder, but with two doors.
Possible difficulties
During manufacturing there is a risk of encountering the following troubles:
- poor quality of seam welding;
- the grate gets stuck when lowered into the cylinder;
- lack of structural stability;
- release of an unpleasant odor during cooking.
A common cause of poor weld welding is the incorrect choice of welding electrodes. To avoid this, choosing their markings according to the thickness of the metal being welded will help.
Important! Iron, steel and stainless steel sheets require different electrodes, and the angles must be made of the same metal as the furnace cylinder. To prevent the grate from getting stuck in the middle of the cylinder, its dimensions are selected 5-10 mm smaller than the internal diameter of the body. To prevent the grate from getting stuck in the middle of the cylinder, its dimensions are selected 5-10 mm smaller than the internal diameter of the body
To prevent the grate from getting stuck in the middle of the cylinder, its dimensions are selected 5-10 mm smaller than the internal diameter of the body.
The instability of the structure results from the incorrect choice of the angle of inclination of the supports. The taller and narrower the cylinder, the straighter the oven legs should be.
An unpleasant odor inside often appears if iron with poorly cleaned paint is used for the structure, so before folding the sheet for the body, it is burned with a blowtorch.
Options
You can also arrange a gas option for it, that is, create a burner using this fuel. This option is much more convenient, since control over the flame is easier, there is no need to use firewood and wait for a large fire to burn.
It is also important to purchase the right cauldron. It is better to opt for the aluminum or cast iron version
The first one is excellent for hiking. It has compact parameters and modest weight. The second is better suited for home or country conditions. You can also use the steel version at the dacha. The steel in it is heat-resistant and thick.
Even before creating a burner for your cauldron, you need to have knowledge about its specifics. Its walls are of good thickness. The bottom has the shape of a ball. Therefore, this cookware is not stable on flat surfaces. The shape of the cauldron is such that a ring-shaped stand is specially supplied for it. The cauldron should be placed only on it. It is not recommended to place it on a standard barbecue grill or on an outdoor grill model.
If you set out to please yourself and your family and friends with the most excellent pilaf, then you need culinary skills and the right cauldron. You cannot create real pilaf in a container with a flat bottom.
A container with a flat bottom heats up faster in the lower part than along the walls. And heating is distributed evenly throughout the cauldron.
One more nuance: if you just purchased a cauldron and have not yet had any culinary operations in it, then you need to clean it of any remaining machine oil. It remains after the production process. The method for eliminating it is simple: it is washed off with warm water and safe laundry soap is used. The use of modern means for these purposes is prohibited. Because their composition contains elements hazardous to health. And besides, the walls and bottom of this cookware are very porous.
Operating principle of a potbelly stove
A potbelly stove is a primitive version of a metal wood-burning stove. This device works extremely simply: firewood is placed in the firebox, it burns, the stove body heats up and gives off heat to the surrounding air. Smoke gases are removed through the chimney, and the ash is poured through the grate into the ash pan, which should be cleaned periodically.
One of the main advantages of a potbelly stove is its simplicity of design. There are no strict dimensions here, the main thing is that the body can withstand heat and the chimney works properly. An experienced craftsman will make such a stove in just a couple of hours. And you can burn almost any dry wood in it: logs and sawdust. On our website there is an article with a detailed description of the process of making a potbelly stove with your own hands.
A potbelly stove is also heated with other flammable materials: diesel fuel, coal, peat, household waste, etc. If desired, you can cook quite successfully on such a stove. This point should be considered before the construction begins in order to create a smooth cooking surface.
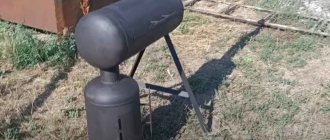
A potbelly stove is a combustion chamber made of thick metal with a loading door, a chimney, a grate and an ash pit. You can use an old gas cylinder as a housing
But one should also take into account the disadvantages of such a heating solution. For starters, there is a high risk of burns and fires.
For the potbelly stove you need to choose a special place, decorated with fire-resistant materials. It is advisable for it to stand to the side, where no one will accidentally touch the body and get burned.
If desired, the upper part of a vertical potbelly stove from an old gas cylinder can be turned into a modest-sized hob
Such a metal structure weighs a lot, so we are not talking about any mobility of the device. It will be difficult to move a potbelly stove to heat different rooms.
Such stoves are usually used to heat utility rooms where there is no electricity or where it is supplied intermittently: garage, barn, workshop, etc.
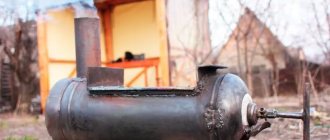
From two gas cylinders connected perpendicularly, you can make an improved version of the potbelly stove, which allows you to retain more heat and get high efficiency when burning fuel
Another problem is low efficiency, since part of the thermal energy during the combustion of wood literally flies out into the chimney. There are various ways to retain heat and modify your stove slightly to make it work more efficiently.
Finally, you need to take care of good ventilation of the room in which the potbelly stove is installed, since such a device burns a large amount of oxygen during operation.
So, a potbelly stove consists of a metal body, the role of which is usually “invited” to be an old gas cylinder. It is necessary to make two doors in the case: large and small. The first serves to load fuel, the second is needed as a blower, through which air enters from the combustion chamber to ensure the combustion process and draft.
A drawing of a stove-stove from a gas cylinder allows you to make a device with specific parameters and calculated power, but such accuracy is not required
Below, at some distance from the bottom of the structure, a grate should be welded. It can be made from thick wire or simply take a sheet of thick metal and cut long slits in it. The distance between the grate rods should be such that the combustion material does not spill down into the ash pan.
If the potbelly stove will be heated only with wood, the gaps of the grate are made larger, but when it is intended to use wood chips, the grate should be made more frequent.
A curved metal chimney installed on a potbelly stove made from a gas cylinder allows you to retain more heat in the room and increase the efficiency of the structure
The ash box can be welded from sheet metal or take a ready-made metal container of a suitable size and resistant to strong heat. Some people prefer to do without an ash pan altogether, simply scooping out the ash from the lower section as needed, although this is not very convenient. As a rule, the chimney for a potbelly stove is oriented upward to provide the necessary draft.
The standard design of a gas cylinder stove can be modified to increase productivity by turning a solid fuel heater into a heater or hob:
Image gallery
Photo from
Fixed to body
Attaching heating pipes to the cylinder
Air heating unit
Devices for heating food
Maintenance
- Use a brush to remove insects that accumulate inside the tube.
- Replace the flexible tubing periodically, checking the expiration date printed on it.
- Clean the burner openings periodically with a stiff brush.
- Use this device only outdoors.
- Do not move the device while it is running.
- Close the gas valve on the cylinder after use.
- Do not adjust or damage parts sealed by the manufacturer.
Attention. Before connecting the cylinder: Place away from any open flame and use outdoors or in well-ventilated areas - Make sure the gas valve is well closed by turning it clockwise. Place on a flat, non-flammable surface.
Source
Pros and cons of barbecue from a gas cylinder
The main advantages that masters who decide to make a similar design focus on:
- low cost with decent quality material;
- the ability to simultaneously prepare a large number of products;
- variety of cooking methods;
- durability.
Minuses:
caution is required when making barbecue; significant amount of work; bulkiness and heavy weight of the structure, which makes moving difficult; uneven cooking of food; significant coal consumption; not very attractive appearance after several uses. Despite the many disadvantages, the advantages still outweigh, which is confirmed by the emergence of more and more new varieties of cylinder barbecues throughout the country
Despite the many disadvantages, the advantages still outweigh, which is confirmed by the emergence of more and more new varieties of cylinder barbecues throughout the country.
With a table
This device, which provides ease of use of the unit and improves its functionality, requires a larger amount of welding work. The table can be made retractable, folding or detachable. It is attached to high legs made of steel profiles or reinforcing bars.
The table is mounted directly under the lower plane of the grill or taken to the side. For a retractable structure you will need profiled guides. The folding or removable version is installed on door hinges similar to those used to secure the lid.
Homemade stove for a cauldron: drawings and dimensions
Creating a stove with your own hands is not an easy task. In creation projects, the study of drawings always comes to the fore.
Brazier
The most easily constructed are barbecues. It is better to choose metal with a thickness of up to 8 mm for the barbecue. But sometimes they use metal 4 mm thick.
They prefer rectangular grills. In some situations, barbecues with a pipe can be produced. There are also barbecues designed like cylinders.
Grill Sharm el-Sheikh BBQ
At the first stage of work on constructing a barbecue, the elements of the box and other components of the barbecue are cut out. Next, make the intended holes. After this, the box itself is boiled. If necessary, solder the handles.
The design can be decorated with various ornaments. It can be painted in any shade.
B-B-Q
The basis of the design of each model is the box. Coals are placed in this tray, and a grate is also mounted there on which the food will be placed. Thanks to this design, uniform roasting of meat is ensured:
- Before designing a barbecue, you need to understand what kind of model you need to make. This can be either a mobile oven or a stationary oven.
- Mobile ovens are made from bricks without mortar. The design of stationary models always contains a solution.
- When choosing a stove, you need to focus on the composite from which it is made. It can be brick, stone, high quality concrete. All these models are always heat resistant.
- For exterior decoration, natural stone or shell rock is used, and it can also be porcelain stoneware.
- The barbecue stove must be installed on a flat surface. There should be no flammable objects nearby. You should always ensure that the oven is protected from precipitation.
- First, the first row of bricks is laid on a smooth surface. The shape of the future barbecue can be either square or polygonal. The choice of form is always limited by the client's wishes.
- The niche in which the frying grates will be located must be laid with fire-resistant bricks.
The barbecue area is often equipped with electricity, water and drains. You should always take into account that utility networks do not pass near it. When a supply to the water supply system is not provided, the stove must be located near the summer kitchen.
There is always tile around the stove because "wood floors" can accidentally catch fire. Also, in the oven area, a zone for dishes is always designed. Very often, a table for family gatherings is immediately installed next to the barbecue.
Tools
What you can't do without:
- Welding machine and accessories for it;
- Grinder (angle grinder);
- Drill.
It is better to buy all the iron not at a metal warehouse, but to find scraps or used ones. You can search at scrap metal collection points.
We will need:
- Gas cylinder 27 or 50 liters;
- 0.7-0.8 m of pipe (profile or regular) for each leg, for all – 2.1-2.4 m;
- Sheet 4 mm 300*300 mm, for the grate (you can weld the grate from 6-8 mm reinforcement, but this will take longer).
Cook-steam-simmer
Archaeologists have long been surprised by the incongruously small size of the fireboxes of ancient Roman culinary ovens compared to the size of the cooking utensils built into them. It was clear that the design was generated by economy; Italy had never been rich in fuel. But how did the Romans boil water using a small bundle of firewood with a heat release of barely 3000 kcal/kg in a cauldron in which a small person could bathe? There is no doubt that they were boiling: many sources indicate that water was continuously boiling in a large cauldron.
Ancient Roman cooking oven with cauldrons
Over time, the secrets of the Roman cauldron oven were revealed. Firstly, smoke tooth 3 (on the left in the figure) in combination with the rise of the semi-circular arch of the woodshed 8 behind it formed the so-called. draft (emphasis on the first syllable) 4 – gas channel of variable cross-section without shut-off valves. The boiler for cooking and stewing 5 in it is simply a cooking vessel built into a cast iron or stone stove 2; There was a burner above the firebox. But the role of hot water boiler 6 is twofold.
Firstly, it represents an aerodynamic obstacle to the flow of gases, and their turbulence behind it creates an invisible gas smoke tooth before lowering into the chimney 7, which further traps the gases in the draft. Then, remember: the water in Roman boilers boiled all the time. The Romans used boiling water sparingly and, having scooped it up, immediately added fresh water.
Boiling requires a large consumption of so-called. latent heat of evaporation, so the gases near the boiler 6, lingering, cool further and their flow rate drops even more. Two clearly demarcated regions are formed: in the draft the thermodynamic process is closer to isothermal, and in the furnace to adiabatic. As a result, the zone of sharp cooling of the flue gases, along the length of the draft, remains above the tooth. In a smooth draft, she would have the opportunity to jump forward, but in this scheme it is excluded by the rise of the arch of the woodshed behind the tooth, immediately behind the tooth there is a visibly distinguishable potential hole.
As a final result, the firebox of Roman kitchen stoves turned out to be exactly the same as a bell-type stove in terms of gas dynamics, with high efficiency and self-regulating: the flue gases circulated in the firebox until they burned out completely. Only part of them passed over the tooth into the draft, carrying exactly as much heat as was needed to support the culinary process.
Nowadays, hot water in jugs is not carried around the rooms, but the Roman cauldron can easily be modified to meet the requirements of modern times, on the right in Fig. An aerodynamic barrier will be created by an oven in place of the hot water boiler, and heat extraction can be assigned to a hot water supply heat exchanger with a storage tank in the chimney lower. By the way, its best design in this case is 2-3 sections of an old cast-iron heating radiator.
Choosing the type of grill
Charcoal grills
You probably cook food at home on the stove and in the oven, and outside the city you have lit a barbecue at least once. So, such food cannot be compared with food cooked on a charcoal grill. What's the difference?
A charcoal grill is a closed fireplace with coals and a barbecue grill, inside of which a special microclimate for cooking is created. The fact is that, in addition to the heat from the coals, the dish is also affected by hot air, the flows of which carry out a convection movement inside the hearth. The second point is the barbecue grill. It absorbs the heat from the coals and transfers it directly to the dish, creating a juice-retaining crust and a beautiful pattern on the meat. And, perhaps, the main advantage of the grill is the special barbecue taste, which is created when fat and juices drain from the meat, fall onto the coals and return back in the form of steam, which saturates the dish and saturates it with new shades of taste.
Sometimes you can see how a charcoal grill is used as a kind of barbecue. The meat is fried on a grill, but without a lid. As a result, instead of convection, the meat is fried only from the heat of the coals from below. Outdoor air constantly cools the grate, preventing it from heating up to full capacity. Cooking this way is more difficult and takes longer, and the dish turns out much drier. Use your charcoal grill correctly and you will be pleased with the results.
Preparatory work
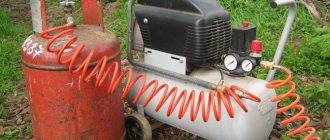
Selecting a gas cylinder
For work, it is better to use a propane tank. It is most suitable for this design due to its dimensions. You can buy a cylinder at any scrap metal collection point, the main thing is that it is intact, without holes or large dents.
It doesn’t matter when the cylinder was produced or when it was tested. Do not pay attention to the uniformity of the paint coating the walls of the container; it will still burn out immediately during the first tests of the stove. The main thing is that rust does not eat through the walls; it is better if they remove the tap before you and release the gas from the cylinder
The main thing is that rust does not eat through the walls; it is better if they remove the tap before you and release the gas from the cylinder.
Gas cylinder
Expert opinion Pavel Kruglov Stove maker with 25 years of experience
You should not purchase a new vessel; it is better to use these funds to purchase sheet metal and other materials. Ask your neighbors and friends if they have an unnecessary cylinder collecting dust, which they will gladly give you as a gift or sell it for a small fee.
Materials and their quantity
It is difficult to indicate the exact quantity of materials. Much depends on the size of the water container or the size of the compartment for stones. Here is a list of the necessary materials, and how many you will need is up to you:
- gas cylinder;
- sheet of metal, 2-3 mm thick;
- if after construction there are pieces of reinforcement or rods left over, you can use them to make a grate and handles for doors;
- for the legs you can use a corner or a profile pipe. If the farm has a piece of large diameter pipe, you can cut a piece 60-70 mm wide, cut it in half and weld it to the cylinder;
- pipe, cross-section 120 mm, length 400 mm for the chimney outlet;
- rod or reinforcement for making a mesh in which we place stones;
- bricks for the foundation of the bathhouse stove.
Do not use mica stones or granite. In the first option, carbon monoxide will be released when heated, and granite will quickly collapse when exposed to high temperatures. It is better to lay the heater with diabase.
Tools
You will need:
- welding machine with hand and eye protection;
- workbench with a vice;
- clothing with long sleeves made of thick material;
- electrodes for welding structural steels. An inexpensive option is ANO-21 or MP-3, with a diameter of 3-4 mm;
- Bulgarian;
- cutting and cleaning discs;
- metalworking tools;
- sandpaper, metal brush.
Consumables
In addition to the cylinder itself, for the construction of the furnace you need to purchase the following cast iron materials:
| No. | Name of material and stove fittings | Unit change | Quantity |
| 1 | Pipe with a diameter of 100 - 150 mm | m | 3 – 4 |
| 2 | Steel corner | m | 4 |
| 3 | Steel sheet | m² | 0,5 |
| 4 | Grate | PC. | 1 |
| 5 | Fire door 180x150 mm | PC. | 1 |
| 6 | Blower door 100x70 mm | PC. | 1 |
| 7 | Asbestos cord | m | 1,5 |
Pipe cauldron stove
The thickness of the metal firebox wall is an important factor that determines the service life of the product. Thick sheet metal will last significantly longer than thin sheet metal.
The powerful wall perfectly accumulates thermal energy and then transfers it to the cauldron with food. Metal heat generators are similar in their properties to cast iron bodies. Metal has only one drawback, compared to cast iron, and that is susceptibility to corrosion. Therefore, it is best to coat the metal surface with a protective compound.
Mobile stoves are needed by people who often travel outdoors. These are hunters, fishermen, fishermen, gas workers, oil workers, geologists, tourists, summer residents (at the beginning of the season it is brought to the country house, and in the fall it is taken away). Of course, there is not a wide variety of materials for mobile options. The list of mobile ovens is limited to metal models.
The main advantage of such a stove will be mobility and durability. Mobile stoves differ from stationary ones in the thickness of their walls. If the system is stationary, the wall thickness is 3 mm, and the mobile structure is made of steel 2 mm thick. There are mobile installations made of powerful hardware.
How to use it correctly?
Before you start cooking, you must first remove the cauldron from the stove and heat the inside of the device using a small portion of firewood. In this way, you can eliminate any remaining odors and check the tightness of the installation of doors and chimneys.
During further operation, observe the following rules:
- when fuel burns, the surface of the container and its legs are completely heated, therefore, to ensure fire safety, the structure must be installed on a thick sheet of metal;
- regularly clean the oven from ash residues;
- use only solid fuel for heating. It is strictly prohibited to pour liquid petroleum products into this model of furnace;
- limit the access of children and animals to the heated device;
- do not place the stove near flammable objects;
- Do not light the stove with flammable liquids;
- such a stove is not suitable for burning household and construction waste;
- it is advisable to use only dry firewood, since when raw wood burns, drops of condensation will form and settle on the working elements of the device;
- equip the stove chimney with a spark arrester in the form of a tin can with a large number of holes made with an awl.
Cooking
Types of stoves for cauldrons
Depending on the material of manufacture:
- metal stoves (factory-made and home-made);
- stationary brick structures.
Brick stoves vary depending on the method of installing the cauldron:
- in classical designs, the cauldron is placed almost completely in a brick recess;
- in modified versions, the cauldron is installed on a specially mounted burner.
Ovens are also divided according to the method of cooking:
- specialized devices only for using the cauldron;
- universal (multifunctional) devices in which food can be cooked using a cauldron and other devices (for example, a grill for frying meat or a portable hot smoker).
The choice of one type of design or another depends on personal preferences.
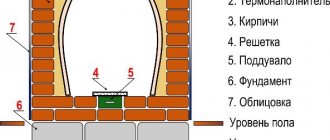
Features of brick stoves
There are two types of schemes for a brick oven - classic and multifunctional or universal.
A classic oven looks like this:
- steel plate for fixing the cauldron;
- metal corners for securing the plate;
- firebox with door;
- blower;
- smoke channels and chimney;
- external walls that frame the entire structure to achieve a better thermal insulation effect.
If we are talking about creating a universal oven, its design has a number of differences:
- plates for fixing cooking utensils;
- for each device (for example, for a cauldron, a grill for frying meat and a smokehouse) its own firebox is created, because it is necessary to achieve maximum efficiency from each surface;
- in order to combine all the created surfaces into one chimney, it is necessary to erect an arch above them, in which the outlet to the chimney will be made.
Tips for use
For obvious reasons, people have lost the culture and skills of using the stove. Improper operation and incorrect handling of the unit in most cases are the cause of premature failure of the cooking device.
When operating the oven:
- Do not forget to clean it from burning in a timely manner.
- Check the functionality of the chimney from time to time.
- Try to keep the temperature at the same level.
- Install in places where the product will not come into contact with moisture.
Do not forget that lighting a stove requires its owner to follow certain rules. Warming up should be done in several stacks spaced apart in time, the door is closed, and after 10-20 minutes the remaining amount of solid fuel is added. The top door can be left slightly open.
Modernization of heating equipment
Any home craftsman can install a homemade atmospheric gas burner for a sauna stove. So, without any special costs, a solid fuel boiler can be converted into a gas boiler .
Equipping an existing solid fuel stove in a sauna with a factory-made gas burner unit will require some adjustment. You will be faced with the need to modify the dimensions of both the burner and the combustion chamber of the wood-burning stove.
Converting a solid fuel sauna stove into a combined gas and wood stove is within your power, but it will require precision and some effort. Do not allow the flame to come into contact with the walls of the firebox
To heat the combustion chamber evenly, the burner should be positioned closer to the bottom of the stove and strictly in the center. It is unacceptable to place the source high and offset in any direction. In this case, the camera will not warm up completely. And the flame from the burner can touch metal parts or the heater of the sauna stove.
The final
I almost forgot about the grate in the grill: you need to attach a grate there that is suitable in size, but so that it is not tightly fixed.
barbecue grill
The insides of the smokehouse are also equipped with a handle and grates: on top and bottom. You can hang chicken carcasses and hams on them. All meshes are made manually with minimal calculations and labor.
grates in the smokehouse
The chimney needs a damper that you can control from below: it regulates the amount of smoke.
damper on smokehouse pipe
Then you should paint the unit with heat-resistant paint so that it is not only useful, but also beautiful, and the neighbors wonder where you bought such a thing.