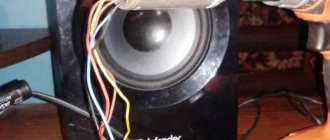
Salute to everyone!) In short, I had a screwdriver, it worked properly for 4 years, it never failed, but then the battery began to run out quickly, it lasted about 5 minutes, then the charger died... The engraver recently caught fire, there are hard-to-reach places on the car that you can’t reach with a screwdriver or a drill , but of course I feel sorry for the money for this crap)) I disassembled the screwdriver, pulled out the motor with the regulator and the cartridge, brought out the wires. Powered it from the power supply from the computer. I made the case out of 2 covers from the ax)))) well, whatever was at hand was into action))) the case turned out to be surprisingly very good, it fits perfectly in the hand! in principle I’m happy)
Comments 44
There are not enough revolutions
Yes, it’s not enough, but somewhere there’s enough to sharpen or clean up something
A friend of mine has a more advanced one - a suitcase from a photo enlarger - there is a power supply - the shurik itself is screwed through a clamp to the tripod - the handle responsible for its movement up and down has been slightly modified - it looks like a drilling machine
Make a lantern from the body
+1! I have one too, but at 48 V, what can I make a power supply out of?
From power supplies of communication equipment, to you to signalmen
I don’t know what kind of power supply you have, but I was at the dacha, the battery on the Shurik died, well, I think I’m smart, I took out the standard battery from the car, the wires and everything was turned, and the torque decreased by 50 percent
The power supply from the computer is 250 watts, all the pluses are paralleled, at the end there is an incandescent lamp, everything is simple)
I don’t know what kind of power supply you have, but I was at the dacha, the battery on the Shurik died, well, I think I’m smart, I took out the standard battery from the car, the wires and everything was turned, and the torque decreased by 50 percent
+1 I use it too!
Not bad) If you don’t use the Ax, you can use the money you save to buy a Chinese device)
with the Chinese it is 50/50 that they will send a worker! mine worked for 15 minutes and died! (((
Not bad) If you don’t use the Ax, you can use the money you save to buy a Chinese device)
stink but turn))
you have to wash so as not to stink)
Everything is correct! Why should the necessary tool lie in vain, use it!;))
It's more like an electric screwdriver. Just don't break your hands with it.
It looked more like an electric screwdriver. The drill has a speed of up to 30,000 per minute.
I also had similar thoughts recently, Shurik is lying idle! =)
brilliant) ALSO THERE IS AN OLD SHURIK, the battery is already dead. We should probably stir up something like this. Well done!
brain! +100 for the caps!
I personally at one time bought a 12 W screwdriver. For three or four years now it has been riding in the car like a simple drill from the on-board network. But as a bur machine or engraver, I can accurately tell the revolutions are very low. But there were several cases in the forest when, without a drill, it was just an ambush, and I was right there with such a tool. With the drill you need to carry an extension cord and a small set of drills and taps. It helps out very well, especially when away from people. And in the home garage there are places where you can only get to such a tool. It is especially convenient to drill out creases. The revolutions are low, you can feel it well when the drill goes to the side and you can always make corrections. What is important is reverse.
Read also: Operating principle of a rotary lathe
Hello! Some small and delicate projects are impossible to drill with a machine, but not everyone can afford to buy one for amateur crafts. In this article I will tell you how to make a drill attachment for a screwdriver from scrap materials and I will be pleased if my idea is useful to you.
Materials and tools:
– 2 bearings from spinning reels – valve from a truck wheel chamber – screws for a nut 10 – cap nut 10 – bicycle brake cable – plastic hot water pipe 20 – screwdriver – metal hacksaw – needle file – soldering iron
And so, let's start with the most complex mechanism of this device, namely the tip.
For it we need two bearings from spinning reels. I saw similar bearings for sale in a radio parts store. I didn’t buy them because I had broken coils in stock.
Hand generator
To create an alternating current generator from a broken screwdriver, keep in mind that the motor and gearbox must be in working condition. Such a device is suitable as an alternative power source when traveling outdoors or during an unscheduled power outage.
From a screwdriver with an operating voltage of 18 volts or more, with a gearbox torque of 150 rpm, you can get 6-8 V. This is enough to recharge a mobile phone or a flashlight with a USB port.
Electric generator from a motor with a USB connector
In order to make an electric generator from an old screwdriver you need:
- disconnect the battery and disassemble the case;
- disconnect the button and the power element from the motor so that they do not interfere with the transmission of current;
- solder a parallel diode bridge in their place;
- the diode bridge must have a 220 mF electrolytic capacitor and Schottky diodes;
- at the other end of the diode bridge it is recommended to solder a USB port, which will be used as a charging connector;
Example of a handle for a generator
- make a handle from any convenient L-shaped part and insert it into the cartridge.
In some cases, you can do without soldering. To do this you need:
- connect two wires with alligator clips to the terminals inside the housing;
- Observing the correct polarity, supply power to the light bulb or USB port.
This method is simpler to implement, but it increases the likelihood of damaging the device that will be charged from it, and also reduces the efficiency of such a homemade product.
This video shows an example of assembling a generator from an old screwdriver
Complete analogue of the factory “Dremel”
The original housing is also made independently in such a way that the engine is tightly fixed inside, while leaving a gap or an open part in the heating area.
The body of the mini-drill can be any plastic tube.
There are models that used a tube of sealant, a syringe, a plastic tube of toothpaste or children's candy.
A piece of plumbing plastic pipe cut to the required length will also work, but in this case the open ends will need to be sealed with some kind of movable “plug”, for example, acrylic or cut out of plastic.
The resulting tool is a universal option; Depending on the type of repair, various attachments are fixed with such a clamping chuck: drills, cutters, discs with a cutting edge or screwdriver heads.
Bulgarian
If you don’t have a grinder or an angle grinder, you can replace it with a screwdriver or drill. To do this, you need a special nozzle or adapter with a gearbox. Using a stud, nuts and washers whose diameter fits the screwdriver chuck, you can make a homemade attachment or purchase a ready-made one at a hardware store.
The speed of a drill or screwdriver is often lower than that of an angle grinder, and they also do not have special protection. Therefore, this craft can only be used as a one-time option and solely at your own peril and risk, since it is dangerous.
Why do you need a drill stand?
The stand allows you to easily perform various tasks such as angle or perpendicular drilling with a hand drill. It is also adjustable so you can drill holes at precise points in gradual increments.
They can hold tools horizontally so you can sand different shaped workpieces, sand different sized pieces of metal, or polish metal objects with different shapes and aspects. They offer telescopic adjustment to provide different drilling heights and allow you to work with a variety of power tools. You can change the angle of the tool holder clamp, turning it easily while still locking firmly when needed to ensure accuracy. You must have one if you want your workstation to have a good maximum height to accommodate a variety of tools.
Lawn trimmer
To cut the grass on your property, you can make a homemade trimmer or lawn mower from an old screwdriver. To do this, you need to prepare the following materials:
- a piece of plastic or aluminum pipe 1.8-2 m long, which will be used as a handle;
- fasteners (bolts with nuts or clamps);
- motor from an electric drill (screwdriver);
- wires;
- stub;
- battery;
- adapter for a pipe with a diameter of 40-50 mm;
- button;
- plastic bucket or galvanized sheet;
- clothespin clips or alligator clips;
- blade of a stationery knife.
An example of a homemade trimmer attachment with wire
To make a homemade trimmer for home use you need:
- disassemble the body of the old screwdriver and remove the motor from it;
- Markings for fastenings must be made on the plug;
- drill holes using a drill and install the motor in them, attaching it to the screws;
- solder power leads to the motor;
- bring the wires through the pipe, and at its end make a hole for the button to which you want to connect the wires.
- on the motor side, make several holes in the pipe;
- secure a cut plastic bucket or a cut and bent galvanized sheet in them.
Trimmer from a motor from a screwdriver
To power the trimmer, you should use the battery from the screwdriver from which the motor was removed. To secure the battery to the pipe you need:
- cut off the battery connector from the screwdriver body;
- bring the wires to the outputs on the connector terminals;
- secure it to the end of the pipe with screws.
For the cutting attachment you will need:
- 2 bolts and nuts M4-M8;
- a screw that will fit into the cartridge;
- 2 nuts and washers of the same diameter as the screw;
- 2 metal plates (strong tin lids can be used).
Trimmer attachment for a screwdriver
To make knives for a homemade trimmer you need:
- make holes for bolts in the stationery blades;
- drill 3 holes in the metal plates: one in the center for the screw and two on the sides for attaching the knives;
- insert the knives between the plates and secure them with bolts;
- secure the screw to the homemade nozzle.
Using a working electric drill, you can make a collapsible homemade trimmer, for which you do not have to do any soldering. For this you will need:
- clamps;
- protection made of galvanized steel or a plastic bucket;
- a hollow pipe of small diameter for the handle;
- homemade or purchased nozzle with blades.
An example of a collapsible trimmer from a drill
To make a homemade collapsible trimmer you need:
- make indentations on the pipe with which the drill will be attached;
- remove the handle from the drill and attach a protective casing made of a bucket or galvanized sheet in its place;
- secure the network cable to the pipe with tape or clamps;
- If the drill does not have a function for automatically holding the button in active mode, then it can be fixed in the same way as the wire.
Important: such modification of a drill or screwdriver cannot serve as a high-quality and permanent replacement for the factory trimmer, and is also hazardous. Therefore, you should adhere to safety precautions and use this device only as a last resort.
Do-it-yourself drill: making a homemade drill for small jobs – Metal Profi
- AliExpress
- Screwdrivers
- Tools
Greetings. Today I want to tell you how I made a drill with my own hands for “three kopecks”, and at the same time it was effective and practical. I hope my solutions will be useful to someone else.
As a former builder and decorator, I have a lot of different power tools at home. However, when you do all sorts of desktop handmade things, sooner or later you realize that it’s time to buy something like a Dremel. And since I’ve already set out on the path of home-making, I decided to make the stray stuff myself.
In general, I purchased a cordless Dremel 1100-25 Stylus Hobby as a donor - without a charging station, without a cartridge, with half-dead batteries. But I liked it so much that it became a pity to ruin it, so I want to restore it (I’ll report on that later).
To solve the problem, the following was ordered from Ali: • a motor, • a cartridge for the shaft with a set of collets, • several connectors. The products arrived in Ukraine in 20 days with free delivery and were packaged in polyethylene foam. Everything else was scraped together.
I caught my eye on the 12 volt motor "high quality DC3-12V large torque motor super model high speed motor". Now this model is not available from the seller, but at the time of purchase the product cost me 197 rubles and kopecks.
A similar unit is installed on the original Dremel, only it is about a centimeter longer (it has an impeller installed in the body for cooling). In appearance, the motor is nice and of high quality. It is compact in size, here are its actual dimensions: length - about 40 mm, diameter - 27.4 mm, shaft diameter - 2.3 mm, length of the open part of the shaft - almost 13 mm.
Additional photos
Here are the performance specifications from the product page: • Voltage range: 3.0-12V • Rated voltage: 9V • No-load speed: 20160 • No-load current: 680mA • Maximum current: 3.8A • Rated torque: g.
cm • Rated power: 20 W • Starting torque: 1000 g. For cm Looking ahead, I will say that the motor turned out to be really playful and powerful.
I ordered a collet chuck from the same seller, fortunately, at that time he also had a quite humane price tag - 194 rubles (the link to the product now shows page 404).
For some reason, the cartridge did not indicate what shaft diameter it was suitable for, but after reading the comments, I realized that the product would fit well on a motor. The set arrived in a neat box and a spare parts bag, which, in addition to the cartridge, contained 5 collets with a working diameter of 0.5 to 3 mm, as well as an hex key.
Additional photos
Everything is of very high quality, the cartridge is attached with two barrels. The cartridge sat very tightly on the shaft, without any doping or play. Tests have shown that there are no beats at all, literally at all. By the way, the shaft is completely inserted into the chuck, so the lateral load is minimal. The cartridge also qualitatively clamped two collets from another manufacturer.
Since the voltage range is quite wide, I tried several options available. The power supply from the television antenna (12 volts, 100 mA) and from the telephone (5 volts, 800 mA) predictably did not start the motor. Also, the 9-volt transformer TP-30-2 from the VEGA radio (0.7 A) did not work.
But the computer power supply with its 16-20 amperes turns the motor with a bang. Lines tested at 3.3 volts, as well as 5 and 12 volts. Using these three outputs as needed, I resolved the issue regarding speed control, although I was thinking about more elegant solutions using special boards.
Also (for a crossword puzzle) the engine was powered by one 18650 battery and two - the flight is normal, you can safely make an autonomous model if you choose a suitable housing. My casing was only 12-15 mm too short to fit the battery inside without major modifications.
I was considering the case of a Rickson roll-on deodorant, but my neighbor promptly fitted a box that was ideal in size, which is a device for producing soap bubbles. The engine enters it with gaps, but closer to the bottom it literally becomes a surprise.
That’s why the motor was placed that way, and the “stiffening ribs” turned out to be very convenient for a reliable grip. I cut the hole for the shaft with a margin to get some ventilation from the front part. In addition, in order to somehow remove the heat, I used a six-piece drill to make holes in the body - a lot near the body of the motor and a few above.
Additional photos
I found a button in the garage and deliberately used a large one to make it more reliable and not miss the mark. I placed it at the end so it wouldn’t get in the way while working. Based on the 12-volt Proxxon Micromot 50/EF drill, I came up with the idea of installing a “spiral” power cable, which is less in the way and is more flexible.
I found one like this on the farm - from an old Philips electric razor. I didn’t make it removable, I soldered it directly to the engine, although for greater ergonomics it was possible to move the button a little to the side and attach a “female” type socket to the end. I chose the connectors based on reliability, but they also fit well into the green color ensemble. I recommend.
They are neat and practical, the contact is tight.
I bought it in real life, but there are also such products on Ali, they are inexpensive - as an option: aliexpress.com/item/10-Pcs-CCTV-Cameras-2-1mm-x-5-5mm-Male-DC-Power-Plug- Adapter-DC-Power/32598414355.html (1.7 USD for 10 pieces).
The entire assembly consisted of unsoldering the button, connecting the cord and installing the connectors. And from the inside, the motor in the housing was slightly fixed with hot-melt adhesive nozzles so that when drilling it would not go inside.
For hanging storage (it has now taken pride of place next to my work desk), I attached a bracket made of 2.5 mm hard copper wire to the Dremel through the ventilation holes, which, if necessary, can be easily detached from the case. The car turned out to be very compact, but powerful.
Additional photos
I tried to process a piece of thermoplastic polypropylene pipe. The machine performed excellently on this viscous material. Manipulations with metal and wood are no problem at all.
Additional photos
1. It took about an hour and a half to create the drill, including “design”, smoking breaks and photographing. 2. Only 400 Russian rubles were spent on the creation of the instrument itself.
A used computer power supply was purchased on the market of the city of Slavyansk, Donetsk region for 150 Ukrainian hryvnia; I will also use it to power LED strips and dead cordless screwdrivers. Plus I used a little small things. 3.
Torque and rotation speed (adjustable) are more than enough. 4. Ideal ergonomics “to suit you”. 5. Pleasure from the process of creation.
And who cares where the hands come from if they are golden!
Planning to buy +91 Add to favorites Liked review +87 +191
Do-it-yourself accessories for a hand drill, drawings. A simple homemade drill (from junk)
Many home craftsmen are interested in the question of whether a drill can be made with their own hands. Solving this problem is not difficult, and the finished home-made device, despite the simplicity of its design, will be distinguished by fairly high efficiency and functionality.
A homemade drill will not cost much and will not cause any problems during manufacture. It will be useful in many situations, including when performing such technological operations as:
- drilling;
- drilling holes;
- processing of grooves and recesses of various configurations;
- engraving;
- polishing;
- cutting of plastic products;
- cutting non-ferrous sheet metal (aluminum, brass, bronze, etc.) up to 1.5 mm thick.
The drill, made according to the instructions below, is distinguished by its compact dimensions, light weight and ease of use.
Such a device, made by hand at home, is equally successfully used to perform small and quite serious work with products made of various materials - metal, wood, plastic, bone, etc.
Such a drill is very useful in jewelry making, when repairing small items for various purposes, manufacturing and repairing electrical devices, and in many other situations.
What you will need
How to make a drill with your own hands? You can use various options for its design. As the main working element of such a device, it is very convenient to use attachments that were supplied with old-style dental drills.
Such an attachment, as a rule, is initially mounted on a flexible shaft, from which it must be removed by unscrewing its spring. From the bottom of the dismantled drill attachment, you need to cut off a not too wide ring, which will act as a nut used to fix the entire device on the plate.
In addition, by cutting off such a ring, you will free the end of the shaft on which the gear will be mounted.
On the engraver attachments, made by yourself in the proposed design, you can install various types of replaceable tool holders. Such holders, in particular, can be:
- straight;
- with a lateral arrangement of the tool;
- with a curved working head.
More universal are direct type holders, which are used in 90% of cases. In situations where the location of the element being processed does not allow the use of straight holders, they turn to curved type nozzles with a side-mounted tool.
When choosing working attachments from an old drill to equip your homemade engraver, keep in mind that they can only be used in conjunction with a tool whose shank diameter is 2.35 mm.
At the same time, tools intended for installation in straight-type holders are distinguished by an elongated shank.
The shanks of burs installed in corner holders are shorter and have a special groove (slot).
Using homemade attachments for an engraver from an old drill has a number of advantages. The main one is that you can purchase such a drill for very little money, since such devices are practically no longer used in modern dentistry. Finding and buying tools to equip such attachments is also not a problem.
Assembling a homemade device
In order to be able to use an attachment from an old drill to perform minor work on items made of metal, plastic, wood and bone, it is necessary to make a device with which such an attachment will be driven by a small electric motor of the required power. As a drive motor for a homemade drill, you can use a small, but resourceful and powerful motor from an ordinary hair dryer or an old VCR.
Engraver
In order to make an engraver (drill) from a screwdriver without a battery or with a battery, you can use a special adapter, which is sold in a hardware store. You will also need a bit, the diameter of which must match the hole in the adapter.
To make an engraver from an old screwdriver with a working motor you will need:
- disassemble the screwdriver body and remove all the insides from it.
- remove the gearbox from the motor so as not to damage the shaft;
- attach the bit attachment to the shaft.
To protect your hand from the current that can “hit” the motor, you can wrap it with electrical tape or make a protective casing made of rubber (silicone).
Engraver from a motor from an old screwdriver
From an electric toothbrush
An interesting option is a mini drill that can be repurposed from an outdated electric toothbrush.
The motor and gearbox installed in it are capable of transmitting sufficient torque to drill a hole in thin metal, plastics or computer boards.
The main thing that is required from the master is to replace the cleaning head on the shaft with the same engraving or collet chuck. Before purchasing a cartridge, it is important to determine the diameter of the shaft so that the cartridge is securely fixed on it - sometimes this will require filing down the mounting screws.
Reference! Many brushes, including older models, are already equipped with a rotation speed controller and are sold complete with a battery pack.
Garden shredder
Using a drill, you can make a shredder for small wooden debris, such as branches or wood chips, the diameter of which does not exceed 10 mm, as well as for grass. In order to assemble such a homemade product from a screwdriver or drill with your own hands, you will need:
- screwdriver or drill with a power of up to 0.5 kW;
- a threaded shaft that will fit into the cartridge;
- blades (for example, a hacksaw blade);
- a large bucket, pan or boiling pot as a container for branches; it should not be made of plastic.
The cutting part of a homemade garden shredder
To make a garden shredder from a screwdriver you need:
- Drill a hole of the required diameter in the center of the selected container for the shaft.
- Place the container on the work surface. To do this, you can fix it on the edge of the table or build a special frame from a metal corner.
- secure the knives to the machine shaft using bolts and washers (for better performance, it is recommended to install the blades with the sharpening point down);
- fasten a drill or screwdriver under the bottom of the container so that the hole in the chuck coincides with the shaft, and the electrical device itself does not begin to rotate around its axis during operation.
- make a 10x20 cm cutout and insert a plastic or metal sleeve into it to remove recycled waste from the container.
Example of a garden shredder made from a drill
Tips for using an electric screwdriver
volt power supply is assembled, the screwdriver becomes mains-powered. It must be used according to the rules:
- every 20 minutes of work, take a break for 3-5 minutes to allow the block element to cool down;
- If you operate an external unit, make sure it is clean. It should not be dusty or dirty. This will cause the device to heat up faster and work less efficiently;
- the updated tool cannot be used at a height of more than 200 centimeters;
- equip the element with a residual current device. If there are problems with the network, the RCD will save the equipment from breakdown;
- All wires must be securely soldered.
DIY switching power supply for a screwdriver
A suitable microcircuit is selected for the pulse unit, and assembly is carried out in the following sequence:
Diode bridges and a thermistor are placed at the input. Two capacitors are installed. Drivers are used to synchronize the operation of the gates of field-effect transistors. When installing transistors, the flanges are not short-circuited. They are attached to the radiator using insulating washers and gaskets. Diodes are installed at the output.
Wind generator
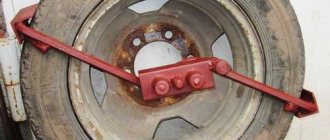
Wind and manual generators work on the same principle, but in a windmill the axis rotates using blades. In order to make such a device you need:
- disassemble the old screwdriver and disconnect the button with the power element from the motor;
- find an axis with a thread that will fit the diameter of the cartridge;
- attach a metal plate no more than 1 mm thick to its end;
- cut 2 plastic pipes lengthwise into equal halves;
- attach homemade blades to the plate using bolts;
- place the clamping clamp on the shaft between the gearbox and the chuck;
- secure the entire structure to a sheet of plywood or thin board;
Wind generator from a motor from a drill
To protect the motor from moisture, the generator mechanism should be placed in a container made of plastic or aluminum. This device can be used as a charger for a mobile phone when going outdoors, if you attach a battery or USB port to the wires. Also, such a wind generator can be installed as a weather vane, so that in the event of an unscheduled power outage, a power source is always available.
Wind generator made from a screwdriver
From an old tape recorder
Another basis for a mini-drill can be the electric motor of a well-worn player or tape recorder that rotates a CD disc. The standard motor of such devices runs on 6V voltage, so you may need to additionally purchase a portable power supply or build a mount for a battery or battery.
Using two soldered wires, the power unit (via a switch button or without it) is attached to the motor and fixed with tape or glue in a homemade tube-shaped housing. After this, the same collet chuck is attached to the shaft, which holds the drill.
Important! To avoid “figure eights” and vibration of the drill, the diameter of the collet hole must correspond as closely as possible to the size of the engine shaft, usually 1.5 - 2.3 mm, and sit tightly on it.
Bench Drilling Machine
To turn a drill into a tabletop drilling machine, you can purchase a factory mount, which is sold in hardware stores. It is made in such a way that the tool just needs to be inserted into the connector and screwed on.
To make a drilling machine from an old drill or screwdriver you need:
- disassemble the screwdriver body and pull out all the insides;
- make 2 clamps with different hole diameters: one will be attached to the motor itself, and the second to the gearbox. The clamps must have an additional small hole in their body into which fluoroplastic bushings must be placed.
- insert a guide rod with a diameter of 10-12 mm made of metal into the bushings. You can use a part from an old printer for it;
- drill 2 holes on the clamps on the left and right;
- fix metal tubes with an axis inside them;
- make 2 bosses from caprolon, in which you need to drill a hole, but not in the center, but with a slight offset to the side to create eccentrics;
- Using another clamp and a threaded rod, the bosses are attached to the main supporting rod and installed in such a position that the backlash minimizes the backlash of the shaft.
Example of fastening a screwdriver
To make a handle you need:
- take wooden blocks: 1 long (30-40 cm) and 1 short (10-15 cm). at one end of the large strip it is necessary to make an overlay from a piece of wood;
- drill a hole on this edge of the handle, the diameter of which will coincide with the sleeve on which the bosses are attached.
- drill another hole at a distance of 10 cm from this hole;
- make 2 holes in the short part along the edges. Using the first one, you need to secure 2 bars together so that the connection is movable. The second hole is required for mounting the short part onto the clamp attached to the gearbox.
- make a spring mechanism from a metal corner onto which 2 short bolts are welded.
Example of fastenings for a working metal structure
- secure it to the bottom of the clamp with the same fastening that secured the limiting post;
- put the springs in loops on the screws, which must be screwed into the long part of the handle between the edge and the lock of the short part;
- assemble a holding stand for the entire machine. It can be made from wooden blocks or welded metal corners together.
The idea of this homemade product is suitable for those who do not have the funds for a full-fledged machine, but there is a need for such a device. With this design it will not be possible to drill metal parts, since there will not be enough rigidity and the applied weight. This machine is suitable for woodworking or drilling thick layers of paper (for embedding diplomas and homemade books).
Power supply for a screwdriver: preparation for conversion
Experienced repairmen advise placing the power supply for the screwdriver inside the product. This way, dust, dirt, and liquids will not get on it, which means the element will last longer. At this stage you need to open the collapsible housing. To open, take a penknife and go along the seam.
open the screwdriver to install the power supply. Run it along the connecting seams to loosen the fastenings
- to understand where to place the power supply;
- find out what voltage you will be working with (there is a marking inside, usually 12-18 volts );
- determine the installation method.
At this stage, you should think about what you will use to create a new power supply.
Electric car or children's catamaran
To create an electric car for children you need:
- make a frame (frame) from a metal profile or PVC pipes. They need to be assembled together so that you get a small car or a tricycle;
- as an axle for the wheels, you can use a metal pipe or rod, on which you need to attach a large sprocket;
- on the frame under the seat, make fastenings for a screwdriver with a battery and a shaft with a small gear;
- put the chain on the sprockets;
In order for a car to brake, you need to make a gas pedal or handle. The first part can be constructed from a rod with springs, to one end of which a pedal will be attached, and to the second a metal part that will press on the button. This design requires welding skills and a lot of time.
Car made from a screwdriver
To make the job easier, the throttle handle can be made from a set of bicycle rim brakes. To do this, you will need to take a part of a bicycle fork that has mounts for the brakes or make an analogue of them yourself from a metal rod of the required diameter.
A children's catamaran is made according to a similar principle, but its assembly requires PVC pipes. Since the movement of the gears is provided by the motor from the screwdriver or the tool itself, additional protection should be provided for it from water ingress. If the structure is made from a broken screwdriver, then the gas button can be removed with separate wires through pipes, and only its motor can be used as a motor.
An example of a catamaran design made from pipes for children
Important! The motor of a drill or screwdriver is not designed for heavy loads, so this electric vehicle is designed only for light passengers. Also, from prolonged use in this mode, the screwdriver can quickly break.
Cordless screwdriver: understanding the design
Structurally, the cordless screwdriver consists of the following elements:
A screwdriver with a power supply will become an indispensable assistant for the homeowner. While a screwdriver unscrews one screw, a power tool can handle ten
- motor;
- batteries;
- start key;
- regulator;
- gearbox;
- a lever that changes the direction of movement of the device;
- charging.
Why convert a wireless device to a wired one? The batteries inside the unit last a limited amount of time (about a year with constant use). Changing batteries is an expensive undertaking (one battery will cost at least a thousand rubles and is not guaranteed to last long).
After only 3-4 months of use, the battery begins to quickly run out. Then the device needs to be constantly recharged, which, at a minimum, annoys the owner.
Do-it-yourself charging for an 18-volt screwdriver
make an 18- volt according to the scheme described above. If the original block is in good condition, you can use it for remodeling. If not, you can use the power supply from your laptop as a basis. It produces just the right 18 volts .
You can make a unit according to a scheme often found on the Internet. This modification allows you to speed up battery charging time. According to the circuit, current flows into the battery, and control is carried out using a transistor. It affects the indicator readings. Then the current decreases as it charges, and the LED goes out.
As you can see, the device is far from the most complex. Any master can improve the charging unit for his screwdriver. This way you will make the charger more reliable, with the ability to quickly recharge batteries.
Flashlight
From an old broken cordless screwdriver you can make a powerful flashlight that runs on battery power. To create this homemade product you need:
- disassemble the drill body and remove the motor, gearbox and chuck from it;
- instead, an LED lamp of the appropriate size with a power of 5-12 W must be installed in the groove. For this you may need a G 5.3 cartridge.
Due to the battery capacity, such a flashlight can work for a long time and is well suited for those who experience frequent power outages.
Preparing tools and materials
The following tools were used in working on the drilling machine:
- Cordless drill and bits.
- Miter saw.
- Hand saw.
- Electric jigsaw.
List of materials:
- Boards 2.5x8.0 cm, length 48 cm.
- Boards 5.0x8.0 cm, length 42 cm.
- Boards 2.0x10.0 cm, length 15 cm.
- Plywood 0.9 cm thick.
- Wood glue.
- Self-tapping screws 80 mm.
- Screws 60 mm.
- Screws 50 mm.
- Hex bolt 60 mm.
- Steel spring.
Circular Saw
From an old screwdriver or drill you can make a homemade machine with a circular saw. To do this you need:
- make a stable frame from a metal profile or pipes.
- take a sheet of plywood or chipboard with a flat surface for attaching a screwdriver;
- make a cut in the center of the sheet in which the cutting wheel will rotate;
- secure the screwdriver to the work surface using clamps;
- A sheet of plywood is securely fastened to the frame. All parts must have no play, as this will cause the structure to begin to loosen, and vibration can break the fasteners, which will lead to damage to the machine or injury.
Example of a small circular saw from a drill
The reel is in motion!
Another original way to make a mini drill at home is using a fishing rod reel. In this case, the assembly technology is quite simple, but the principle of operation itself will be based on mechanical rotation, you will get a mini-hand drill
To make a device with your own hands you will need:
- spinning reel;
- a chuck from an old drill or a collet clamp of a suitable size;
- hot glue or cold welding;
- drill.
Bor machine from an old unnecessary screwdriver!!!!
The assembly process is quite simple and consists of only two steps. The first step is to dismantle the spool with fishing line and cut off the remaining extra axis. After this, the cartridge is glued to the remaining rod. You can do without a chuck and install a collet instead. When the glue has hardened, you can check the finished mini drill. You can see all the assembly details in this video example:
Sharpening machine
To make a grinding or sharpening machine from a screwdriver you will need:
- cleats or other reliable fastening;
- gear unit from a grinder or sharpening machine;
- attachment for grinding or sharpening, which can be installed in an angle grinder chuck.
In order to assemble such a structure you need:
- connect the gear unit and the screwdriver using a shaft;
- secure all parts so that there is no play during operation;
- Place the grinding attachment in the angle grinder chuck and you can start working.
Drill sharpening machine
Second life for an old tape recorder
So, in order to make a mini drill from a motor yourself at home, you must follow these steps:
- Solder two flexible wires to the contacts of the device, as shown in the photo.
- Install a drill of a suitable size into the collet.
- 3. Place the finished nozzle on the motor shaft and secure the cartridge with screws. Please note that the collet hole must ideally fit the shaft diameter, which is usually 1.5 or 2.3 mm. Otherwise, it will be difficult for you to remove vibration when operating a homemade small drill. If the hole in the collet chuck turns out to be larger than the motor shaft, then you can try wrapping several layers of tape, thick paper, polyethylene or other material. This will compensate for the gap and reduce vibration.
- Carefully tighten all 4 bolts on the nozzle, then connect the wires to the power source and test the finished homemade product. For ease of use, it is advisable to add a button or switch to the power supply.
READ Adjusting the Carburetor of a Husqvarna 55 Chainsaw with Your Own Hands
That's all the technology for assembling a device with your own hands. As you can see, making a microdrill from a motor is not at all difficult, even for a novice electrician. The only drawback of this device is the low strength of the thin drill. If you drill holes that are not at right angles, it will break immediately, so be careful and buy a few drills in reserve for practice.
A very important point that you should know about is that to make the drill spin in the other direction, just swap the wires! You can watch an interesting video instruction on how to make a simple drill below:
Replacement for various household appliances
A screwdriver in the household can replace a large number of different devices:
- If you attach the mixer attachment to the chuck, you can beat the desired products (eggs, dough) at low speeds.
- There are special brushes made of metal or plastic on sale, which, when installed, can quickly clean surfaces from rust or old dirt.
- If you purchase a round Velcro attachment, you can glue an ordinary kitchen sponge onto it, which you can use to polish a bathroom or tile.
Velcro attachment with a set of sponges
- A special attachment will help you sharpen pencils quickly and on an industrial scale.
- When installing a small drill using a screwdriver or drill, you can make holes in the soil for garden plants.
- There are attachments on sale that make a construction mixer out of a regular drill. The power of this device will be noticeably less, but it is suitable for small jobs.
Mixer attachment for drill
How to make a drill with your own hands: assembly instructions and video
Many home craftsmen are interested in the question of whether a drill can be made with their own hands. Solving this problem is not difficult, and the finished home-made device, despite the simplicity of its design, will be distinguished by fairly high efficiency and functionality.
Homemade drill based on a small-sized electric motor
A homemade drill will not cost much and will not cause any problems during manufacture. It will be useful in many situations, including when performing such technological operations as:
- drilling;
- drilling holes;
- processing of grooves and recesses of various configurations;
- engraving;
- polishing;
- cutting of plastic products;
- cutting non-ferrous sheet metal (aluminum, brass, bronze, etc.) up to 1.5 mm thick.
Grinding a metal part with a drill
The drill, made according to the instructions below, is distinguished by its compact dimensions, light weight and ease of use.
Such a device, made by hand at home, is equally successfully used to perform small and quite serious work with products made of various materials - metal, wood, plastic, bone, etc.
Such a drill is very useful in jewelry making, when repairing small items for various purposes, manufacturing and repairing electrical devices, and in many other situations.
Communities › DIY › Blog › Do-it-yourself drill or engraver
Salute to everyone!) In short, I had a screwdriver, it worked properly for 4 years, it never failed, but then the battery began to run out quickly, it lasted about 5 minutes, then the charger died... the engraver recently caught fire, there are hard-to-reach places on the car that you can’t reach with a screwdriver or a drill , but of course I feel sorry for the money for this crap))
I disassembled the screwdriver, pulled out the motor with the regulator and the pronto, brought out the wires. Powered it from the power supply from the computer. The case was made from 2 covers from the Ax)))) well, whatever was at hand was the main thing))) the case turned out to be surprisingly very good , fits perfectly in the hand! Overall I’m happy)
Power Supply Options
Any screwdriver requires much less voltage than a regular socket produces. Therefore, for recharge you will definitely need a special converter, the output of which will produce the required voltage. All power sources are divided into two large groups: pulse and transformer. Let's consider each of them separately.
Reworking a Chinese-made power supply
excellent for creating a power supply for 12- volt screwdriver with your own hands. But since the tools use less voltage, you need to lower it first.
To achieve the goal, you need to replace the original resistor R10 with an adjustable resistor, with which you can achieve the desired voltage. This is done in several stages:
- the permanent resistor is removed;
- in its place a pre-prepared adjustable resistor is inserted, on which a resistance of 2300 Ohms will be set;
- so far the voltage is still 24 V;
- Using the resistor settings, you need to achieve the required voltage at the contacts.
After all the manipulations, you need to check that the output voltage is the required value (12 V, 14 V, etc.), and also that the current exceeds 9 A.
Computer power supplies are distinguished by durability, advanced overload protection and many other advantages. They may not be very convenient due to their size, but a long wire will help solve this problem.
Procedure for connecting a computer power supply to a screwdriver:
- disassemble the block;
- remove the power-on protection by disconnecting the green wire from the board;
- this wire must be connected to the black connector on the device;
- separate all wires except yellow and black;
- these two wires are soldered to the extension cable;
- the second end of the cable is directly connected to the screwdriver;
- All open contacts are isolated if possible.
Thus, from a computer device you will get a power supply for a 14 volt .
Manufacturing Features
The procedure for making a drilling machine with your own hands is not complicated, but you must take into account the advice of the experts:
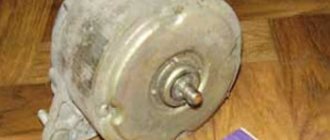
for a small drilling machine it is better to choose an asynchronous motor from an old washing machine; to install a sufficiently powerful engine, you will need a more durable and as stable base as possible; During the design and assembly of the installation, it is important to place the engine closer to the rack, which will reduce the vibration level; the connection using hexagons should be as strong and reliable as possible to increase the wear resistance of the unit.
This machine is more difficult to assemble even with an accessible circuit, but its main advantage remains increased power, which is suitable for processing different surfaces.