Connoisseurs of classic barbecue are sure that for fun outdoor gatherings it is worth building a gas grill with your own hands, without overpaying for the finished product. This simple design will allow you to cook your favorite grilled dishes at any time of the year, and you can install it both in the gazebo and on the terrace or balcony.
Today, purchasing a gas grill for a barbecue is not a problem, but if you want to get a truly reliable design and save on buying a finished product, you can build a gas grill yourself. Let's figure out what this requires.
Types of gas grills
Depending on the purpose of using the grill, its size may vary. Thus, to prepare dishes from small or large pieces of meat, different designs will be used, each with its own manufacturing features.
Grill from an old gas stove. To prepare kebabs, sausages and small steaks in the kitchen, it is enough to build the simplest option. The heater is a home gas stove, on which an old saucepan with the bottom cut off is installed. A stainless steel grill or mesh is attached to the top of the pan.
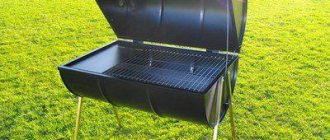
When building a gas barbecue with your own hands, you can save on materials by using an old receiver or a metal barrel as a body
Mobile grill with separate burner . This option is ideal for preparing large portions of steaks or homemade sausages. Since it is unlikely that a “royal” portion of barbecue can be prepared in the kitchen, you will need to build a mobile structure with the ability to connect to a gas cylinder.
, DIY gas grill , and involves installing a lid, a temperature regulator, and a massive grill.
It’s not difficult to build a grill from an old gas stove, but in this case all “outdoor gatherings” will be limited to barbecuing in the kitchen. The ideal option is to make a mobile grill with a separate gas burner, which can be installed in any corner of the yard.
For convenient transportation of a homemade grill, it is recommended to install two metal wheels, and equip the remaining two legs with support platforms
In the article we will look at both methods, which will allow you to familiarize yourself with the construction features of two different gas grill designs and choose the appropriate option for yourself.
Required design components
Regardless of the structure of the structure, the classic gas version has unchanged components, which include:
Frame . Food grade stainless steel is used as a grill container. When building a structure with your own hands, you often install a frame from an old gas cylinder, beer keg or large saucepan.
Heaters . Often, burners from a conventional gas stove or homemade nozzles are installed. The main condition is that the heaters must be insulated from dripping fat.
Lattice . The structure should be made of small stainless steel rods and fixed to the sides of the grill.
Skewer with a rotating mechanism . Both on the sides of the container and on its lid, it is necessary to mark triangular cuts for rotating the skewers.
Collection of fat. To prevent the burners from being completely filled with grease, it is necessary to install a tray in advance.
In the absence of a factory burner, you can build homemade nozzles by installing several metal tubes with identical holes for gas outlet
Lid . The presence of such a simple element distinguishes a grill from a barbecue, since only the lid ensures the highest possible temperature inside the container and distributes heat evenly.
Required set of tools
If, to build the simplest possible structure, you can limit yourself to only metalworking tools - a hammer, a metal file and a drill, then when making a high-quality autonomous device you will need to arm yourself with the following:
- measuring equipment . Specialized tools include a caliper, ruler, and level;
- welding machine and electrodes . To connect two stainless steel elements, it will be enough to use welding. In the absence of such equipment, the body will have to be welded from ordinary iron;
- metal cutting equipment. In this case, all metal cutting work is carried out using a grinder or plasma cutter.
If you have previously worked with professional equipment, then you can quickly understand the principle of constructing an autonomous grill. The main condition is compliance with the rules of proportionality, on which the correct functioning of the gas barbecue will depend.
Preparatory work before installation
The process of cooking meat on a grill involves interaction with an open flame, so it is important to secure the location of the structure in advance.
If the gas grill is installed outdoors, then you will need to prepare a stable base for it with good fire protection characteristics.
You can use paving slabs or sand as a material to create a flat surface. Even if the structure tips over, such a non-combustible base will help prevent the fire from spreading to nearby areas of the territory
If the barbecue design is based on an old gas stove, and its installation will be carried out indoors. The floor and walls will have to be finished with slabs made of fire-resistant materials, for which tin sheets or ceramic tiles are ideal.
For such a design, it is better to select a separate room with good ventilation, and try to install it away from objects with a high level of flammability.
General design
A grill is a special portable or stationary installation for preparing various culinary dishes over an open fire. The classic form of this design is a deep metal container in which grates are installed at different levels: the bottom one is for placing coals, the second is for cooking.
The grill is equipped with a lid, but some models are made without it. The first option is more functional, as it allows you to cook in three ways:
There are three types of grill:
- Classical.
- Connected to the mains. Grills of this type are used as additional equipment for professional and home kitchens.
- Operating on gas.
Options running on gas and electricity are more functional, but for country holidays many people prefer a charcoal grill.
Photo: grills of different types
Table: advantages and disadvantages of a classic grill
| pros | Minuses |
|
|
Not only coal can be used as a fuel material. Currently, there is an alternative to it - special briquettes. The use of this solid fuel ensures quick ignition and maintains a constant temperature for a long time. Briquettes are compressed blocks of different types of wood.
Grill briquettes are more economical
What is the difference between a grill and a barbecue?
Quite often, people do not find the differences between a grill, barbecue and barbecue. Each of the braziers has individual characteristics, despite the fact that they are used for cooking food over coals.
The barbecue has the simplest design. This device is a metal box. Food is cooked on metal skewers. Hot coals are located at the bottom of the box.
To ensure even heat, several small holes are drilled in the sides of the grill.
High design legs create comfort during frying
The only difference between a grill and a barbecue is that the first does not have a lid, while the second is equipped with a spit and lockable hatches for air supply.
The barbecue does not have a lid in its design
Grill from an old gas stove
If you have an old gas stove at your dacha that still performs its functions, then it will only take you a few hours to assemble a homemade barbecue.
First, you will need to carry out calculations of the stove and the components of the future grill, on the basis of which you can draw up a detailed drawing or diagram. After preparing the equipment and acquiring all the necessary materials, you should begin manufacturing the structure.
For better stability of the structure, it is recommended to weld a metal shelf on which the gas cylinder will be placed at a height of 10 cm from the floor
A small hole is drilled in the bottom of the stove to collect fat and liquid. When cooking meat, a huge amount of fat is released on the grill, which can prevent the burners from burning. A pipe is connected to the hole and a flexible tube is secured. This installation will allow you to maintain cleanliness not only inside the fryer, but also under it.
Next, you will need to assemble a frame that acts as a base for the frying chamber. The structure is welded from several steel angles. The upper frame must have dimensions corresponding to the dimensions of the stove and the side of the stove. The suitable height of the legs is 70 cm, while at a height of 10 cm from the floor, fittings are welded to the legs, from which the frame for the gas cylinder is formed.
After assembling the frame, you should begin making the sides and bottom of the grill. The height of the sides should be no more than 20 cm. First, the sides are welded to each other, after which the bottom is welded between them.
To ensure sufficient heat flow, holes with a diameter of 10 mm are drilled into the bottom, and the distance between them should be 7 cm. The holes should be located so that there are no burners under them. A stainless steel grill is installed above the bottom.
A rectangular grill lid is cut out of a steel sheet, and a handle with a wooden overlay must be welded in the center. The lid itself should have slots for the grille handle. If you plan to use the gas grill as a homemade barbecue, then along the edges of the sides and lid you will need to make triangular cuts for skewers.
The next stage is assembling the finished structure and connecting the grill to the gas cylinder. You will need to install the frame on a flat surface and fix it in a static position. If necessary, permanent grooves can be welded for additional stability.
If you wish, you can independently weld a durable mesh of stainless steel rods, or “digest” the grate from an old gas stove
Next, the gas stove is installed on the base and secured to the corners using self-tapping screws. A roasting pan is mounted above the stove, which can be fixed in grooves or simply welded to the frame. Immediately after installation, it is important to check the stability of the frying chamber. A gas cylinder must be inserted into a special strip for the receiver, which will subsequently be connected to the stove.
If the gas grill is working properly, then you can begin cosmetic procedures for cleaning and painting the finished structure. All steel parts should be cleaned of scale and rust, after which the product is coated with fire-resistant paint.
Making the bottom of the oven
The base for the barbecue is a rectangle made of sheet steel, with openings for air, grooves for attaching sides, and holes for screwing to the frame.
The procedure for making the hearth bottom consists of the following steps:
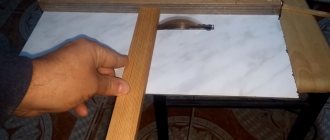
- A rectangle measuring 300x600 mm is cut out of sheet iron. Its edges are aligned and rounded to prevent injury from them during assembly and disassembly.
- Holes with a diameter of 20 mm are drilled in the base. The optimal distance is 5 cm between the holes. If there is a lot of this (in strong winds and high pressure), then the holes can always be plugged with bolts. Through holes are made to fasten the base and frame.
- Grooves are cut along the edges of the plate to install longitudinal and transverse sides. For this, a drill, grinder and jigsaw are used. For a reliable connection, 3 grooves are made along the length and 2 in the width.
- The grooves are filed with a file to obtain perfectly smooth edges with the correct shape. The steel is treated with anti-corrosion impregnation.
When the impregnation has dried, the base is screwed to the frame. The bolts are inserted from above, and the nuts are screwed from below, so they do not stick to the thread.
Making a gas grill from a receiver
A gas cylinder grill is an ideal option for lovers of classic barbecue when you have to cook meat for a large company. This large design is ideal for outdoor barbecues, without having to worry about preparing firewood or charcoal. The construction of a grill from a receiver is carried out in several stages.
As a housing for the grill, you can use any food-grade stainless steel container with a diameter of at least 40-50 cm. This can be an enamel pan, an old beer keg, or the housing from an old receiver. In this case, a propane tank will be used.
When preparing the gas receiver, the valves and axlebox tap are removed, after which the cylinder should be filled two-thirds with water and boiled. Next, a sector of 1/3 of the side surface is cut out, which will later be covered with a special lid. To remove paint from the container, you will need to burn it, and, after heating, remove the remaining coating using sandpaper.
The size of the cut sector should be 1/3 of the side surface of the cylinder, since only such dimensions of the cut make it possible to install the grid to the full thickness of the container, which means placing more meat
To collect fat, it is recommended to install a special tray in the form of a removable bottom, or drill several holes in the bottom of the container and secure the tray to the frame. Nozzles are installed on the bottom of the container - metal tubes, 1-3 cm thick, with drilled holes of 3-4 mm.
It is through these holes that the gas-air mixture will pass. It is better to make the nozzles removable so that they can be cleaned in the future.
The nozzles are installed as follows: a 3-4 cm piece of pipe (connector) connecting the nozzles and the mixer is welded into the wall of the cylinder. The diameter of the pipe should be chosen so that the nozzle fits tightly into it by 2-3 cm, and at the same time is securely fixed.
A gas and air mixer is connected to the outer part of the connector, which is a tube with the same diameter as the nozzle and a length of 5-8 cm. A hole is made in the wall of the mixer into which the gas nozzle is inserted.
The grille is installed at a distance of 5-10 cm below the edge of the container. It is recommended to use a stainless steel grid with a rod diameter of 3-5 mm. If you don't want to spend time making the mesh, you can cut it from the original grill grate. The structure must stand firmly on supports and, if necessary, be easily removed.
The cut out part of the cylinder body will be used as a lid, which will need to be attached using hinges. You can install a thermometer in it, which allows you to monitor the temperature inside the fryer and regulate the gas pressure. The final stage is welding the handle onto the lid for maximum comfortable use of the grill.
When painting a product, it is better to give preference to aerosol packaging, which allows you to evenly distribute the paint over the entire surface of the structure.
Since the receiver itself is quite heavy, it is better to install the finished grill on a metal base welded from a steel square pipe, with a separate place for a gas cylinder. To make the structure easy to move around the area, two of the four legs can be equipped with wheels from a wheelbarrow, for example.
After all work on the construction of the gas grill is completed, the outer surface of the body is painted with heat-resistant black paint.
We build an automatic spit
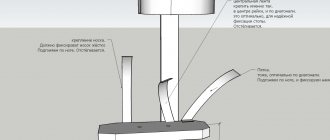
Installing an automated spit will help increase the functionality of such a simple design, allowing you to expand the menu of a classic barbecue. To do this, the design will have to be changed slightly: instead of a grate, install a skewer mount. On one side there is a simple tube in which the sharp end of the skewer is rotated, and on the other there is a triangular cutout for fixing it.
A motor from a conventional tape recorder along with a power supply is attached to the outside of the case. After installation, a strap from the motor is placed on the skewer, and the spit rotates at the speed that you set. In this case, the speed regulator is the diameter of the pulley.
Connecting the burner to the gas cylinder
When connecting a homemade grill to a receiver, you will need to purchase and install an adjustable gas reducer, which allows, if necessary, to regulate the gas pressure in the nozzle.
When building an autonomous gas grill, the safest option would be to connect it to a gas receiver
To safely use the system with a cylinder, you must perform the following algorithm:
- close the taps on the grill, open the cylinder valve and adjust the gas pressure using the reducer;
- light a match, turn the grill tap and ignite the gas above the nozzles through a special hole;
- After completing the cooking process, you need to turn on the gas on the cylinder, and after complete extinguishing, turn the grill tap in the opposite direction.
Often, a grill from an old gas stove is connected to the main gas; in this case, it is enough to screw the tap onto the pipe and connect it to the grill using a special gas hose. To achieve maximum safety during operation of the grill, it is important to seal all joints and threads.
How to make a barbecue
In principle, a barbecue from a gas cylinder is made in exactly the same way as a barbecue, only with small additions. First, a grille is installed inside. It is removable, but it requires support shelves to be installed inside the cylinder. They are made from steel angle 25x25 or 32x32 mm. The length of each shelf is 10 cm; they are welded on two opposite sides of the opening in three pieces at the same distance from each other. The height location is under the holes for the skewer. Accordingly, from the opposite side at this height.
Secondly, you need to install a chimney. There are quite a lot of options here:
- on the lid;
- on the side, with a cut-in hole for the tap;
- next to the cover in the cylindrical part.
Barbecue made from a gas cylinder with a side chimneySource es.decorexpro.com
What difficulties may arise?
The main task when creating a gas grill is to guess the proportionality of all the details. Cutting out a sector that is too small in the body will not allow you to attach a full-size grill, which means it will be impossible to prepare the required portion. If you install a nozzle that is too powerful, the meat will simply start to burn during the frying process.
The inside of the case must be made of food-grade stainless steel or coated with a special heat-resistant Teflon-based compound.
You can look at the correct location and number of holes on the burner of an old gas stove, and build homemade nozzles with an identical structure
Unless absolutely necessary, you should not paint the inside surface of the case, since choosing the wrong or poor-quality coating can lead to poisoning. All heated parts of a homemade grill should not emit smoke or odor - during the frying process, the meat absorbs all toxic fumes.
Therefore, before starting to prepare the first batch of barbecue, it is necessary to carry out a test run of the barbecue. During this time, all remaining paint and dirt will burn off, and your gas grill will be ready for further use.
Required Tools
To create a metal grill you need to take
- welding unit (if a person does not know how to use such equipment, the elements are fastened with bolts);
- drill;
- grinder, jigsaw;
- fasteners, screwdriver;
- corners and loops;
- tape measure, square;
- metal barrel or container.
You can also take a mask, goggles and gloves for protection.
Conclusions and useful video on the topic
Making a gas grill with your own hands does not require any special knowledge, because to do this you only need to understand the principle of operation of the structure. If you have all the necessary tools and materials, you can build a gas barbecue grill with your own hands with a connection to a gas cylinder, saving a round sum of money on the purchase of a factory grill.
With such a multifunctional gas grill, you can organize gatherings with friends while preparing a barbecue at your dacha:
If you can add to our material or share your own experience of creating a gas grill, please write your comments and ask questions in the block below.
Preparation for construction
The first important step in arranging a barbecue will be choosing the place where the stove will be installed. When choosing a site for its placement, you must be guided by the following recommendations:
- The distance from the structure to the house should not be too large, since preparing a dish will require repeated trips to the main kitchen for utensils, food, spices, etc.
- Trees and shrubs should not grow near the fireplace.
- Take into account the prevailing wind direction in the area; smoke from the stove should not go towards residential premises.
Next, you need to decide what the future structure will look like, draw or select an approximate drawing of a barbecue on construction sites or in special magazines, and decide on its dimensions.
When creating a design diagram, be sure to take into account the individual features of the landscape on the site, plan so that the grate or any other main barbecue cooking surface is at a safe and comfortable height for the person cooking.
Before starting the stove manufacturing process, be sure to decide on the design of the future structure; it is best that it is made in the same style as the country house and favorably complements the overall design of the land plot.
In a large free space, you can place a large barbecue that combines various work areas; in a small area, a compact oven with an optimal set of functions will look great.
Principle of operation
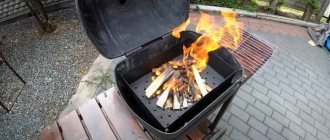
If you want your BBQ grill to last longer, you must use it correctly. Typically, the procedure for cooking meat using a charcoal grill is as follows:
- Install a barbecue grill on the site;
- Clear away ash and ash residues (if you have used it before);
- Pour the coals inside. To begin with, it is better to use a small amount, after which you can add more;
- We light the coals. We use a heater or use a special device for igniting coals - a starter or a luft lighter;
- Cover with a lid and bring to a temperature of 200-250 degrees Celsius;
- Cooking meat.
The very principle of operation of such barbecue grills is based on creating a zone of direct and indirect heat, when, in the first case, the meat is located above the coals, and in the second, the coals are located on the sides of the meat. As a rule, special steel trays-separators for coal are used for this; some manufacturers include them in the complex along with the grill.
What to look for when choosing a barbecue
If you still decide not to make a barbecue grill, but to purchase one, we recommend that you pay attention to:
- Device dimensions. Even when choosing a product, you must understand how much meat it is designed for. As a rule, this is 2-4 kg, but it is best to check with sellers.
- Wall thickness. The larger it is, the better your barbecue grill will retain heat inside and the faster the meat will cook. The average wall thickness is from 3 to 6 mm, but there are models (for example, cast iron) with walls of 8 mm.
- There is a handle to secure the top cover when opening. This is a rather convenient device that will help you open the lid slightly and check the readiness of food.
- Availability of hooks for additional accessories. Some manufacturers omit this point for the sake of product mobility, but this is also a rather important detail.
- Availability of a container for collecting ash. One of the most important devices in a grill. It allows you to easily remove leftover coals and ash immediately after cooking without waiting for the BBQ grill to cool down.