Why are they created?
The decor of balloons wrapped in threads is very attractive. It can be used for completely different purposes:
- as elements for children's crafts (New Year's crafts are especially interesting and bright - for example, balls or snowmen made from balls);
- for organizing holiday decor. Balloons perfectly complement the created image. They are often used as an alternative to balloons and lanterns when organizing wedding decor;
- as a preparation for creativity. The options for using balloons are limited only by your imagination!
Creating such decor is not at all difficult. You can involve not only children, but also the whole family, spend time together and make original decorations, or rather blanks for them, because in the future even these most delicate designs can be made much more interesting with the help of decorative elements.
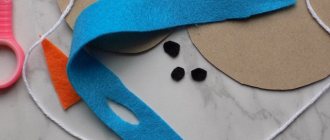
To create Christmas balls with your own hands we will need:
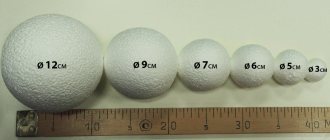
- foam balls of different diameters (5 pcs.)
- glue gun + 3-5 glue sticks
- spray paint (brown and beige)
- nylon
- coffee beans
- raffia
- jute twine (2 types)
- willow twigs
- sackcloth
- decorative elements (ribbons)
What you will need for production: we share secrets and tips
So, the list of what you need to make balls is actually small. Moreover, you can probably find almost all of this at home without even going to the store.
Basic list:
- in fact, balloons in the required quantity;
- PVA glue;
- threads of the desired color;
- food or construction film;
- Vaseline or massage oil.
However, so that everything really works out the first time, and working on the balls does not turn into stress due to the fact that not everything comes out beautifully and accurately, we tell you a few secrets about how to choose materials.
Balloons
Many people claim that you can take any balls, even the cheapest ones. But in this case, there is an unpleasant possibility that the balls will not have the desired shape. Standard balloons are egg-shaped, so they will never achieve a perfect sphere. In addition, such balls are more fragile, they are easier to damage during operation and ruin the result.
The optimal solution is special children's balls of special density. They have a hole at the top through which an elastic band is threaded, so the ball can be hung or worn on the hand. These balls are more practical to use, suitable for reusable use (if you tie the ball with a thread and not in a knot) and have an ideal spherical shape.
PVA glue
If you use yarn, it is better to use PVA glue marked “M”. It can be purchased at a hardware store and will hold better. For thin threads (floss or sewing thread), regular PVA from a stationery store is also suitable. The average glue consumption is 1 liter for 8-9 balls.
Threads
It all depends on what image you want to get. The thinner the thread, the more windings will be made on the ball. You will have to fiddle with a large ball and a thin thread for a long time, because you need to fill the empty space between the threads. With a thick thread the result will be faster.
Film
You only need it if you want to tie the ball with a thread, not a knot, and then use it again. The film will help the ball not stick to the threads, which means it can be easily pulled out of the structure.
Petrolatum
Any fatty mixture that will help the threads easily separate from the base ball will do. You can use massage oil or even any vegetable oil that you have in the kitchen. Fat cream is also allowed.
Since the work is quite dirty, it is additionally worth covering the workplace with at least newspapers (preferably oilcloth). You also need to immediately determine where the ball will dry! Especially if you make several balls in a row.
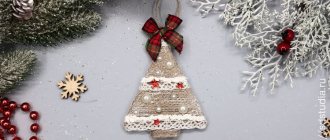
Christmas tree toy made of twine “Herringbone”
Twine Christmas trees can be used not only as Christmas tree decorations, but also as elements of New Year's garlands for New Year's home decoration. For work we will need:
- Printing cardboard 2mm thick for the toy base template;
- Jute twine (can be purchased at a stationery store);
- PVA glue (you can also buy it at a stationery store);
- Double sided tape;
- Large flat brush for applying glue;
- All kinds of New Year's decor that is at hand.
Video master class on creating a Christmas tree decoration “Herringbone” from jute twine:
Watch this short video. It shows the entire process of creating the Christmas tree decoration. Detailed explanations and little tricks are in the description under the video.
A brief description of the stages of creating a Christmas tree decoration “Herringbone” from jute twine:
- From cardboard we cut out a Christmas tree of the simplest shape, a triangle on a leg. I recommend using 2mm thick cardboard. But if this is not the case, you can take something thinner. If the cardboard is thin, it is better to make a Christmas tree from several layers, gluing them together with PVA glue. It’s better to immediately glue a rope inside, with which we will then hang the toy on the Christmas tree. As soon as the toy is dry, start wrapping the base with twine. In my master class I use thick cardboard, so I also make a rope for hanging the toy from twine during the process of wrapping the workpiece.
- We secure the twine and wrap the base, trying not to make gaps and lay the thread as evenly as possible. You need to wind dry twine. When the winding is completed, coat the twine with diluted PVA glue. Why does the glue have to be diluted? So that it is better absorbed into the twine and fixes everything well.
- When the glue has completely dried and the toy has brightened, we begin to decorate. It all depends on your imagination. You can glue ready-made decorative elements purchased in advance, you can paint with three-dimensional contours, you can use braid, lace and ribbons. If you sculpt, you can create unique, special elements to decorate these Christmas trees.
Balls of thread step by step
The process of making balls is not at all complicated: with a little training, even a child can easily handle it.
- We prepare materials. If possible, think about how you can protect yourself from getting dirty. For example, you can use an apron and gloves that fit tightly to your hands.
- Inflated balloons should be wrapped in film, which is then lubricated with oil or Vaseline so that the rubber does not dry out from the glue. Naturally, the oil should not flow down the film.
- Prepare the glue. You can add 2 tbsp to PVA. potato starch dissolved in 20 grams of water. This proportion is calculated for 300 ml of glue. This approach will make the glue more viscous, and the balls themselves stronger.
- Let's prepare the threads. They need to be dipped in glue. You can pour glue into a cup and lay out the threads, slightly “drowning” them there, or you can make a tool for pulling - this will be more convenient, and the threads will not get tangled. You can use either a plastic cup or a bottle. In the cup from the bottom, on the sides, you need to make two holes with an awl, pour PVA glue on top, pull the threads through the cup and continue working, adding glue from time to time. In the bottle you need to make two holes in the bottom and in the cap according to the size of the threads, stretch the thread, fill the bottle completely with PVA glue and start working.
- After the first skein, you need to secure the thread by making a small knot, and then wind it randomly. The basic rule is to try to make the gaps uniform and try to follow the principle of winding “a new line is perpendicular to the previous one.”
- At the end of the winding, it is most convenient to hide the cut thread inside the winding to avoid knots. It is enough to simply “slip” the thread under the previously wound layers.
- You need to dry the balls by hanging them upside down. After complete drying, the ball can be burst with a needle or untied and removed through the holes along with the film. Thanks to the oil, it will easily come away from the thread base and will not leave any marks.
- Ready-made balls can be decorated - for example, spray-painted with acrylic paint, glued on decorative elements (flowers made from lightweight foamiran, rhinestones, sparkles, bugles, etc. look especially delicate).
Birds and animals
How to make a ball of thread and glue, so that later, from this blank, some kind of animal can be made? You need to learn how to make the ball itself. No special skills are required for this.
To make balls, you will need the following items:
- PVA glue;
- capacity;
- needle;
- thread or rope;
- Balloon.
For example, you can consider making a bear from thread balls.
For it you will additionally need:
- false eyes;
- black paper.
Craft process:
- Initially, you need to make holes in the container with a needle, then thread the thread through the holes.
- Next, PVA glue is poured into the tank, which will saturate the thread. After this, the needle can be removed.
- To make the bear you will need a total of 9 balloons. The first balloon needs to be inflated with the largest one, since this will be the body of the bear. The second smaller ball is the head. 4 even smaller balls are needed for the paws. 3 very small ones for ears and nose.
- After all the balls are inflated, they need to be wrapped with thread and allowed to dry. The 3 smallest balls need to be wrapped only halfway, that is, the second part of the ball should remain clean, without threads.
- In order to work comfortably in the future, it is advisable to give them a day to dry.
- To get an inflated balloon, you first need to disconnect it from the threads and then burst it.
- The paw pads, nose and mouth of the bear are cut out of black paper. The paws are glued to 4 medium balls, and the nose and mouth to one of the small ones. The eyes are glued to the head.
- All the balls are glued together to form a bear shape.
To make a bird, you need to take 5 balls. The largest one will be the body, 3 small ones will be the neck and 1 larger one will be the head.
In addition to the necessary set for thread balls, the bird will also need the following:
- wire;
- colored paper.
Progress:
- In order to wrap the inflated balls, you need to make a hole in a plastic cup and thread a thread through it, after which glue is poured into it.
- Next, threads are wrapped around all 5 balls.
- After 6-8 hours, they are freed from the balloons by piercing.
- The paws will be made of wire, which needs to be wrapped in brown colored paper.
- Also cut out of paper are 2 black wings, eyes, 2 orange legs, a beak and eyelashes on the eyes.
- After this, all 5 balls are fastened together and the legs are attached to the body.
Avoiding basic mistakes
In order not to spoil the finished design, we will analyze several errors in the work that lead to failures.
- The ball must be tied tightly so that it does not deflate during the drying process. Otherwise, the design will “behave” from this.
- You cannot inflate the balloon to its maximum size; it can burst even from a slight impact and ruin the work.
- Fully synthetic threads do not hold their shape and are not attached to the ball; it quickly becomes unusable.
- To avoid knots on the ball, use whole balls of thread rather than sections.
- Excess glue on the threads harms the structure - the threads get tangled and gather in knots.
- When wrapping the ball with film, do not forget to leave the “tail” of the ball free so that it can be deflated.
- The optimal drying time for each ball is 6-7 hours.
- You need to dry the balls by hanging them by the tail using a clothespin. To prevent the glue from the balls from staining everything around, it is recommended to lay a cloth or paper under the drying area of the balls, just in case. If the ball is dried on the surface, the glue partially flows down and the appearance of the ball.
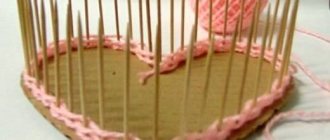
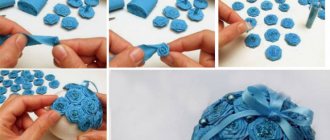
How to make a New Year's ball using jute twine
Jute twine is made from long and soft natural strands, which are obtained from plants of the same name.
Tools and materials:
- foam ball
- glue gun
- jute twine (2 types)
We start making a ball from a loop. Then we wrap it with jute twine.
We fix the thread with a glue gun. For a better look, we do it pointwise.
This is what the first jute ball should look like.
For the second, we take a ball of a different diameter and a coarser thread.
The operating principle is the same.
The final result is wonderful Christmas tree decorations.
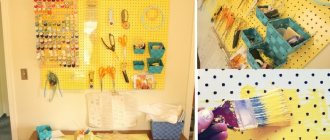
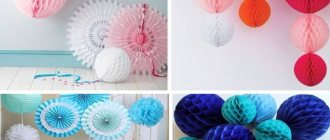
Some decor ideas
A ball of thread is a blank for decoration. We invite you to get inspired by a few ideas and figure out what to do with the balls.
"Fountain" of balloons
To make it, you need several balls of thread of different colors and different sizes. They must be randomly tied to ribbons and secured like a bunch at different levels. Tie all the ribbons in a knot, decorate the knot and hide it. This “brush” can be hung from the ceiling and used, for example, as a holiday decor.
Ceiling lamp
You can make original lampshades from the balls. The space for the light bulb socket can be cut out on the finished ball. If you make a lot of thread micro-balls, you can decorate any garland: just attach the balls to the light bulbs and the “body” of the garland.
If there are trees in the garden or on the veranda, the balls can be hung directly on the branches! If there is no tree, you can take large branches of a bizarre shape (without leaves, dry), spray paint them (acrylic coating with metallic paints looks most impressive) and hang the balls on the branches. The finished composition will look great in a floor vase.
Composition for the holiday
Combine yarn balls with other party decor. These can be either individual bundles of balloons or large photo zones. To make everything look organic, think about colors and their combinations in advance. Don’t be afraid to decorate balls of thread with additional elements: lace, flowers, rhinestones. You can also make a garland of balloons by hanging them on a horizontal thread.
New Year's decor
With your child, you can make fun New Year's decor - for example, a snowman. It is enough to make two or three balls of thread of different sizes and connect them. The balls need to be decorated with eyes (you can take eyes for toys), a carrot nose (a cone made of orange cardboard), and decorate the junction of the balls with a scarf. You can place a bucket, hat, cap, etc. on your head.
Balls of thread are an original decor that will be appropriate in different situations. The process of creating a ball is simple and interesting! Tools for creating can be bought everywhere, and it’s easy to involve a child in making thread balls or even arrange a creative evening for the whole family.
Create, experiment, show your imagination - and you will definitely like the result!
Where can it be used?
- The most banal thing. Multi-colored or monotonous balls can be placed in a plate and placed on the table. Such a cute detail can make an accent on itself and the color of the interior.
- Christmas tree decoration. In order to make it, you just need to glue (on the same PVA glue) the base for the toy anywhere and tie a ribbon.
- Candlestick. For it you need to cut one hole and another parallel to it.
Important! You need to be careful and make sure that the candlestick itself does not touch the candle flame, otherwise this may lead to a fire.
- New Year's wreath. It can be made from a base (a simple hoop) and many balls. Simply by gluing thread balls onto the hoop and decorating it.
Well, now you can easily decorate your interior in a simple and elegant way. And fakes made in this way will delight you and your loved ones for a long time.
Shelves for things made of rope
Another interesting variation of a practical craft is a shelf that is supported by strong ropes. This design must be carried out carefully, observing safety precautions.
Materials:
- Planks;
- Hammer;
- Rope;
- Paint for wood.
The workflow here is simple:
- First, make holes in the planks and stretch a string through them.
- First, the knots are tied under the first plank, then under the rest.
- The structure can also consist of one board. It all depends on desire.
You can also paint the product in any color or simply paint it with wood varnish.
Cozy jute rug
This DIY jute rope craft will definitely decorate any decoration in your home.
Materials for production:
- Jute rope (it should be thin enough);
- Glue;
- Scissors.
To create a single canvas, separate circles of rope are prepared. They can be of different sizes.
- When forming them, you can use a hot glue gun instead of a regular one.
- After the individual parts of the carpet have been glued together and have had time to dry, they are assembled into a single picture.
- If desired, you can complicate the rug with some patterns.
Comfortable chair seat
This kind of craft made from a bundle of rope and twine will serve very well in everyday life and will decorate the interior of an apartment or private house.
Prepare the following materials:
- Several types of ropes (one must be thicker than the other);
- Furniture stapler or glue;
- Wooden base for a stool.
It may seem that the work progress is quite difficult, but in practice this is not the case. Weaving patterns can be found on the Internet.
- As soon as you have chosen exactly what kind of sketch the future chair will be, you need to start weaving it.
- To begin with, the stool is wrapped with one rope (the one that is thicker in diameter).
- The same actions are repeated with the second rope, only perpendicular, thereby setting the composition.
- The remaining parts of the first rope can be secured with glue if you do not have a furniture stapler.
- Tie knots at the ends of the second rope.
- If you want to add some bright colors to the decor of your home, you can use colored laces or ropes.
Simple and practical basket
Required materials:
- Strong rope;
- Glue;
- Scissors;
- Threads.
The basket is sewn together with thick, strong rope. Also, to prevent it from deforming, you need to use glue, since this craft is made without a base. Here you can also use various decorative elements, including colored threads or ribbons. The spaces between the ropes are wrapped with threads (ribbons).
In addition to decoration, they cover parts of the joint of ropes. This interesting and simple basket will serve not only as an excellent organizer, but also as an addition to the interior of an apartment or private house.
One of the advantages of such products is their naturalness and hygiene, since the material is a fiber of plant origin, processed in a special way.
In turn, rope crafts are suitable for beginner needlewomen who want to somehow update the decoration of their premises.
Convenient rope organizer
For various pencils, pens, markers and other office supplies you need an organizer. For this craft you will need all the same materials only with the addition of cardboard boxes and various decorative finishes. You also need to draw up a rough sketch of the work.
- Before you wrap the string around the cardboard boxes, you need to apply a small amount of glue to them.
- It is important that the next turn of twine is pressed as tightly as possible against the previous one and does not compress the row soaked in glue.
- The entire structure must be wrapped. You need to do the same with other details.
- The main thing is to wait for all structural elements to dry completely and only then combine them into a single craft, covering them with varnish.
If desired, you can decorate the organizer with beads, beautiful ribbons, shells, and so on.
Step-by-step master class on making a garland from balloons
Now we know how to make each individual ball, I propose to build a garland from them. Of course, it will be too big for a regular Christmas tree, but hanging it on the cornice and curtains will be just right. Whether from the street or inside, it will look simply wonderful.
It is clear that we cannot make the threads themselves glow, so we will take ordinary garlands with small diodes as a light source. Large shapes (roses, pyramids, etc.) will not suit us; they simply will not fit through the threads of the balls.
First we make the balls ourselves. By the way, one of the options is not to lubricate the wound threads with glue, but to first moisten them in glue and only then wrap them. This makes it a little faster, but dirtier.
About 10 pieces with a diameter of 8-10 centimeters will be enough. We won’t attach a ball to each light bulb.
So, when the threads are dry, we burst and remove the latex and put 4-5 light bulbs in the place where the tail was, so that they are located inside throughout the entire volume. Due to this, they will hold on and will not fall out. You can tie the wires to the balls to be sure, but then you will be exhausted after the holidays to take everything apart.
We place the next ball 20-30 centimeters from the previous one, depending on the length of the garland itself and our own preferences.